Alley Canal in Bruges

Alley canal in Bruges

“Alley Canal in Bruges” made it to 99.6 on 500px.com

A couple of years ago I went to Bruges in Belgium. We were driving to France, and we made a point of going to Bruges to see it.

After a classic Belgium dinner, I went shooting some photos. We stayed in the city centre and I could walk.

There was a change in the weather. All day had been extremely hot and humid, the evening was no better. But while I was out, a light drizzle came and went again.

Bruges is famous, not only for it’s medieval town centre and canals but also for its chocolate. They call it the Chocolate Capital. And if there is something that I like, it is chocolate.

In the morning, the weather had finished changing, and it was a cold morning and the weather stayed cold for the most of the vacation. But I got myself some great photos.

These are couple of other favorites from the same evening.


Lamp post

The Famous Bell tower in Bruges. You can see it poking up from many places in the city.

The Little Venice Corner in Bruges

The Little Venice Corner in Bruges.

–Jacob Surland

The Bell Tower in Bruges

The Famous Bell tower in Bruges, Belgium. You can see it poking up from many places in the city.--Jacob Surlandwww.caughtinpixels.comArt sale as limited prints. Photo by Jacob Surland,  Licensed Creative Commons non-commercial v4.0.  No Derivative Work. Protected by Pixsy.com.

The famous Bell Tower in Bruges.

I only stayed in Bruges for one night, on the way to France. I did, however, make sure I got that way, even if it was bit longer. Bruges is incredibly beautiful, and there are a lot of chocolate stores, pretty close to Paradise if you ask me!

This photo I shot on the main square Grote Markt as a 5 shot HDR. It was on an extremely hot summers eve, in a light drizzle. I made a point of making a more dramatic image, than the original. This is the original photo:

Bruges dramatic bell tower

I created the drama, by adding some strong vignetting, and on top of that, I brightened the sky around the tower itself, and increased contrast to enhance the structures. A bit like a storm building up. This way I got a more interesting photo.

The Little Venice Corner in Bruges

Bruges is a fairytale medieval city worth a visit. The movie 'In Bruges' got my attention on the city, and I made a one night stop there, on the way to France. We stayed at the most charming old renaissance hotel right in the center, and it was a perfect fit, with the city, capital of chocolates. Photo by: Jacob Surland, www.caughtinpixels.com

Bruges is one the Venices of the North.

Bruges is a fairytale medieval city worth a visit. The movie ‘In Bruges’ got my attention on the city, and I made a one night stop there, on the way to France. We stayed at the most charming old renaissance hotel right in the center, and it was a perfect fit, for staying the medieval city, capital of chocolate.

I have shot a few shots from this amazingly beautiful corner. This is another one:

Canal in old Middle ages town. "In Bruges" is the name of a movie. It refers to the old middle age town of Bruge in Belgium. Along with Amsterdam it's called the Venice of the north and it is. Photo by Jacob Surland, www.caughtinpixels.com.

I just updated the blog post of ‘the making of’ this photo.

I have made a tutorial for one of the shots from this location in Bruges, which has the same kind of lighting as this one. If you want to see how to make a photo like this, you might want to read it here.

There is also a before edit photo from this location.


I just had to go and see the Bellagio in Las Vegas

This location I recognized from the movie Oceans Eleven. It's the spot they gathered at the end of the movie, looking at the Bellagio. Photo by: Jacob Surland, www.caughtinpixels.com Licensed creative commons non-commercial v4.0. No derivative Work. Protected by Pixsy.com.

The final scene of Oceans 11 is shot at this location.

When I was in Las Vegas I just had to find this location from the movie Oceans Eleven. It’s the spot they gathered at the end of the movie, looking at the Bellagio. It’s right in front the Bellagio, it was not difficult to find. I really love going to places, that are famous or recognizable. I once travelled all the way to Bruges, just because I had seen the movie ‘In Bruges’. A movie that is hated by some, but I loved in. Colin Farrell is as negative, as he can possibly be, and the only thing he is basically looking for, is a beer, in town he hates. But the town is so beautiful, that I just had to go and shoot it.

Near Venice Corner in the medieval town Bruge, Belgium, you find this beautiful view. Along with Amsterdam it's called the Venice of the north and it really is. Photo by Jacob Surland, www.caughtinpixels.com

In the movie ‘In Bruges’ they stayed at the white hotel you can just see at the right hand side.

One of the most popular booths at Art Monaco 2014

Near Venice Corner in the medieval town Bruge, Belgium, you find this beautiful view. Along with Amsterdam it's called the Venice of the north and it really is. Photo by Jacob Surland, www.caughtinpixels.com


Maybe it really wasn’t a big surprise, but still it feels great, that Mona Youssef Art Gallery had one of the most popular booths at Art Monaco 2014. You could feel the spirit and the kindness among all of the members of our team. Many had spouses with them, and it all added to the feeling of one big family, with Mona Youssef in the center.

Not only was the spirit good, so was the art works presented by the 30 different artists. It really was no surprise, because we all had that feeling, when we were in Monaco. So many people in the booth. But of cause it is nice to know that Art Monaco noticed the same and tweeted about it https://twitter.com/ArtMonaco/status/459377802031009792.

About this photo

This is one of my Realism Digital Art photos from Bruge in Belgium. It’s a slightly different composition than the earlier published image. In this version, the famous bell tower of Bruge is more prominent. The tower plays an important role in the movie “In Bruges”.

Red Dress in Bruge

Bruge in Belgium is a beautiful medieval city, also called the Chocolate Capital. The inner city is full of old houses. On the square a young couple took a photo, at the same time as I did. Photo by: Jacob Surland, www.caughtinpixels.com

This is a 7 shot HDR from Bruge in Belgium. I shot it on a very very hot summer evening last year. There was little of a drizzle earlier, but the rain stopped. Many people were out and this couple kept hanging around. In the end I decided to include them in the photo, and the fact that the girl has a red dress adds to the photo I think.

They are placed very much to the side of the photo, which is unorthodox, but for some reason it still works. The rules of composition can be broken.

Other people also kept walking by. The advantage of 7 shots in HDR, is that often you can remove some people by mixing the photos in Photoshop, using layers. I ended up with three people on the right.

Improving the reflections in the water

Dramartic sky above a canal in the capital of Chocolate, as Bruge in Belgium is called. The town has a most wonderful picturesque old middle age center with canals and really old buildings. Really worth a visit. Photo by Jacob Surland, www.caughtinpixels.com

 Buy a print

Bruges (Brugge) in Belgium just is lovely. I was there for the night, but I would have loved to have more than just a night in that old middle age town. It’s a bit like Amsterdam or Venice because of all of the canals in the old center. I saw a funny movie with Colin Farrell called ‘In Bruges’ – I didn’t know that he was Irish, thought he was American. But he’s got a lovely Irish/British accent in this movie. Anyway, that movie inspired me to go to Bruges.

About the processing

This photo is one of these double tone mapped images. It adds an extra level of ethereal mood to the image. It makes it look a bit like a painting, which I like a lot. It works particular well in night shots. The processing of the is image is pretty much straight forward. The water generates some pretty bad halos in the tone mapping process, but I blend in the water from the 0 exposure. If you want to learn about how to create the effect, you can read about it my tutorial on double tone mapped images here.

In this photo, I used a special trick. I found that the water was a too big mass, with no structure. The water doesn’t reflect the clouds, but I made it so. I think a lot of people “cheat” with their reflections. Some reflections are just too perfect, in particular mountains reflecting in still water. As long as you get a good result, I have no problem with that. In this photo, I tried experimenting with the reflections. I wanted to add a little structure to the water to make it more interesting. I did that by duplicating the layer in Photoshop and then flipped it upside down. I now had clouds where the water should be.

Canal in Brugge - upside down

Then I blended some of the clouds gently into the reflected water. I only did it lightly at perhaps 20% or so and only in some of the water. That makes the illusion of the clouds reflecting in the water, and it adds some structure into the water.

Canal in Brugge - final result

As you can see the clouds are only just making themselves visible in the water.

Bruges the Chocolate Capital

Canal in old Middle ages town.

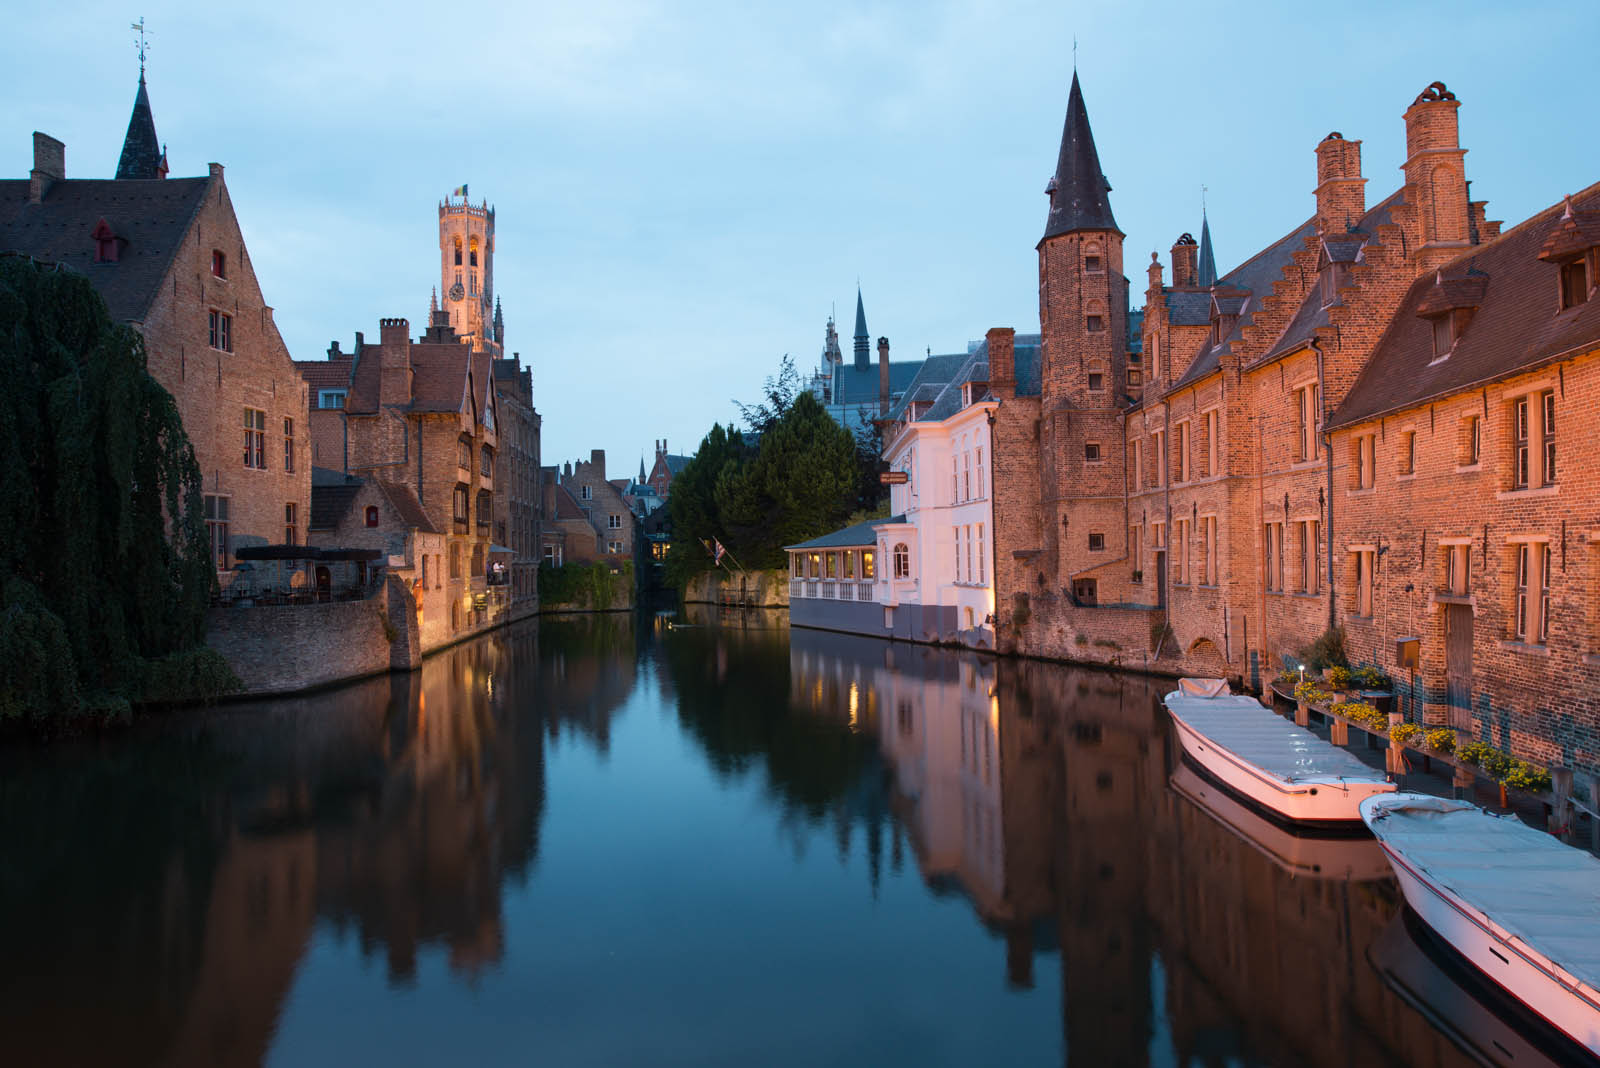
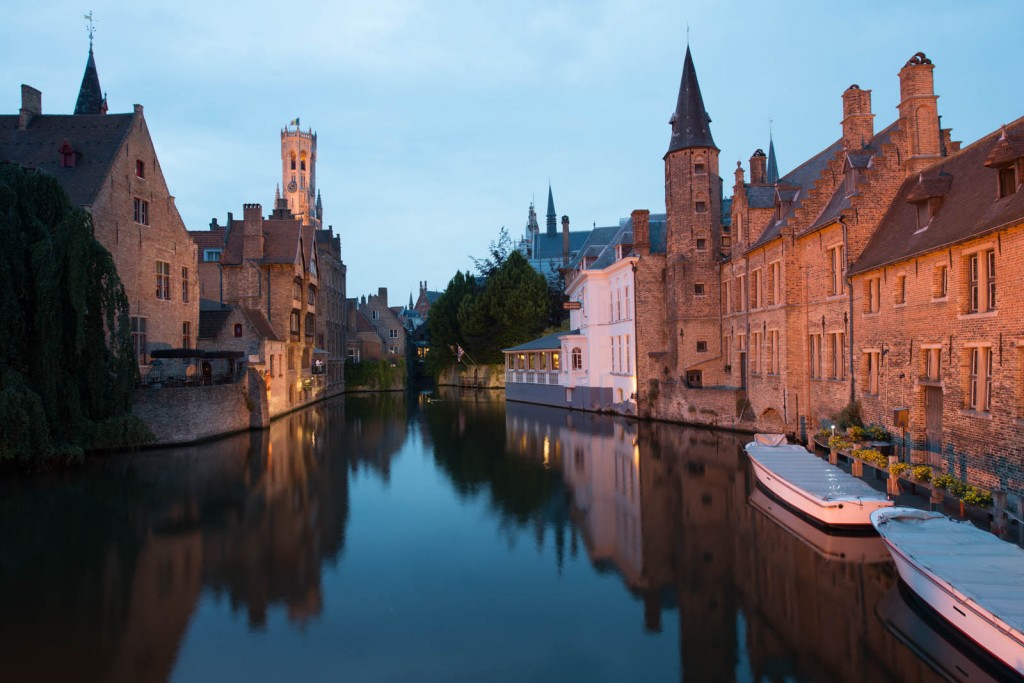
The White hotel on the right is the one from the move “In Bruges”.

Bruges in Belgium is an amazing town with a center that dates back to the middle ages.Some call it ‘Venice of the North’, but I learned that cities and towns with many canals, like to call themselves Venice of this” and “Venice of that”.

I think both Bruges and Amsterdam both in all fairness can be called a “Venice of the North”. They are both absolutely fantastic. Bruges has a lot of canals, and they wind their way through the medieval center of the city. It is a very beautiful place that I can highly recommend coming visit it for an extended weekend.

I got inspired to go to Bruges from the movie “In Bruges” starring Colin Farrell. In the movie, a couple of hired killers go on vacation to Bruges, and the one character really hates it, while the other one loves it. Personally, I found the movie hilarious, but I know other’s hate it. Some movies divide the World, just like cats and dogs do.

Anyway, the great footage from the old center that made me want to see Bruges, and I made a point out of making a one night stop in Bruges on my way to France.

What I didn’t know about Bruges is that it’s called the Chocolate Capital. I just love chocolate, and we did buy some, which, unfortunately, had to eat at once, due to the extremely hot weather.

This photo is from a particular famous corner, next to “Cafe Little Venice”. I have seen many shots from this corner, and this is my version.

The making of this photo

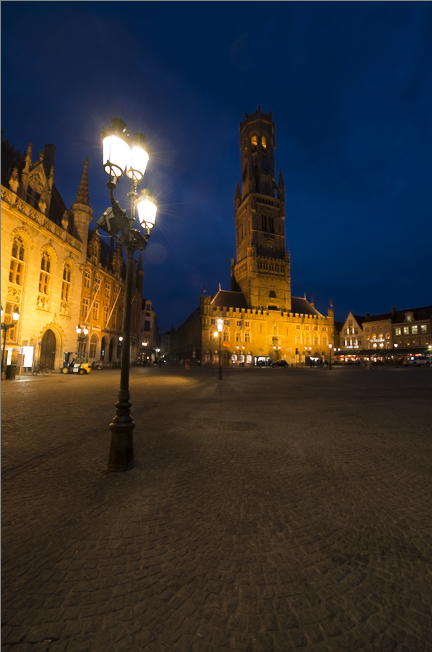
I shot this photo using my Nikon D800 and Nikkor 14-24mm. I shot it as a 5 shot HDR from -2, -1, 0, +1 and +2. This is the 0-exposure (the normal exposure):

Canal in an old middle age town

 Nikon D800, Nikkor 14-24mm, ISO 200, 22mm, f/11, 2.5 sec.

I should have used a lens not quite as wide, but there was a light drizzle and I did not want to change the lens, instead I cropped the image. That’s one of the wonderful things about having many megapixels. You can crop quite a bit away, and still end up with a 12-megapixel image, like this one.

I know that some people find that cropping images to be a sin and that you should get it right in the camera in the first place. I believe that if a photo get’s better from cropping it, then by all means crop it! And one more thing, I would rather come home with 10-20% too much of a scene, than 10-20% too little.

In this case, I didn’t like the white canal tour boats in the corner. I composed the photo, and included the boats and decided to crop the photo later if I didn’t like the boats.

HDR Processing workflow

My overall workflow, when I process HDR photos is, that I generate a pool of images, based on the original bracketed photos. And these I blend to together into a final image. I usually create a one or two images in some HDR software, usually Photomatix Pro. And these I add to the pool of the original RAW files, these files I load into Photoshop as layers and blend them together.

Photomatix supports presets and I have a few I use for inspiration. Often I use one, and tweak it a little bit until I am happy. I did that in this case.

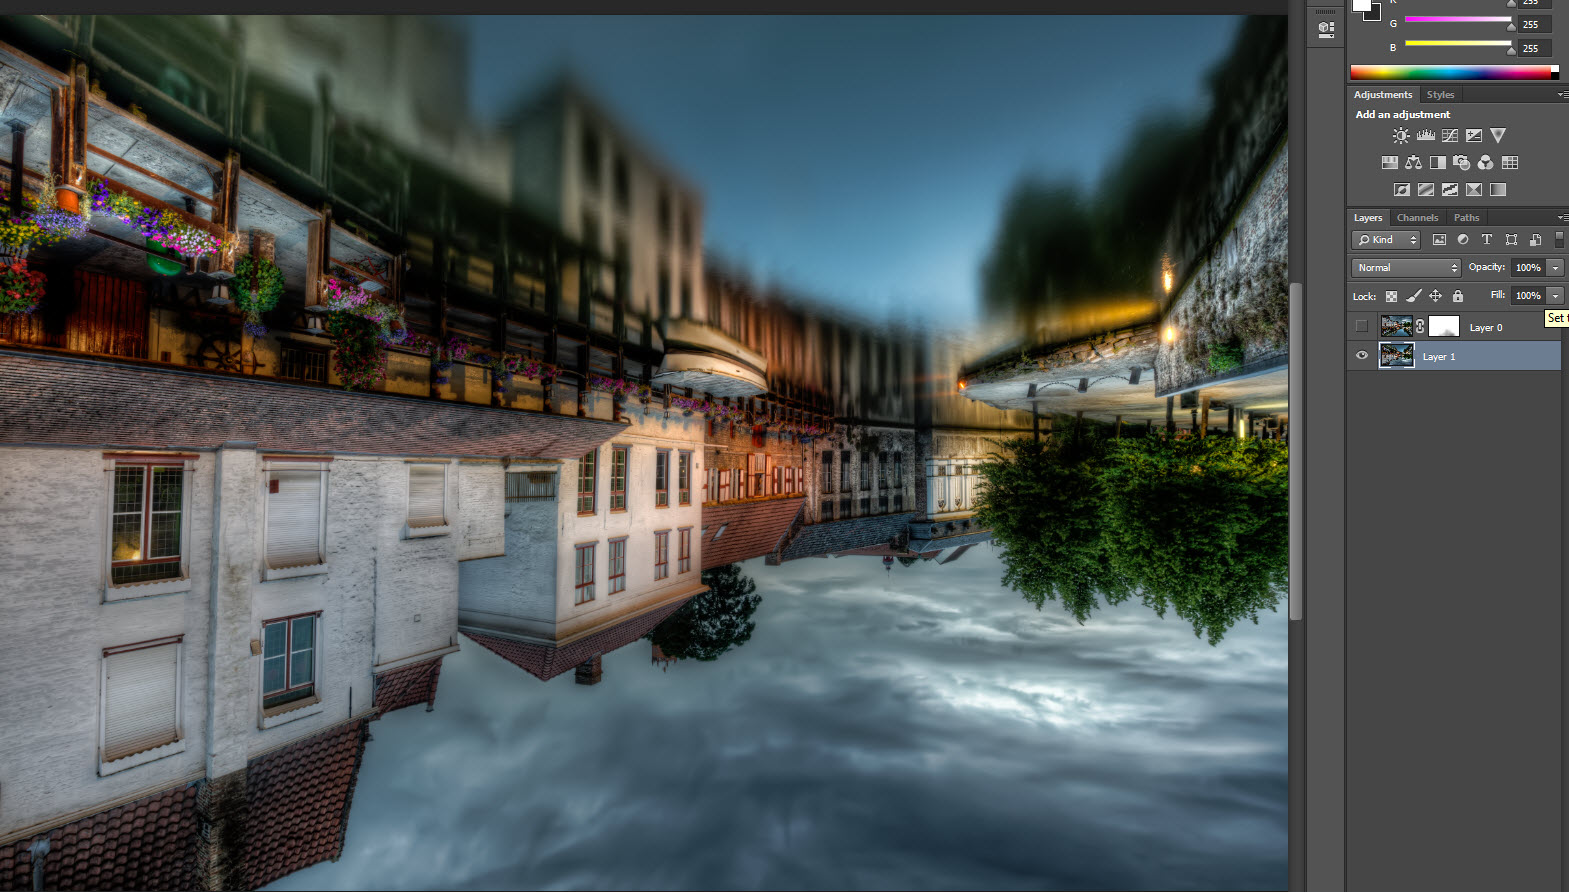
I processed two versions of this photo in Photomatix Pro. First I made one, a single tone mapped. Saved that, and then I took the output, and put back into Photomatix, and did a double tone mapped image.

Bruges double tonemap

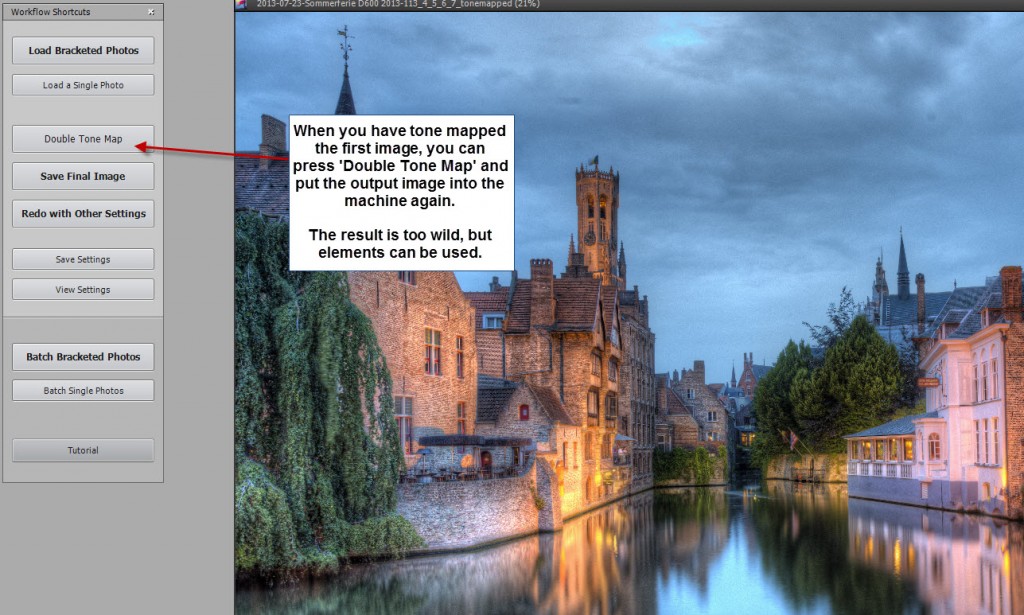
Use Double Tone Map to push the effects, but use it with care, because the effects easily get’s really out of control.

Canal in an old middle age town - single tonemapped

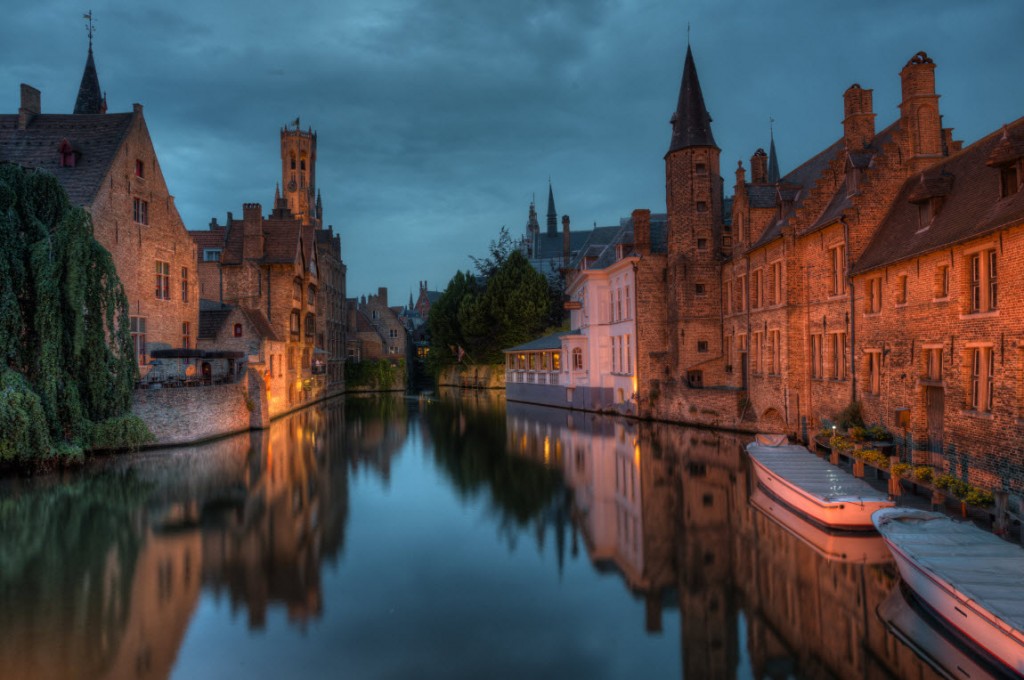
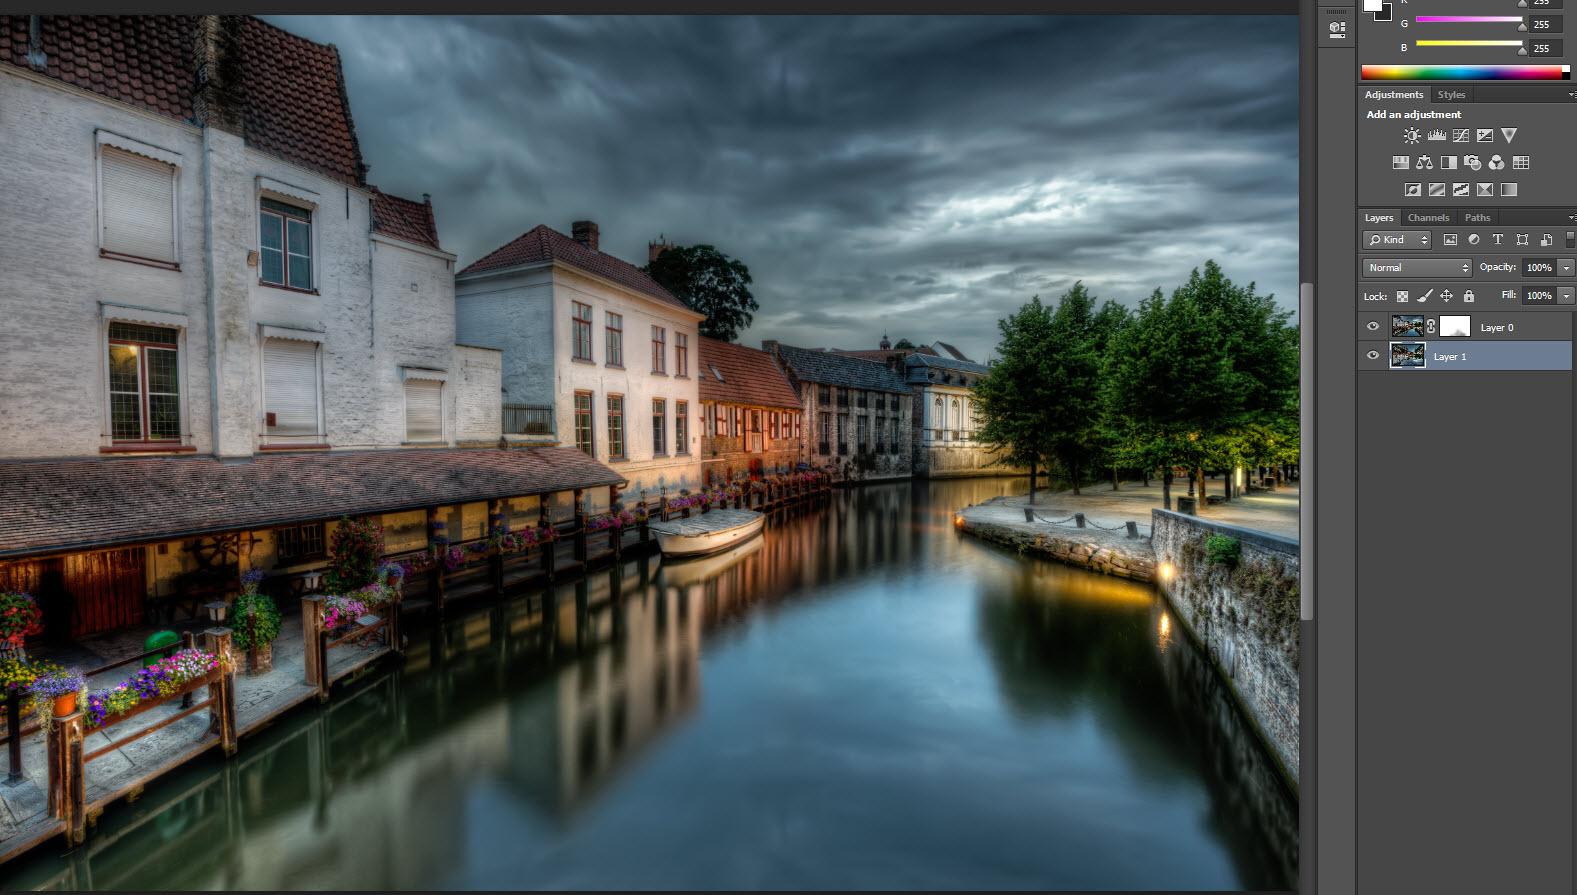
Single Tone mapped image.

The double tone mapped image usually goes completely wild, and you have to control it a bit, to make some of useful. The trick is to turn down saturation to around mid 40’s, and push Tone Compression to the left and Detail contrast to the right. They are highly potent, and you will have to find the right balance. Sometimes I find that the balance isn’t really there, and just skip making a double tone mapped image.

Bruges double tonemap number 2

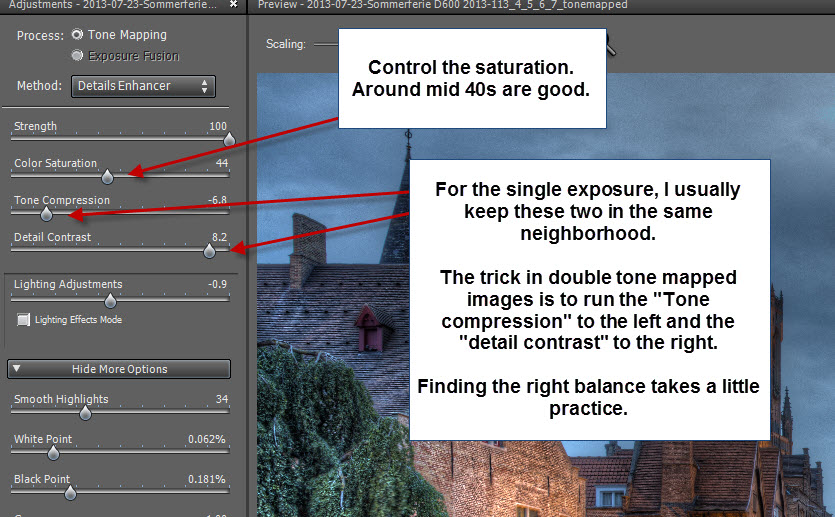
How to get the best result when making double tone mapped images in Photomatix Pro.

When I start to blend my images in Photoshop (you might find my tutorial on layer blending useful) I order them, so that the one I like the most, is my primary image, and it’s usually my single tone mapped image, but not always.

Canal in an old middle age town - double tonemapped

Double Tone mapped image.

In general, my goal with my post-processing technique is to improve my primary image, and by improve I mean:

  • Remove ugly bits.
  • Add cool effects
  • Make it work as a complete and balanced image.

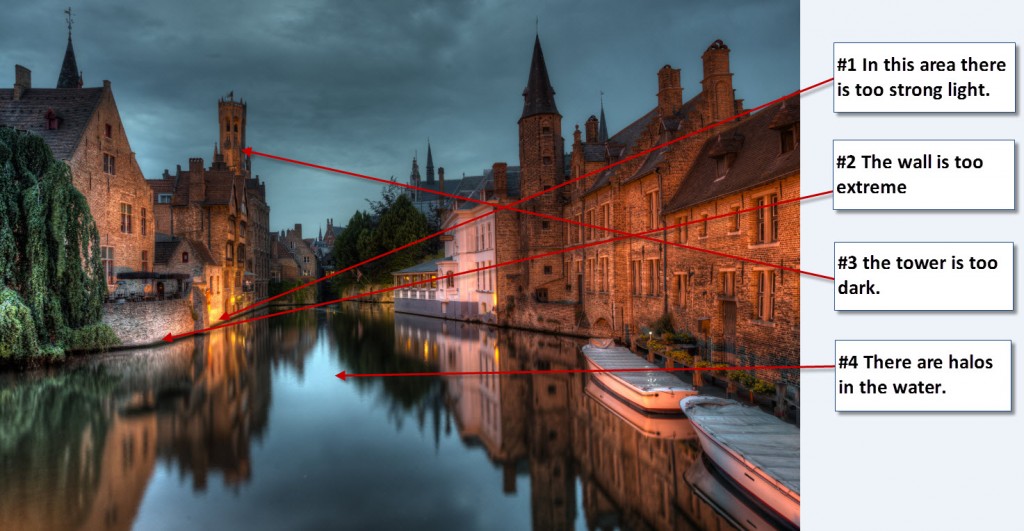
Now that I have my (primary) tone mapped image, I look at the issues I face:

#1 The lamps are way too bright. I dial them back a bit by blending in a darker version of the lamp, from one of the other images.

#2 The wall for some reason has gone almost white (blown highlights). This I also change by using a darker version and masked it in 25-50%.

#3 I really wanted the tower to be brighter, so I found a brighter version in one over the over-exposed image and blended that in.

#4 The water is bad – really bad. It has got a nasty halo. You can see that the water is almost black in the lower middle while it’s very bright along the edge of the reflections. This is called a halo and must be removed. I do that by mixing in the water from the 0 exposure.

A side effect from using the double tone mapped image is that light sources and other bright areas tend to get very bright or even blow out. A part of making the double tone mapped images is to find the balance between getting enough effect, without getting too much trouble repairing the blown out highlights and the halos.

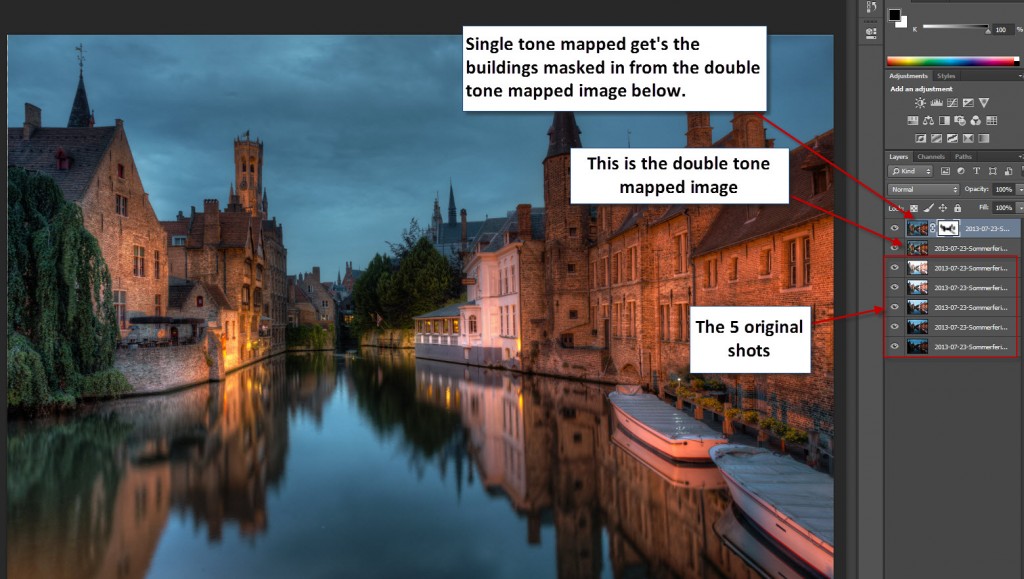
To fix all of the above-mentioned problems, I use Photoshop. I load all my original five shots plus my two tone mapped images into layers (you might want to read this blog post for a full demonstration).

By using this technique I can remove and fix blown out highlights, by blending either the single tone mapped or one of the originals into the areas that are ruined or just look bad.

The result is, that the buildings and reflections come from the double tone mapped image, primarily, while the sky and the water comes from the original exposures.

Canal in an old middle age town - photo shop

Final touches

When done in Photoshop I then save the file as a flattened TIFF file and import that into Lightroom.

In Lightroom, I use the brush tool to increase contrast and the clarity in the sky. By doing this, I enhance some details in an otherwise flat sky. The texture is there, it’s just not very easy to see, but I can be enhance it this way. A side effect of doing this, is that the colors get too saturated, I have to turn down the saturation a bit.

Canal in an old middle age town - Lightroom

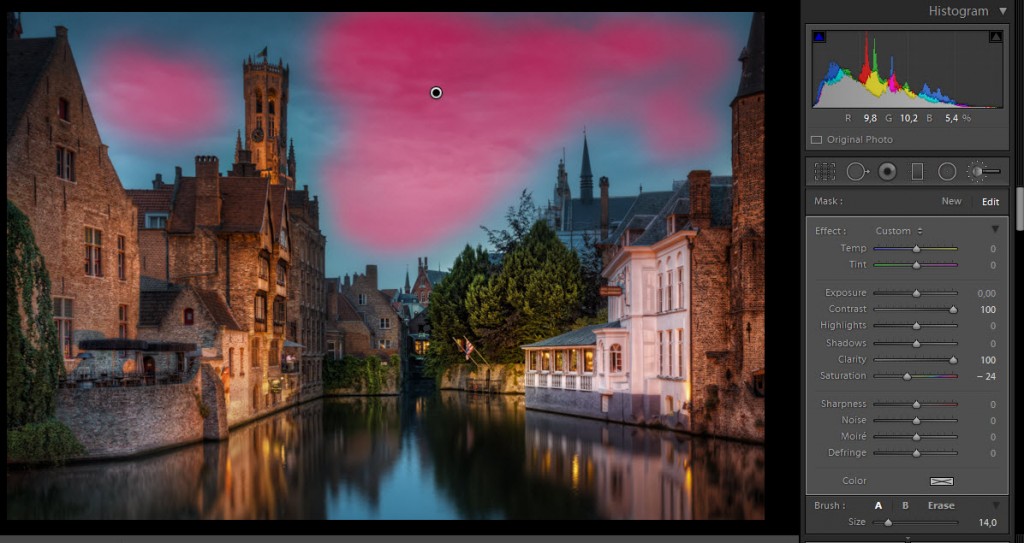
The pink areas are the areas that I painted using the brush. On the right you can see what settings that is applied to the pink areas.

Further reading

If you find this kind of processing interesting and want to try it out for yourself, you might want to get a hand on a copy of Photomatix Pro. There is a free trial, but if you use the discount code “caughtinpixels” you will get a 15% discount.

Get Photomatix Pro.

You might also want to read my basic understanding of making HDR photos. There’s a lot of things to understand, and a lot of pitfalls. I get around all of these things here.

I also have these tutorials:

Detailed tutorial on using Photomatix Pro.

Learn how to make double tone mapped images in Photomatix Pro.

Learn how to blend layers using layer masks in Photoshop.

Learn how to blend layers using layers masks using GIMP, the free alternative to Photoshop.