
A quite unique reflection of the Rialto Bridge in Venice
Scaffoldings covered half of Rialto Bridge when I visited Venice. This, of course, was a great disappointment, as I had planned to shoot it. I call it Scaffolding Disease, and I seem to suffer from this disease.
The good thing about such situations is that you are forced to look for alternative compositions. In this case, I had half of the Rialto Bridge to work with, and only from this side. On the other side, houses on both sides were completely covered in scaffoldings too.
I walked around, and suddenly I saw this reflection in the roof. The Taxi boat had been lying there for ages. We had been at Rialto bridge since before the city lights were turned on, and the taxi had been there most of that time, but I hadn’t thought of using it as a reflection surface.
I am not sure I would have shot this shot, had it not been for the search for a unique composition, using only half the bridge. The reflection in the roof is a bonus, but it is the final touch, I think.
]]>
A small pool of water after the showers used to photography a reflection the Campanile di San Marco.
We had a lot of rain the first couple of days in Venice. Too hard to shoot photos in, from time to time, but in the spells without too much rain, we took out our camera’s. A good thing about the rain is that many people disappear into restaurants, shops and cafes, and you can get a photo of the Piazza San Marco without too many people.
The making of this photo
I literally sat down my Nikon D800 on at the edge of this pool of water and shot my HDR 5 shots. I have got an L-plate on the camera, that makes it very easy to snap on and off my ball head and change from horizontal to vertical. Another advantage is, that it gives a sort of a foot to have the camera on, and I just placed that straight on the ground.
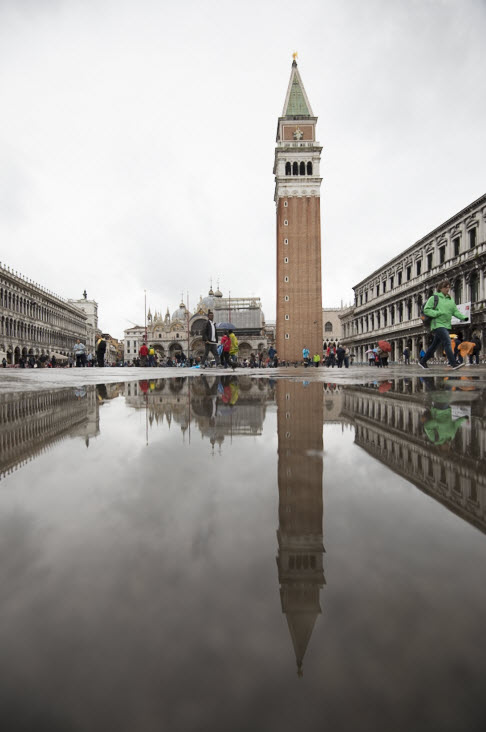
One of the five bracketed shots unedited. As you can see the surface of the water is not perfect.
The surface is of the poodle is not perfect. What I did to compensate for that, was to make a duplicate of the layer, flip it vertically, and blur the flipped layer slightly, using Gaussian Blur. The purpose of the blue is to match the blur the water gives. I don’t like a too perfect reflection.
Then I placed the new flipped layer in the right place and put a black mask on it and painted through with a white brush. In Photoshop it looks like this:

First the layer is duplicated. This is done by pressing CTRL + J or on a Mac CMD + J. The next step is to to blur the newly flipped layer, to match the blur of the tower in the poodle. Pick somewhere, where you like the blur level. It is a part of what makes it balance between the unreal and the believable.

The next step is to place the layers exactly on top of each other. To do this I use the Rotate tool, found under Edit->Transform->Rotate. I will end up using the flipped layer completely in the pool, but it still have to look like a straight tower. To be able to place the tower correctly, I change the opacity of the top layer momentarily. It’s a classic mistake to forget to set it back to 100%, and then you can’t figure out what is wrong.
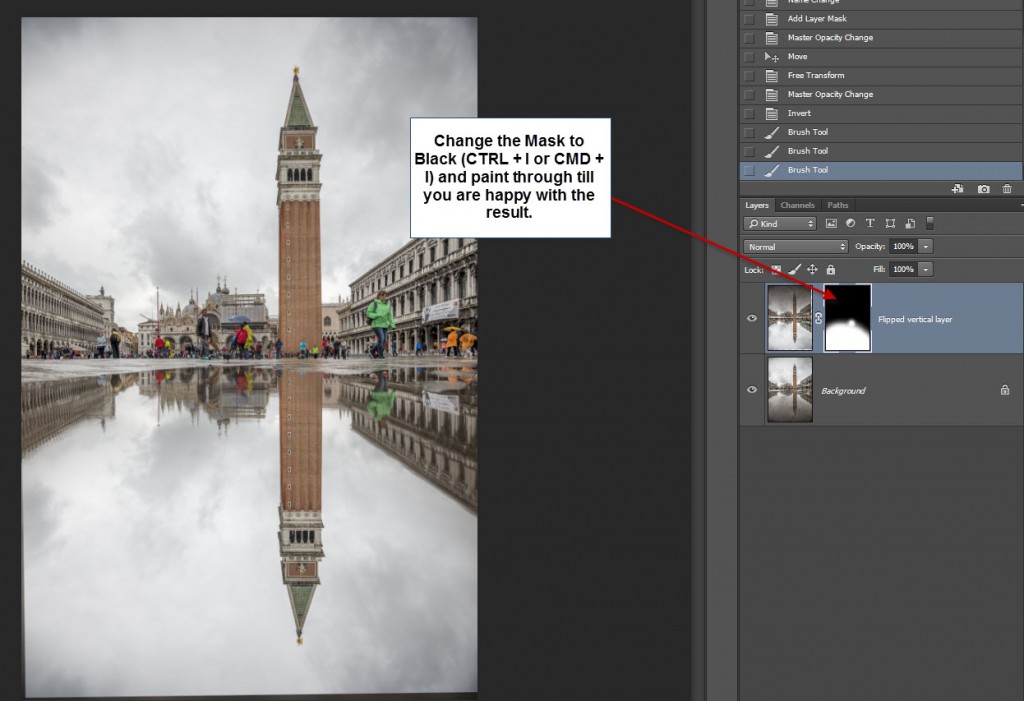
The last step is to mix the two layers. That is done by using a mask. I prefer to work with a black mask and use a white brush to paint through.
I did some extra clean up in the photo. The person in the very green jacket I removed by using some of the bracketed exposures. The person is moving quite fast and is not in the same location in any of my shots. By blending the layers, changing the exposure to the appropiate level, I could completely remove the person.
]]>
Oh I do miss summer or even just spring. I still have snow in my garden and there is ice on lakes and in the fiord. This is absurdly late, compared to normal winters. You know, it has been snowing for a couple of hours today. So this photo is an archive photo from last summer. I had just got my first full frame DSLR and took it out for a walk down by the fiord, in my hometown Roskilde. I came by this jetty with a pair of shoes on it, but nobody was around… Strange.
About the processing
This is a single exposure RAW file, that I did a minus 2 and plus 2 virtual copies of in Lightroom of. I then exported the three photos to Photomatix. A problem with HDR is that it often gives a grayish color to the sky, which is quite odd, because much of the rest of the image often turns out quite colorful. So I had to go back to the single exposure and process the sky individually, and then merge that into the rest of the image. I had some quite bad noise problems with the shoes, because they were in shadow. But using by some heavy noise reduction both before exporting to Photomatix and later again in Photoshop they ended up quite good.
]]>
I guess it’s no surprise that Amsterdam has all these lovely canals. You find house boats, construction boats and just small boats for cruising around in the canals. The yellow shoe shaped boat is one of the more spectacular ones I found.
About the processing
It’s a 5 shot HDR, that I processed with Photomatix. Nothing unusual there. Then I blended layers in Photoshop, to remove a little ghosting in the trees, not much there though. The photo still didn’t really pop the way that I had hoped. I had managed to get a not very pretty handle of bicycle in the lower part of the photo. In the end I decided on this cinematic format, cutting away the handle. The other thing I did like, was the hanging bowl of flowers, so I decided not to emphasize that too much. I focused on the small Shoe shaped boat and the sun rays in the far end. Those I processed to be emphasized. The boat was a bit dark, I made it more light and the sun rays I emphasized using burn and dodge tools.
]]>
One of the most beautiful and dramatic fiords lies on the the west coast of New Zealands South Island. The sun rises and shines on Mitre Peak, which rises an amazing almost 1700 m straight out of the water, which I was told was the record. The weather changes a lot in Milford Sound and seeing it without a cloud is a rare experience. It rains up to 11 meters (!) per year here, which is makes this place one of the places on Earth where it rains most.
About the processing
This is 7 shot HDR photo merged together using Photomatix. I have worked a lot with the image. Created a new layer, fine tuned an area, and then blended that area into the main photo, then made another duplicated layer to optimize another area. I have used Topaz Adjust and Nik Color Efex filters with delicacy.
Cleaning up the photo
I have done a lot of cleaning up in the photo. There was a lot of dirt, leaves, insects etc in the water. This I have removed using the clone tool in Photoshop. It took some time, but it’s important to achieve the calm mood of the photo and the strong clear reflection.

After walking through Amsterdam taking nightscapes I finally arrived to the harbor, to see the sun rise behind the Amsterdam Maritime History Museum. A beautiful place, that I returned to in the evening, to attend to a cocktail party. That I didn’t know, when I took this photo.
About the processing
The photo is a 5 shot HDR. I did the tone mapping with HDR Efex Pro 2. Not a bad tone mapping tool, though I find it more detailed in Photomatix. Afterwards I did a little blending layers. Primarily to remove ghosting in the water, on the masts of the ship.

Rothenburg ob der Tauber in Germany is the most georgeous middle age city, surrounded with a city wall with beautiful towers and buidings. This particular photo is from St. James church.
About the processing.
I did a double tone mapping in Photomatix on a three exposures HDR. This is done by first doing one tone mapping, and when it is done, you just press the Tone mapping button again. The second time you have to push the saturation and the luminosity a good way into the negative area. That gives this funky and gritty look, which is quite far from how it looks, but is kinda cool.

Not exactly a big great harbour bridge, but nevertheless I do like it. It connects the Museum Island, part of the Viking Museum here in Roskilde.
The photo is a 5 shot HDR shot before sunrise.
EXIF: 21mm, f/10, 5.0 sec. It was my aim to get the longest exposure to be a maximum of 30 seconds (which is the limit of the camera on automatic). I had to raise the ISO to 400, to keep the f/10 at a reasonable small value (higher number). I want the keep the f-stop low, to keep the foreground sharp as well.
]]>
I’m getting better at stopping the car, when I see something interesting. This time I saw the mist on the pond, and the sunshine going through the mist. The car went over the curb and luckily nobody was just behind me. Kind of stupid to drive so crazy; it was in a round about, and I could just have taken another round, but I got excited. Notice how the sun shines in one tree, but not the rest.
About the composition
I placed the sun behind the tree. It gave less power from the sun. It is about an hour after sunrise, an the sun is quite strong. I used the rim of the pond as a lead in line, but also the sun coming through the mist on the lake works as a lead in line.
About the processing
This is an HDR from 9 shots with one EV step between each shot. I used Photomatix to make the tone mapped image, and then I copied all 9 original shots plus the tone mapped into Photoshop as layers. The ducks were not exactly sitting ducks, so I had to mask them in from individual images to de-ghost them. I then removed all bluish colors, giving this almost black and white look with a golden glow, and a little green grass. In the foreground I removed a ton of leaves and floating feathers from the water.
]]>
From one early summer morning close to my home town. A raft sitting in last minutes before the sun comes up.
This is a 5 shot HDR. I also attached a soft grad ND 2-stop filter and a 3 stop filter to get a longer exposure time. It is a fairly clean Photomatix image, only a little Photoshop’ing to keep the boat and raft sharp.
]]>