
I often hear someone saying about my photos “Usually I do not like HDR photos, but I this one I like. You have not overdone it.” This kind of comment of course makes me happy; who doesn’t like to get appraisal of ones work? But I also think to myself “You should know how much I have treated this photo – this is HDR extreme!“.
I have heard it so many times, that I have started thinking about, what it is that people “who don’t like HDR’s” don’t like. Because, clearly, it is not the HDR they don’t like. It must be something else.
I believe that one of the things they don’t like, is when the HDR photos are badly processed. If you want to make great HDR’s, there are some rules, you have to oboy, no-matter if you are doing extreme HDR’s or more natural looking HDR’s.
Save 15% on Photomatix Pro. Remember that by using the coupon code “caughtinpixels” you will get 15% discount on Photomatix Pro here. Photomatix is the HDR tool in the world.
Tip #1 Do not have halos in your HDR’s
Halos tells that you are not very good at processing your photos – or at least sloppy about it. Halos can in some cases be really really difficult to fix. But in most cases I find it easy, to moderate easy. The problem usually comes, when you start boosting your effects.
 Learn to control your boosting of effects. Do not apply the strongest effect you possible can. Do go either one step at a time or do it more moderately. It is not a competition of going most extreme. It is all about making an awesome photo. This is NOT awesome.
You can do almost anything with your HDR, go lightly, extreme etc. Just do not have halos!
Check out my HDR tutorial to see how to remove halos. And here you will also see how to use effects selectively. One of the most important rules, is that you don’t have to use an effect globally in your photo. If the effect only improves 10%, of the photo, by all means, only use it in 10% of the photo and throw away the rest.
Tip #2 Be there at the right time
I am not a great fan of daylight HDR’s. Yes, often you do have a very high dynamic range in the middle of the day, and you can only cover it using HDR technology, but you usually do not get the coolest photos. Yes, you can usually hand held the camera, because there is much more light, and therefore the shutter speeds will be much faster, but it shows in the final result.
This is 20 minutes difference. Do you agree, it was worth waiting for those 20 minutes? And it is not only the much cooler car, that does the trick. It is the light.
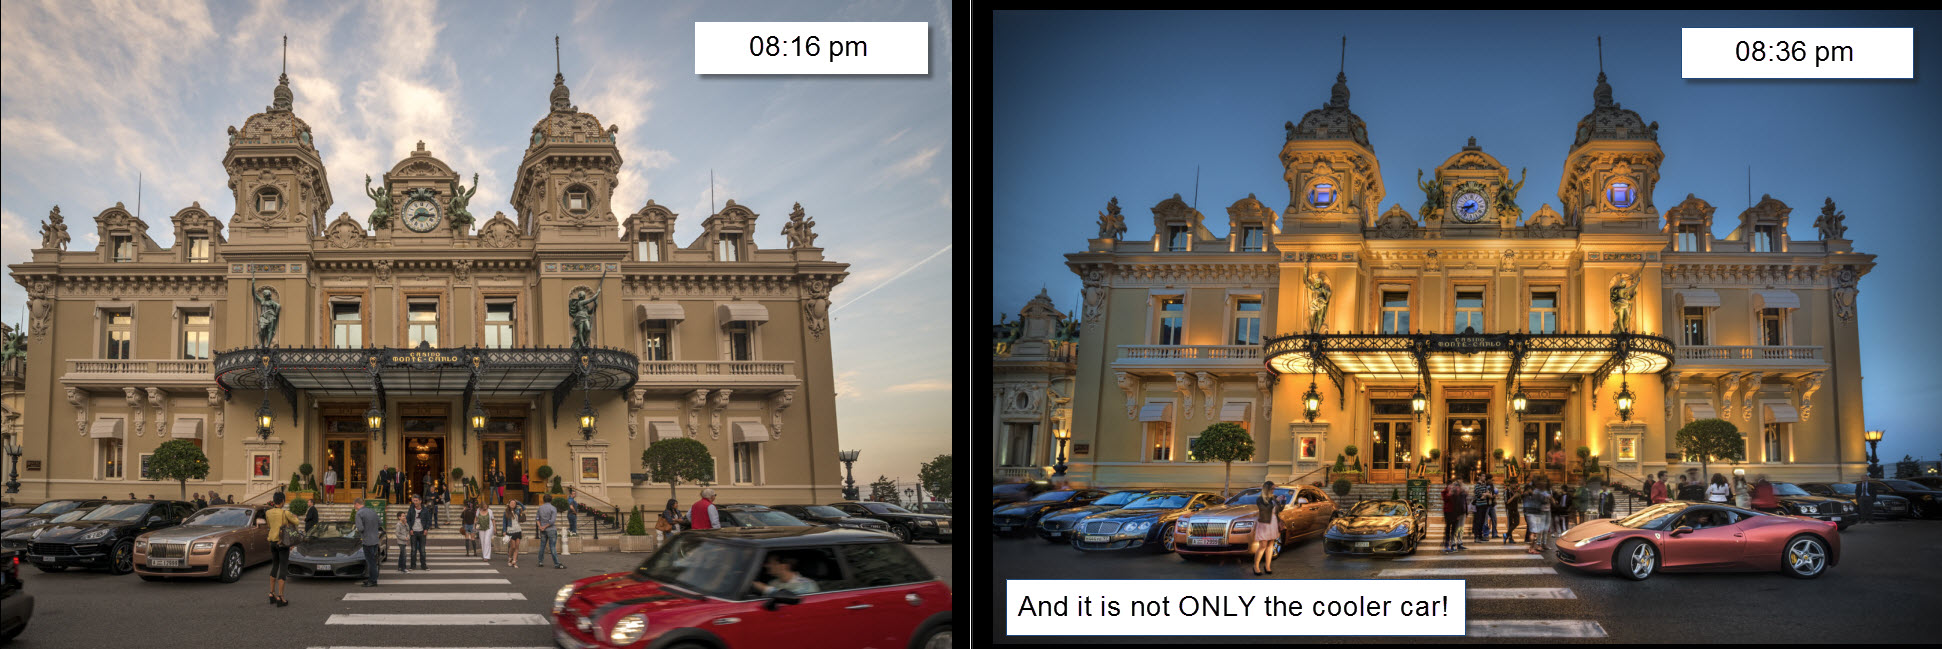
The timing goes for all photography really, but HDRs kick in the turbo, when it get’s low light.
Tip #3 Use a tripod
If you already have learned to accept tip #2, then do not be tempted to shoot with out a tripod. If you do not use a tripod, you will have to compensate in other ways. First you will open your lens to the lowest f number and will end up at f/2.8 or f/3.5 or whatever your lens supports. Second, you will get longer exposure times, and when they get so slow, you can’t keep the camera still, you will increase the ISO.
A nasty side effect of making HDR’s, is the noise. It kind of comes with the concept, because details are enhanced. Some HDR products are better at handling the noise than others. And you can do a lot with noise reduction, but still… You loose quality and details.
The only way around it, is to use a tripod and have those longer exposure times, too keep the ISO as low as possible.
It took some convincing for me to use the tripod … always! And I felt stupid the first times I used the tripod among people, but I have learned, that you gain respect. And whenever you put up the tripod, people stop up, and take the “same” photo using their cell phones.
Tip #4 Setup the camera right
Setting the ISO
Fix your ISO to as low a setting as possible – do not use auto ISO! You will get far too much noise in the bright exposures.
It is a compromise, when it get’s darker, you will have to increase the ISO, to stay within the 30 second exposure, for the longest exposure. If you need to have a longer exposure than 30 seconds, you can either increase the ISO or the aperture (a lower aperture number). This is a compromise.
Use aperture mode
Always use fixed aperture mode (A or Av depending on the brand) when you shoot your bracketed shots. You can also do this in manual mode, but I only use manual mode in extreme cases. If you using aperture mode, you will be just fine in 99.9% of all cases.
But why not use Shutter speed (S or Tv) mode? Because what the camera will do, is to change the aperture for each photo. And changing the aperture changes the depth of field. And if the depth of field changes, you will end up with photos, that are not identical.
A scenario you could end up with, is that the dark -2 exposure might be tack sharp, because it has the lowest aperture (highest number), and largest depth of field.
The normal 0 exposure will have slightly blurred background and the bright +2 exposure will have both blurred foreground and even more blurred background, because the brightest will have the lowest depth of field.
Three photos with changing Aperture you can not blend. They are not identical and the result will not be good.
Use a timer or remote control
Use a remote control, cable release or a timer to set off the bracketed series of photos. If you touch the camera, the photos might be shaken.
Tip #5 remember to check out your histogram.
If possible at all, make sure, that you have all light covered. The reason why you are shooting more exposures in the first place, is to cover all light, from the darkest shadow to the brightest light source. And if you miss out, when you are doing the bracketed serie, you are not much better off, than you were in the first place with only one photo.
Check your histogram on the cameras playback function and check that you have all light covered.
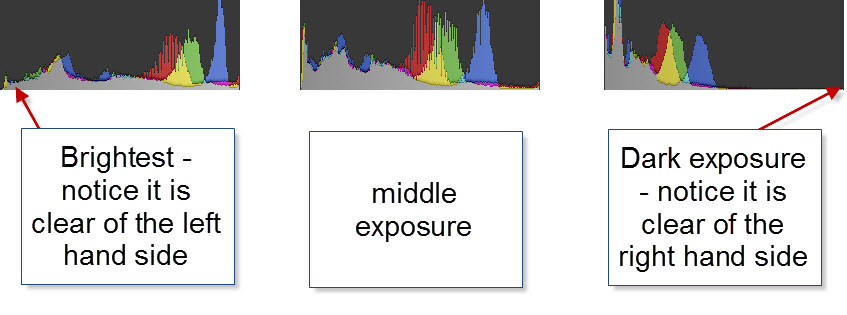 Some situations are harder to cover than others, and might require more shots than others.
Some of the more difficult ones, are city night shots or shots having the Sun in the frame. Many of my city night shots, I often cover from -4 to +4 to get all information from the darkest shadows to the brightest light bulbs in the street lamps.
About the photo
I shot this photo in front of Monte Carlo Casino in a wild crowd of people with cameras. I only got four of my 5 planned shots, because a guard noticed my tripod. He was a senior member of the tripod police, and certainly did not like no tripods. I did not enter a discussion about, this being a public square, because I knew I had covered the light well enough, and got my cool car. I packed up my tripod and left the location happy.
Making the photo was really much more about mixing the four photos I had shot. The cool car is only present in the two of the four photos.
What I did, when I shot the serie, was a bit unusual, because of all of the crowd and the many cars passing by. I very carefully broke with my tip #4, and pressed shutter release manually for each exposure. Looking carefully at the scene for each photo. This way, I got my cool car, and made sure that I had photos with no people in more or less all parts.
 As you can see, it was quite a challange because of all the people and cars.
Another problem was, that I had positioned the camera for the pedestrians crossing instead of the Casino. This was a bigger mistake than first anticipated. I ended up spending quite some time correcting the perspective. It wasn’t easy.
Removing the people required a very delicate mixing of the layers in Photoshop, and then some cloning too. But I ended up with a fairly clean photo.
When my photo was clean, I started to apply my effects on the lower half of the photo. The casino itself is HDR, but the rest is a handful of effects from various tools.
]]>

These trees are just magnificent. Perfectly round and framing the beautiful Church of Eglise Saint Charles in Monaco.
It’s really a milestone, 100,000 photos. 11 years has passed since I bought my first pocket Canon IXUS 400 camera, which I loved and still has. It was 4 megapixels and did take some really good photos.
I always had the love for photography, but I never really did dive into it, until 2 years ago, when I started to buy more serious equipment and using software to improve my photos. And what a journey these last two years has been. The first few shots I made, even surprised me. Is this really possible? I thought. But it really is.
But how to get to this point I am now? Well, the most important step is to be serious about what you do. And you have to realize and accept that there is some real work in it. There is no silver bullet and a no button that says “Press here to get your awesome photo”. It is true that many filters and tools exist, which will do 50%-80%.
But you know what? It’s not the first 80% that counts; it’s the last 20%. And the last 20% takes 80% or more of the time.
You can’t really be sloppy, when you shoot or when you post process. But that doesn’t mean that you have to fix every pixel in the photo. There are some basic rules that you have to follow, to make a photo work. Some of these rules are here:
- Do not have burned out sky (white splashed in the sky) in your photos. Use ND graduation filters or HDR techniques to make sure, that you cover all light. I have tutorials on HDR on this blog right here.
- Do prioritize to take photos during the golden and blue hour, or in city lights. Photos in the middle of the day are just so much harder to make great. I even stopped to take photography serious in the middle of the day, unless cloudy.
- Be precise with your composition. If you are shooting something symmetric, then it MUST be symmetric. If something must be centered, it must be centered – not almost in center. The same thing applies to more complex compositions.
- Do make sure the horizon is level, and if it is not, make sure it is obvious it shouldn’t be.
- Do not have “halos” in your photos. If it looks like that your horizon is lightening up the sky, it doesn’t look good, and it is obvious you didn’t put effort into the last 20% or simply, that you have to work more with the photo.
- Try to avoid too much digital noise in your final photos. If you are doing HDR photos you are likely to get that. Use noise reduction software, to keep the noise under control.
- Do not overdo the post-processing. It must work, within the style you are doing.
- Clean up cigarette buds, garbage and other stuff from your photo. A cleaner photo simply works better.
In a photo like this train from Zurich Central Station in Switzerland:

I had to spend a few hours removing bugs, but the it is worth the reward, and the photo wouldn’t have worked, if I hadn’t taken my time.

This I (of course) have learned bit by bit, and Rome wasn’t built in one day. But each of these small steps, I improve for every photo that I make. I make a lot of mistakes, some I fix, and some I think, next time I will fix it.
]]>