Warning: Undefined array key "multiauthor" in /var/www/caughtinpixels.com/public_html/wp-content/plugins/post-layout/plugin.php on line 114
Warning: Undefined array key "mobile" in /var/www/caughtinpixels.com/public_html/wp-content/plugins/post-layout/plugin.php on line 352
(I know there is a bug clicking on the images on this page – I haven’t figured out yet, why WordPress does that – I’m working on it. Hopefully you can read the images as they are.)
This part of my HDR Tutorial assumes that you have a version of Adobe Photoshop CS. It’s not so important what version it is. What I’m going to teach you, you can also do with Photoshop Elements, but you have to do a work around to do it. For some reason Adobe have not made the Layer Mask a part of Photoshop Elements. And if you do not have a budget for either of these two, you can also do it with Gimp. I will use Photoshop CS6 to demonstrate, what to do, and later I will make tutorials that shows how to do it with Elements and Gimp, but for now you will have to translate the principles into those two for yourself.
I assume that you have read my page with ‘How to make an HDR image‘. You will then remember that I had 3 source images (an under-exposed, a normally exposed and an over exposed image). I then created a 4th tone mapped HDR image and saved that next to the 3 source images. These 4 images I want to get into Photoshop in layers.
Loading images into layers in Photoshop
I use Adobe Bridge to get my images into one Photoshop file as layers. There are many other ways of doing it manually, but this is the only one I know, where I can do it in one operation. I do not use Bridge for anything else, but this is nifty little feature.
When I open Bridge I select my HDR Process folder with my 4 images and I select them.
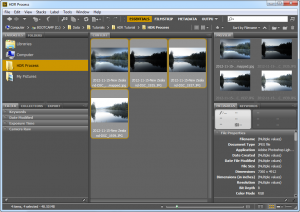
Then I hit the command to ‘Load into Photoshop as Layers’. I find in this menu:
 And Photoshop loads and then load the layers.
Step 1 Arranging the layers in Photoshop
Before I start working with Photoshop I always switch to English keyboard. I use a Danish keyboard. I have observed that the Danish shortcut layout is badly optimized in Photoshop. The English keyboard short cuts are optimized and I prefer to use these and I recommend to switch to English keyboard. It is fairly easy to switch, given that you have installed it. In the Danish version of Windows, we get English automatically, and that may be the case of every installation. If not it is quite easy to add a language in the Windows Control panel (Control Panel->Region and Language->Keyboards and Languages->Change Keyboards). When I open Photoshop and I hit SHIFT+ALT and then the keyboard language changes into English.
![]()
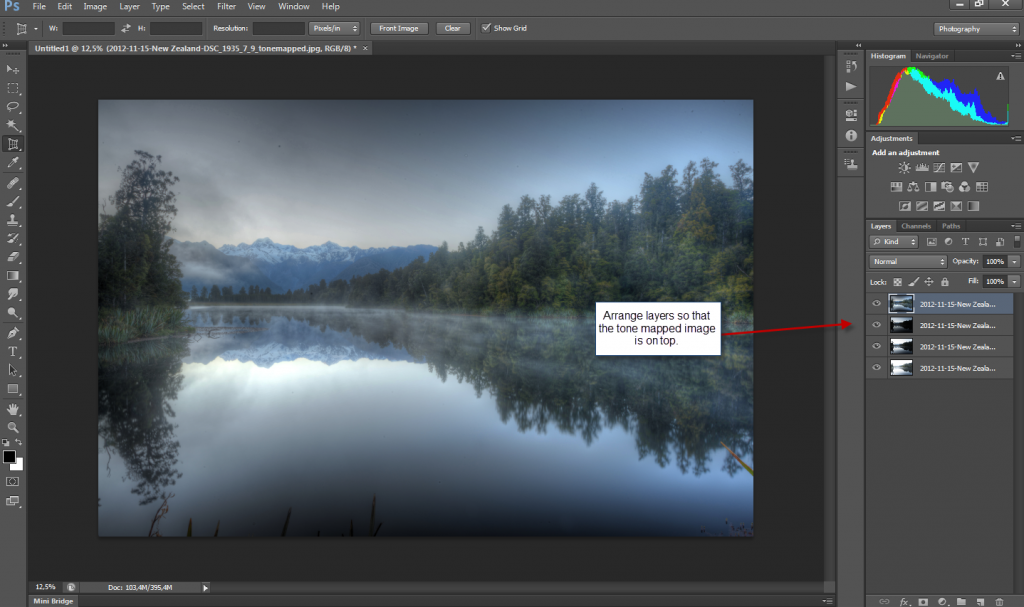
I now have my 4 images in Photoshop as layers. I start by arranging them, so that my tone mapped image is on top. Then I find the one with the good sky, which is the under/exposed and place that second.
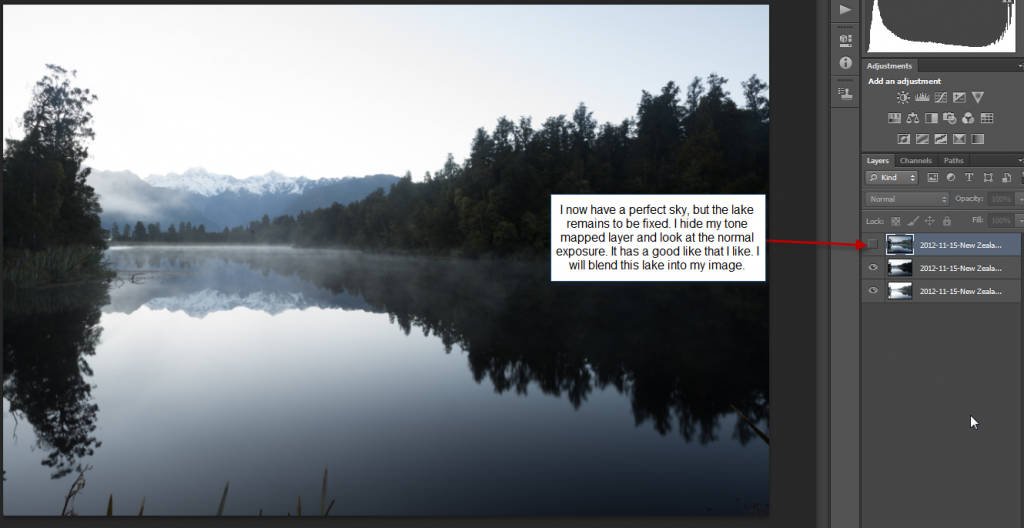
Now that I have my layers arranged I check that my sky looks great on my under exposed image. I do this by hiding my tone mapped layer like this:

I then study the under exposed image for a moment:

As you can see both the sky and the lake looks good here. The lake is maybe too dark, and I will use the lake from one of the other exposures. However the trees are black. I don’t want black trees in my final image, so I have to merge the sky in, without getting the trees. This may prove a problem. Remember that the tone mapped image has got halos (shining edges) around the trees. This I have to get rid of to get a successful HDR photo.
I now unhide my tone mapped image again.
Step 2 How to remove halos from the sky
The sky has some nasty halos around the edge of the trees. You can see the trees “glows” adn the rest of the sky gets too dark. This “glowing” is called halos, and must be removed to get a successful HDR photo.
What I will do, is to blend the sky from the under exposed image with my tone mapped image on top.
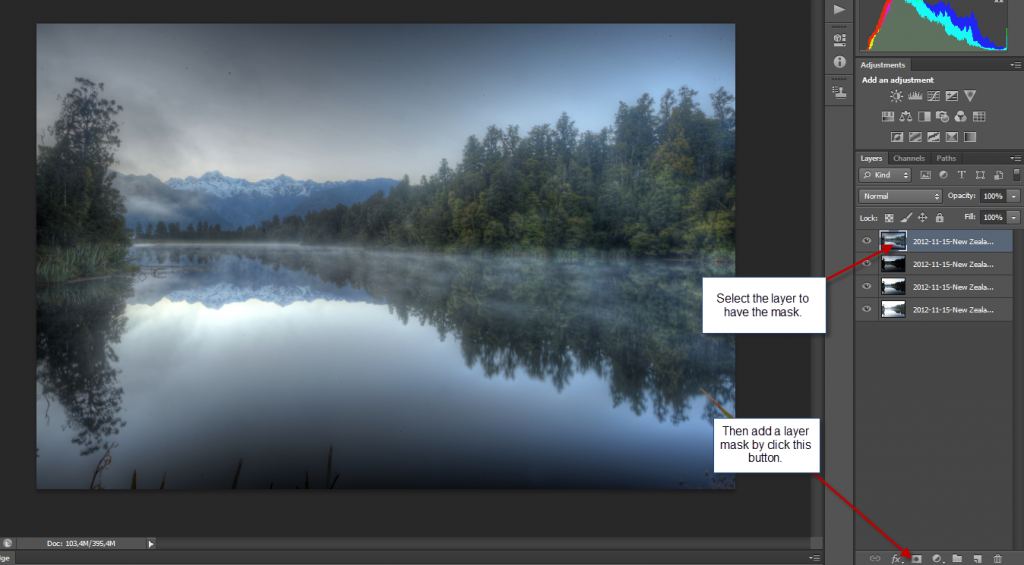
To do this, I will have to make some of the tone mapped image invisible or partly invisible. Opaque or Opacity is the technical term. The hurdle is that I only want to do it in the sky. To do this, I have to make a mask on which I can define what parts of my under exposed image I want to blend into my tone mapped image. I say that ‘I mask the under exposed sky into the tone mapped image’.
First I create a layer mask this way:
And I remember to select the layer mask before starting to paint. You will, just as I have, forget this many times and then you will end up drawing directly on the layer, which you don’t want to do. Luckily Photoshop has got a history, which allows you to step back to where you made the mistake.
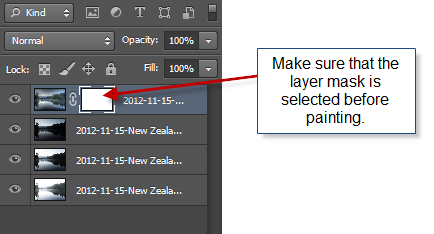
When I draw on a Layer Mask I only use White, Grey or Black. I can’t paint with any colors at all. The idea is that, where ever I paint, the darker the color I paint with, the more I increase the Opacity. Or said in another way, the darker the Layer mask is, the more of the layer beneath I will be able to see on my tone mapped image.
I want to get the sky into my tone mapped image, so I will have to paint black the area with the sky. To avoid a hard edge, I use a soft edged pen and I use a very big one too. Thin pens are easy to notice has humanly drawing on top of an image. Avoid thin pens in big areas.
The closer I get to the trees the less I want of the image below, so I have to make the top of the mask completely black and then go through grey colors to completely white all the way down by the edge of the trees. Let’s go for the black first.
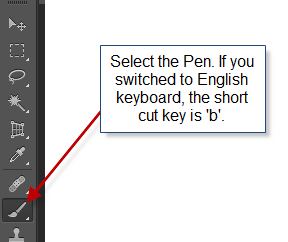
Then I select the Pen tool to paint with. I can also use the short cut key ‘b’. The size of the pen I can adjust in the toolbar belonging to the pen, but it is (much) faster, when I have got the English keyboard layout, to use [ and ] for resizing the pen.
I’m now ready to paint. I select opacity 100% to make the mask completely black where I paint. I want the top of the image to be the sky from the under exposed image, so the top I paint black.
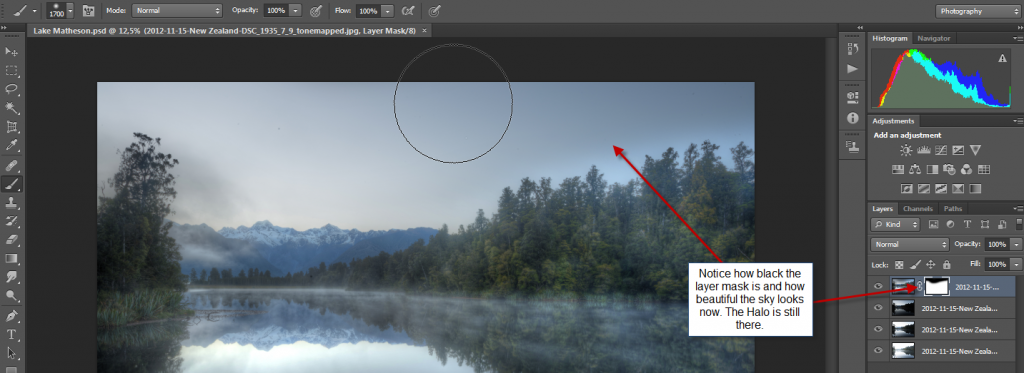
While I paint with the pen, the sky from the under exposed image in layer below appears and it improves the image a lot. While I paint I’m careful not to go too close to the trees. This still leaves me with the Halo above the trees.
I adjust the opacity to 25% (I can just type 2 5 on the keyboard – nice and easy), and then I make the pen smaller (using [ and ]) and paint half of the pen across the trees and half of the pen in the sky and closes the gab up to the black area. This way I get more of the sky from the under exposed into my tone mapped image, but I don’t get it all. I only get 25% of it, but it is enough as you can see.
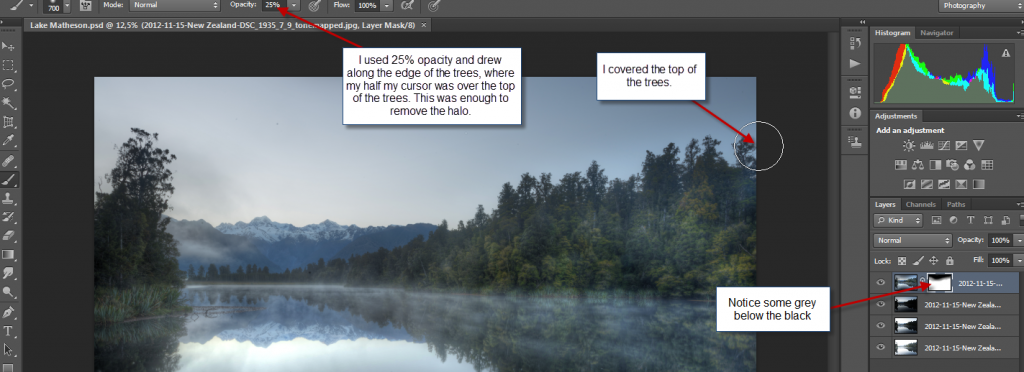
The only drawback is, now I got the top of the trees too dark. There is only the hard way to fix that, and that is by erasing some of the grey on the layer mask. This takes time and is hard pixel by pixel work, but the picture will not be as successful if I don’t do it.

I erase by switching to white color, still making sure that I paint on the mask and not on the image. And then I start erasing. I use 25% opacity again, which means I only remove 25% of the grey. So if I add 25% black and remove 25% again it will not go white, because I remove a quarter of the grey. You get used to how it works after a while.
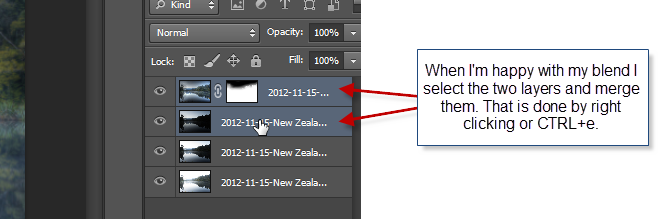
After working the edge of the trees for some time, I’m quite happy with it. I now have my green trees back. Then I check (by hiding the top layer (click the eye)) to see if I want anything else from the under exposed image, but I don’t. I then mark the two top layers and merge the two layers together to one layer. I can do this either by marking the two layers and right clicking (not on the thumb but on the text – pretty annoying) or as I prefer to do it, use a shortcut key CTRL+e.

Now I have got three layers left. My tone mapped layer with a new and pretty sky. Now I want to fix the lake. I do that by using the same approach as I did with the sky.
First I look at the lake to confirm that I like it. And while I’m looking at the normal exposure I look for other things and want to bring in, but there is nothing I need. So I will only blend in the lake.

I have now masked in the lake, but just as with the sky, I didn’t go too close to the reflection of the trees. I do this with a 25% opacity pen. The trees will be darkened again and again I will have to fix afterwards.
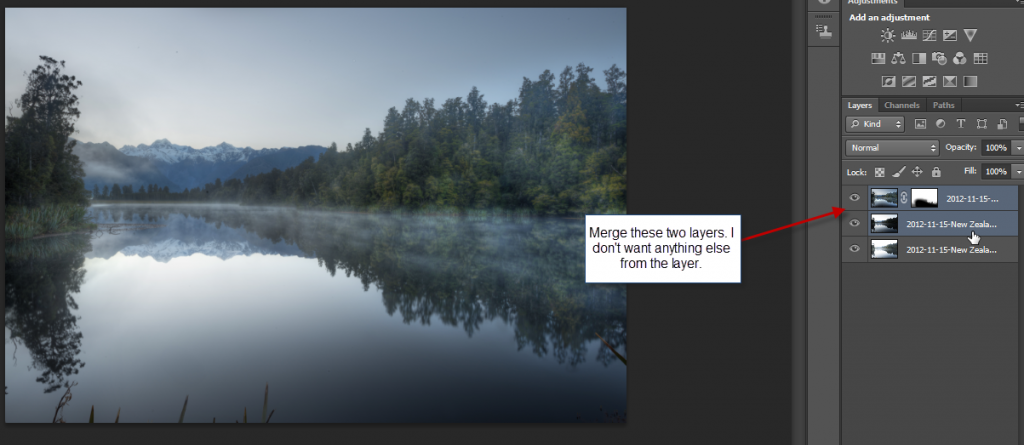
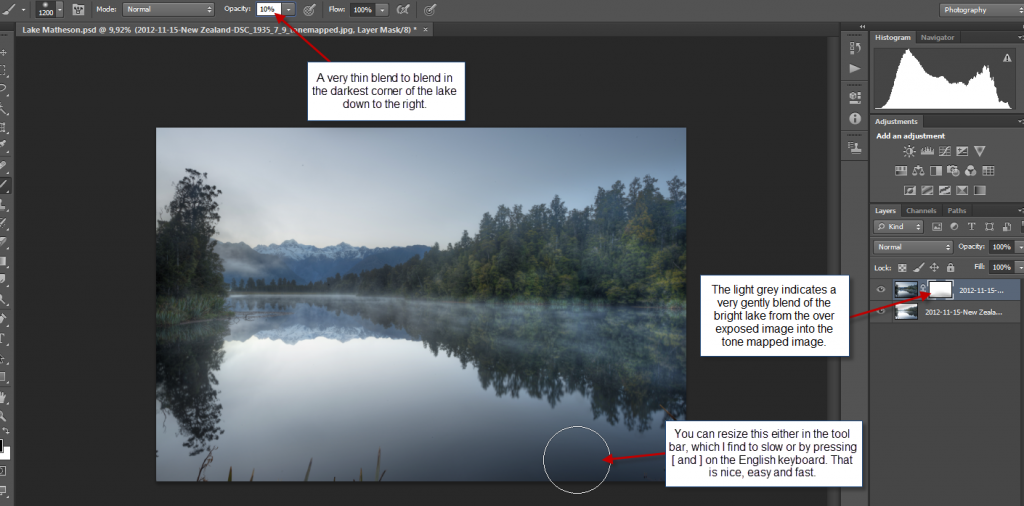
I now got a perfect lake and sky. The halos are as good as gone and I still have my green trees. The lake is perhaps still a bit too dark in the lower right hand corner to my taste. I merge these two layers and continue to bring in a little bit of the over exposed layer in the lower part of the image. But this time I will do it very gentle. I don’t want it completely in because it is way too bright.
Tip: A VERY good thing to know while painting. While you keep the left button on the mouse pressed, you can paint as many times over the same area as you like, and it will stay the same opacity. When you let go of the mouse button and press again and paint over once more, it will multiply the opacity. This is good to know. If you click a lot you get into trouble, because you can see where you paint. The same goes if you use to small a pen. Go BIG on the pen in big areas like the sky!
Now the lake looks good. I merge the last two layers (CTRL + e) and continue to clean up.
Step 3 Clean up the image
What I now need to do is clean up the image. I have some dust on my sensor, and since I used a very small f-stop f22 the dust on my sensor becomes very clear. I had a small f-stop to get the longest possible shutter time, to make the water go as flat as possible.
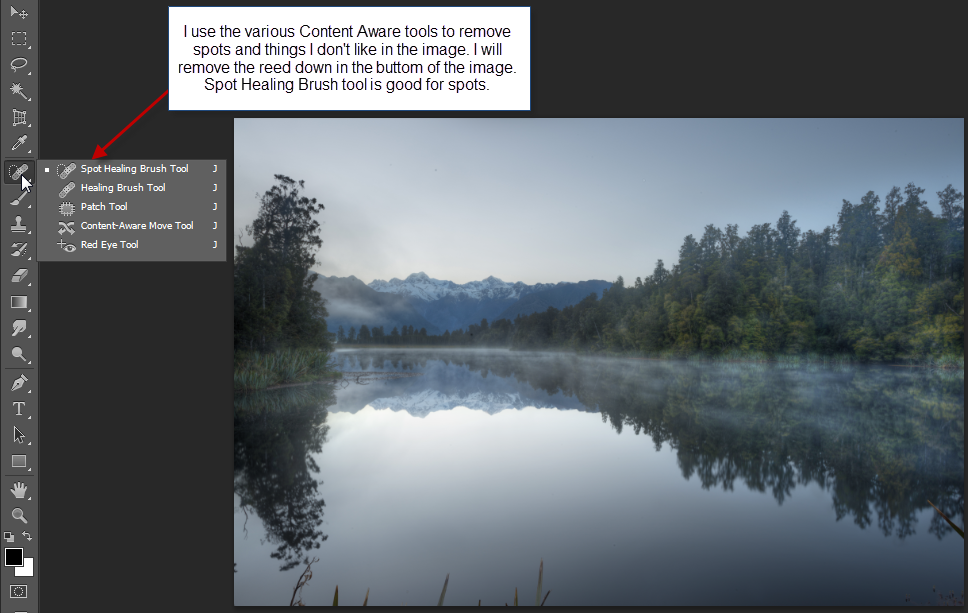
To remove dust spots I use the Spot Healing Brush Tool. Just as the normal brush I can resize it by using [ and ] (because I use the English keyboard layout).
I fit the brush to the size of the spots. In general Photoshop does a really good job in removing these spots. 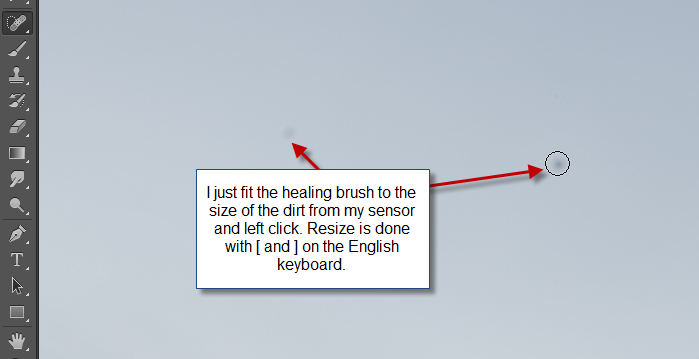
I then scroll around, while zoomed very far into the image. A good large monitor is a great thing while doing this.
To remove the reed in the bottom I use the lasso tool to select them and then, I fill the selected area by using Content Aware fill. This is really awesome and in a lake like this, it works just perfectly.

I can right click with the mouse and select Fill, but I can also just press SHIFT+F5.
 And then the reed goes ‘Bye bye’. Really awesome.
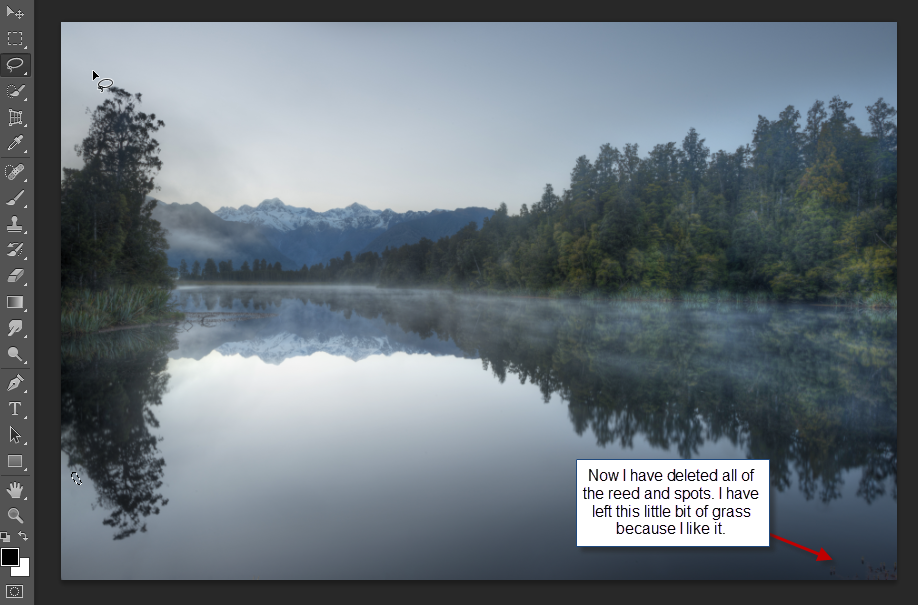
Apart from the dust and reed I also removed a couple of branches from the tree as well, and I remembered to do it in the reflection too. I left a little grass in the lower right hand corner, because I like it.
Step 4 is the final adjustments
Now I will do the final touches to the image. These are the steps I didn’t do in the end in Photomatix Pro. First of all I will sharpen the image by using the Unsharp Mask (it does sharpen the image despite the name), then I will adjust the contrast by using the Curves tool and at last I will adjust the saturation or the vibrance to my liking.
First I sharpen the image by using the ill named Unsharp Mask.
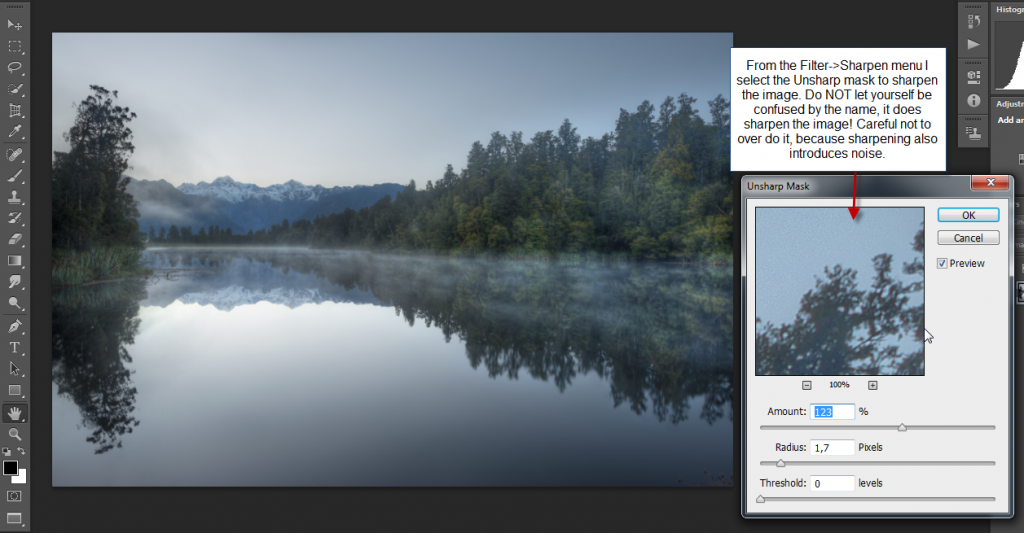
Careful with the sharpening, because it also adds some noise. It’s a balance.
Then I adjust the contrast by using the curves tool. It adds a layer on top of my image. I will have to merge it into the image when I’m happy with my contrasts.
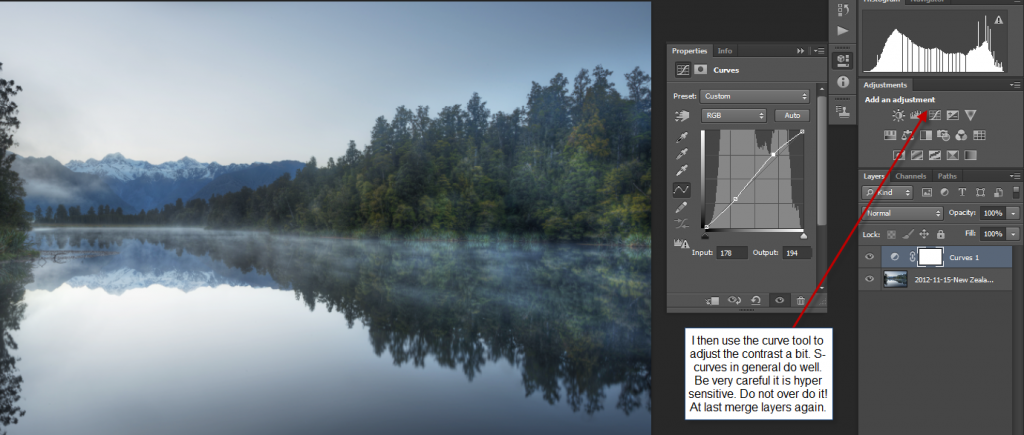
The curves tool is a very potent thing, so be very careful how you adjust it. A slight S-curve like mine is neat, but wild curves makes the image go completely over the edge. So be careful.
At last I adjust the saturation and or the vibrance. This is also an adjustment layer put on top of the image, so I will have to merge the layers when I’m done.
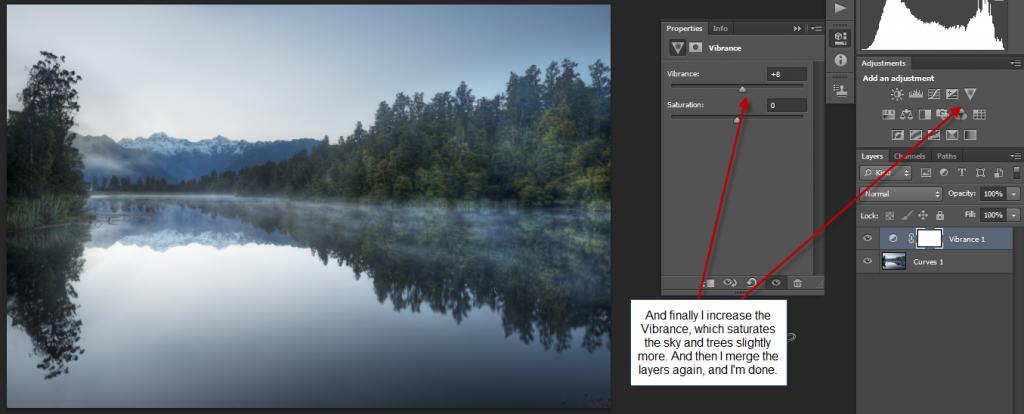
After playing around with the sliders I ended up only raising the Vibrance to +8. It added a little to the trees and sky.
Step 5 Flattening and saving.
The last step is to flatten the image. I always do this to my final image because I save it as TIFF. For some reason it takes up about half the size if I flatten the last layer compared to if I do not flatten the image.
I could save the image as a jpeg, but should I ever need to work with the image again, I will have lost some information. I do not loose anything by using TIFF. I can always export a jpeg from Lightroom, should I need a smaller file.
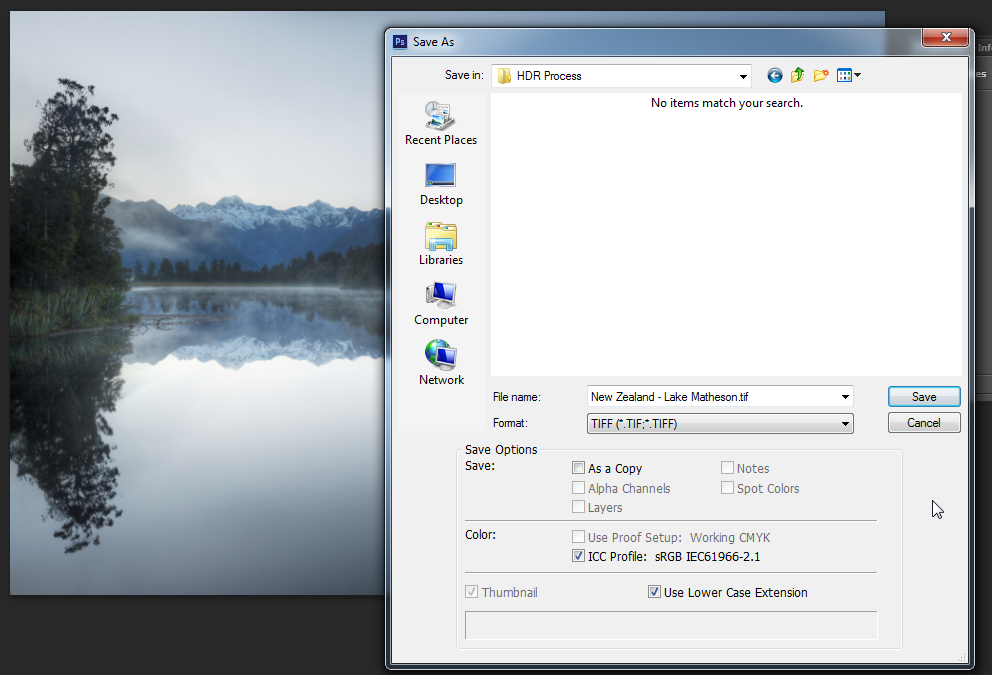
I save the file in my HDR process folder, from where I will import it into Lightroom. When I got it back into Lightroom I will delete the contents of this folder, because I will not need it again.
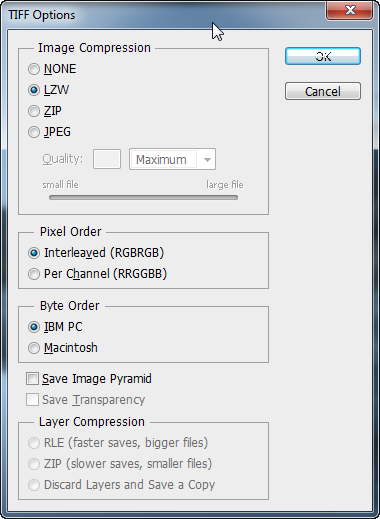 I always use LZW to compress my TIFF files. It is the most compatible format and I don’t want any troubles later.
Now the image is done and I have a flawless HDR image.
Step 6 additional steps
What else could I have done to this image? I could have used some plug-in filters in Photoshop. The best of these costs a lot of money and in general you can do many of the same things in Photoshop if you work hard at it. But some filters are also highly complex algorithms, just like the tone mapping algorithm is.
I mostly use Topaz Adjust 5 and Color Efex 4 from Nik Software. I use them by creating a new layer and then blending the filtered and the tone mapped image to what I like. This I do in the end just before I do noise reduction.
I always do the noise reduction as the last step. Some times I just use what’s available in Lightroom, other times I use more powerful tools like Noiseware or DeNoise from Topaz. It depends much on the image.
This particular image from Lake Matheson in New Zealand I will probably use Lightroom for before publishing it.
Warning: Undefined variable $pstl_comments_number in /var/www/caughtinpixels.com/public_html/wp-content/plugins/post-layout/plugin.php on line 43
Warning: Undefined array key "cid" in /var/www/caughtinpixels.com/public_html/wp-content/plugins/post-layout/plugin.php on line 46
This is so detailed and perfect!! Thanks so much for taking the time to show us how you work. Cheers!
Warning: Undefined variable $pstl_comments_number in /var/www/caughtinpixels.com/public_html/wp-content/plugins/post-layout/plugin.php on line 43
Warning: Undefined array key "cid" in /var/www/caughtinpixels.com/public_html/wp-content/plugins/post-layout/plugin.php on line 46
Thank you so much Janice – and you are most well. I am glad that you can use it 🙂
–Jacob
Warning: Undefined variable $pstl_comments_number in /var/www/caughtinpixels.com/public_html/wp-content/plugins/post-layout/plugin.php on line 43
Warning: Undefined array key "cid" in /var/www/caughtinpixels.com/public_html/wp-content/plugins/post-layout/plugin.php on line 46
Brilliant Jacob. Sheer dedication for sharing the knowledge.
Warning: Undefined variable $pstl_comments_number in /var/www/caughtinpixels.com/public_html/wp-content/plugins/post-layout/plugin.php on line 43
Warning: Undefined array key "cid" in /var/www/caughtinpixels.com/public_html/wp-content/plugins/post-layout/plugin.php on line 46
Thanks a lot Rhul – have a nice day 🙂
–Jacob
Warning: Undefined variable $pstl_comments_number in /var/www/caughtinpixels.com/public_html/wp-content/plugins/post-layout/plugin.php on line 43
Warning: Undefined array key "cid" in /var/www/caughtinpixels.com/public_html/wp-content/plugins/post-layout/plugin.php on line 46
Massive thanks Jacob, Halos are a massive problem for me as I use HDR all the time. I always seem to get them around the top of building where they reach the sky and they are annoying, so I will give your solution a try….. The only problem I see is in HDR photos you would see that the sky does not match the rest of the HDR look? But I can also see that it depends on how good you at processing the shot.
Many kind thanks Jacob, from a massive fan
Kevin
Warning: Undefined variable $pstl_comments_number in /var/www/caughtinpixels.com/public_html/wp-content/plugins/post-layout/plugin.php on line 43
Warning: Undefined array key "cid" in /var/www/caughtinpixels.com/public_html/wp-content/plugins/post-layout/plugin.php on line 46
Hi Kevin,
Thank you so much for your kind feedback. Please forward questions – I find it very inspirering to answer questions.
Halos and skies are definitely some of the hard parts in HDR photos. What I often end up doing, is including more or less a complete sky from one of my photos. Do you shoot 3 shots? The only way to mix this properly is by doing it in layers in Photoshop or Gimp. You can only very rarely get a final shot out of Photomatix. I am not sure I ever got one. But quite often, I only have to fix smaller parts, like the sky.
Some of the sliders are worse than others in generating Halos. And some prevent them. Try using the Highlights slider and the Micro smoothing, they provide preventive opportunities.
–Jacob
Warning: Undefined variable $pstl_comments_number in /var/www/caughtinpixels.com/public_html/wp-content/plugins/post-layout/plugin.php on line 43
Warning: Undefined array key "cid" in /var/www/caughtinpixels.com/public_html/wp-content/plugins/post-layout/plugin.php on line 46
Thanks Jacob, I will definitely give that a try regarding the sliders. Yeah I shoot on Aperture priority with 3 captures of under-exposed, a normally exposed and an over exposed image with -2 & +2. I tend to start off in Lightroom first and do my normal work-flow in bringing down the highlights and increasing the shadows and working on the Black & White balance before reducing the noise on all 3 pictures by 40%. Last thing I do before I send into Photmatix is enable Lens correction and remove Chromatic Aberration.
Is this something you would do yourself? Or I’m I best just to go right into Photomatix?
Jacob, I’m going to wreck your head with questions so I really hope you don’t mind, your web page is full of good information and I’m having a meeting shortly with some of the other guys from around Manchester on Flickr and I’m going to recommend they look at your site…
Thanks again
Kevin
Warning: Undefined variable $pstl_comments_number in /var/www/caughtinpixels.com/public_html/wp-content/plugins/post-layout/plugin.php on line 43
Warning: Undefined array key "cid" in /var/www/caughtinpixels.com/public_html/wp-content/plugins/post-layout/plugin.php on line 46
Hi Kevin,
Manchester? Isn’t Chester somewhat close to Manchester? I am going to exhibit at Chester Art Fair in November. Me and my wife (she’s shooting photos too) plan on shooting some photos in Chester. It looks just like my kind of “photo opportunity”.
I do some processing in Lightroom before going to Photomatix, but I rarely do the “HDR” processing in Lightroom (highlights: -100, shadows: +100, whites and black adjustments), before taking the images to Photomatix. Why? Because it makes the output from Photomatix TOO strong. Sometimes, it can add that extra element, but I only do it in rare cases. You might want to read this article: https://caughtinpixels.com/chicago-the-day-after-sct-patricks-day/.
So what do I do normally? I might adjust white balance, in particular for city night shots. You can have a look at this article too: https://caughtinpixels.com/cold-evening-at-the-bean/. BTW: It’s random that both images are shot in Chicago.
I might also do the correct lens distortion, if the lines are crooked (which they will be in architectural photos), and I will definitely check the Remove Chromatic aberrations.
I might do a noise reduction also, if the photo gives noise problems in Photomatix. But this is something I only do, if necessary. And how do I determine that? If I find the noise levels too high, in Photomatix, I go back to Lightroom, and increase the noise reduction.
But the most important step in my workflow, is to blend the output from Photomatix, with other versions of the image. The other versions could ‘just’ be the original 3, 5 or 7 shots. I might process other versions in Lightroom, I also add to my pool of “images to blend”. I might have somewhere between 4 (1 Photomatix, 3 originals) and 10+ images (1 or 2 Photomatix, 7 originals, 1 or 2 two processed images from Lightroom). The image pool I load into Photoshop (or Gimp, if you don’t have Photoshop) and then I blend all layers into a final image. And I do this by masking the layers. And this is the single most important step in the processing workflow.
This is very important because it is in this step, you take out the nasty effects from Photomatix, and keep cool effects in. It takes a little practice, but when mastered, it’s a really simple process, and it is this step that makes the difference.
It does take longer, than just using Lightroom, but you can tell the difference. But I would rather make fewer images of a higher quality, than many of a lower quality.
–Jacob