Warning: Undefined array key "multiauthor" in /var/www/caughtinpixels.com/public_html/wp-content/plugins/post-layout/plugin.php on line 114
Warning: Undefined array key "mobile" in /var/www/caughtinpixels.com/public_html/wp-content/plugins/post-layout/plugin.php on line 352
If you are completely new to HDR (High Dynamic Range) and you haven’t already read it, you may like to read the Free HDR Tutorial page first. It explains the overall process. Then you can return to this page when you are ready for the real tutorial.
This part of the tutorial is really a tutorial in using Photomatix Pro. You can get a free copy of Photomatix Pro to play around with. It will put watermarks on your image, but otherwise it’s fully functional.
When you are ready to buy Photomatix Pro I can get you a 15% discount if you use the coupon code “caughtinpixels”.
Download Photomatix Pro and get 15% off by using coupon code “caughtinpixels”.
About the photo used
I will use a photo that I took in New Zealand in 2012 at sunrise by Lake Matheson. It is Mount Cook and Mount Tasman you can see reflect in the lake.
Originally I shot 7 exposures with 1 ev step between each step, but in this example I will only use the three of them: the -2, 0 and +2.
I shot the photo at ISO 50. Everytime you cut the ISO in half, you double the exposure time. ISO 50 makes the camera use twice as long an exposure time as if I had used ISO 100. I wanted long exposure times to flatten out small ripples on the surface of the lake. I also used the smallest f-stop available on my lens, which was f/22. This lets in only a little light, which also requires longer exposure times. At the minus -2 exposure, the shutter speed was 1/6 sec, while at +2 the shutter speed was 2,5 seconds. This is because for every EV (exposure value) step, the shutter speed is cut in half or doubled, depending on whether it is a – or + ev step. In this case my exposure times was plenty to flatten the surface almost completely.
In order to make an HDR photo, you need a set of photos with different exposures, so that you have an under exposed photo, a normally exposed photo and an over exposed photo of the exactly same scene like this:
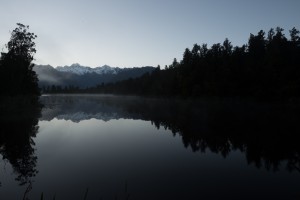
ISO: 50, f22, 1/6 sec (-2 exposure), 21 mm.
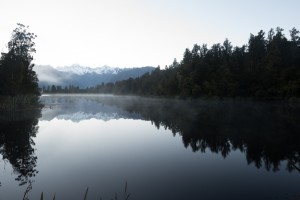
ISO: 50, f22, 0.6 sec (0 exposure), 21 mm.
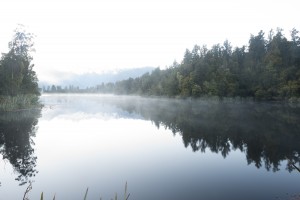
ISO: 50, f22, 2,5 sec (+2 exposure)
As you can see the sun is perfectly exposed on the dark one, while the jetty is completely black, but on the bright one, all of the right hand side of the image is almost completely blown out, while the details of the darkest shadows are now clear. Neither of these photos can be used as a single shot. But by merging them together in the HDR software, you will see, that we get a really nice result.
I had my camera on a tripod while shooting these three shots. The slowest shutter speed is far too slow, to hand held the camera. A tridpod is really a good thing to have, when shooting HDR, though you can shoot handheld.
Getting the shots into Photomatix
The three shots I have stored in my Adobe Lightroom catalogue, along with all of my photos. I have shot them in RAW format, but in my Lightroom catalogue I have converted them to Adobe DNG files, which is a device indendent RAW format.
To process them as an HDR photo I need to get them into Photomatix Pro, which is my HDR processing software. There are basically two ways of getting things into Photomatix:
-
I can select my three photos in Lightroom, and then export them into Photomatix directly.
-
I can export the photos from Lightroom to a folder on my harddrive, and then load them into Photomatix.
While number 1 may seem the easiest way, it’s not always what appears to be the easiest way that is really the best way. However, I do use method number 1, but only for ‘previewing’ an HDR image. The direct export from Lightroom into Photomatix is convenient, because Lightroom and Photomatix cleans up temporary files after use.
In my normal workflow, I export the photos to a folder on my harddrive. Usually it is good enough to export the photos as JPEGs, in 100% quality. The alternative is a TIFF files, which will contain more information, but also take up a lot more disk space. Only if I run into image quality problems in Photomatix, I will go back to Lightroom, and export as TIFF files, to see if that helps.
Now that I have exported my photos to jpegs in 100% quality I start up Photomatix to merge my photos. Personally I use the Windows version, but I have tried out the Mac version of Photomatix and they work exactly the same way.
Photomatix overview
There are a number of tasks the Photomatix Pro does, before I get the HDR image. I will go into detail with each of the steps, but I think it’s nice to know in advance where we are heading.
In Photomatix Pro, I will go through these steps:
-
First I load the images into Photomatix.
-
Then I get the option to do do some preprocessing of my images, to improve the quality of them, before the HDR is processed.
-
After the pre-process, Photomatix shows a preview of the HDR and I can work the settings and sliders until I have what I like.
-
Then Photomatix will process the HDR photo.
-
And at last I have the option to do some final touches, like sharpening, contrast/brightness and color tuning.
Photomatix Pro can do a lot of stuff, but I find that other tools does some of them better, than Photomatix does. And since I always bring my images into Photoshop later, I prefer to use Photoshop. As a consequence I don’t do contrast, sharpening and cropping in Photomatix, Photoshop and Lightroom are superior in these disciplines.
Now lets dive into the details.
Step 1 select the photos
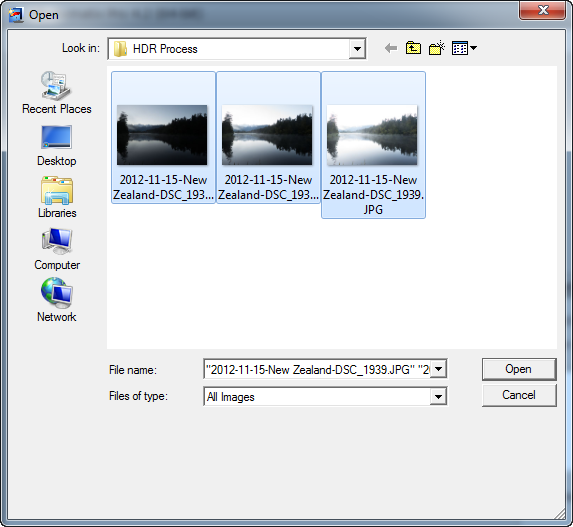
As you can see, the files are clearly bracketed photos with different exposures, but otherwise it is the same scenery.
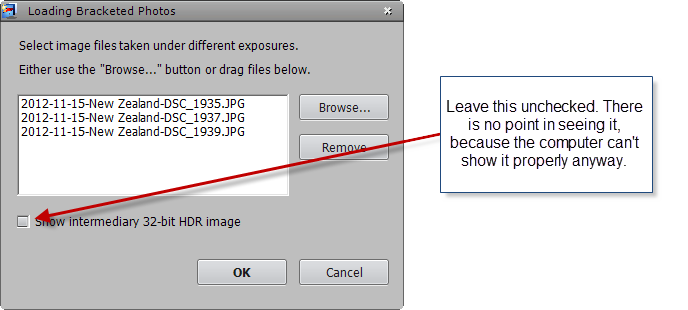
I get the option to see the 32-bit image, but I don’t really want to do this, because the computer can’t display anything meaningful. I just leave it unchecked.
Step 2 Photomatix Pre-processing options
Before the images are processed to HDR, I may want Photomatix to do some pre-processing to optimize your photos.

Align source images: If I have shot my photos hand held, I must be sure to check Align source images, otherwise I will get a horrible image. Photomatix really does a really great job of aligning the photos on top of each other, and I do take a lot of photos hand held with success.
Crop aligned images: Personally I don’t check this one. I like to have the additional pixels, in case I need them later. I can always crop later, but I can’t uncrop later.
I Just leave the the option ‘by matching features’ at it’s default.
Remove ghosts: This one is intended for handling moving objects, which will be ghosted, when the bracketed photos are merged. I never use this one. I started out by using it, but it tends do things I don’t like. In this tutorial I will skip it, but later I will show what it can be used for and what it can’t be used for. In this tutorial particular image there are no moving objects, and I will leave it unchecked anyway.
If you are going to use this tool, it is the Selective Deghosting tool option you want to use. Then you can select a person, a car or what ever is ghosted, and then Photomatix will use one of the images, instead of merging in that area.
Reduce noise: This feature I use a lot. Photomatix does a great job in reducing noise levels of the images. Noise is these small peckles that you can see if you zoom to a 100%, typically very clear in the skies or dark areas. The higher ISO you shoot at, the more noise you get. The HDR process only makes noise worse and some times a lot worse, so you may want to reduce the noise to some degree, before you process your images.
You can select which group of photos you want to do the noise reduction on.
-
The underexposed (that is the dark ones). It includes all photos with an EV adjustment less than zero.
-
The underexposed and normal exposed. It includes all photos with an EV adjustment less than zero and the zero shot.
-
All source images: All source images will be noise reduced. This you only do, if the noise is really bad.
Be aware that the noise reduction will also remove details in your photos. Only do it if you find it necessary. In many cases you also need to noise reduction afterwards, because the HDR process tends to enhance the noise levels.
The values goes from 50% to a 150%. If I got a noise problem I tend to push it to a 120-130%. I rarely go higher than 140%, because of the loss of details. I also rarely reduce noise on all images. For this image I will do noise reduction of the under exposed images.
Reduce Chromatic aberrations: I usually do this when I import my photos from my memory card into Lightroom. I have made a preset, that removes Chromatic Aberrations from the images, this I apply during the import. This one I don’t use, because I find Lightroom’s feature excellent and easier and faster to use. Because I do it in the import phase, I don’t have to worry about it later. I like that.
When you have selected your options, press OK. I went with these options:
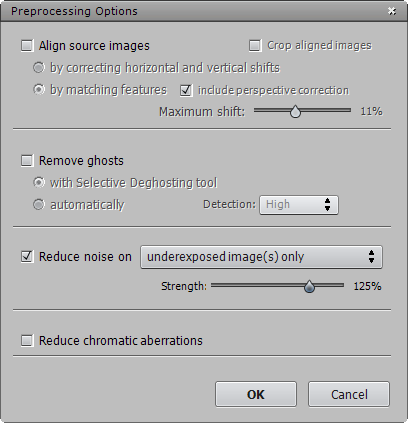
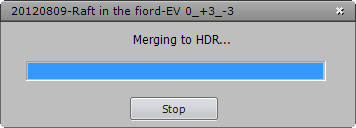
When I press OK, Photomatix will make the HDR image (the 32-bit image I chose not to see).
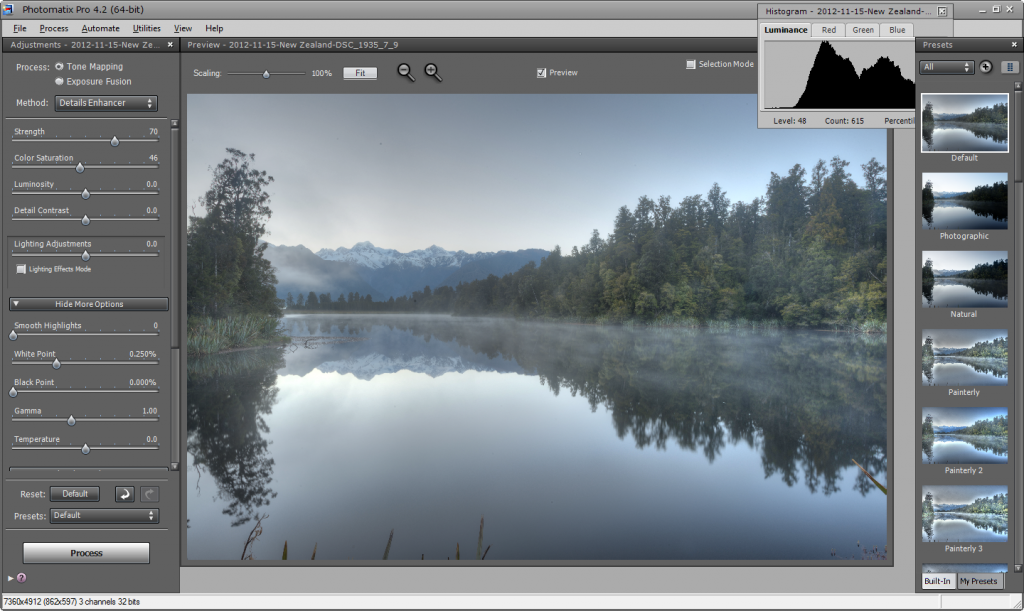
Step 3 HDR tone mapping
Now comes the hard part. Now I have to ‘design’ my HDR by adjusting sliders and this is called tone mapping. Tone mapping is some advanced algorithm that exist inside Photomatix, as well as any other HDR software. It is the tone mapping that gives that HDR effect, and if you go extreme in the tone mapping, you get images that are very ‘HDR-ish’. It is a balance of not going to extreme, and yet still pushing it beyond the flat and dull default setting.
I know that there is a set of presets, but I never (as in never ever) use the preset, except for the default one, and I only use it to reset my sliders. Think about it. If I am walking around and taking pictures, all of my pictures will be totally unique. They a have a unique composition and a unique light, and therefore, I should honor them by treating them as unique photos. I can press click on the presets, and think ‘that’s kind of cool’, but I know that I can do better than that. And if I want to make great HDR photos (which I do), it is definitely not the way, just to press a button. Many of the presets are far to extreme to use anyway.
So I work the sliders in Photomatix until I get something that I like. But Photomatix isn’t perfect, and it isn’t the last tool I will have to use. After Photomatix, I will put my tone mapped image into Photoshop, along with my original photos, and then I will start fixing the problems.
Let’s have a look at what Photomatix gave me this time. This is only a preview, but it is close enough to be able to adjust the tone mapping to my liking. I can click somewhere to zoom in too see the details. It’s quite bad quality in the zoom, it is but better than nothing.
A common problem in HDR software, including Photomatix, is that they generate Halos. And halos must be removed, because they ruin the overall impression of the image and makes it into an unsuccessful photo. If the picture includes a clear sky, like this one, you can be sure that there will be halos. These are halos:
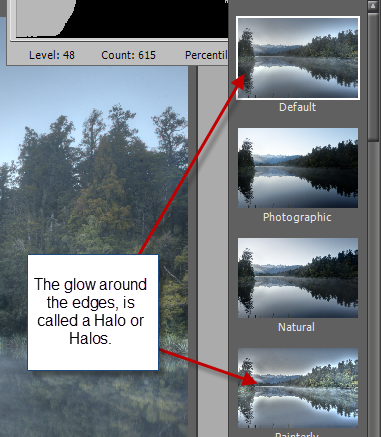
Photomatix remembers the last settings, but since I treat all photos as new photos, I start by clicking on ‘Default’ to reset the sliders and making sure, that I use the Details Enhancer.
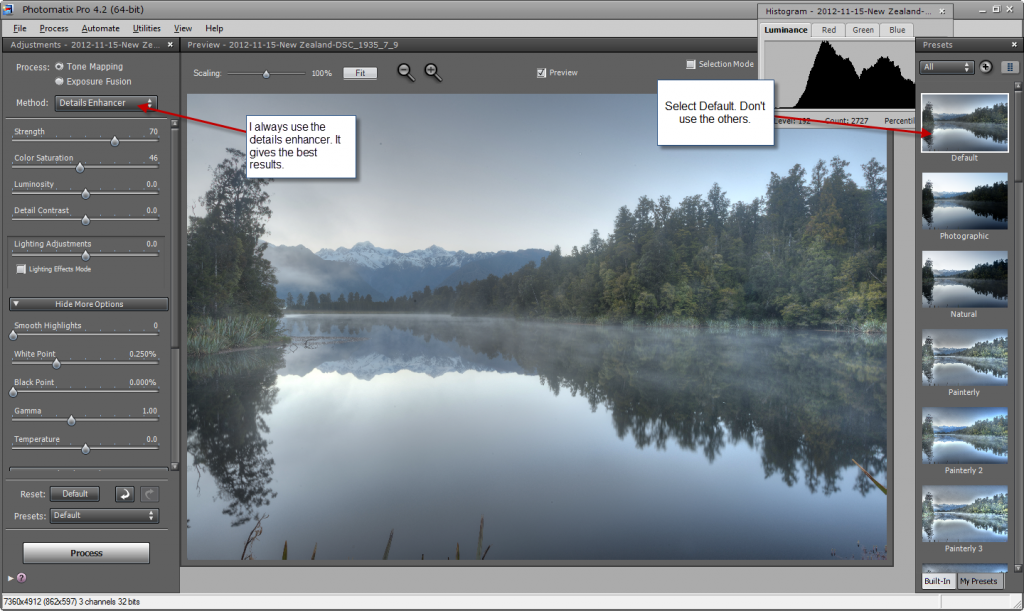
The Default gives a dull image, but I like to have my slides reset, when I start out.
I prefer to use the Details Enhancer. The alternative to the Details Enhancer is the Tone Compressor, but I find that it gives too extreme images and I don’t like them.
The next thing I always do is to drag the slider Strength to maximum 100. On rare occasions I may go a little lower, when I have played around with the sliders, it is very rarely I do that.

This particular photo is not very saturated, since it was taken at sunrise, in the shade. The forest on the right hand side of the image responds the most, when I slide the Color Saturation slider back and forth. When I slide my sliders, I often try big swings, to see the full effect, and then I narrow it down, to what I like. I like my photos to be richly colored, but not over-saturated. Some of my photos I push just to the limit, others are well within the limit. I usually end up somewhere between 60 and 75. This particular one, I don’t want to push to the limit and I settle for 67.
After adjusting the color saturation I start working no less than four sliders at the same time, and I may go back to them later. As you will learn from processing more and more photos, there are thousands and thousands of combinations, and you just have to pick something you like. And careful not to go extreme. A common mistake is to go too extreme and it is a beginners mistake. You just have to work these a lot in many images to get the hang of it and what works, and what is too extreme or too flat.
The four sliders work simultaneously are: Luminosity, Detail Contrast, White Point and Black Point. They work with the brightness and contrast levels in different ways and I have to find something that I like. What I find important is to get rid of the dull and flat image I started out with and this I do by increasing contrast. There must be some very dark or even black areas in the photo, to give it some bite and depth. It is the black parts that moves it away from being dull and flat, so it is very important to get some in, and I doesn’t have to be much, depending on the image. If there is no black, it tends to get grey’ish and flat and as a consequence uninteresting, which is the last thing I want.
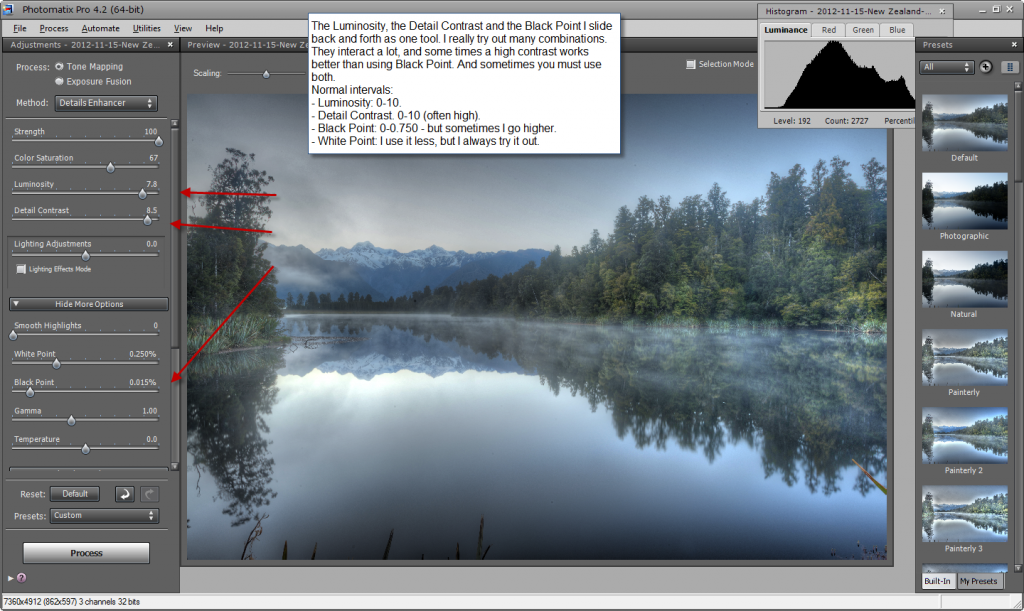
The Luminosity does funny things and is not always predictable. But the further to the left I push it, the more dramatic and extreme it goes and blown out whites appear. Nobody wants blown outs. I mostly keep it above 0 and often in the higher area.
The same goes with Detail Contrast, this I normally keep high as well. It usually adds some of blackness into the images, but sometimes it doesn’t work as well. Black Point also adds black into the image, but in a different way. When the Detail Contrast doesn’t work, the Black Point does the job. Sometimes the Black Point is to bold and I don’t use it, while Detail Contrast seems more subtle. I work them together and find a good balance.
The White Point I use less, but I always try it out. It can make the image lighter or darker, which Gamma also can do.
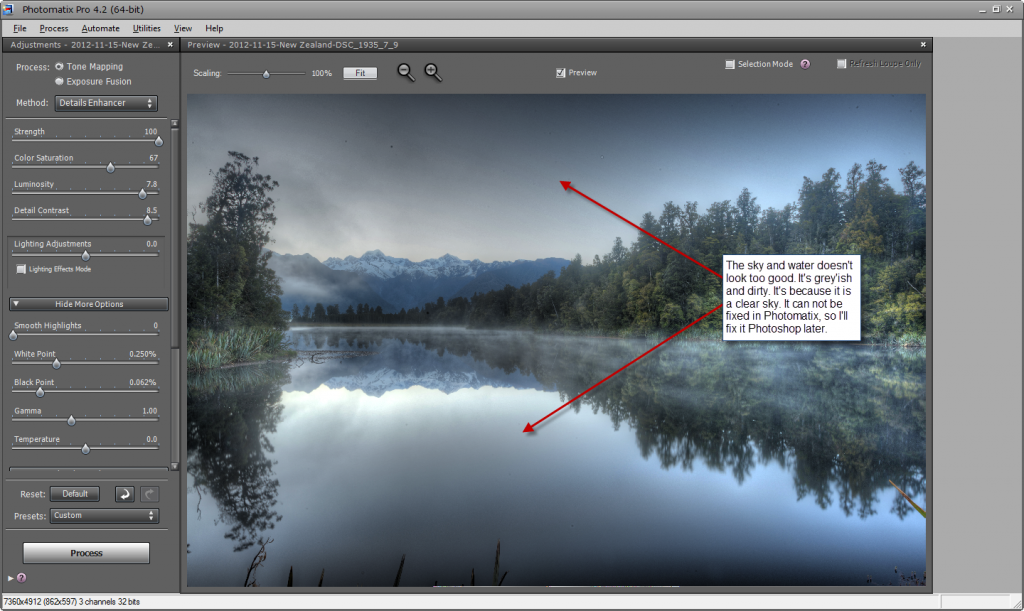
As you can clearly see now. The sky and water has not turned out very good. It is very dirty and grey. I can’t really fix it in Photomatix. This is common problem, if there is clear sky included.
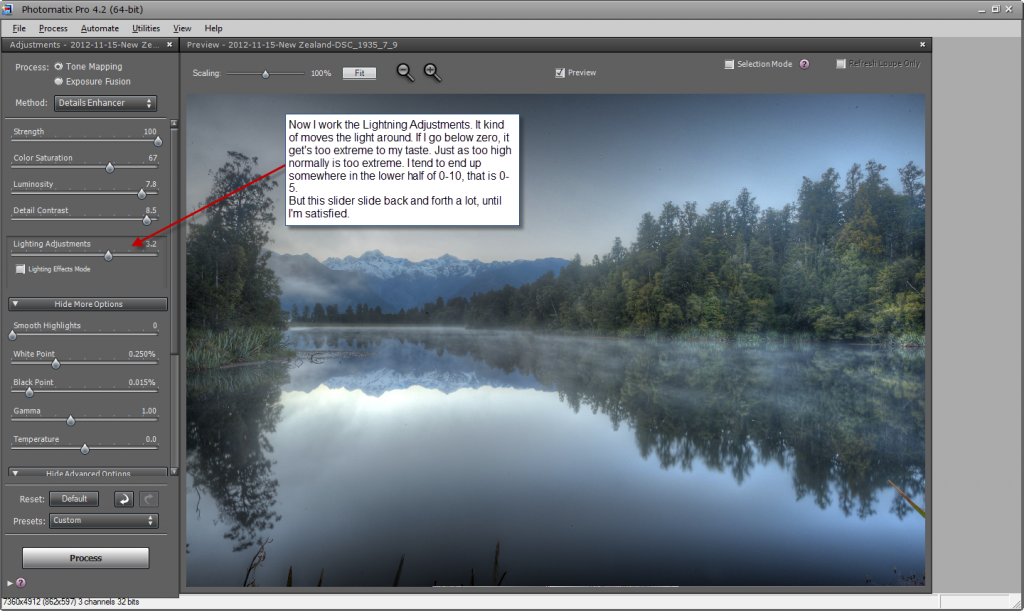
Now I start working the Lightning Adjustments. Here’s a checkmark “Lightning effects mode”. I never use that. It gives my five buttons, to select from and no further adjustments. I prefer to use the slider, to do fine adjustments.
The Lightning Adjustments is one of the real hidden secrets in the tone mapping algorithm. It changes how the light is expressed in the image. If I go far to the left, it get’s more extreme and in general not good looking. If I go to far to the right, the same happens, only in a different way. I usually end up some where between 0 and 5 and more often in the 1 to 3 area, but it is no rule. I always move this slider around a lot, because it makes many subtle changes to the light and I would like the light to be in the right places and darkness in the right places, as much as possible.
In the advanced options you find the more subtle changes to the saturation and temperature you also find here.
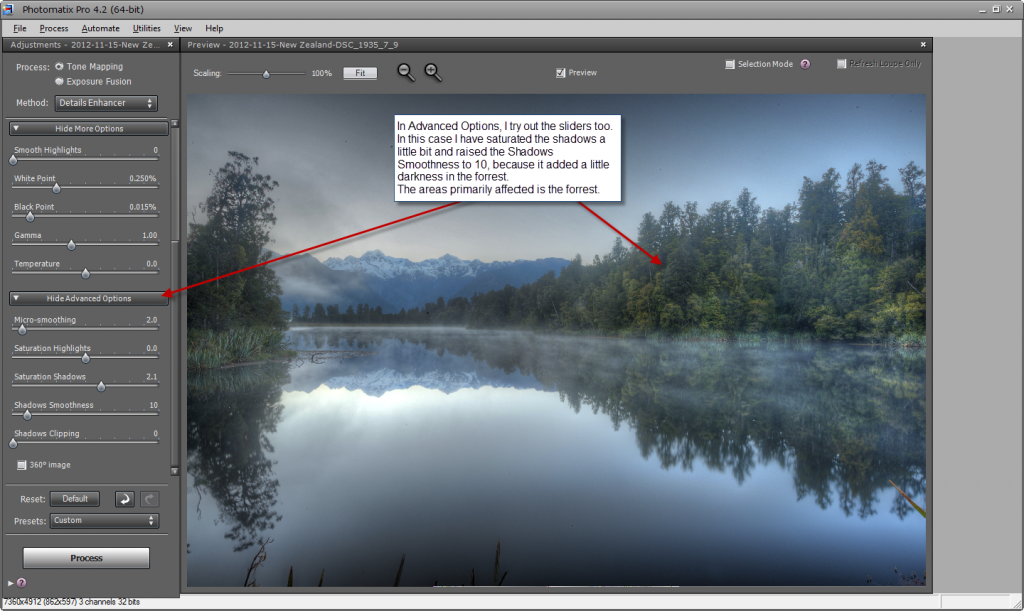 I usually try out the Micro-smoothing but I usually end up leaving it around it’s default value 2.0. The saturation I play around with too, in this case I have raised the Saturation Shadows to 2.2, because it saturates the forest a bit more, but leaves the rest untouched. I also add a little Shadow Smoothness, which also adds a tiny bit of depth to the image.
Now I’m happy with the settings for my image and I press Process and Photomatix does the Tone mapping.
And I get the final result:
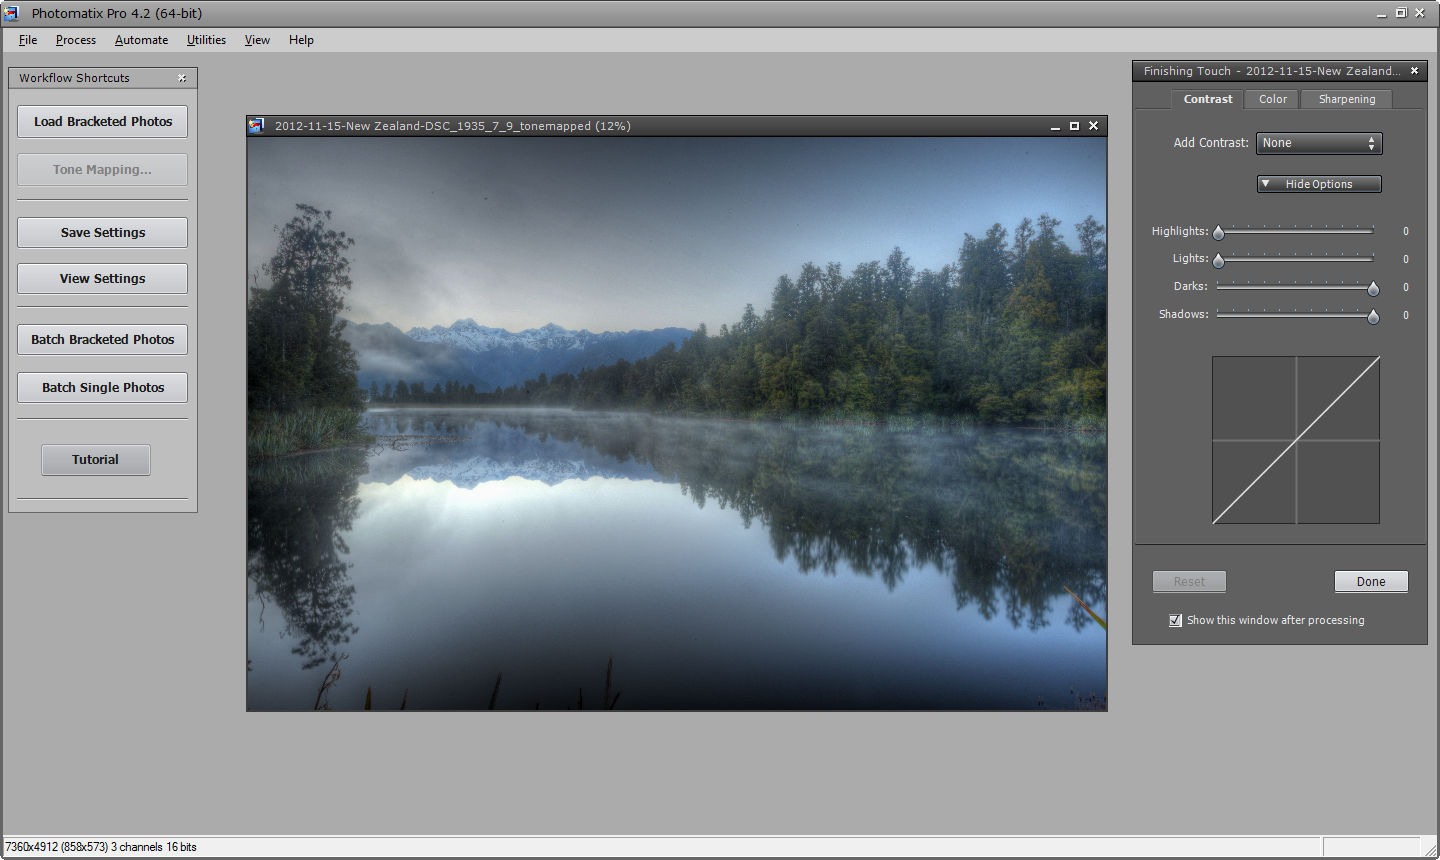
Photomatix displays a toolbar on the right hand side, with a Contrast, Color and Sharpening tabs. I don’t use these, because Photoshop can do better, and I’m going to load the image into Photoshop anyway.
This image is not good enough to be the final image. As I already pointed out the sky and water doesn’t look to great, I have to fix that. There’s also a weak halo around the edges of the trees. I want that to go away too, and there are some dust spots, which I also have to remove. And at last, I don’t like the plants at the lower edge of the image, I think I will make those disappear too.
You don’t get final images from Photomatix, but you get a large portion of the final image.
I’m happy with my image so far, and will save it. I save it back to the same folder I had my three source images.
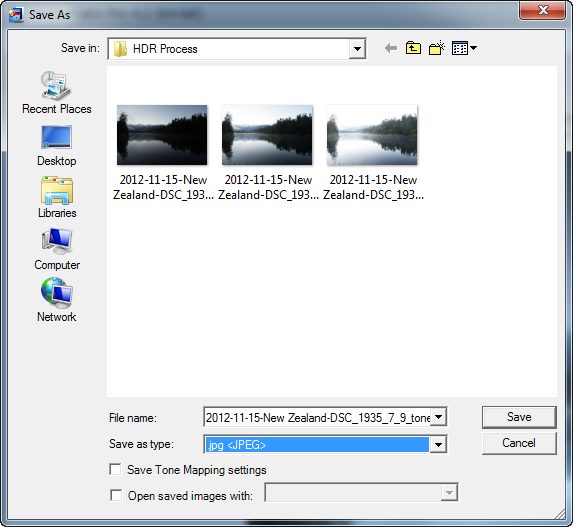 I save it as jpeg and I don’t save the Tone Mapping settings. If I intend to work a lot with contrast and lightning and colors in Photoshop, I will save it as a 16-bit TIFF file. The TIFF file contains a lot more information compared to a jpeg, but if I’m not adjusting that too much, jpeg is just fine.
When you are ready to buy Photomatix Pro I can get you a 15% discount if you use the coupon code “caughtinpixels”.
Download Photomatix Pro and get 15% off by using coupon code “caughtinpixels”.
You can also continue with the more advanced steps if you read the page about Blending Layers in Photoshop or if you prefer to use GIMP this page about making HDR’s in GIMP.
Warning: Undefined variable $pstl_comments_number in /var/www/caughtinpixels.com/public_html/wp-content/plugins/post-layout/plugin.php on line 43
Warning: Undefined array key "cid" in /var/www/caughtinpixels.com/public_html/wp-content/plugins/post-layout/plugin.php on line 46
Hi Jacob,
First of all – wow what a blog! Nice that you even included the Gimp software in one of you tutorials! It is quite unique.
I have a question in regards of EV’s that I would like your opinion on – I changed from a Canon 500D (crop) to the Canon 6D (FF) some time ago and as you probably already know this camera can bracket -3 to +3 EV which is great BUT are there any drawbacks in terms of using the “max” bracketing for each HDR shot or am I better off using the “normal” -2 to +2 bracketing in some situations?
Warning: Undefined variable $pstl_comments_number in /var/www/caughtinpixels.com/public_html/wp-content/plugins/post-layout/plugin.php on line 43
Warning: Undefined array key "cid" in /var/www/caughtinpixels.com/public_html/wp-content/plugins/post-layout/plugin.php on line 46
Hi Lars,
Thank you very much – glad that you like it! For 90% of the work I do in Photoshop, I can do exactly the same in Gimp. However, Photoshop is more optimized and has native integrations with some of the tools that I use. This makes it faster to work with Photoshop, and that is my primary reason for using it.
I used to have the 5D mark III, which also does -3, 0 +3, and my current Nikon D600 also do -3, 0, +3. I have done a little shooting at this interval, but I am not happy with the results and will not do it again. The contrasts gets too harsh and you are more prone to get artifacts and banding into your photos.
I have considered making ‘fake’ -2, -1 and +1, +2 photos, by adjusting the exposure in Lightroom, to see if this improves the quality. It should do it. I know that if you do a single 0 exposure and then make fakes -2 and +2, you get a better result in Photomatix, than using just one 0 exposure in Photomatix.
What I would suggest instead, is to do two series, adjusting the exposure compensation to get more photos. This I do sometimes when I shoot with my D600. I might do this then:
First shoot the normal -2, 0, +2, and then if the scene is very bright, set the exposure compensation to -1 and shoot another set of -3, -1, +1.
And if the scene has some very dark areas, then set the second set to +1.
-2, 0, +2 and then -1, +1, +3.
And usually you know what the problem is, and can do the right series. And if you are really in an extreme situation do -2 or +2 or both:
-4, -2, 0 and then a 0, +2, +4
Just be careful not to move the camera, while adjusting the exposure compensation, between the two series.
I hope this answers your question.
–Jacob
Warning: Undefined variable $pstl_comments_number in /var/www/caughtinpixels.com/public_html/wp-content/plugins/post-layout/plugin.php on line 43
Warning: Undefined array key "cid" in /var/www/caughtinpixels.com/public_html/wp-content/plugins/post-layout/plugin.php on line 46
Thanks Jacob,
Your reply totally makes sense – it’s funny how you (in this respect: Me) get caught in the habit of using the in camera bracketing feature and combine the pictures in post that way too but your way is much more controlled.
Tanks again.
/Lars.
Warning: Undefined variable $pstl_comments_number in /var/www/caughtinpixels.com/public_html/wp-content/plugins/post-layout/plugin.php on line 43
Warning: Undefined array key "cid" in /var/www/caughtinpixels.com/public_html/wp-content/plugins/post-layout/plugin.php on line 46
Jacob – many thanks for this straightforward explanation of Bracketing. Just got a new camera which is like going from a go-cart to a race car for me. Thanks! gail
Warning: Undefined variable $pstl_comments_number in /var/www/caughtinpixels.com/public_html/wp-content/plugins/post-layout/plugin.php on line 43
Warning: Undefined array key "cid" in /var/www/caughtinpixels.com/public_html/wp-content/plugins/post-layout/plugin.php on line 46
Hi Gail,
Thanks for the feedback – glad you could use it. Good luck with your new camera 🙂
–Jacob