Warning: Undefined array key "multiauthor" in /var/www/caughtinpixels.com/public_html/wp-content/plugins/post-layout/plugin.php on line 114
Warning: Undefined array key "mobile" in /var/www/caughtinpixels.com/public_html/wp-content/plugins/post-layout/plugin.php on line 352

Normally I use Photoshop CS for post processing my photos, because I have it. But, Photoshop is an expensive piece of software and it’s not available on everyone’s budget. GIMP (download it from here) is a free alternative to Photoshop, and I figured, that I wanted to try it out to see if it was any good, and I must admit, that I was quite surprised. GIMP is not bad – not bad at all! On the contrary, it is excellent!
The shooting
A few days ago I was out shooting. My D800 was in for sensor cleaning, so I brought my Nikon D600 (you can get one from here Nikon D600 Digital Camera), which I love almost as much as I love my D800. However, there is one flaw, it only does 3 bracketed photo. I was going to shoot into the sun, because it was sunset, so I knew that I was going to need more bracketed shots to cover the dynamic range. I tried shooting -3, 0 and +3, but too often the result is just not good enough, so I brought along my Promote Control (please use the link, if you are going to get one). The Promote Control is the remote control that every HDR photographer needs.
The Promote Control allows you to take as many bracketed shots as you like, with any Exposure Step you like. The only limit is how short a shutter time your camera can do.
What I did was to shoot 7 exposures, with an Exposure Value Step (EVS) og 1.3, which covers from -4 to +4 (-4, -2 2/3, -1 1/3, 0, +1 1/3, +2 2/3, +4). In that way I was able to cover 22,2 EVS (calculated like this, the camera has native 14.2 plus the bracketed shots 2×4 EVS = 22,2 EVS). Normally I would only get 18,2 or 20,2 on my three shots. So in this way I close to the same the same total dynamic range, as the D800 is capable of (it does 22.4 on 9 shots – you might want to see my review of the D800 and D600 which covers this in detail). And that is all made possible by the Promote Control – I love that device!
When I got home, I unloaded my memory card into Lightroom. I exported the 7 shots to Photomatix Pro (if you use my discount coupon code “caughtinpixels” you get 15% in discount on Photomatix Pro and you can learn how to use it in my free Photomatix Tutorial). However, for once I wasn’t quite satisfied with the result I got from Photomatix, as you will see later. Sometimes Photomatix does the most awesome magic, but a few times, it just disappoints. This time it disappointed, but no worries, that happens.
However small your budget is, I strongly recommend, that the first piece of photography software you buy is Lightroom. Not only does it organize your photos in a great way, but it is an extremely powerful photo processing tool. You get a lot of value for your money, buying Lightroom. And as it turned out, this photo is done 95% from post processed photos I did in Lightroom.
This is my orignal shot (the 0-exposure):

Nikon D600, Nikon 14-24mm, 20mm, ISO 400, f/9.0, 1/50.
Post processing using Lightroom and Gimp
My post-processing always start by making a number of candidates, which has got parts that I like. In this case I made two in Lightroom, and one in Photomatix. Sometimes I make two in Photomatix and one in Lightroom. I consider it as raw material to be used for the final image.
I made two images in Lightroom, one with a great looking ground, and one with a great sky. I made the ground from the 0-exposure, and got a lovely ground with a golden glow. For the second image I used the -4 (and darkest) exposure, to do a great sky. The two look much alike:

As you can see, they look much the same, but why can’t you just use one of them? Well, the 0-exposure is way too burned out around the sun, and the other has got way too much noise on the ground:

The photo on the left is a -4 exposure, that I have raised 4 exposure steps, noise can be expected in such dark areas.
This is what I did to the 0-exposure in Lightroom:
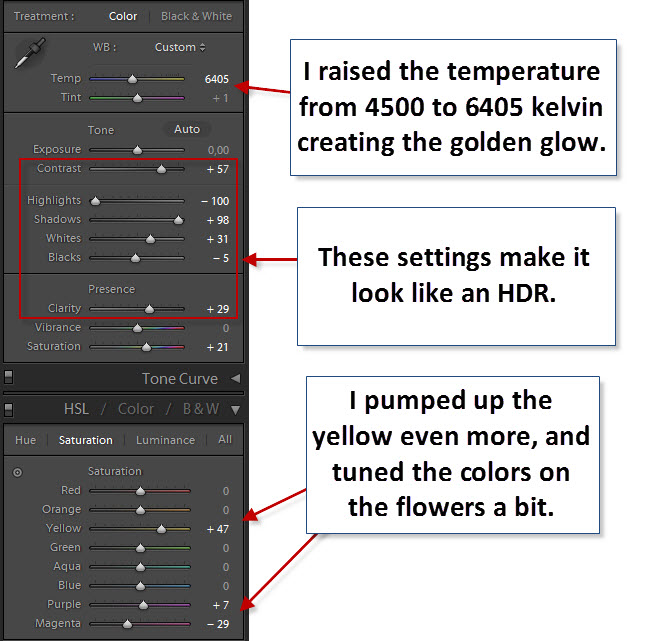
I raised temperature from 4500 to 6405. This gives a much warmer sunset, which I like. Then I have turned down the Highlights and turned up the Shadows. Along with Clarity and Contrast adjustments, and a bit of White and Black point adjustments, you get this HDR’ish look to the image. The image turns out really well, better than I had hoped. One of the reasons for that, is because of the Dynamic range of the D600 is incredible and only second to Nikon D800. But all of Nikons DSLRs does really really well with the Dynamic Range.
I have exported the 6 of the original bracketed exposures (I left out the brightest), which left me with 9 images (1 from Photomatix, 2 processed from Lightroom and 6 original unprocessed images).
In GIMP I can open the files as Layers, which gives me 9 layers in GIMP. Just the way I like to work.
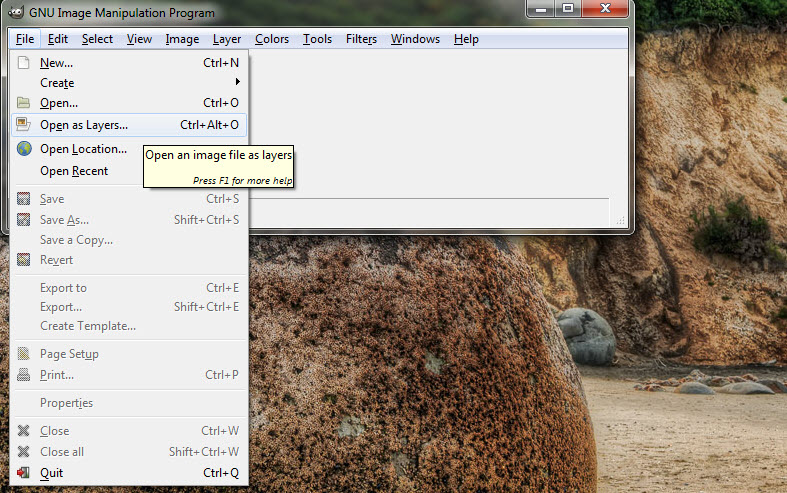
Here are my 9 layers:

I order my layers, so that on top I have the one I like the most, which in this case is the 0-exposure I processed in Lightroom. The second layer is the one with the good sky, also processed in Lightroom. My third layer is the Photomatix layer and then the last 6 original shots follow.
My objective is now to mix my final image from these various images of the exact same scene. I have shot them with my camera on a tripod, so they fit exactly on top of each other.
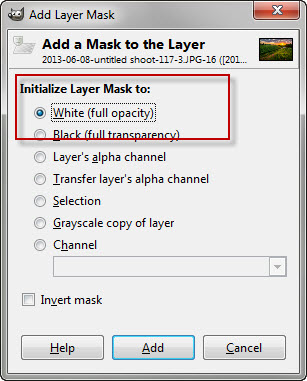
The way I mix or blend two layers, is by added a Layer Mask to the top image:

And make sure that I get a Layer Mask with full opacity. This means that I will only see the top layer – for now.
Here you can see the Layer Mask as a white square next to my top layer. If I paint something black on the Layer Mask, my top layer will become transparent where ever I paint. If I paint grey, it will only become partly transparent. This way, I can quite precisely control how much of the two images I want to mix.
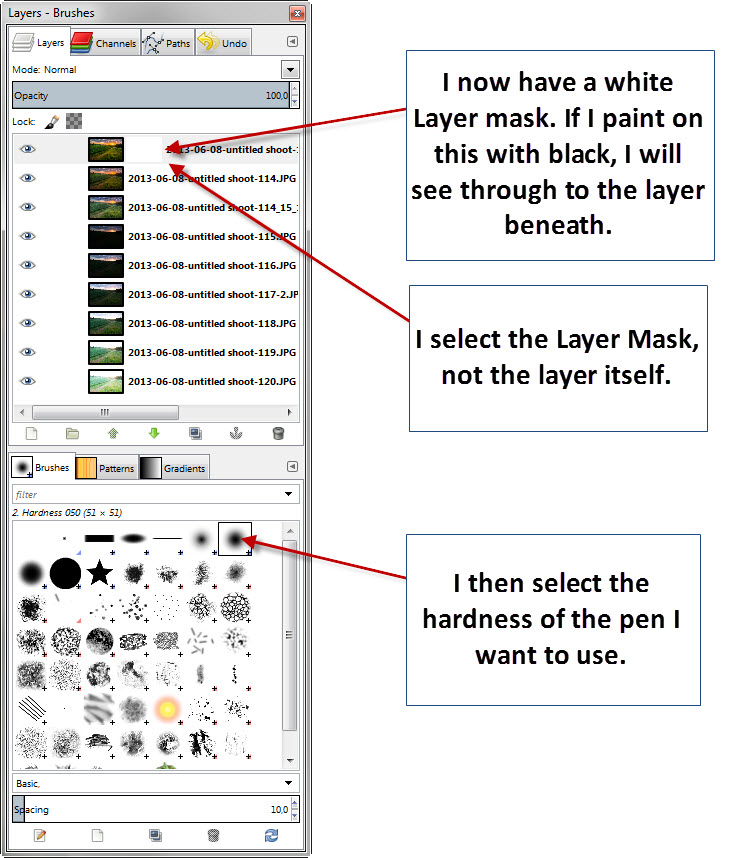
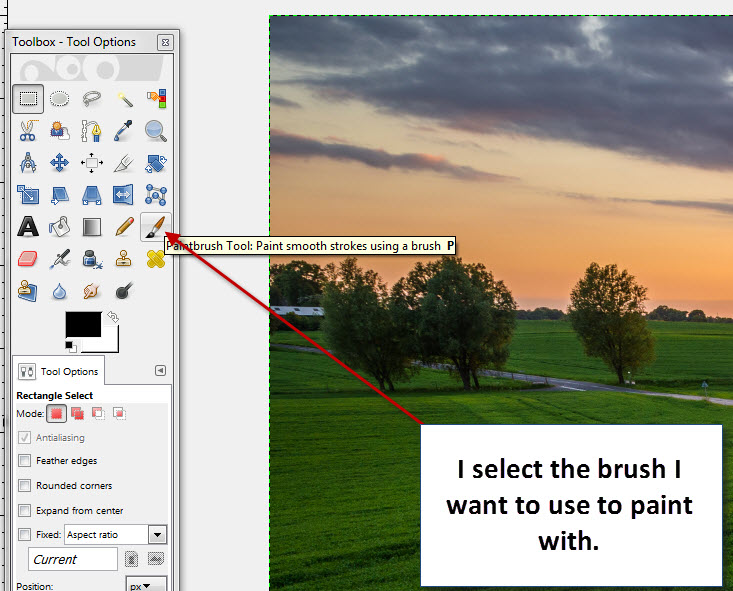
I select a soft edged pen, which makes the edges of where I paint merge softly between the two layers, and that gives a better result. You won’t be able to tell exactly where one image starts and the other begins, because of the soft transition.
To paint black I select the paint brush tool:
And then I set the opacity to 100%, because I want all of the sky to come through from the layer beneath the top layer:

And I use a big brush approx 600 px in diameter. Using a big brush makes it harder to see the strokes that I make. If the brush is too small, you will be able to see how I paint, and that is not good. In the beginning I sometimes used a too small brush, and you could tell.

And then I paint ON the Layer Mask. Notice that the Layer Mask to the right of the top layer, has now got a black bar on the top. This makes the top layer transparent in this area and you can see the sky from the second layer image. This already improves the overall look of my photo, because the sun is not burned out as badly.
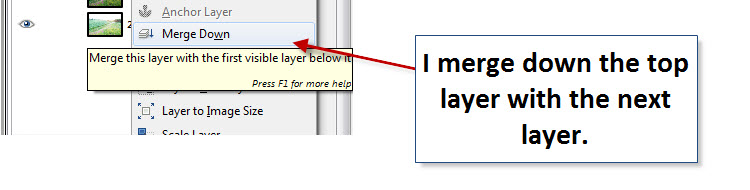
I then Merge the two top layers using the Merge Down feature. This merges these two layers into one new layer.
My top layer is now the merged image and the second layer is now my tone mapped image from Photomatix. By clicking on the small “Eye” next to the top layer, I will be able to see the next layer like this:

Click on the image to see it in full size. You will probably agree, that this tone mapped image is not very good. If I should use any part of it, it is the sky, but it is too dramatic, and I like the soft tones from my Lightroom version better. It is rare that I don’t want anything from my Photomatix image, but in this case I just delete the layer.
So what now? Well, the area around the sun is a bit too orange to my taste. This comes from over saturation of the image with the sky. There are several ways to fix this, but an easy one, which uses the same practice as when I merged in the sky, is to merge in a new area around the sun, from one the original unprocessed shots.

So I add a Layer Mask to the top layer, but this time I don’t want the sky painted in as a 100%. And I don’t want it from the -4, but instead from the -2 2/3.

The area around the sun is less saturated and I don’t want it as it looks here, but if I mix it with a 25% of this original shot and a 75% of my too orange image, I just might get a good balance.
One problem I have to be aware of, is that this photo is unprocessed and the ground is close to black. I don’t want the ground to go black, so I have to be careful along the edge of the horizon.
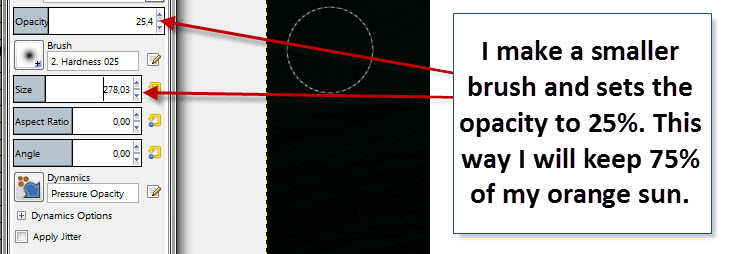
I set the opacity to approx. 25% and make the brush smaller, to fit the area between the horizon and the clouds.
I then paint the on the Layer mask (be sure to select the Layer mask!):

Notice the small grey area on the Layer mask. This makes the layer 25% transparent, and that gives just the perfect blend between the original unprocessed shot and the too orange image. I’m happy with the result and merge down the two layers and get one new layer.
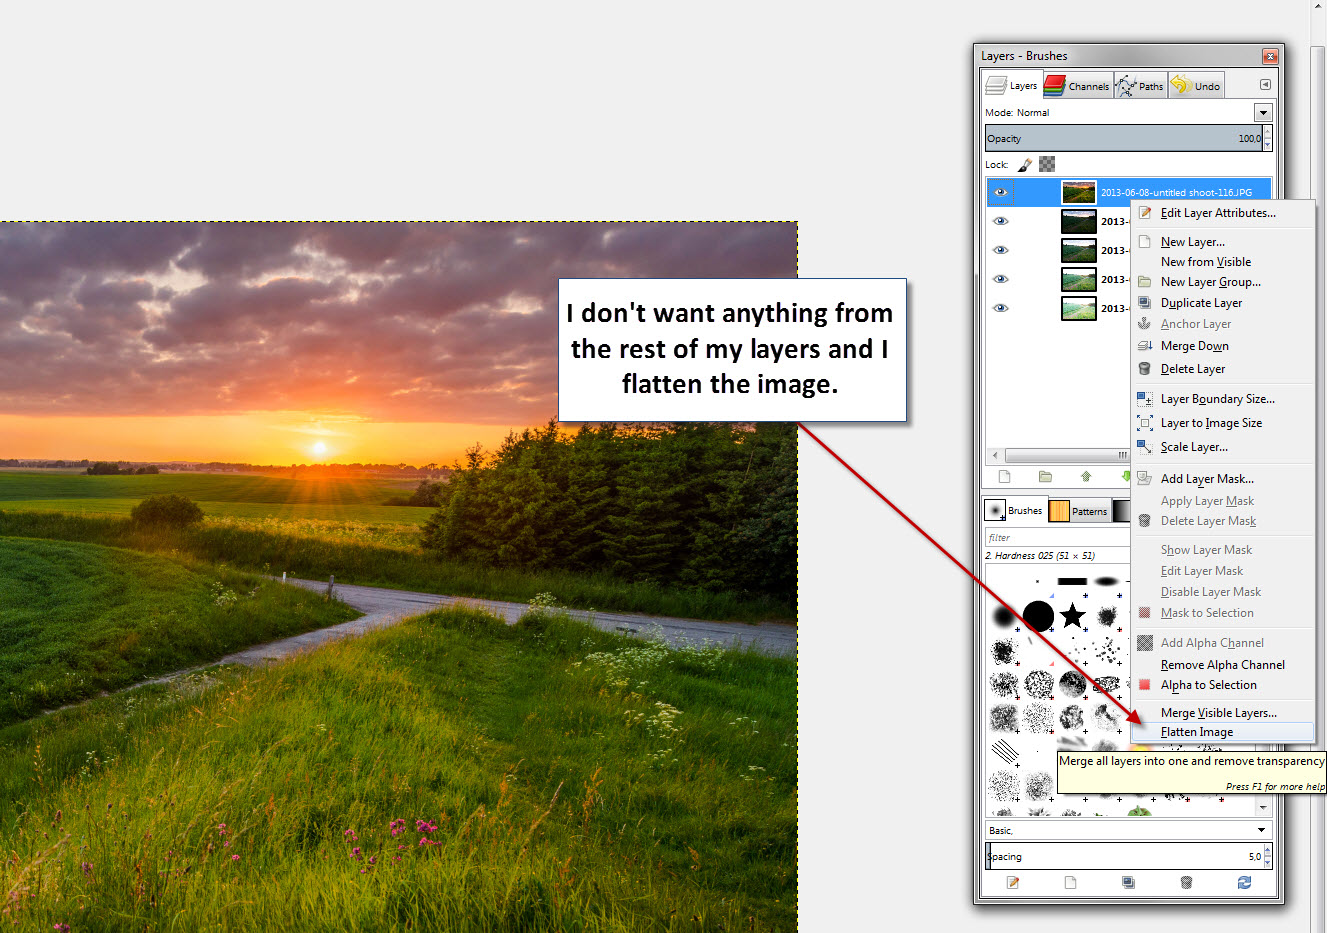
I look through the rest of the layers, but I don’t want anything from them. I then flatten the image into just one layer.
And this is the almost finished photo:

Not bad – I like it. But there is one last thing I want to do in GIMP and that’s the clean up of unwanted objects, like these two road side posts:
I do that by using the Heal brush. The way the Heal brush works is, that you find somewhere to use as a reference area, and then press CTRL+left mouse on that area. What happens is, that when you start to paint anywhere, the reference area will be cloned in. I use a reference area just next to the posts:
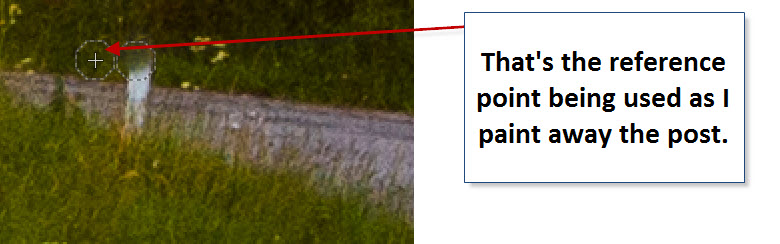
And as you can see, the posts starts to disappear when I paint.
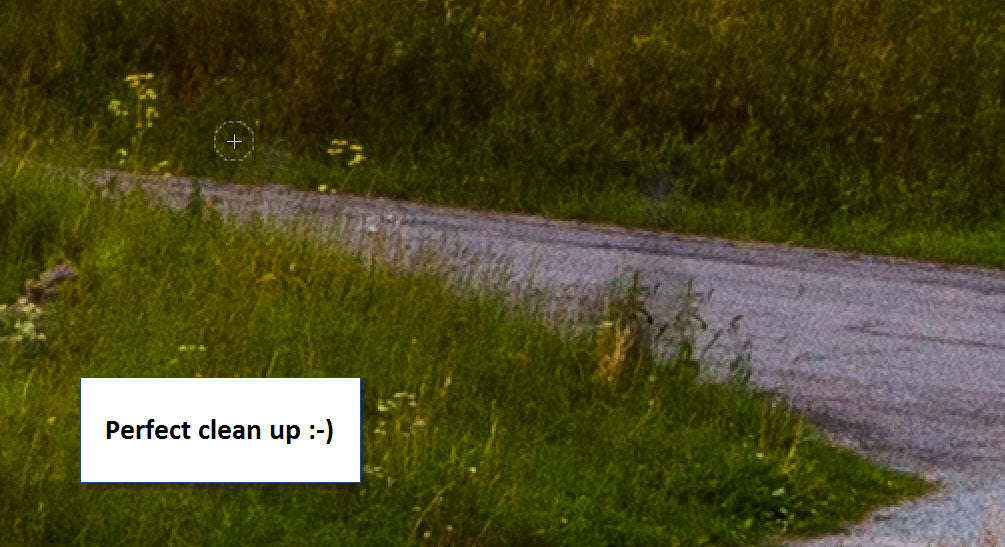
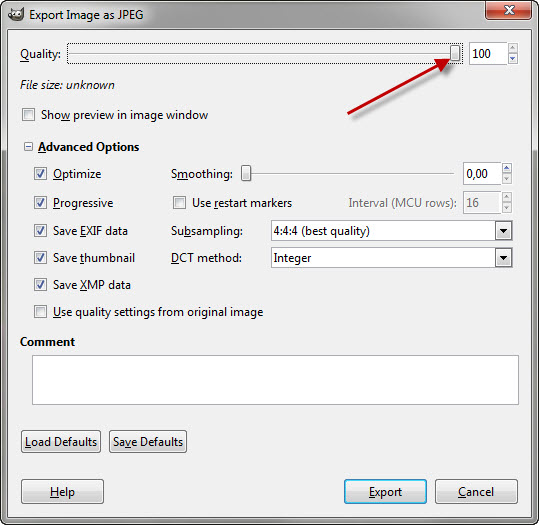
And GIMP does a perfect job in removing my two posts. You can’t see where they were. The very last step in GIMP is to export the image, so that I can get it back into Lightroom, where I keep my Portfolio.
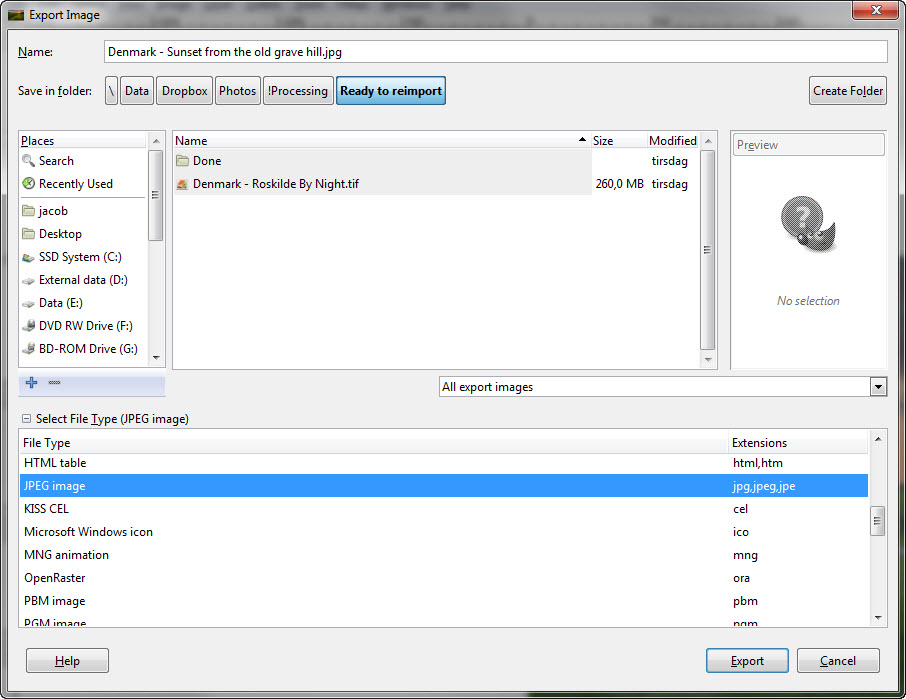
And I of course export in maximum quality:
Back in Lightroom I crop the photo slightly and straighten the horizon and turn the noise reduction up to 13, only to take the top of the noise, without loosing any details.
Conclusion on using GIMP for post-processing
This is a typical post-process workflow for me. I make some candidates in various ways, and merge them together to my final image. It is a bit unusual that I can’t use anything from my Photomatix version, but that happens. The way I mix the layers, is exactly the same procedure I go through in Photoshop. I found GIMP surprisingly easy to use and I got an excellent result I can’t complain about.
In my mind there are three alternatives for this kind of processing, there are GIMP, Photoshop CS and Photoshop Elements. They all have a ton of features, however Photoshop Elements is a down scaled version of Photoshop CS and only has a subset of the features from the full CS version. The one feature I use the most in Photoshop is the Layer Mask to blend layers. That feature has been removed in Photoshop Elements, and for that reason alone, I don’t like to use Elements any more. There is a workaround, but I find it cumbersome to use, but of course it works. If I was to choose between Elements and GIMP for the kind of processing I do, I would go with GIMP any day of the week.
One thing I did notice about GIMP, it is a bit slower than Photoshop. It seems like it doesn’t use the graphic accelerator chip on the video card to do calculations or at least not as well as Photoshop does. It was not something that was problem, just something I noticed.
The real drawback using GIMP is, that the plug-ins that I have for Photoshop, like Topaz Adjust, Nik Color Efex and OnOne doesn’t work directly from GIMP, but they work from Lightroom, and I could just use them from Lightroom. A bit more cumbersome, but doable. I do use these filters quite a bit.
One last question you could ask is ‘is this really an HDR, because I threw away the Photomatix image’? What are HDR photos anyway? I think this is an HDR photo and it has an HDR look too it as well.
It is a mixture of three different exposures (which some seems to think qualifies). I used the -4 and the 0 for the majority of the image and then I used the -2 2/3 image for the area around the Sun. But I didn’t do any tone mapping for this image, which normally gives the HDR-look to an image.
Tone mapping is an algorithm that you can apply to any photo, also single exposure photos. The more information you have (the more Dynamic Range), the better a result you usually get from tone mapping an image, but is tone mapping HDR then?
It’s a long discussion and I won’t go into detail with right here. In my mind, this is an HDR photo.
Get Photomatix with a 15% discount!
Even though this HDR photo ended up, not using Photomatix, I strongly recommend that you get it, if you want to make HDR photos. If you use this coupon code “caughtinpixels” you get 15% discount, and you can Photomatix Pro here.
Warning: Undefined variable $pstl_comments_number in /var/www/caughtinpixels.com/public_html/wp-content/plugins/post-layout/plugin.php on line 43
Warning: Undefined array key "cid" in /var/www/caughtinpixels.com/public_html/wp-content/plugins/post-layout/plugin.php on line 46
Thank you for such a good and detailed tutorial! The resulting image is awesome. It is exactly the kind of pictures which I never was able to make. Now I have a chance.
Warning: Undefined variable $pstl_comments_number in /var/www/caughtinpixels.com/public_html/wp-content/plugins/post-layout/plugin.php on line 43
Warning: Undefined array key "cid" in /var/www/caughtinpixels.com/public_html/wp-content/plugins/post-layout/plugin.php on line 46
Hi Sergey,
Thank you very much – I’m very happy that you can use it. Look around for other tips and tricks on my blog, also about shooting HDR photos with your camera.
–Jacob
Warning: Undefined variable $pstl_comments_number in /var/www/caughtinpixels.com/public_html/wp-content/plugins/post-layout/plugin.php on line 43
Warning: Undefined array key "cid" in /var/www/caughtinpixels.com/public_html/wp-content/plugins/post-layout/plugin.php on line 46
Great stuff here. I use both Lightroom and GIMP, so I’ll be putting this to work. I’m always in the market for new ways to process.
Warning: Undefined variable $pstl_comments_number in /var/www/caughtinpixels.com/public_html/wp-content/plugins/post-layout/plugin.php on line 43
Warning: Undefined array key "cid" in /var/www/caughtinpixels.com/public_html/wp-content/plugins/post-layout/plugin.php on line 46
Hi Rick,
Thanks – I’m glad that you have found something useful. I must admit I was quite surprised, when I opened up GIMP for the first time. In general it really supports 95% of my Photoshop workflow process. If you strip my Photoshop (or GIMP for that matter) workflow down to bare processing technique, it’s always the same process I follow. I have a master image in a layer, I then duplicate the layer, add some effect (sharpening, blurring, blend mode effects or other filter effect) to the lower version of the image. Add a layer mask to top layer and start to mask the effects in, to the agree I like to mix them with the master image. And when I have got what I want from the ‘effect layer’ I merge the two. Both Photoshop and GIMP supports this process equally well.
–Jacob
Warning: Undefined variable $pstl_comments_number in /var/www/caughtinpixels.com/public_html/wp-content/plugins/post-layout/plugin.php on line 43
Warning: Undefined array key "cid" in /var/www/caughtinpixels.com/public_html/wp-content/plugins/post-layout/plugin.php on line 46
Good info on GIMP Jacob. I’ve often wondered on using it instead of Elements since Elements processes in 8-bit (though will allow loading of 16-bit files). I noticed GIMP now supports 16 and 32 bit files.
One thing I wanted to clarify – all of the layer masking you are doing in this tutorial is available in PS Elements; at least as far back as version 8 (not sure about previous versions).
The only thing that’s kind of a pain is getting all the separate images loaded as layers in a single image file. Once loaded and layered however, the blending/layering/masking is the same.
~Randy
Warning: Undefined variable $pstl_comments_number in /var/www/caughtinpixels.com/public_html/wp-content/plugins/post-layout/plugin.php on line 43
Warning: Undefined array key "cid" in /var/www/caughtinpixels.com/public_html/wp-content/plugins/post-layout/plugin.php on line 46
Hi Randy,
The last version Elements I used was version 7, which didn’t have the layered masks. I will have a look into a trial of Elements and correct the article. Thanks for that info 🙂 GIMP really has a great way of loading images into GIMP as layers – a feature that Adobe easily could have replicated for Photoshop.
–Jacob
Warning: Undefined variable $pstl_comments_number in /var/www/caughtinpixels.com/public_html/wp-content/plugins/post-layout/plugin.php on line 43
Warning: Undefined array key "cid" in /var/www/caughtinpixels.com/public_html/wp-content/plugins/post-layout/plugin.php on line 46
Great post thanks.
You may be aware but there is now an option in GIMP to make it single window mode.
On my mac this coupled with the new back scheme looks very familiar 😉
Warning: Undefined variable $pstl_comments_number in /var/www/caughtinpixels.com/public_html/wp-content/plugins/post-layout/plugin.php on line 43
Warning: Undefined array key "cid" in /var/www/caughtinpixels.com/public_html/wp-content/plugins/post-layout/plugin.php on line 46
Hi Steve,
No I wasn’t aware, I will have to look it up. Actually black is nice 🙂
–Jacob
Warning: Undefined variable $pstl_comments_number in /var/www/caughtinpixels.com/public_html/wp-content/plugins/post-layout/plugin.php on line 43
Warning: Undefined array key "cid" in /var/www/caughtinpixels.com/public_html/wp-content/plugins/post-layout/plugin.php on line 46
Thank you !
Is there any way to export photos from Lightroom to GIMP? any GIMP Plug-in for Lightroom?
Warning: Undefined variable $pstl_comments_number in /var/www/caughtinpixels.com/public_html/wp-content/plugins/post-layout/plugin.php on line 43
Warning: Undefined array key "cid" in /var/www/caughtinpixels.com/public_html/wp-content/plugins/post-layout/plugin.php on line 46
Hi,
Jigs, thanks a lot. No, not that I know of. This really is a weak point for GIMP. It makes the work process less smooth.
–Jacob
Warning: Undefined variable $pstl_comments_number in /var/www/caughtinpixels.com/public_html/wp-content/plugins/post-layout/plugin.php on line 43
Warning: Undefined array key "cid" in /var/www/caughtinpixels.com/public_html/wp-content/plugins/post-layout/plugin.php on line 46
Excellent tutorial, you are a genius of photography … you take the time necessary to take photographs with precision, and then use the best of the two programs to give the subtlety of tone that gives us Lightroom and the plasticity of the GIMP. Bravo for sharing your methods with all your followers. I wish you success and keep sharing your skills.
A hug.
Warning: Undefined variable $pstl_comments_number in /var/www/caughtinpixels.com/public_html/wp-content/plugins/post-layout/plugin.php on line 43
Warning: Undefined array key "cid" in /var/www/caughtinpixels.com/public_html/wp-content/plugins/post-layout/plugin.php on line 46
Thank you so much Carlos – you just made my day 🙂
Have a great day!
–Jacob
Warning: Undefined variable $pstl_comments_number in /var/www/caughtinpixels.com/public_html/wp-content/plugins/post-layout/plugin.php on line 43
Warning: Undefined array key "cid" in /var/www/caughtinpixels.com/public_html/wp-content/plugins/post-layout/plugin.php on line 46
It is not a HDR in the sence of having High Dynamic Range. It is 8 or 16 bit file it is Low Dynamic Range in strict sence. (It has not got a High range of luminosity information in it). But in a common sence it is the same effect as having those bracketed exposures photos meged into real HDR and than tone maped.. or maybe even better cos you can be picky about what you want..
But if you want to use it for lightning a sceen in a 3d rendering, than it is NOT a HDR.
Warning: Undefined variable $pstl_comments_number in /var/www/caughtinpixels.com/public_html/wp-content/plugins/post-layout/plugin.php on line 43
Warning: Undefined array key "cid" in /var/www/caughtinpixels.com/public_html/wp-content/plugins/post-layout/plugin.php on line 46
Hi Tomasz, Thanks a lot for your comment and you are absolutely right. The problem is that HDR as a term has been misinterpreted as the tone mapped image and changing that perception is impossible. That ship sailed several years ago, unfortunately. I do cover the exact terms in this article Understanding HDR part IV.
–Jacob