Warning: Undefined array key "multiauthor" in /var/www/caughtinpixels.com/public_html/wp-content/plugins/post-layout/plugin.php on line 114
Warning: Undefined array key "mobile" in /var/www/caughtinpixels.com/public_html/wp-content/plugins/post-layout/plugin.php on line 352

The Bean in Chicago is an awesome pieace of art. Though I only had very little time in Chicago I managed to get by it three times, the last time was at night time. The bean is a huge mirror built in steel, and then shaped like a bean. Everything reflects in the bean but in strange ways, because of the curves. It’s very fascinating.
The photo is a 5 shot HDR shot with my Nikon D800 and the Nikon 14-24mm lens, which I love to death. When I processed this photo I made both a tone mapped version and a double tone mapped image in Photomatix Pro and then I have blended them in Photoshop. The double tone mapped image I have primarily used for the ground, because it emphasize the texture and details.
Double tone mapped HDR images are often very easy to recognize. They push the image beyond a natural looking image, into a much more painterly world. They start to look like paintings rather than photos. Some like this, others don’t. I do like it. But exactly what effect you get when you double tone map an image, depend very much on how the light was when you shot your photo. A city night shot like this of the been, is excellent for double tone mapping. Here are some other examples of double tone mapped images:


As you can see they have a look and feel in common. That is the because of the double tone mapped image made in Photomatix Pro.
What a double tone mapped image does, is to exaggerate the texture and details enormously, which can look very cool if applied to all of an image, but you can also use it much more subtle, like in the two images below. In both I have applied a double tone mapped image to both on the rocks in the foreground and to the house in back ground, but the rest of the images are mostly other normal tone mapped or maybe just even one of the original shots.


As you can see, they are very rich in detail on the rocks as well as on the houses. This is because of the double tone mapped.
How to make a double tone mapped image
The idea of the double tone mapping is that, you first do one HDR photo and tone map it in Photomatix using the option “Tone map” and “details enhancer”:

and the image that you get from that process, you tone map too.
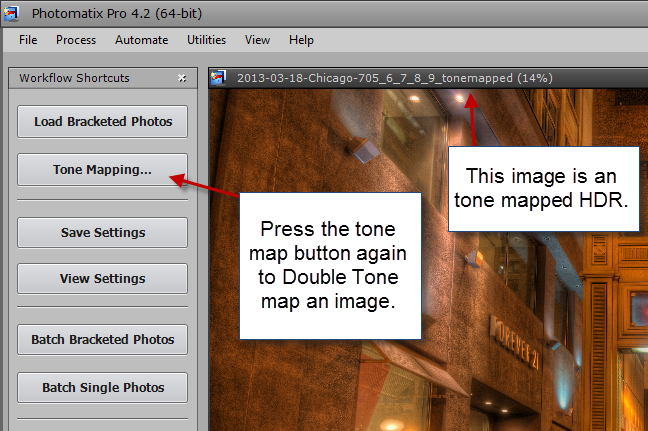
This is simply done by pressing the “Tone mapping” button once more. A side effect of the double tone mapping is, that you get a lot more noise (grain) into the image and a wildly saturated image. The noise you have to clean up with a tool, but not necessarily all of it. The noise adds some of the grittyness to the image, which is part of the effect.
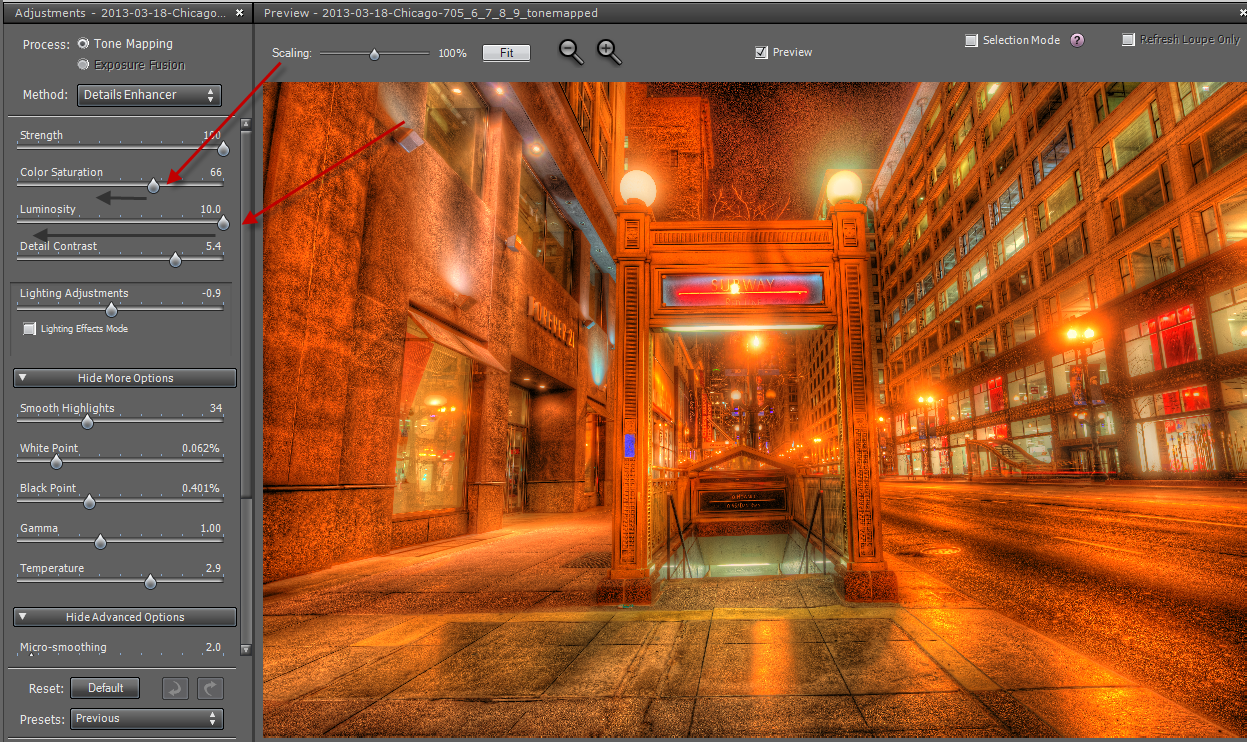
As you can see this is wildly saturated, so I slide the saturation slider to the left. I also do that to the luminosity slider. The Luminosity slider is very potent now, and I select something that I like, which is usually on the far left. And this is the result I get:

When you try to do this, try some of the other sliders too, and see how they affect your photo. When you are done, you have your double tone mapped image.
The way I process my photos, I will only use a portion of the photo. I never use what I get from Photomatix 100%, I always mix a bunch of images into the final image. I have a pool of candidates, the double tone mapped image is just one candidate.
If the double tone mapped effect is too strong, I will only mix it in with perhaps 50 or 75% opacity (see my tutorial on blending and mixing layers in GIMP or Photoshop).
This is the basics of double tone mapped image. You do need to have Photomatix Pro to do that. If you use this coupon code “caughtinpixels” you get 15% discount, and you can Photomatix Pro here.