
Eltz Castle in Germany.
How do you shoot a unique photo of something that one million others have shot before you? It’s tricky and it requires preparation and patience, and in the end, the result may “just” be your version of a classic shot.
For a long time I have wanted to take a photo of Eltz Castle in Germany and finally, I got the chance when I came back by car from my exhibition in Paris.
I really wanted to have one that I had not seen before, but it has been shot to death and therefore no easy task. There is quite a steep walk down from the parking lot and the first time you see the castle is from a viewpoint you pass as you walk down.
As preparation, I had watched other photographer’s photos of the castle and studied the paths around the castle at www.openstreetmap.org. OpenStreetMap has a lot more details than Google Maps when it comes to paths and hiking routes. In short, I had some kind of idea how to area was arranged and the viewpoint was high on my list of potential shooting locations for my hopefully unique shot.
All shots I looked at when I Googled Eltz Castle without exception was shot at daytime, at various times of the year. I realized I could shoot a night time shot and that alone would make it a special photo and that was my plan.
I arrived well in advance of when I planned to shoot my “photo”. That is always a good thing to arrive in good enough time, to allow you to search the area for compositions as well as be prepared for the light.
I examined the different places to shoot the castle and shot various compositions. After having taken the classic pictures in … classic light (ie daylight), I decided to use the viewpoint. There are probably 10,000 photographers who have got a nice picture home from there, but I prepared myself to wait for the light.
When I had waited for 30 minutes I realized that I had forgotten my jacket in the car. Mental note for later: Always bring warm enough clothes. As the light dimmed the cold came too and the wind felt really cold and I still had a couple of hours ahead of me.
As I waited the clouds began to clear somewhat, from a total clouded sky to something with holes. That was good. A very nice little moon appeared, but of course outside the frame and the composition would suffer too much if I tried including it, so I ignored it.
After hours, the staff began cleaning up and driving back up using the shuttle bus.
Finally, they lit the light on the castle and just as I thought that I had shot the last shot, a car came up from behind the castle and while it picked up the last group of people, I set the camera to a 20 second exposure and I got my picture of Eltz Castle, which I have not seen before.
Sony A7RII, 24-70 f/4
EXIF: ISO 50, f / 8, 24mm and 20 seconds.
–Jacob
]]>
I shot “Soft light in Nyhavn” in Copenhagen in Denmark.
Timing and location can be a game changer for a photo and sometimes you have to option to plan for something special. At other times, you just have to accept what it is, good or bad. But you can help yourself, if you have the right tools. More about that later, first a story about how I learned a lesson or two.
When I shot this photo on a very early morning, I didn’t realize that I had a gem in my hand.
This location is a place in Copenhagen called Nyhavn and it is a very famous location. And as any other famous location, it has been shot to death.
However, this morning, I captured something special, and I only have shot two shots of it. This is the second. When I published the first one, some local photographers called it ‘the best shot of Nyhavn ever seen’. Wow! The bad part is, that I didn’t see what I shot when I shot it.
This is shot very close to midsummer, and my clock radio had been on at 3 AM, and this photo is shot at 4 AM. But, what was on my mind, was something completely different. I was afraid that I was going to miss the moment when the Sun rose behind The Opera House all the way down in the other end.
I had misjudged the timing and been delayed by a couple of drunk Polish guys looking for a ferry to Poland. I was so focused on my target, that I didn’t see this one. I just made two quick shots and moved on.
Had I seen what I had, I would have made a whole series from this location. The colors and the light were just fantastic, but I didn’t see that. The lines formed by the clouds are fantastic, but I didn’t see that.
The only thing, that was on my mind, was getting the sunrise behind the Opera House.
The photo is a 5 shot HDR, but I had put a 3 stop ND filter on the lens. I rarely do that, but I wanted the water to be more smooth. The water did have small ripples this morning, and by putting on a Neutral Density filter, I could make longer exposure times to smooth out the water.
The longest exposure is 20 seconds.
A Neutral Density (ND) filter is like a pair of sunglasses put on the lens. It darkens the lens. Getting a 100% color neutral ND filter is almost impossible, however a 3-stop filter like this one, has less colorcast than a 10-stop filter.
Thinking about it right now as I am writing this blogpost, it might just be the ND-filter that has added that tiny bit of fantastic bluish colors, that makes this light very special.
After having shot my two shots I hasted down to the main harbor, at the far end of this canal.
The Sun always rises in the East… NOT!
I know this area so well, I didn’t think much about it. The canal of Nyhavn is going from East to West and because the main harbor at the end is perpendicular it goes from North to South. And the Sun rises in the East, no big deal!
I hadn’t done my homework.
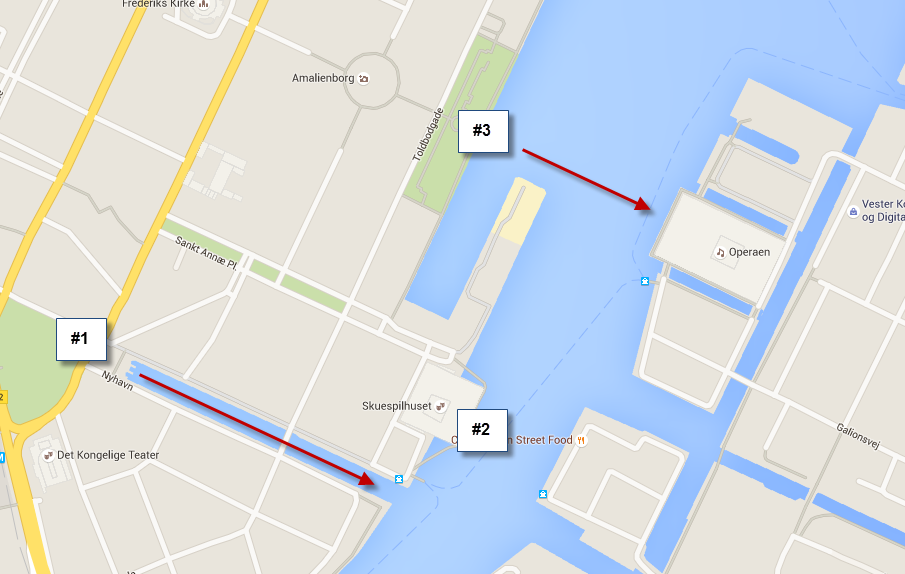
The Canal of Nyhavn does not go from East to West. It goes from South East to North West, more east than South, but absolutely NOT East to West.
The Canal of Nyhavn does not go from East to West. It goes from South East to North West, more East than South, but absolutely not East to West. This fact combined with another fact flunked my intended shot completely.
“The Sun rises in the East”, and in the summer slightly to the North, and in the winter, slightly to the South. Only, it’s not ‘slightly’. But, in Copenhagen it is not just a little to the North, it is a quite a lot!
The Sun rose so far north, that even if I had used an extreme wide angle lens, I still wouldn’t have had it within the frame.
Had I done my homework, I would not only have looked at a map. I would have used an app, to let me know exactly when and where the Sun would get up.
I now use a Sundial app on my iPhone to plan when and where to shoot. It uses the GPS and calculates when the sun rises and sets. You can even set the date, and a location, so you can plan where to shoot the sunset or sunrise.
Had I used the app ‘Photo Sundial‘ (it costs $1.99), I would have seen, that the project that I had in mind, was not at all possible, at this time of the year.
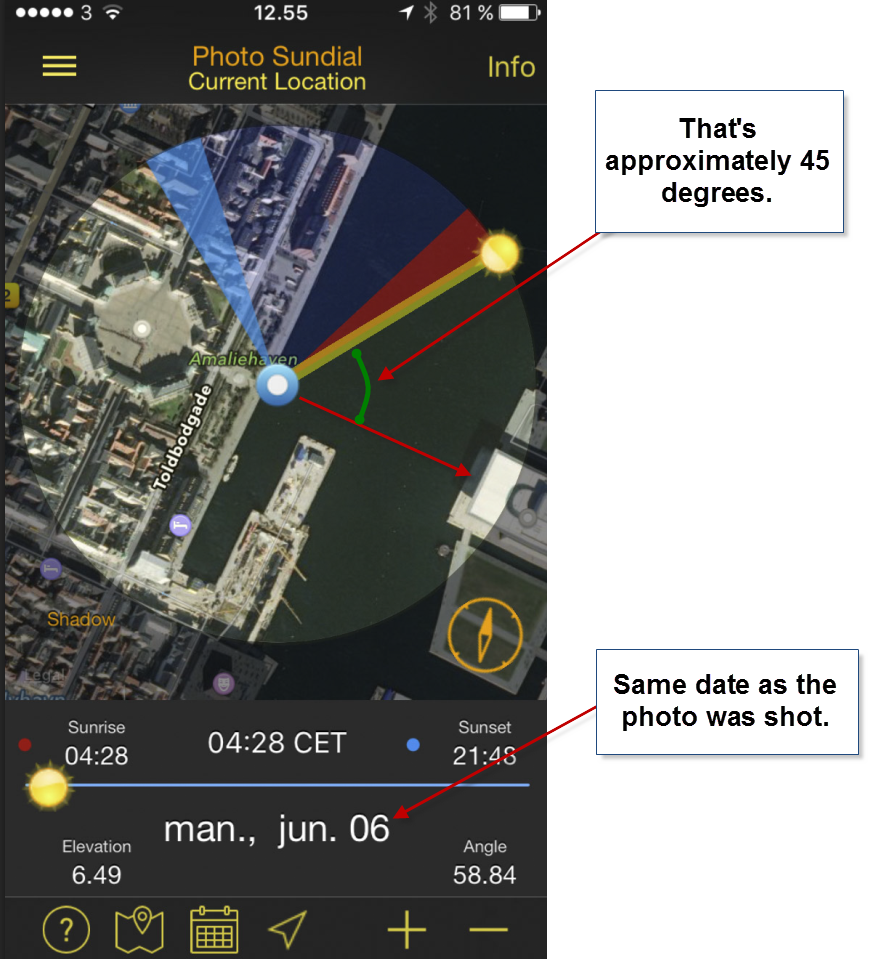
Even an extreme wideangle lens, would hardly have included the Sun.
I use the ‘Photo Sundial’ quite a lot, but I also use the ‘Sun Seeker‘ (it’s more expensive it costs $9.99) quite a lot. I found the expensive one first, and I got comfortable with that before I found the cheaper one.
The ‘Sun Seeker’ is way more advanced, and has augmented reality, which I don’t use, but you could use it.
If I went to The Opera House, I could use the augmented reality viewer, to find the exact date and time to get the Sun rising EXACTLY in the middle of The Opera House. Maybe one day I will do that.
A Sundial app like either of these two is ‘a must haves’ for any photographer. I couldn’t live without them today, and they are an integrated part of my photo planning. Sometimes it means, that I don’t go to a particular location, at rather to another.

The Opera House in Copenhagen. A few minutes later the Sun rises far to the left, way out of the frame. The water is not as smooth as I had hoped. I only used the 3-stop ND filter
The best thing I could have done on this morning was to stay in Nyhavn, and kept shooting as the light changed. The clouds were fantastic seen from there, and I would have gotten a lot of great photos.
I did go back to The Opera House later when I had consulted one of my Sundial apps. And at the end of September, it looked about right.
I went on the 27th of September, coordinated with the weather forecast, and the Sundial looked like this on that day:
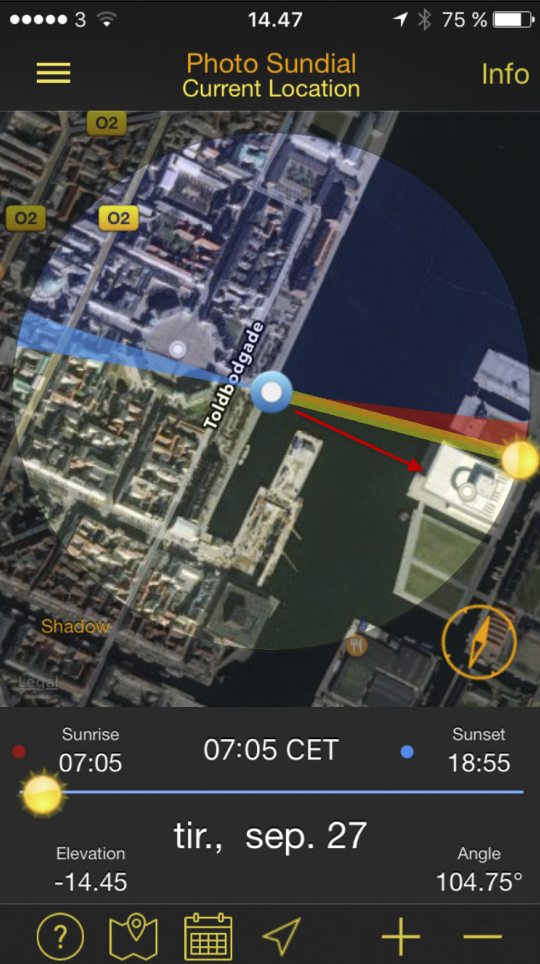
The Sun rises slightly to the left of The Opera House, seen from the other side.
It was not very important that it was precisely behind The Opera House, but just within the frame.

A few minutes before the Sun rises behind The Opera House.
Lessons learned
I learned quite a bit on this summer morning, and I have not covered everything. It is from making mistakes you learn. You have to be critical of your work to be able to see your mistakes and learn from them.
Nobody is perfect, but if you learn to see your mistakes, you grow closer to being perfect step by step.
So what did I learn this morning?
- I have to plan when to shoot a sunset and a sunrise if I have a certain location and scene in mind.
- I can’t smooth water at sunrise using a 3 stop ND filter. I need to bring a 6 stop or a 10 stop ND filter.
- Look at my photos as I shoot. If I have something magic, I must reconsider and adapt my plan. A sunrise is dynamic; I should be too.
- My Nikon D600 had a severe dust problem. Don’t bother shooting when there are so many dust spots. At least not on f/32. The sky had hundreds of dust spots. I ended up using the “Dust and Scratches” filter in Photoshop. It also took all texture from the clouds.
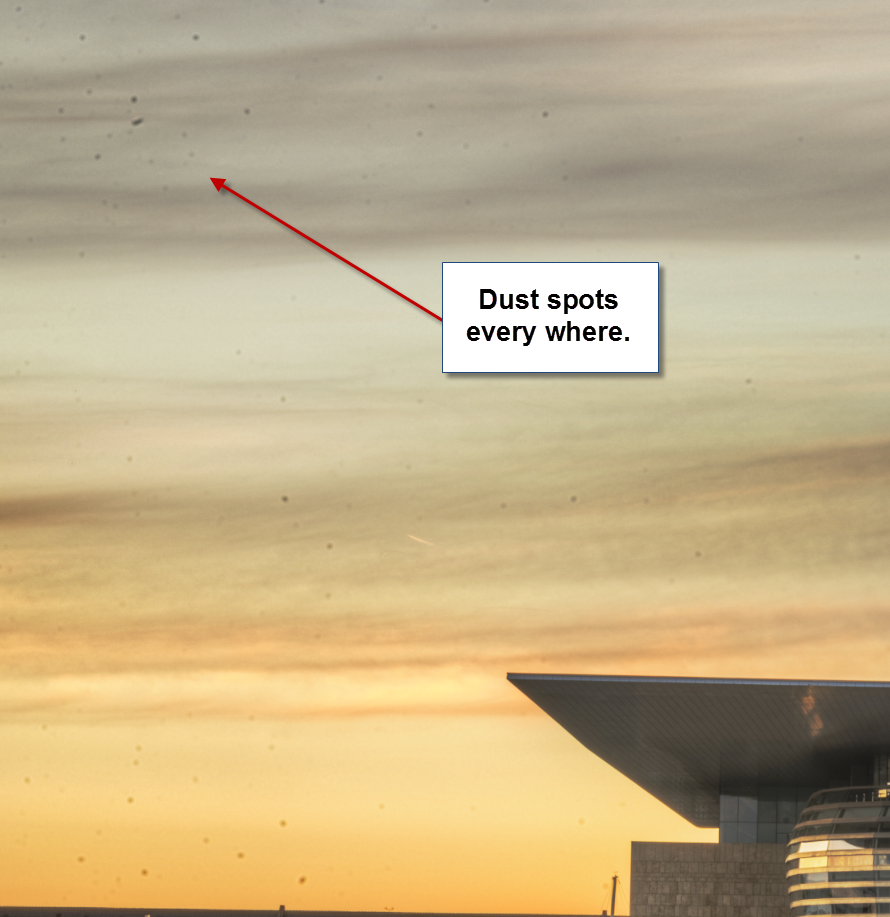
The dust issue from the Nikon D600 was a total nightmare the first year. But it seems to be solved pretty well now, and I have got life time free sensor cleaning.
So I learned a lot this morning, the hard way.
You can also follow me on Twitter, Facebook, and Google+. I post photos daily.
–Jacob Surland
]]>

The old main building of the University of Copenhagen.
This post is The Weekend Post – sign up on the website, to get it on email. Last week I showed how to get two great and yet somewhat different photos, out of one photo. If you missed it, you can find it here.
This week I will dive into three things, that I find very important to improve if you want to improve as a photographer. I will put this into three solid tips, that will improve your photography. It’s not the usual tips, but it’s three things that make a big a difference.
We all know the phrases ‘Composition is everything’, ‘Timing is everything’ and ‘ Light is everything’, and somehow they seem both to work together, and yet still, if they are not contradictory, at they are least not the same thing. So which is right? Well, sort of all three at the same time.
If you have a poor composition, your photo will, no matter what you do to it in the post-processing, not be very successful. I once read that a bad composition is a turd, and no matter what you do in the post-processing, it will still be a turd. I tend to agree, and yet I have some reservations. I believe it’s a balance of several things, the composition being one of them. A weaker composition, can to some extent be compensated by great light, timing and post-processing, and you will still end up with a successful photo.
Tip #1 Learn to post-process and learn it fast
If you can make everything peak, you will have a stunning photo. If you can get the perfect composition, in the perfect light, with the perfect timing, you will have a perfect photo … IF you know how to process the photo perfectly too. If you do not know how to post-process the ‘perfect photo’, it will never be a winner.
One of the reasons, why I got into photography, and the very essence of “Caught in Pixels” is the realization, that an SOOC (Straight Out Of Camera) photo usually is not interesting. It is the post-processing, that brings a photo to life. No matter how good your composition, light and timing is, if the photo has a poor processing, everything falls apart. The post-processing is the glue that ties everything together. And the better post-processing, the stronger is the glue.
Far too many people, think that extreme processing makes a good photography, but it doesn’t. If you want to have success with your photography, you need to have control of post-processing and have it on a (tight) leash. Have a look at this photo, in a badly processed version, and afterwards in a good processing.
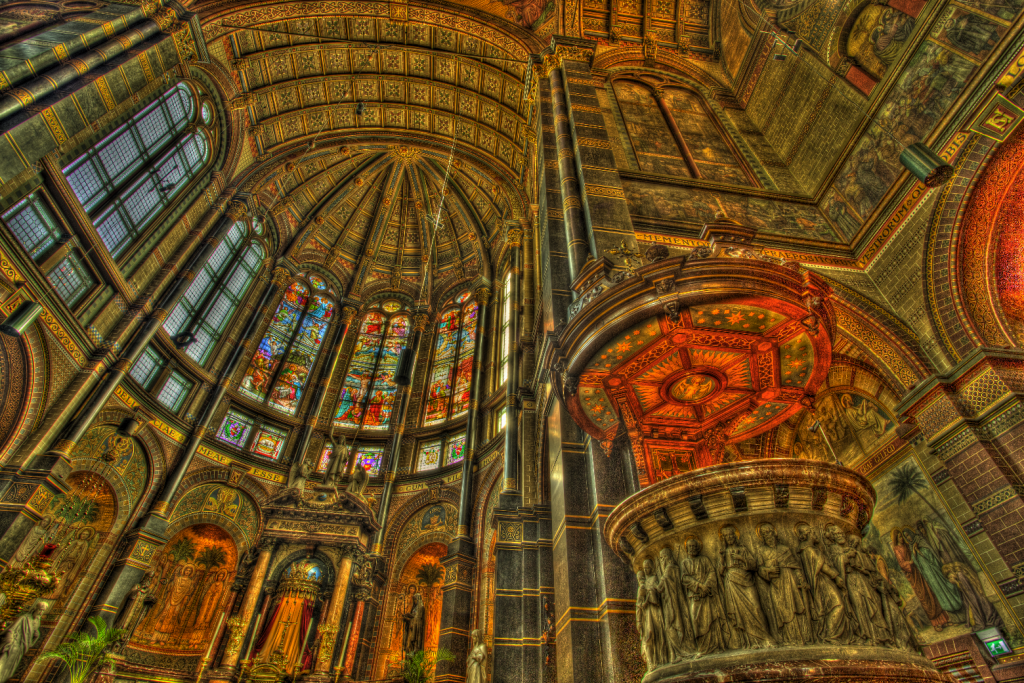
An example of a poorly processed photo. This is a 30 second processing process. It almost hurt my eyes to look at this, and they keep floating around searching for focus points.
And now the exactly same photo, just processed competently.

The same photo processed in a good way. This is a 2-3 hour processing process. This one is much more peaceful, and the eyes wander straight to the pulpit.
In the first version of the photo, is a classically badly processed HDR. And it is that kind of processing, that has given HDR photos a bad reputation. It is too much of everything, and the depth is completely gone, because everything seems equally important. If everything is enhanced, nothing is enhanced.
You might be able to see, that a strong photo and composition is behind the bad processing, but a poor processing takes the away the quality of the photo. In the first version, the first thing that comes into my mind, is ‘too much, too much of everything’. In the second version, there is a much stronger balance in the photo, and this is the difference.
I have often received the comment “Normally I don’t like HDR photos, but I like this one you have made'”. Of course, this makes me happy, but it also makes me think. I have received that kind of comment, where I think I have knocked myself out in HDR, and gone quite extreme, like in this one from Copenhagen Central station:

A heavyly processed HDR photo, with the award “I dont’ like HDR, but I like this one”.
Why that comment is given to the photo of Central station in Copenhagen, does make me wonder. HDR apparently divides people into two groups, those who like it, and those who hate it. And yet, some of the people, who are dedicated haters of HDR, still likes photos like mine. Even if I have done an extreme HDR processing. Why? I think it is because I have kept a foot in the real world, and I don’t have a lot of classical processing mistakes.
There hundreds of ways I could have processed it, and another person could have processed the photo in yet another hundred ways, and anyway would have made it to a successful photo. The way I did it, I just made it mine. I keep depth in the photo, by controlling highlights and shadows. I play with them, and enhance some, and flatten others, but I don’t enhance everything, and that is an important part.
If I had released the photo from Copenhagen central station, in a crazy psychedelic HDR processing, like the one from the cathedral above, this would never have received any appraisal from an HDR hater. It would have been categorized as ‘a typically HDR’. HDR is not a synonym for bad post-processing, but unfortunately, there are tons of badly processed HDR photos out there.
A large part of my game is HDR, but it is generally applicable. You need to learn to do proper post-processing, to make quality photos.
It requires more than pressing a button or perhaps even investing 30 seconds on processing images, to create something, that is pleasing to more people, even people who are declared ‘haters of HDR photography’. That is because the quality of the HDR photos increases, by doing proper post-processing.
Learn post-processing and learn it fast. It’s one of the most important factors. Do not rely on ‘press a button’ processing. In these Instagram and Snapseed days, everyone can do that. Don’t be everyone else. Be yourself!
Learn to post-processing, and learn it fast. Be yourself… No, you will not make nearly as many photos in the same time, but wouldn’t you rather make high-quality photos? I know I would.
Quality is everything!
I believe that is the truth. It is a much more complex matter, than ‘light is everything’ or ‘composition is everything’. It is about the quality of the photo, and light and composition are factors in this equation, but they can not stand alone. Quality is to an extent a subjective matter, but there are also many objective elements. One of them being, bad processing doesn’t fly.
Tip #2 Learn to listen to that little voice inside your head
What you have to do, when making a photo is to strive to get as high a quality as possible. This begins, when you grab your camera, to go out shooting, and goes through many different steps, until you finally stop post-processing, because it is finished.
As time passes by, and your overall skills improve, something else happens. A small voice in the back of your head appears. It says, ‘is that good enough?‘. It happens when you are post-processing your photos, but also when you are shooting photos. No matter where you hear it, you should pay attention to it.
The first time I was seriously aware of that little voice was when I did this shot. First I did the one on the left, and the little voice said ‘You are almost there, you are on the right track, just move the camera a bit‘. I heard that little voice, and three shots later, I had the composition working my way.
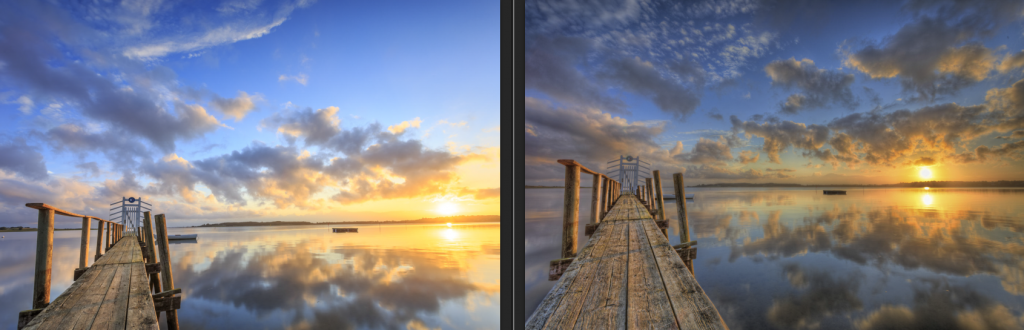
Moving the camera a bit to the left, and a bit down, as my little voice suggested to me, makes the difference between a nice shot and a killer shot. It was the last but one shot, I shot that morning, because the Sun came out too strong only a few minutes later and had I not listened to the voice, I would not have gotten this photo.
The same goes when you post-process you photos. Learn to listen to that voice saying ‘ahh, is that contrast just over the top?‘ or ‘something is missing in that area!‘ It takes some practice to be able to hear this little voice, but it is usually right. It is about finding a balance, that works well with a photo, no matter if you are aiming at something natural looking or you are aiming, at something more surreal. It has to be balanced nicely.
A classic mistake made by novice photographers, diving into post-processing, is to be too drastic in the post-processing. Too much HDR effect, too much Contrast, too much Clarity or too much saturation. We have all been novices, and have made all the same mistakes. And it is by listening to that little voice, in the back of our heads, that we improve.
There is nothing wrong, by going a little bit crazy, and wild. You just need to balance it in the photo. The sunrise photo, has a crazy wild processing too, but it is only applied locally. And it is a very strong element in the equation, that gives the image a high quality.
In most cases, global adjustments (saturation, contrast etc) to a photo is not enough, to make a photo reach its full potential. I am tempted to say that the whole difference, between a successfully processed photo and a less successfully processed photo, is the ability of the photographer to apply changes locally, accordingly to what is necessary.
This might be a little bit abstract, but in the photo above, I did a lot of standard processing, but what knocks this photo into being something special, is the heavy enhancement of the jetty.
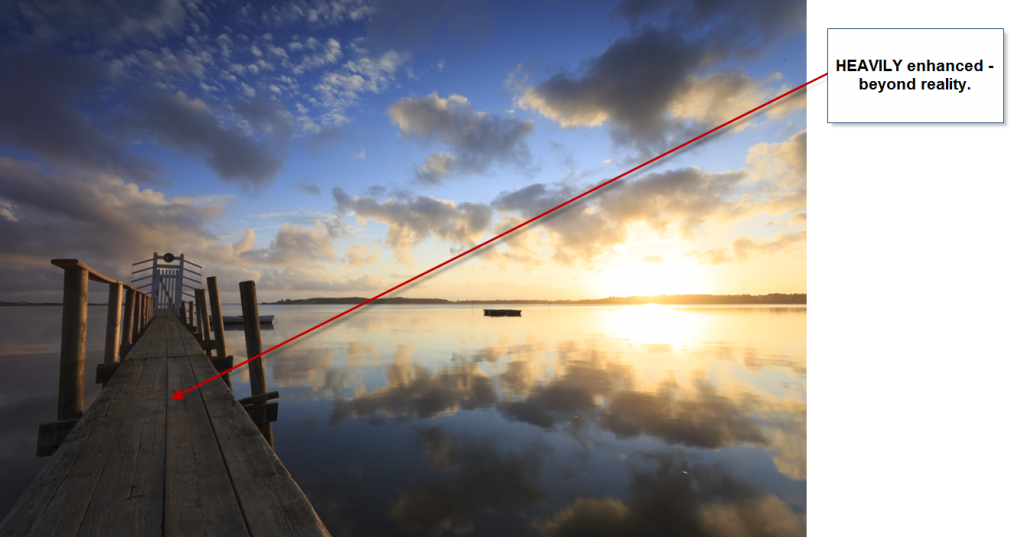
The jetty is heavily processed. The exposure has been increased, and a 100% clarity pen and some detail enhancement from a Topaz Adjust filter have been applied to the jetty. Had I applied those effects globally to my photo, it would have been ruined the balance, due to over processing, but applied to just the jetty is amazing. And it is the little voice in the back of my head that suggests that, and I listen to it.

The little voice in the back of your head will eventually begin to say ‘that does not look too interesting, can we either enhance or hide it?‘ or ‘this is the important element, it needs to be popped!‘. What is important is that you, listen to that little voice, when it speaks. The little voice is your intuition, and the intuition is MUCH stronger than the rest of your conscious brain.
Learn to listen to that little voice saying ‘ahh is that composition or processing good enough?’ Usually, that little voice is right, it’s you sub-conscience, and it is much more powerful than the rest of your brain. Learn to listen to it, and act on it, to improve your photography. You learn from making mistakes, but only if you notice you make them!
Learn from your mistakes. Your little voice points out your mistakes, listen to it! And learn from it.
Tip #3 Learn to separate the good photos from the bad photos
I have more than 100.000 photos in my library. Even if some are series of 3, 5, 7 or 9 HDR photos, it is still a lot of different photos. I don’t have time enough, to process all of them, not yet anyway, but not all are worth processing either. If I was to try to process them all, I would not have enough time at all.
Since I don’t have the time, to process all photos, I should only focus on the ones resulting in quality photos. Not all can be killer shots, but certainly above my personal minimum level of quality.
One of the pitfalls I regularly fall into is that I try to process a photo, that is clearly never going to turn out any good. This is something, I have seen other photographers do too. For some reason these photos attract us, I know I am attracted to them because I see them as problems that need to be solved and I love to solve problems. But some problems are just unsolvable or extremely time-consuming to solve, and I end up wasting valuable time, with mediocre results.
A photo might not be worth processing for many different reasons. It could be the clouds that are boring, the wrong time of the day, or even wrong time of the year or simply, that the composition has failed. Some of these things are fixable, and some are not.
Train yourself in identifying the photos worth processing. I use a star system in Lightroom. When I imporort new photos, into my catalog I rate them 3 stars.
0 stars: Not in the evaluation process
1 star: I will not look at this photo again.
2 stars: Maybe on a rainy day, but probably never.
3 stars: Unevaluated.
4 stars: Has potential
5 stars: Ready to process.
Often I have a lot of different, and yet similar compositions, and picking the strongest ones, takes a bit practice, but it is worth spending that time. You learn a lot from evaluating your own photos.
Sometimes, when you have evaluated your photos, you can see, that if you had moved the camera, or it had been shot at a different time of the day or year, it would have been a better photo. And sometimes, you have the option to actually go back and reshoot. Put the photos in a folder for reshooting, not to forget.
Don’t work too long on ‘not good enough’ photos, you just waste valuable time. If you have the option, go back and reshoot, and that way you will learn from your mistakes. Or move on to other photos, just being able to stop yourself, is learning too.
There is a lot of satisfaction, as well as a lot of learned lessons, gained from going back and reshooting a location, and doing everything right. The right timing and the right composition, and going back home to do the right processing.
This last example shows an example of, how I deliberately went back to shoot a specific scene. When I was there in May and everything was green and just too green. Grass, fields, trees, everything was just green and then more green. Instead, I returned not long before the harvest, when the fields had turned yellow and I reshot. The Sun was in a different location at sunset, and I had to move into the field, to get the Sun behind the trees in the far background. This allowed me to use the tracks in the field as leading lines.
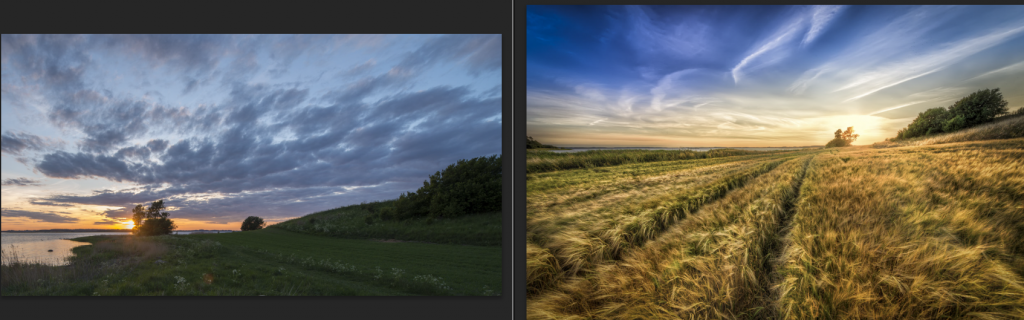
The photo on the right couldn’t have been shot in May, even if the sunset was nice in May, and it was nice. This I could do, because this is pretty close to where I live, and I can just go there.
If you are travelling, you might not have the option to go back, and yet you still might have. I often travel to cities, and as it turns out, you often pass the different locations more than once. Often during the day as well as night. What I have begun to do, is to shoot daytime photos, and review them, and then go back and reshoot early in the morning or in the evening. This way, I get some ‘practising’ time.
Doing this, saves me time later, because the sorting processes will be easier, simply because I have less photos, trying to find the best composition.
Summary
These three tips require something of you, but photography does! You can not improve your photography, if you do not put some kind of work into it. There is no silver bullet, only sweat. Some of the things, might come easier to some of you, while others have to work harder. But eventually, if you work hard enough, you can succeed.
These three tips, will make you a better photographer, and remember a photographer is not only, about being in the field. It is also about bringing a photo to life in the post-processing. And because, it is only you, who does things the exact same way, as you do, you will get your own style, in time.
–Jacob Surland
]]>
Rubjerg Knude Fyr in Denmark.
I have approximately 20 different compositions from this day. It was a bright summer day just after midday. The light was pretty hard, but just a little bit of summer haze defused the light a tiny bit. But not enough to make great light. Of the 20 compositions, this one, is the one that works best, and it works really well, even if I broke the rule “do not center your primary object”. I did that, and it yet it still works, but why is that?
I have been thinking about the ‘why’. Let me start by showing you the original unprocessed shot:
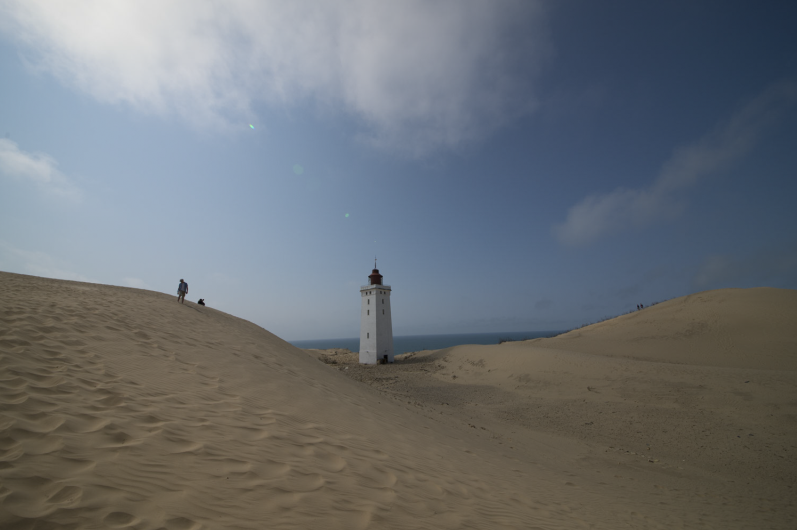
Unprocessed shot of Rubjerg Knude Fyr.
The unprocessed photo is flat, and the light is pretty hard. The sky is uninteresting, and yet you can see the potential. There some leading lines and a couple of other important details.
The tower is shot at close to an exact 45-degree angle. Dead on angles usually work well. as for the dead center. This is no different than shooting a building straight from the front, like this shot:

The Pantheon in Rome shot dead on from the front. A strong composition.
Symmetry is pleasing to the eye, a square building, like the lighthouse, gives symmetry when shot at a 45-degree angle. This is the first important factor. When you work with symmetry, it often works well, to have the object the center, in particular if you can support it with leading lines.
The leading lines in the shot from Pantheon are easy to spot. Man made lines, and they all (if extended) point to the door. This draws the eyes of the viewer to the center of the image, to the door, and the door itself is also a focus point because it is so bright.
But how about the leading lines in the lighthouse photo? There are plenty! Let’s have a look:

Leading lines. Some are more subtle than others.
As you can see, there are many leading lines. Some are more subtle than others. The one going from the left-hand lower corner is very subtle, but there are lines going through the sand dune. And the curved orange line going through the sand is very powerful, and probably the most important one. And then you have the sand dune horizon that also work as leading lines from left and right.
During the post-processing, I also enhanced some lines, and I created some new ones. The sky I had, in the original photo, didn’t work well. I replaced that, with another sky, shot just before sunset. A sky that had the soft light, that we like so much. I made a mask, and dumped the new sky. The sky was shot at higher resolution, and it allowed me to move the sky around until I found the strongest position for it.
The new sky also adds some leading lines. There is the brighter cloud wiggling like an s-curve from the right to the center of the image, and you also have it coming down from the top. And from the left, you have clear blue sky moving in. Everything pointing to the lighthouse.
There is one more thing the new sky added, and that is a repeated shape. The cloud where it says #1 repeats the shape (more or less) of the lighthouse, this is also a well working a compositional trick.
The dark and bright lines coming in, from the right-hand corner I enhanced by using some simple dodge and burn (making things brighter and darker in local areas). This enhanced existing lines.
A centered composition can be a strong composition
So, what at a first glance looks like a simple composition, turns out to be quite complex. All of these lines makes it a very powerful composition, and if you compare it to the photo of Pantheon, it is a very similar composition. All lines point to the center of the image, where you find the brightest part (the bright door and the bright lighthouse).
The straight on composition used on the Pantheon photo, is a strong composition, even if it seems simple. The interesting composition, are the ones, that order things in a pleasing way, no matter how complex that may be. And usually in a way, that you don’t normally see with your human eye.
The head-on shot of some building or whatever, is unusual for the human eye. How often to you stand at the exact center and watch a building or similar? Hardly ever! And that is why it is unusual to the human eye and is a strong composition, and it is pleasing because it is symmetric.
The hard part is to know when to use the centered composition, and especially when NOT to use it. One of the important factors is, can you get a perfect symmetry? Then it’s probably ok. If it is supported by leading lines, then go ahead for sure!
The processing details
As for the rest of the processing. The photo still had a bit of hard light to it, and I began to add some textures. I find that textures can be used to add that missing element, that softness in the colors, take off the edge of the hard light.
When I was done, I could see, that the texture was too much, and I had second thoughts on the textures. I made a new copy of the image, without the texture part. That’s one of the great things about working with layers in Photoshop. You can just hide some. Now I had these two images:
Now I had these two images:
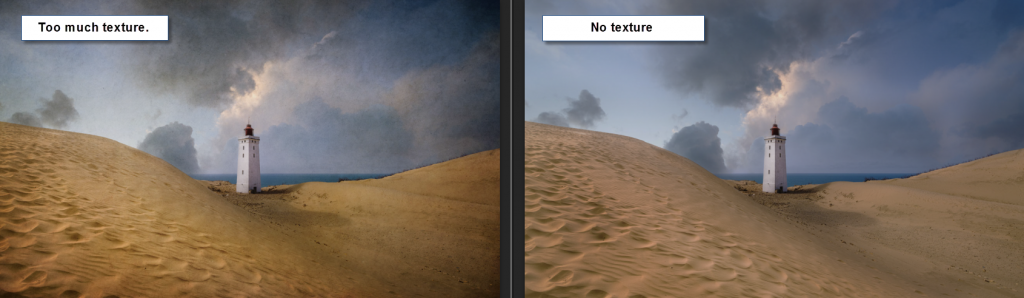
Too strong textures and no texture version.
I found that neither worked to my satisfaction. One had too strong textures, but the other one missed something.
In the end, I decided to do a compromise. I loaded both images as layers into Photoshop and changed the global opacity for the top layer, which happened to be the one without textures. And moved the slider back and forth, until I had the right amount of textures, to my taste, and that was at 45% opacity.
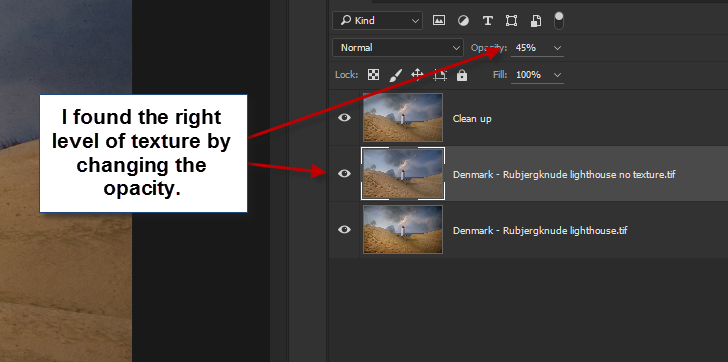
And my final step, was to do a clean up in the photo. Removing irregularities, stones, rubble etc. that did no good thing to the image.
–Jacob Surland
]]>
Paris seen from the top of the Arch of Triumph in bad weather.
I was in Paris last week to exhibit at Art Shopping at Carrousel du Louvre 2015. A pretty exciting thing. As a photographer, I, of course, could not go to Paris, and not shoot photos, and I carefully planned what to photograph, and when, while not exhibiting.
I did a very careful planning of what I want to shoot mornings and evenings, and what to shoot while driving down there, and back again. It’s the first time I have been the so prepared – and yet you can still meet obstacles.
I will only have one blue hour evening, and where did I want to go? In the end, I decided for the rooftop of the Arch of Triumph. There is a magnificent view of Paris from up there. I got there in good time and waited in the line. After waiting 30 minutes in the line, I got so close to the ticket office and saw a sign which said ‘no bags larger than 40cm’ mine is 53cm and my hope sank. What a stupid mistake to make. I knew that I could not use tripods up there, but no big bags? I took a deep breath, and went took a shot at it, anyway, and I slipped through. The security guard just received a large group to pay his attention to and did not pay attention to the size of my bag. Lucky me.
I thought I was home free from there, but noo… There was a more specific security check, before going up to the top of the roof. The security lady started saying something about the size of the bag, but I just opened it and showed her my camera equipment. She said ‘no tripods’, but I knew that and had prepared for that, and she let me through.
I got to the roof, after climing a small narrow winding staircase. It really was taller than I expected, and when I got up there, the view was magnificent. I had taken no chances and was there almost two hours ahead of the sunset. So I had to wait.
Instead of a tripod, I had brought my Manfrotto Super Clamp

The Super Clamp is really made for filming equipment, but it works with cameras too.
Because I knew tripods wasn’t allowed, I had researched the nature of the roof and had seen from photos, that there was a spiked fence, which the Super Clamp would be super easy to attach to. And that was my plan. But I had not considered that the fence might be wobbly, and it certainly was. It turned out, that people leaned against it, while taking selfies, and children yanked in it. My camera would fly back and forth on long exposures.
While I waited, I searched for my compositions. This one I liked particularly well because it is different from the classic shot from up here. I also got the classic one, but this one I liked rather much. And guess what? It’s shot with a fisheye lens. You can hardly even tell!
While I waited, bad weather came. La Defense in the distance disappeared completely, and it got closer. At this time I did not feel very lucky at all, but in the end we only got a small portion of the bad weather; enough to have minor problems with rain, but not enough to ruin the photos.
Back to the wobbly fence. When it was time, and the exposures got longer, I waited until the fence was still, or if didn’t stay still, I held my breath and I put my full weight against the fence (hoping it would hold). I shot a lot of photos of the same composition and hoped that enough would be sharp enough to work with. As it turned out, it was not so bad at all. I got a lot useable photos.
So this photo I am quite happy with, not only because I like it, but also because I went through a lot of trouble to get it.
]]>
A long exposure from a classic block buster photo location in Venice. From the top of the Rialto Bridge.
The view from Rialto Bridge is world famous, and not without reason. It is stunning. I tried to capture a slightly different scene than the classic Canal-Grande seen-from-the-Rialto-Bridge photo (though I shot that one too). I love that Mahony taxi boat in front of Hotel Rialto, and that restaurant with the golden light.
I shot this HDR photo using a 6 stop filter, to increase the shutter time. The longest exposure was 30 seconds, which explains the smooth water. The Mahony taxi was kind enough to stay still long enough to be sharp. Some things you can’t control as a photographer, and needs to rely on luck for. I got lucky this time.
I was waiting for the city lights to be turned on. I had an idea that the three armed lamp would look awesome. What I hadn’t noticed, at this time, was that the large spotlight to light up the Rialto bridge was placed there too.
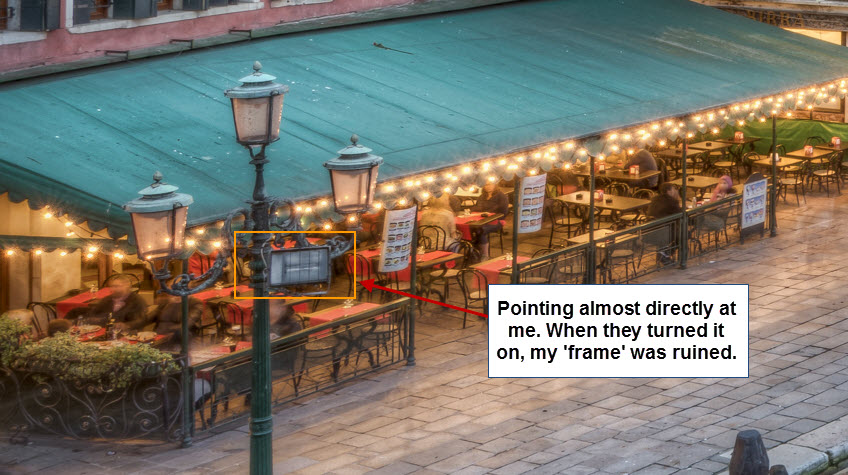
A large spotlight ruined the intentions I had with this frame. I am glad I shot this before it was turned on.
While shooting from the Rialto Bridge there was live music.
]]>

The Moeraki Boulders at Moeraki Beach on the South Island of New Zealand.
Nature sometimes presents some odds things to human beings. Why do perfectly round boulders come out of the sea, at one particular beach in New Zealand? You can’t help but stand and stare in wonder. I had something particular in mind when I got to the beach. A long exposure to enhance the peacefulness that you experience on a beach, but the light and waves wasn’t right, and I did not get this the way I wanted it. But instead I made the long exposure look even longer, by using some horizontal motion blur. I then also changed the colors, until I got something I liked, and this is the result.
This is the original photo:
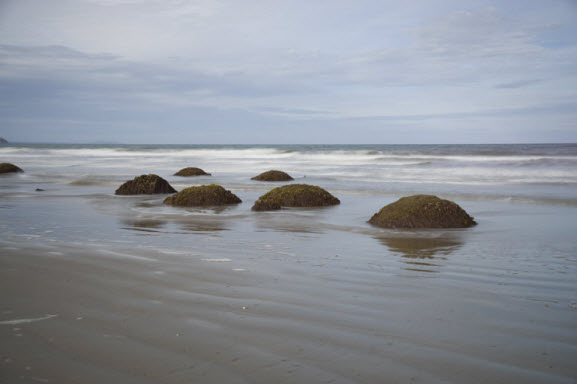
As you can see I have cropped the image some. As long as I have enough megapixels, I don’t mind cropping images, if it is an improvement. I would rather come home with a little extra scenery, and crop slightly at home than come home, and lack that last bit. Some believe in getting it right in the camera, but I don’t belong to that school. And as you can see I don’t mind faking colors and long exposure either. I see that as the freedom of the artist.
]]>
A small pool of water after the showers used to photography a reflection the Campanile di San Marco.
We had a lot of rain the first couple of days in Venice. Too hard to shoot photos in, from time to time, but in the spells without too much rain, we took out our camera’s. A good thing about the rain is that many people disappear into restaurants, shops and cafes, and you can get a photo of the Piazza San Marco without too many people.
The making of this photo
I literally sat down my Nikon D800 on at the edge of this pool of water and shot my HDR 5 shots. I have got an L-plate on the camera, that makes it very easy to snap on and off my ball head and change from horizontal to vertical. Another advantage is, that it gives a sort of a foot to have the camera on, and I just placed that straight on the ground.
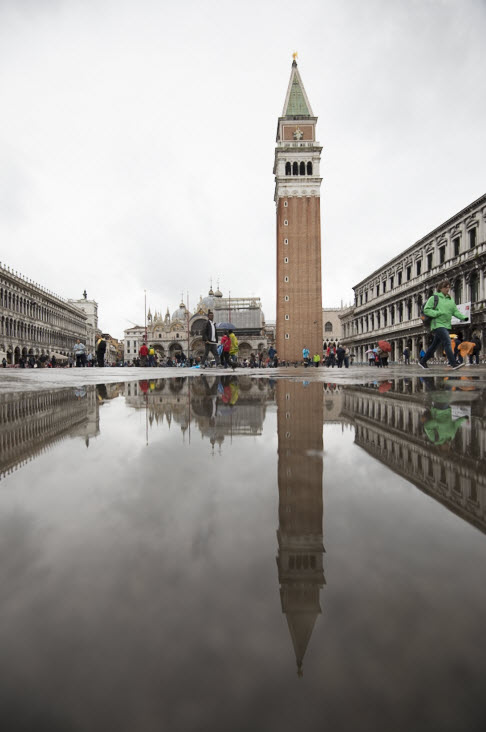
One of the five bracketed shots unedited. As you can see the surface of the water is not perfect.
The surface is of the poodle is not perfect. What I did to compensate for that, was to make a duplicate of the layer, flip it vertically, and blur the flipped layer slightly, using Gaussian Blur. The purpose of the blue is to match the blur the water gives. I don’t like a too perfect reflection.
Then I placed the new flipped layer in the right place and put a black mask on it and painted through with a white brush. In Photoshop it looks like this:

First the layer is duplicated. This is done by pressing CTRL + J or on a Mac CMD + J. The next step is to to blur the newly flipped layer, to match the blur of the tower in the poodle. Pick somewhere, where you like the blur level. It is a part of what makes it balance between the unreal and the believable.

The next step is to place the layers exactly on top of each other. To do this I use the Rotate tool, found under Edit->Transform->Rotate. I will end up using the flipped layer completely in the pool, but it still have to look like a straight tower. To be able to place the tower correctly, I change the opacity of the top layer momentarily. It’s a classic mistake to forget to set it back to 100%, and then you can’t figure out what is wrong.
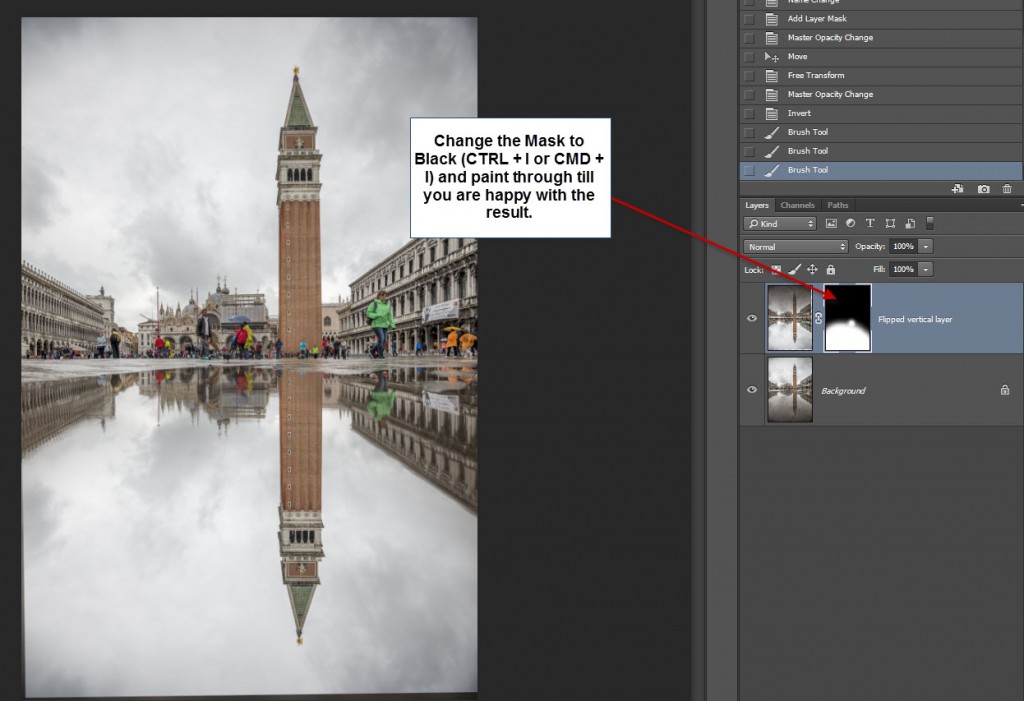
The last step is to mix the two layers. That is done by using a mask. I prefer to work with a black mask and use a white brush to paint through.
I did some extra clean up in the photo. The person in the very green jacket I removed by using some of the bracketed exposures. The person is moving quite fast and is not in the same location in any of my shots. By blending the layers, changing the exposure to the appropiate level, I could completely remove the person.
]]>
“Thames Sunset” shot with a 10 stop ND filter allowing to exposure for 40 seconds with the Sun within the frame.
Using Neutral Density filters can make a dramatic change to your photos. The photo above is a 40-second exposure, which only is possible with something to stop down the light. The Sun is within the frame and had I shot without the filter, the shutter speed would have been 1/25 seconds. I shot this at ISO 100 and f/8. I could have gone to ISO 50 and to F/22, and changed the shutter speed to maybe around a 1/4 or 1/2 seconds, but not 40 seconds.
ND filters are pretty expensive stuff, and I have ended up spending a fortune on them, not only because I have a fairly complete set, but also because I have made some mistakes. Expensive mistakes, that is. In this buying guide, I will try guide you not to make the same mistakes.
There are two kinds of filters, primarily. There are screw-on filters, and there are filters you put in a filter holder. The filter holder is screwed on as well.
I don’t recommend the screw-on ND filters. Though it may seem like a good simple choice at first, it is less flexible. When you have more than one filter, you may start combining filters. A 2 stop plus a 3 stop makes a 5 stop filter. And you might also start using ND gradient filters and soon you might end up wanting to use 2 or three filters at the same time.
- The gradient filters do not come in screw-on for obvious reasons because you can’t place the horizon.
- If you want to combine screw-on filters, you will have to screw them together. I did that with a fairly expensive polarizer filter and a 10-stop filter. And they got stuck together, and I wasn’t able to remove them from each other again. $350 down the drain. I do not screw filter together anymore.
How about flexible filters? There are some brands that make screw-on flexible ND filters. The first ND filter I bought was such one. It went from 1 stop to 8 stops, which sounded just perfect. It was more expensive than one Lee Big Stopper filter, but it was more flexible too. It looked like a good choice.
The only problem with the flexible filter was, that it only worked as supposed for 28+mm and I wanted to use it on wide angle lenses. 28mm isn’t very wide. When used with a shorter focal length the stopping of the light got uneven which made this filter completely unuseful. Another $300 went down the drain.
What do I recommend to buy?
At this point, I had learned my lessons on filters and lost $650, and I went for a no-compromise solution. Lessons are sometimes expensive to learn. I bought a Lee filter holder for 100mm / 4″ filters, and an adapter for my 77mm sized lenses, which fits most lenses I have.
B&H: LEE Filters Foundation Kit (Standard 4×4″, 4×6″ Filter Holder) (Requires Adapter Ring)
B&H: LEE Filters Adapter Ring – 77mm – for Wide Angle Lenses
B&H: Formatt Hitech 100 x 100mm ProStop 1.8 IRND Filter (6 stop filter – explanation for the 1.8 further down in the article). Edit: After a more thorough real-life test of these Format Hitech ProStop IRND filters, I have learned they have a pretty nasty complex colorcast, that I find almost impossible to fix. It depends on the light if the color cast is present, but when it is, it is nasty.
This is a solution just over $300. Still a lot of money, but it’s worth every dime!
And why these? The adapters ring come in a variety of sizes, and you will be able to find one that matches your favorite lens and reuse your 100mm filters without any problem.
There is also a 150mm system, to use on big lenses like the Nikon 14-24mm. At the time of buying my Lee filters, I was still on Canon and only had 77mm sized lenses. When I moved to Nikon to get the 14-24mm lens, I chose to buy the Nikon 16-35mm lens too, to shoot my filtered shots. That was an expensive solution, but the 14-24mm is so great and so wide, and I didn’t want to be without it. That was THE reason for switching to Nikon.
Anyway – I can live without the 150mm system.
The Lee Big Stopper was in back order, and I was told somewhere between 6-12 months delivery (oh God!). So I had to buy what I could get, which was a 2 stop Lee ND filter (and a set of ND soft gradient filters).
While the 2-stop ND filter is nice to have, it is not the one I would choose, should I choose just one filter. 2 stops is just not enough most of the time. If I were only to pick one filter, it would be a 6 stop filter (or Little Stopper as it is also called).
I would choose a 6 stop ND filter if I was only to have one filter
Why this one? First of all, a 6 stop filter has got less color cast than a 10 stop filter. You have to expect some kind of color casts when shooting with ND filters stopping 6+ stops. So the less color cast, the happier we are, and 6 stops have less than 10 stops.
Second, 6 stops are quite a lot. 1/25 becomes 2.6 seconds. Enough to make a change to your photo, but not enough, in a sunset or sunrise situation like the example above shows, but you also have some flexibility from your camera. Let’s look at an example:
The EXIF information for a shot like above without the filter would be ISO 100, 1/25 sec, f/8.
Simply by adjusting the camera, I can change the exposure too. If I change the f-stop from f/8 to f/22 I will change it by 3 stops (see #1 and #2 in the table below), making the exposure time approx 8 seconds. And then I can change the ISO from 100 to 50, which will double the exposure time again, and that makes it around 16 seconds, and that is a good start to get more smooth water. If you do a -2, 0, +2 bracket, chances are, that the water will not be blown out, and you can use that water. And that +2 exposure (#3 in the table below) will be a 64-second exposure. Now we are really getting somewhere!
If I shoot my shots bracketed with a filter attached, I just do it manually, with a cable release. It doesn’t have to be exact to work.
This table shows how to calculate your way around the camera settings. The shutter speed and the f/stop’s are related. Any of these columns represent the same exposure.
| f/stop | Shutter Speeds in Seconds without the filter | ||||||||
| EVS | +4 | +3 | +2 | +1 | 0 | -1 | -2 | -3 | -4 |
| f/1.4 | 1/30 | 1/60 | 1/125 | 1/250 | 1/500 | 1/1000 | 1/2000 | 1/4000 | 1/8000 |
| f/2 | 1/15 | 1/30 | 1/60 | 1/125 | 1/250 | 1/500 | 1/1000 | 1/2000 | 1/4000 |
| f/2.8 | 1/8 | 1/15 | 1/30 | 1/60 | 1/125 | 1/250 | 1/500 | 1/1000 | 1/2000 |
| f/4 | 1/4 | 1/8 | 1/15 | 1/30 | 1/60 | 1/125 | 1/250 | 1/500 | 1/1000 |
| f/5.6 | 1/2 | 1/4 | 1/8 | 1/15 | 1/30 | 1/60 | 1/125 | 1/250 | 1/500 |
| f/8 | 1 | 1/2 | 1/4 | 1/8 | 1/15 | 1/30 (#1) | 1/60 | 1/125 | 1/250 |
| f/11 | 2 | 1 | 1/2 | 1/4 | 1/8 | 1/15 | 1/30 | 1/60 | 1/125 |
| f/16 | 4 | 2 | 1 | 1/2 | 1/4 | 1/8 | 1/15 | 1/30 | 1/60 |
| f/22 | 8 | 4 | 2 | 1 (#3) | 1/2 | 1/4 (#2) | 1/8 | 1/15 | 1/30 |
The highlighted reds are close enough to our example, just without the filter attached.
I would also be able to lower the shutter speed by changing the f-stop in the opposite direction to f/4 and increasing the ISO to, let’s say ISO 400. Then I would have moved the exposure 4 stops faster. I have a span of 8 stops, just by changing settings on the camera.
There are a few compromises. Images tend to be slightly less sharp at f/22 and maybe also at f/4, depending on the lens. Nothing serious, which I can’t get recover in the post-processing.
At ISO 400 there will be a little more noise, but no big problem.
The biggest problem can be the change of Depth of Field by going to f/4.
What brand to choose?
I have Lee Filters for my 100mm system. These are among the very best, and the price comes with them. But you do get what you pay for.
[Edited] My Hitech Formatt IRND filters at first seemed really good, but after a real-life test, I learned that far too often I ended up with a complex colorcast, that I wasn’t able to color correct. I have had a lot of success using the 6-stop Hitech Formatt IRND filter, but the 10 stop Hitech Formatt IRND has a really nasty color cast, that is almost impossible to get rid off. Shot’s I have shot using that, I have turned into Black and White photos, almost without exception.
Instead, I have bought some of the LEE ProGlass and that has even less color cast than the original LEE filters I bought.
I have seen cheap Cokin filters in use, and the photos simply couldn’t be used for anything serious. And putting two filters on top of each other, just made it go from bad to worse.
I can only recommend the most expensive and best filters, simply because the others are not good enough.
Why is 1.8 the same as 6 stops?
In my world only calculating in stops makes sense. That’s how you think as a photographer, but for some reason the filters are primarily given in another scale, having 0.3 pr. stop. A 0.6 filter is then a 2 stop filter, and 1.8 becomes a 6 stop filter.
Another numbering system used is ND64 for the 6 stop filter. This system is easier to understand. That’s the number you have to multiply your exposure time with, and that’s why 1 second (#3 in the table above) becomes 64 seconds in my example above.
Tips for shooting long exposure photos
I have another article on how to use ND filters for shooting long exposures. You can read it here.
]]>
Chateau Queyras in the French Alps looks fantastic lit up in the night. This is a long exposure of no less than 370 seconds.
Long Exposure Photography is fascinating. By changing the exposure time, you achieve dramatic changes in the final result. The two photos featured in this post, are shot within a 25 minutes of each other. The first one is a long exposure og 370 seconds, and the second is a normal exposure of 0,5 seconds. Even if the images are processed different, you can easily tell the difference, if you look at the clouds.

This is a normal exposure shot 25 minutes earlier than the first one. It is only 0,5 seconds, and is processed as an HDR image.
The first photo I shot 25 minutes later having attached a 2 stop ND filter on the camera. A neutral density filter, or ND filter, stops the light down, without changing the colors. A 2 stop ND filter will double the exposure time twice. This photo was the last photo I shot from that location, and it was getting pretty dark, and I wanted to be sure that the clouds were completely smooth.
The clouds were moving a lot, and sometimes I could see the top of the mountain just behind Chateau Queyras, and at other times it was hidden in the clouds. The exposure is 370 seconds or 6 minutes and 10 seconds. In long exposures like that, you can not predict what happens. I was lucky that clouds left the top of the mountain clear in most of those 6 minutes, giving me a hat on top of Chateau Queyras.
I shot it, at f/16 and ISO 100, using my 2 stop ND filter. Had I not used the ND filter, I would have had an exposure of 370 seconds diveded by 2 twice or just by 4, that is 370/4 = 107.5 seconds. A 107.5 seconds is still a long time, and might have yielded a similar result.
I find that to smooth everything out 100% and leaving no textures what so ever, does require more time, than a minute. I wanted to be on the safe side in this case and put on a 2 stop ND filter.
You can also use ND filters during more bright times of day. Had I used the 2 stop ND filter on the first image, I would have increased the exposure time from 0,5 seconds to 2 seconds, which wouldn’t have changed a whole lot. But if I had put on a 10 stop filter, I would have had a 512-second exposure, which would have yielded a similar smooth result.
To fine tune the necessary time, you can change ISO and f-stop values. To lower the exposure time from 512 seconds, to about 370 seconds, I could have lowered the f-stop to f/14 or f/13.
To be able to work flexible using ND filters you need a set of ND filters, to be able to match the desired exposure time. I have a 2, 3, 6 and 10 stop filters. Choosing the right filter, combined with the right ISO, Shutter speed and aperture (f-stop) is what makes your exposure, when working with ND-filters and long exposures.
How to calculate the exposure time
But how to calculate the exposure time? It does require some brain activity to calculate your ways around to get the right exposure time.
Depending on, what ND filter you have on, and how long you approximately plan on making you exposure, you can do a few things. If you plan on exposing for 60 seconds, you can increase ISO to the double value (like ISO 100 to 200). Then then you can adjust filters and f-stop to until, the camera measures a 30-second exposure. Adjust the ISO back to the original value.
Another approach is to do test shots without the filter and when you have the right exposure time, attach the filter and recalculate exposure time.
You can also use an App to help you calculate and time your exposure. While this might seem perfectly easy, I always end up finding it too cumbersome and end up doing the math myself and use the timer in my iPhone.
One thing you have to be aware of the light is changing fast, is that your will have to compensate for that. If it grows brighter, you have to take that into account, shortening the exposure time. And the opposite if the light is fading, you will have to increase the exposure time with a stop or two, depending on how fast the light fades.
The shooting
The obvious thing is; you need a tripod. You can’t do long exposures handheld.
You have to be in manual mode, and switch of auto ISO to do long exposures. You need to be in control of all three parameters, ISO, Aperture and shutter time. Most DSLR or DSLR-like cameras (including the mirrorless cameras) has a maximum of a 30-second exposure. Bulb mode is required to make exposures longer than 30 seconds. Usually, this is something, which you dial to, using the same dial as you use for changing the exposure time.
You also need a remote release. You really want to be avoiding to touch the camera, while shooting. I have a simple cable release. I bought an advanced electrical one, but it died on me, in fact right before shooting this image, and I had to borrow another cable release.
You also want to switch on long exposure noise reduction. If you don’t you get strange hot pixel noise. The sensor heats up while exposing for such a long time, and the long exposure noise reduction, will help reducing the result from that. The downside is that it takes just as long to do, as your exposure took. A 6-minute exposure will also give a 6-minute noise reduction. That is a hard one to swallow.
And that is the basics of long exposure photography.
]]>