
Amstel canal in Amsterdam. On the right-hand side is a small typical Amsterdam Hotel called Hotel Amstelzicht. I have stayed there a couple of times, and the view is amazing.
During the day, Amstel canal is a busy area, with lots of bots in the canal. I guess all canal tours go through here because it connects some of the interesting areas of Amsterdam. In the far distance, you can see the Nationale Opera and Ballet of the Netherlands. On the right, you the Hotel Amstelzicht, which I have stayed at a couple of times.
At Hotel Amstelzicht you can get rooms, with canal view, and it is just amazing to sit and watch through the window and see the locals go around in their small boats. A small family in one, and a bunch of students having a party in another, and then the occasional canal tour boats. You pay a little extra to get the canal view, but it’s worth every penny.
]]>
This is the fourth article in my series of articles on getting a better and deeper understanding of HDR photography.
If you haven’t read the previous articles, you might find them interesting too before reading this one.
- Part I: Understanding Exposure Value Stops or EVS.
- Part II: The Dynamic Range.
- Part III: The Histograms.
High Dynamic Range and Tone Mapping
Is HDR the same as tone mapping and vice versa? No, it is not. However, it is two terms that people often confuse with each other, and it is quite important to get a grasp on which is which, if you ask me.
In Part II about the Dynamic Range I said that a High Dynamic Range photo, is a photo that is merged from several different exposures into one final photo. This way you extend the cameras natural dynamic range and get more detail.
People with some knowledge of photography, will often recognize an HDR photo, as being an HDR photo. But what they recognize is really something different, than the fact it is an HDR photo, if by HDR, we stick to, that it is several photos merged into one.
What people recognize is a certain method of post-processing called Tone Mapping. Most HDR software includes a tone mapping algorithm, and automatically apply it, after merging the photos into the HDR photo. Maybe this is the reason for the confusion.
Let’s try to dig a bit further.
Making the HDR photo
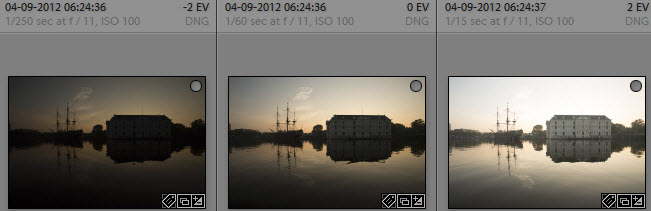
When you have shot your three bracketed photos of let’s say -2, 0 and +2, you merge them together, and you get a 32-bit image instead of three 16-bit images. As you can imagine, this takes up quite a lot of space and even worse, you can display it properly. Very strictly speaking, this is the HDR image, and you can’t even see it properly. Your monitor is not designed to display a 32-bit image and you need to do something to it, before you can see it.
To be able to display the image properly, an algorithm is used to map the tones from 32-bit, to something you can display, like a 16-bit image. And this is called tone mapping and strictly speaking this is no longer the HDR image, but is a 16-bit interpretation, but it still is loaded with lots of information.

32-bit HDR image.
This tone mapping algorithm takes some parameters, and by adjusting these parameters, you get different results. There are a number of these ‘tone mapping’ algorithms, typically one in each piece of HDR software, and while they are rooted in the same theory, each implementation gives different results.

Tone mapped image.
Because it is impossible to show the 32-bit image, it is only natural to bundle a tone mapping algorithm with the HDR software, for which reason you find a tone mapper in virtually any HDR software.
One of the problems with tone mapping algorithms, is artifacts, and you rarely can use them as final photos. It is only one step of the way to a final “HDR photo”. I put it in quotation marks, because, it really only is the 32-bit image, that is the HDR photo.
Other ways of making HDR photos
There are of course other ways of making HDR photos. Another very common way, is to blend the images together, in hand in Photoshop (or Gimp). You then organize your photos as layers in Photoshop, and start mixing them, to get a blend, taking advantage of the complete dynamic range captured.
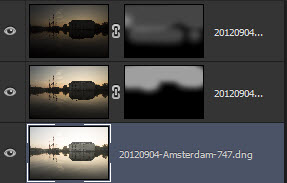
This method of mixing by hand is no less HDR, than using a tone mapper is. Even though it will end up with a different look, and it might require a trained eye, to spot it as an HDR photo. It does not have the ‘HDR look’ and the intensity the tone mapping offers.

Image blended using layers.
Other HDR algorithms
Photomatix offers several algorithms in addition to the tone mapping algorithm. Some have special purposes, like real-estate, but what they have in common, is that the fuse the photos together. What these fusion-based algorithms does, is to mix the photos. The tone mapping works on the “sum” of the three original exposures, while the fusion works with mixing the original photos.
Fusion gives more natural looking photos, and without as many nasty artifacts as tone mapping sometimes provide. But, this also limits, what you can do with the photos. They are less flexible and less artistic.

Real Estate fusion.
What all methods have in common, is that they combine a set of photos of the same scene, with different exposures, into one photo. An HDR photo. No matter what methods was used.
The fusion methods tend to give HDR photos, that are closer to finished photos.
Other methods
A number of other methods exists. Some just merge it into a TIFF file, and skip the whole HDR post-processing algorithms, and work with the TIFF as any other ordinary photo. Others work with luminosity masks. Many methods exists, and they each produce specific types of photos.
The HDR look
You maybe heard this expression ‘the HDR look’ or ‘this is HDR’ish’, this is because HDR is associated with a special kind of style (or rather a number of styles). And when the photo start falling into these styles, they are called HDR’ish.
It is (mostly) a tone mapper, that is responsible for making a photo look HDR’ish. The tone mapper has got many parameters, and some of these are quite potent, and will bring your photo to a place you don’t want to bring it. Like this one:

Extreme tone mapping.
Sometimes The HDR look is meant as something bad, like in the example above. It just doesn’t look good, because it goes over the top. There are nasty halos (brightness around the building and horizon) and strange and very unnatural light in the photo. You do not want to go here.
But you can also do nice photos having The HDR look, like this one:
 When I upload my photos to critique based communities, I often get the comment ‘I usually don’t like HDR photos, but yours I like.’ or something like ‘Such a delicate use of HDR’. While I appreciate these comments, and they make me happy, they are also off track. My photos are HDR gone extreme, and what people really don’t like is, is badly processed photos.
One thing, that most HDR software allows, is to knock yourself out, in post-processing. You can go so far extreme, that nobody, even if sitting on Mars using a telescope, would doubt, that the photo has been post-processed. But that does not make it into a great photo. And this is a common mistake for beginners. I have been there too.
It’s like sitting in a race car, you have to learn how to drive it. Yes you can drive fast, but you will wreck the car, if you do not learn to brake before the curves. The same goes with HDR – if you drive fast (use a too strong effect), you must brake harder, in order not to wreck it (you must fix what goes wrong in the HDR process). And this requires some techniques and skills, which I cover in my HDR tutorial.
In order to make great HDR, but still extreme HDR’s, you need do more, than just using a tone mapper. As in the example of the top image. That is a tone mapped image, that has been mixed and blended to remove what was ‘too much’ in the tone mapped image.
What’s next?
In the next article I will cover HDR software and discuss some of the popular tools, and some pros and cons.
Further reading
- Understanding HDR part I – Exposure Value Steps.
- Understanding HDR part II – The Dynamic Range.
- Understanding HDR part III – The Histograms.
- Read part V about HDR tools here.
- Get 15% discount on Photomatix Pro. Use promo code: caughtinpixels.
- You might also want to read my free detailed HDR tutorial here.

There are many tools and ways to make High Dynamic Range photos. Some are more advanced than others and some give better results than others. I have tried to line out a place to start and what software to get, to make HDR photos. You can start out for free and use the free versions of the software, to see if you like it. And if you do like it, the essential software is not that expensive, and I can give you a 15% discount, if you use my coupon code.
I have made a list of the essential software you need, and why you need it that you can find here.
About this photo above. It is from Amsterdam Maritime History Museum located on the water front of Amsterdam. If you ever get to Amsterdam it is highly recommended to visit, alone to see the building. Make sure to visit the toilets in the cellar…
This is a 7 shot HDR processed first in Photomatix Pro and then afterwards optimized using Photoshop CS6.
]]> I went to Amsterdam on a business trip in september. One day I got up at 3.30 and walked all the way in from a hotel near by the airport to the center of Amsterdam. I hit the harbor when the sun rose – I have shown one shot from the Amsterdam Maritime History Museum. I took around 1000 shots for HDR that morning. In the beginning it was pitch dark and I had the camera on ISO 400. When the light grew brighter I changed the ISO to 100. I have had a hard time getting satisfied with many of the shots, but I have found that it has to do with getting the right mood in the processing and not as much the photos. This particular one is from ‘the way back’
How did I make this photo?
The photo is shot with a wide angle lens close to the ground. A wide angle lens is great, because it is sharp from very close up and all the way out to the horizon. When I came home and looked at this photo, the great sunlight at the end of the tunnel of trees didn’t come out so well. I have had the photo lying around for half a year, trying a few things, but not managing to achieve the mood from that morning. Finally I figured out, that a soft yellow light at the end of the tunnel of trees had been present, and that it had almost disappeared in the shots. So I emphasized it and that really brought the photo together.
]]>
I guess it’s no surprise that Amsterdam has all these lovely canals. You find house boats, construction boats and just small boats for cruising around in the canals. The yellow shoe shaped boat is one of the more spectacular ones I found.
About the processing
It’s a 5 shot HDR, that I processed with Photomatix. Nothing unusual there. Then I blended layers in Photoshop, to remove a little ghosting in the trees, not much there though. The photo still didn’t really pop the way that I had hoped. I had managed to get a not very pretty handle of bicycle in the lower part of the photo. In the end I decided on this cinematic format, cutting away the handle. The other thing I did like, was the hanging bowl of flowers, so I decided not to emphasize that too much. I focused on the small Shoe shaped boat and the sun rays in the far end. Those I processed to be emphasized. The boat was a bit dark, I made it more light and the sun rays I emphasized using burn and dodge tools.
]]>
After walking through Amsterdam taking nightscapes I finally arrived to the harbor, to see the sun rise behind the Amsterdam Maritime History Museum. A beautiful place, that I returned to in the evening, to attend to a cocktail party. That I didn’t know, when I took this photo.
About the processing
The photo is a 5 shot HDR. I did the tone mapping with HDR Efex Pro 2. Not a bad tone mapping tool, though I find it more detailed in Photomatix. Afterwards I did a little blending layers. Primarily to remove ghosting in the water, on the masts of the ship.
 On a day as hot as a summer, during one of the first days of september I caught this in a Cathedral in Amsterdam. A nice american lady said, that it looked like a nice camera I had there, but that she would precious her pictures just as much I would mine, even though her camera was much smaller.
I had been in the church many years before and knew it was beautiful, so I wanted to go back and get this shot.
The photo is 7 photo HDR. I did the tonemapping in Photomatix, and then took all 7 exposures + tonemapped into photoshop as layers and masked through. I tuned the colors a little and did some final sharpening. ]]>
