
Hallstatt in Austria. Edited in Aurora HDR 2018. 0% Photoshop used and 1% Lightroom used.
Initially, when Aurora HDR came out two years ago I was very intrigued by the software. No doubt the makers of Aurora MacPhun have put themselves in a good position, by allying themselves with one of the HDR giants Trey Ratcliff. But, after the first initial rush of interest, I was deeply disappointed.
I did go into the software with a very open mind. I am a software addict and I love to use new software. However, I instantly ran into trouble. It was Mac only, I had Windows. I did have a 4-year-old MacBook Air. The biggest 2011 model, 4 Gb ram and i7 CPU. Powerful enough to run Photoshop, Photomatix, and Lightroom. Not the fastest car on the highway, but certainly working.
But, starting the first version of Aurora HDR with a 36-megapixel image was impossible. I then downscaled the images to about 12 megapixels and I was able to start the application, but I ended up waiting until I got a MacBook Pro.
On my fully loaded, top of the line, all maxed out MacBook Pro I still found Aurora HDR was extremely slow. Whenever I did anything it took seconds and some operations took up to a minute. I timed it and filmed it.
I did make a couple of OK-ish images and I did a review while still biased by the hype. But, as soon as the smoke did clear I was not overly happy to work with the tool. It was far too slow and the results were not always satisfying.
Aurora 2017 arrived
What? Do I have to buy a new version? Not just an update? All of my other tools for Photoshop come with free updates. That didn’t feel right. Particularly, because the first version was more of a Beta than an actual working tool. And looking at all of the praise on the internet and feeling the hype, I thought “This is the Emperors New Clothes”. They were selling a turd as if it was the greatest pumpkin pie ever made.
Anyway, I bought 2017 reluctantly. The speed issues were mostly gone, which was good. A new luminosity feature had arrived, not very fast though, but most things were snappy enough.
I tested the quality of the tool, but I was deeply disappointed by the tool itself. It generated halos no matter what I did and I could not really get rid of them. The brush left strong edges between the layers, making it even harder to work with.
Once in a while, I have tried to process a photo in Aurora 2017 just to be sure, but I never liked what came out of it and I simply stopped using it.
The hype was still going on. To me, Aurora HDR 2017 seemed just as much The Emporers New Clothes as the first version.
Aurora 2018 – I have to pay – again?
I almost didn’t buy it.
Come on, make a subscription out of it! It is ridiculous to buy a new version every year!
Being so disappointed with the two initial versions I had almost given up on it. But being the software addict that I am, I bought it and in short, I was deeply impressed.
Let’s begin with a screenshot:

This is a 5 exposure bracketed image series and I have merged the 5 images and nothing else. I have touched no sliders. This is the clean HDR merge that Aurora HDR does. Notice the very strong dark halos on the left, which is the 2017 version. It is that type of halos that torments almost any image in Aurora 2017, almost no matter what you do.
I have tried to make counteractions to get rid of the halos or try to hide them, but it shouldn’t be that way. Almost all tools can generate halos if you go over the top, but not out of the box. This is what Aurora HDR is put in the world to do. Merge exposure bracketed photos to something decent.
Almost all tools can generate halos if you go over the top, but not out of the box. This is what Aurora HDR is put in the world to do. Merge exposure bracketed photos to something decent.
On the right there is you can see the new Aurora HDR 2018 merge and not only, does it not have the nasty halos, it also does a very clean and nice merge. That has changed my mind entirely on Aurora HDR. At least the software now does, what it is supposed to do.
Edit: To be very strict the merge in Aurora HDR 2018 is not 100% perfect. Halos are just so soft and big, that you have to look for them and it is very easy to work with. I don’t believe in “press a button processing”. I believe what comes out of any HDR tool has to be blended with the original photos to achieve a perfect HDR photo. There is no silver bullet.
A few other very nice new details that I like:
- The speed has improved even more. I would go so far as to call it very snappy and responsive in most respects, even on my 42-megapixel images. They have certainly worked on optimizing the speed. It does get slower as you add more layers, but then again so does Photoshop. I have triggered something that requires heavy calculating, but mostly it is snappy.
- There are the necessary tools to finalize a photo in Aurora HDR 2018. You have:
- Transform features to correct perspectives. However, this feature is only available at certain times which makes it very confusing to figure out. A good beginning, but there is room for improvement.
- Crop tool.
- The Heal tool is an external tool that requires an additional license, but it is accessible from Aurora. You can also just remove the spots when you bring the photo back to Lightroom.
Other improvements that I like
- The brush is soft enough to make nice blends between layers. In 2017 clear edges appeared around the brush, which was another reason not to use Aurora 2017.
- Original images are not apart of the new file format, which I guess is fine if you don’t need them. You can load them if you need them. Edit: This has been fixed in a later update.
What I don’t like
- The merge is very clean and the halos are super soft, if there at all. The images do tend to be a bit flat. That is normal behavior for HDR software and you will have to process the image more, to add depth back into the image. The best way to achieve this is by blending in the original images.
- Minor things that I find annoying, like:
- There is no “Save as…” feature – but why not?
- Some features are located in strange places, like for instance the Transform.
- No preview from Finder or Bridge. A small thing, but it just would make it easier to handle Aurora HDR files in a workflow.
- Call it a software subscription instead of a new paid version every year. I don’t mind paying for a subscription, at least I know it’s a subscription.
Who is Aurora HDR 2018 the right tool for?
When you begin to use a tool, that does a lot automatically, like Aurora HDR 2018 does, you also have to accept that it has a distinct and recognizable style.
Aurora HDR has a distinct style and you have to do some work, to get rid of it, just like you would with any other tool. That doesn’t make it a bad tool if you like what you get out of it.
Aurora HDR is capable of producing high-quality HDR photos, without the nasty halos the first two versions created. It is packed with a lot various effect tools, like Radiance, Glow, HSL panel, Split toning panel, various HDR structure sliders, vignette tool as well as old plain contrast, highlights shadows and white and black sliders. You also have the Luminosity masks available. In short, it is a pretty full package.
So, who is this tool for? Anyone how likes to shoot HDR photos and who might feel that dancing with Photoshop is too difficult, but Lightroom is not enough.
Aurora HDR 2018 is finally ready for real use and it is a full package, that can produce final images, maybe with the exception of removing dust spots.
Will this be my tool of choice? For some things, absolutely, but not solely. Why? Because I love to work in Photoshop and some of the highly advanced things I like to do in Photoshop, are not available in Aurora HDR. I love to post-process the images. I don’t necessarily want the fastest route through the forest. That is just how I am. You may feel different.
–Jacob
]]>

Basilica de Santa Maria del Mar in Barcelona. A vertical panorama of two stiched photos.
I am a total wide angle lens addict and I have much more than I actually need, but they serve different purposes and have different strengths and weaknesses.
The Voigtländer SUPER WIDE-HELIAR 15mm III is one of my favorites, even if it has some limits. The most obvious advantage is the size of this lens. It is super small and it is a perfect match for a Sony alpha FE camera, like Sony A7R or Sony A7RII.
The build quality is solid, but due to the small size, the weight doesn’t run off, even if it is all metal and glass. That makes it great for traveling light.
What I also like about it, is that being a prime, it is super easy to focus. I just crank it all the way to one side and it is focused at infinity, which often is good enough. With a little practice I have even found the amount I have to twist contra to get to the hyperfocal point.
I work a lot in the dark and focusing can sometimes be a hassle, because the lenses hunt. But the Voigtländer is super easy. Of course, it does not offer autofocus, but for my line of photography, this is no problem, as long as infinity focus is easy.
It does come with soft corners at f/4.5, but even at f/5.6 this improves and at f/8 it is reasonably sharp across all of the frame. It is not as sharp as my Zeiss Batis 18mm f/2.8, which is insanely sharp, but plenty sharp to be working seriously with. The Zeiss is just in a league of its own, and it is twice the price.
The most obvious drawback is that it is a slow lens. It is only f/4.5. But, when I attach it to my Sony A7RII, which has image stabilization in the house, I can handheld 1/8 of a second, if I concentrate. This makes it possible to shoot HDR photos indoor, in fairly low light conditions.

Hand held at ISO 1600 and f/4.5 using image stabilization. Slowest exposure is 1/8 of a second.
This photo from the Cathedral of Barcelona, I have handheld three shots at 1/125, 1/30 and 1/8 of a second, at f/4.5 and ISO 1600 on Sony A7RII. Here is a 100% crop of the 1/8:
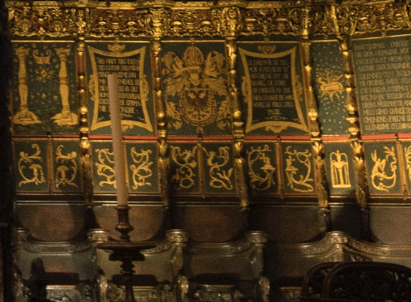
This is the unedited RAW, without sharpness and noise reduction applied. This is highly usable, even the noise levels are well under control, thanks to the amazing Sony A7RII.
I also find it very resistant to flares, compared to some of my other wide angle lenses. Flares are a part of a life with wide angle lenses, but I rarely get frustrated when I use the Voigtländer 15mm.
The lens allows screw on filters, but you can’t remove the lens hood and attach a filter system. As I started out with, the various wide angle lenses have their strengths and weaknesses. For that reason, I also have the Zeiss Batis 18mm f/2.8, which allows 77mm filters to be attached, and I can use my Lee filters on that.
I always carry my 15mm Voightländer with my Sony cameras, because it is so small and easy to bring along.
–Jacob
]]>

Åre early in the morning seen from my hotel room.
It was a Fuji X100 that in 2012 was one-half of the cause to start my photo disease. That is the sickness in which one is driven to take the next bold photo.
A lot has happened since 2017. I have moved to first DSLRs and later I included mirrorless cameras. But even the mirrorless cameras are not pocketable, the X100 was. , but I was very pleased when there was finally a
The X100 had two major limitations, which meant that I didn’t use it terribly much. First of all, the sensor was 12 megapixels, which was only just enough. And not enough for cropping. Second, it only did -1, 0 and +1 in bracketing, which is rarely enough to shoot the HDR scenes that I shoot.
But when the X100F got out, I was happy. Finally – 24 megapixel and -2, 0 and +2 autoexposure bracketing, and still the amazing image quality. I bought it instantly and I love it very much. The smallest camera I have, fast and amazing image quality. I have used that diligently since then.
I shot the image on top, with my X100F from my hotel room in Åre, Sweden. It is a panoramic picture consisting of 3 pictures. I actually had much bigger ambitions with this image than I managed. I would have made a ‘compressed time’ picture, in which I merged pictures together, to show time from when it was completely dark until it was bright.
But, the fantastic little X100F came in short. Funny, because it can easily take time lapse pictures for hours. Even bracketed. The camera also has Manual focus, which works great by the way. First I tried using autofocus, but fair enough, it was nearly pitch dark. The camera could not focus. Instead, I switched to manual focus. But it made a funny mechanical sound after each photo. After having lied in my bed, I eventually got up and checked. All of the images where slightly out of focus.
Then I looked out of the window and thought ‘this is pretty damn nice – I will just shoot a panorama’ – and the result is at the top.
Time compressed photo
A night I picked up my Nikon D800 and put that up for time lapse photography. The good old real DSLR does not play any of the funky electronic games. This image below is 5 hours compressed into one image.

Åre in Sweden in a time compressed photo.
–Jacob
]]>
Sunset at Tadre Mill in Denmark. One of the very first images I shot using my brand new Voigtländer SUPER WIDE-HELIAR 15mm III for Sony FE mount.
I have been waiting for this lens for what seems like AGES. Since I got my Sony A7R two years ago I have been looking for a good wide angle lens solution. I bought the Sony 10-18mm, and though some say you can use it for full frame, I do not agree. It is by far too soft in the corners, and the distortion is a mustache like distortion. And then I can use my Nikon lenses on my Sony cameras, using my Metabones adapter. But neither solution has been satisfactory.
The Metabones adapter has no electronic connection to the Sony camera, and does not transfer the EXIF information, and it does not trigger the focus peaking. Smaller things, and yet still annoying things. The reviews of the first automatic adaptor for Nikon to Sony FE mount, haven’t impressed me.
So Voigtländer SUPER WIDE-HELIAR 15mm III for Sony FE mount is the lens I have been waiting for, along with a native f/2.8 16-35mm.
At the time of writing, the lens is in pre-order most places. But if you like the review, and consider buying the lens, you can support me by using this link and buying it at BHphoto.
Overall remarks
The Voigtländer SUPER WIDE-HELIAR 15mm III for Sony FE mount is a prime full frame format lens. It also fits on APS-C cameras, like Sony A6000 and A6300, only it will be like a 22.5mm lens. Being prime means that it only has one focal length, in this case 15mm.
The aperture goes from f/4.5 to f/22, which means that it is not a super fast lens, on the contrary, a fairly slow lens. It will not be the obvious choice for low light photography.
The aperture ring has a nice feature, allowing you to switch between clicks and smooth turning. When using clicks, it’s 1/3 of a stop per click. The smooth and silent aperture ring turning is practical for filming.
There is no autofocus, but when you start using the focus ring, the lens triggers the focus peaking – God I love that! And even better all EXIF information is transferred. In Lightroom, it registers as:

It uses 58mm filters and the nearest focusing distance is 30cm / 11.8″.
Built quality
When unboxing the lens, it feels heavy when picked up, but this is only a relative deception because the lens is small. The weight is between a third and a quarter of my workhorse, the Nikon 14-24mm, which is around 1000 grams. The Voigtländer is only 294 grams.
The built quality is excellent. It feels solid, though it has no weather sealing. The aperture ring is firm when set to clicks but not too hard. When ‘de-clicked’ it is smooth and easy to turn.
The focus ring is smooth and easy to turn.
Size matters
The Voigtländer HELIAR 15mm III is surprisingly small. I knew it would be small, and yet I became surprised. That you can construct such a small full frame lens is just amazing. This is compared to the lens I have been using so far:
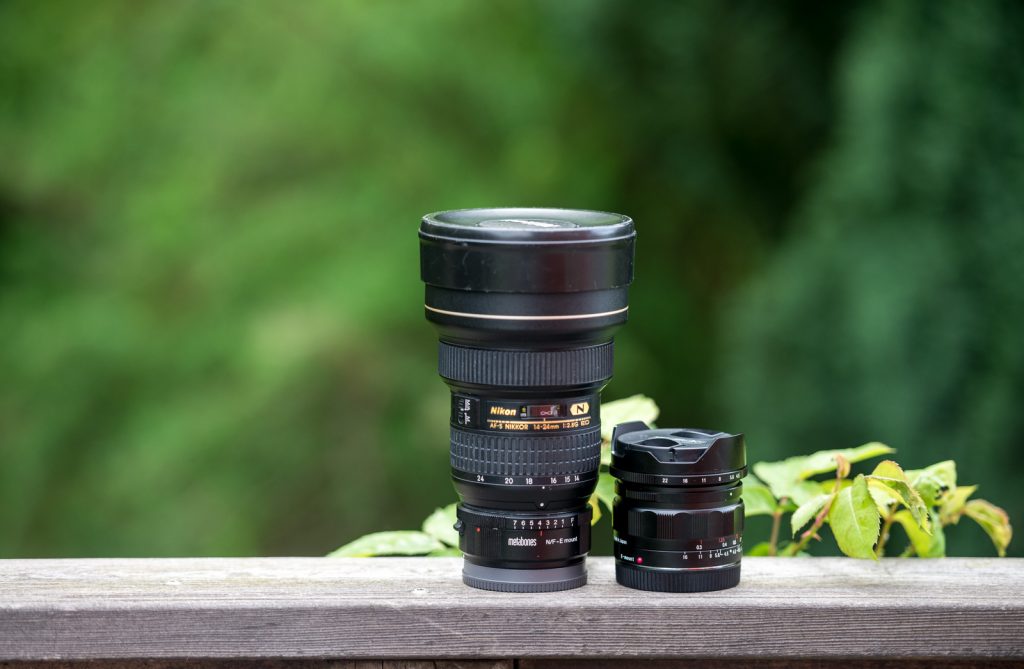
Nikon 14-24mm attached to the metabones adapter side by side with the Voigtländer SUPER WIDE-HELIAR 15mm III for Sony FE mount.
Image quality
I had some expectations to this lens, but I also expected some shortcomings. I have read reviews of the non-native versions of the lens, and of the Mark II version of the lens, so I was pretty excited to test this one.
Sharpness and barreling
The Voigtländer 15mm has a great sharpness in the center, at all apertures, though you can detect som diffraction at f/22.
If you stay around the mid apertures (f/8 to f/13) it also has also a great corner sharpness. I have been used to great sharpness, from my Nikon 14-24mm, and at f/8-f/13 I have absolutely no complaints about the sharpness from the Voigtländer lens.
Wide open at f/4.5 it does have some softness in the corners, but I have seen far worse.
Here are some examples. Click to download the full-resolution jpeg file (unprocessed 80% compression).

Shot with a Sony A7RII at f/4.5. Click to download full resolution file.
100% crop of the corner af f/4.5. A bit on the soft side, but I have seen worse.
Shot with a Sony A7RII at f/4.5. Click to download full resolution file.
100% crop of the corner at f/8. I can not ask for much more. This is great corner sharpness, and for landscape and city scape photography, this is more than good enough.

Shot with a Sony A7RII at f/13. Click to download full resolution file.
100% crop of the corner at f/13. Again a great corner sharpness, maybe even slightly sharper than at f/8.
Shot with a Sony A7RII at f/22. Click to download full resolution file.
100% crop of the corner at f/22. Now we again have soft corners, but again I have seen worse. Diffraction is also noticable, if you look at the center sharpness.
The lens is sharp, very sharp, even in the corners if you stay in the middle of f-stop range. This is normal behaviour to lenses. As a Landscape and Cityscape photographer I have no problem working in the middle around f/8-f/13.
What you can also see from the shots, is that barrelling is no big problem at all, and when Lightroom gets updated, it will fix this in lens correction with no problem at all.
Lens vignetting
The lens does have some vignetting, and it is worst at the extreme ends of the aperture, that is f/4.5 and f/22.
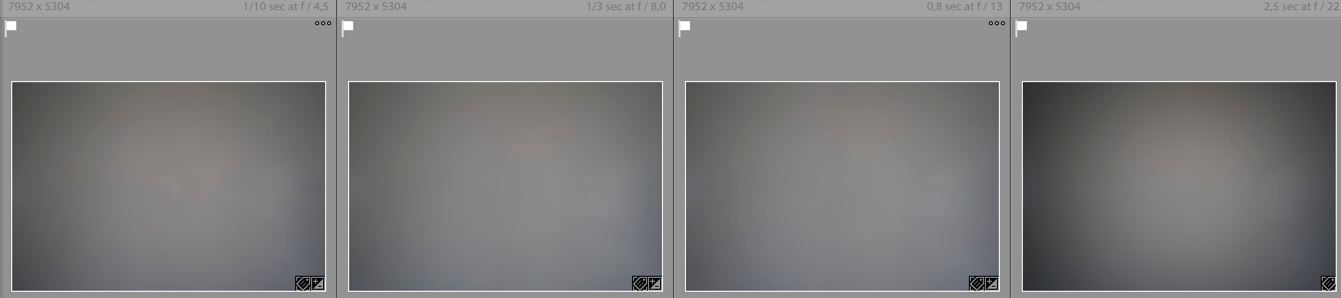
f/4.5, f/8, f/13 and f/22.
Again when Lightroom gets the lens correction profile, this is easily fixed. But I think does have pretty strong vignetting, and definitely more than I am used to.
Flares and Chromatic Aberrations
I tried doing some flare tests. It is not a big issue, in fact I would perhaps go as far to say, that this is probably wide angle with the least flares I have tried.

Flares is always a problem on wide angle lenses. This might be one of the best I have seen. Click to downlod full resolution file.
Chromatic aberrations are very low. I have not been able to detect any.
Bokeh
Using a slow extreme wide angle lens, like the Voigtländer 15mm will not give a lot of bokeh, even at f/4.5. But here a 100% crop just to show it.
Sample images in full resolution
Here are a few sample images, and again you can click to see the full resolution files.

Voigtländer 15mm shot at f/8. Click to download full resolution.

Voigtländer 15mm shot at f/8. Click to download full resolution.
Voigtländer 15mm shot at f/16. Click to download full resolution.
Verdict
Overall I must say that I am very happy with this lens, and I expect it to be my wide angle work horse. And because the lens is so small, it fits nice on the A7RII, and will be perfect for travelling.

Pros
- Native super wide angle lens for Sony FE
- Small
- Very sharp also in the corners at middle f-stops.
- The built quality is excellent
- Triggers focus peaking
- Minimum flares for a wide angle lens
- Very low on chromatic aberrations
Cons
- Slow lens, only f/4.5
- No weather sealing
- No autofocus
- A bit strong vignetting
In short, this lens has definitely been worth waiting for, it is just fantastic.
If you like this review, and consider buying the lens (or other equipment) you can support me, by using this link and buying it at BHphoto.
–Jacob
]]>
Karlskrona in Sweden processed using AuroraHDR.
A few weeks ago I posted my test drive of AuroraHDR. In the meantime, I have got my new MacBook Pro and have been using AuroraHDR a lot more.
One of the risks of taking a new tool into use is that you change your style because you adapt your style to that of the tool.
The photo above is an old one from Sweden and it has been one of my ‘test-cases’. I already had processed it using Photomatix and my standard processing flow. I had got a different, yet similar result. I did not try to get a 1:1 version.What I particularly like to have in this image, is a strong texture on the building and the reflection in the water, so this was what I chased in AuroraHDR.
What I particularly like to have in this image, is a strong texture on the building and the reflection in the water, so this was what I chased in AuroraHDR.
What I have done, is to research what is possible to get out of AuroraHDR, and when I have found something that I like, I have created a preset. I have been trying to create presets that support my style, rather than adapt AuroraHDR presets into my style. You might feel different about that, which is perfectly ok, I just like to be myself with my own style.
This has been a very interesting exploration, and I have found that it can be done; I can create my style in AuroraHDR. It is a matter, of finding the sliders that do what I like to do.
Some of the sliders are extremely potent and you have to be very careful with them.
AuroraHDR gets fast to work with
After processing maybe 10 photos and having created maybe six or seven presets, something happened and things began to speed up.
I find that I learn by just keep trying and using a tool – exploring. I use different images to see how the tool works in different scenarios. I move more or less all sliders, and slowly I begin to get an understanding of the tool.
I don’t analyze each slider in depth, but I register what happens when I move it around and get a feeling. The majority of the sliders in any tool can be divided into two buckets: The contrast bucket or the color bucket. Often they work in pairs. In the contrast
In the contrast bucket, we have Highlights/Shadows and White point/Black point and some are standalone sliders like clarity and contrast.
In the color bucket, we have Temparature/Tint, Saturation, Vibrance and Hue.
There are more in most tools, but you get the picture. It is a matter of getting a feeling of how you adjust contrast and colors to your liking.
My presets represents flavors of my style and what happened, was after having created six or seven presets, I quickly get on track by using one.
AuroraHDR let me add a few more layers to optimize local areas very easily. Finally I can add a layer having a vignette if needed.
In a few minutes, I have 90% of a great image, in my style. The last 10% I have to do in partly Lightroom and partly Photoshop. The last 10% include perspective corrections and spot and lampposts removal.
These are some examples of images I have created primarily in AuroraHDR. Primarily because I cleaned up and maybe did a thing or two more in Photoshop.

Amsterdam Maritime Historic Museum. Created using AuroraHDR and a few minor adjustments in Lightroom.

The Standard in Copenhangen. Created using AuroraHDR and only a few adjustmens afterwards in Lightroom and Photoshop to clean up and adsjut perspective.
AuroraHDR does make HDR processing a much very faster process, even if you are like me and want to finish up those last couple of bits.
Workarounds for slow DNG processing
In my last post, I rounded the fact that AuroraHDR doesn’t handle DNG files very well. Even on my MacBook Pro, this is still the case. But, I have found a workaround for that problem.
A part of my normal workflow is to export my photos to a folder from Lightroom. Instead of exporting DNG files I export tiff files.
The tiff files AuroraHDR handles very well and I can work fast on those.
A different approach would be to export directly from Lightroom to AuroraHDR, and for many of you guys, this might be the right way to work. There is a very nice integration into Lightroom, with a reimport back into Lightroom.
I just prefer not to have work-in-progress files in Lightroom, they clutter up, my Lightroom catalog.
So if you like to work without too much effort on each HDR photo, you will find AuroraHDR easy and fast to work with, just be careful. Like any other HDR tool, you can ruin your photo in potent sliders.
And, if you are like me, and want to put a little more effort into it, AuroraHDR doesn’t hinder you in doing just that.
The Weekend Post by Jacob Surland
A humble request from me to you, if you find my articles interesting and consider getting AuroraHDR, please use the links on my blog and support me that way. I only recommend software and tools that I use.
I am not ‘bought’ to say nice things with sugar on top. I say what I think and feel about products. I get nothing for writing these articles, but I do get a kickback if you use my link to buy AuroraHDR, as well as if you use my 15% discount coupon code “caughtinpixels” for buying Buy Photomatix Pro. I humbly thank you.
You can also follow me on Twitter, Facebook, and Google+. I post photos daily.
–Jacob Surland
]]>
On a warm summer day, I went to see Thingbaek Chalk Mines in Denmark. When I arrived, the mine was closed due to a wedding. Instead of just abanding the plan, I killed some time at the nearby Rebild National Park. A famous Danish American National Park. When I got back to the mine, my waiting was rewarded. Because of the wedding they had lit candles all over the mines. It was very beautiful.
I have made an article or review, call it what you like, on my take on the Sony A7R. The camera is in many ways awesome, but it will not completely replace my Nikon D800 or D600 for that matter.
Please read about my 5 reasons to buy the Sony A7R (A7) and 5 reasons not to buy it here.
]]>
What is the hype about the Sony A7R? For the last few months I have seriously been considering buying the Sony A7R camera. Why? Because I love the size of the camera. I find the D800 rather bulky, and sometimes I bring my Finepix X100 instead. The Finepix X100 is a great camera, but it is terrible slow, not wide enough and it is not great for HDR photography.
But having read many many reviews of the camera, to be sure it really is the right choice. To my amusement, I have come across many Canon users doing flip flops over the Dynamic Range of the camera.
Having had owned both Canon 5D Mark III and Nikon D800, I have learned that there are major differences in the two brands, and in particular when it comes to the Dynamic Range. The Nikons are so much better at Dynamic Range, than the Canons cameras. Apparently this is something that many Canon photographers is not really aware of. Canon 5D Mark III (according to www.dxomark.com) has a dynamic range of 11.7 EVS, while the Nikon D800 has got 14.4 EVS. That is 23% more dynamic range coverage. That is a lot! I
have covered this in detail in my comparison review of Canon 5D Mark III, Nikon D600 and Nikon D800.
The switch from Canon to Nikon really is tough. Not only because it is really expensive to switch, because you have bought a lot of lenses. But Canon and Nikon also are rivals and it’s a religious thing, to be either a Canon or a Nikon guy. You do not go to the enemy!
But Sony has hit a sweet spot. They have crammed a similar sensor to that of the Nikon D800E into a very small body, and the camera delivers the quality. And attaching an adapter to the camera, you can use both Nikon and Canon lenses. Nikon only manual focus though.
Of course both Canon and Nikon photographers loves this little camera. But, the Canon photographers really goes “Wooohooohaahaaaay!” and gets a good surprise, when they realize what 14.4 EVS in Dynamic range truly means. The Nikon guys, they are used to this.
Dynamic range explained
What is the Dynamic Range? Well, it is how much light the sensor inside the camera can capture. What is too bright to capture for the sensor, will just be white. And what is too dark will just be black.
The better a sensor is, the more light it can capture. You measure the dynamic range in “exposure value steps”. One step is equivalent of doubling the shutter speed or cutting it in half.
]]> Nikon D800, Nikkor 14-24mm, HDR of 5 shots.
Updated 2015-07-13: Since I initially wrote this post, I have bought the Sony A7R and later I have bought the Sony A6000 as well. I have adjusted text slightly.
Which brand to choose? It’s one of the difficult questions. Is Canon better than Nikon? And how about Sony? How good are they? Before I got into photography for real, my impression was, that Canon and Nikon were about the same. Sony was somewhat behind and the rest of the brands even further away from the market leaders.
But having owned all three brands Canon, Nikon and latest Sony, I must admit that there are some quite big differences, both in performance and usage. I have written a very well-received review, based on my long time using both Canon 5D Mark III and Nikon D800 and D600 all together intensively. Having owned both brands for a longer period, does give you a different platform, to write a review from, than if you borrowed a camera for a few days.
You can read the entire review here.
How about Sony? The Sony A7R has got the same sensor as the Nikon D800 and they perform almost equally as well.
After a long time considering it, I first bought the Sony A7R and more recently I also bought the Sony A6000. But, did I do the right thing? I still have my Nikon cameras and I still use them – a lot! The huge advantage is that despite the smaller size the Sony A7R delivers the same image quality as the Nikon D800. I can carry a standard 28-70 lens as well as a 10-18mm lens, and it weighs the same as the body of the D800.
The huge disadvantage of the Sony is, a rather small lens lineup for the Sony, but it is improving. New lenses are coming in a slow but steady stream, and some are good, and some are very good. However, it is not too much of a problem, with the weak lens lineup, because Sony has done a clever job with the Sony E-mount/FE-mount. You can buy adapters to virtually any camera brand. In other words, I can use my Nikon lenses on the Sony A7R. I lose my auto-focus and EXIF information, it’s annoying but not a big problem. The manual focus, using focus peaking, on the Sony A7R works extremely well. I have bought the Metabones adapter. There are cheaper options and one more expensive Novoflex.
In my opinion, Sony is in the lead when it comes to innovative, high-end cameras. The Nikon D800/D810 and Sony A7r sensors are the most awesome sensors made so far, for landscape photography. The Dynamic range is still unrivaled, and the amount of mega pixels is incredible. But Sony has managed to pack it into a very small body, without comprising quality. Nikon and Canon could learn a lot from this. If they don’t pull themselves together in this area, they will lose big time to Sony in the long run.
A lot of other cameras like the Fujifilm X100 or X100s are incredible too, but 12 or 16 megapixels, just doesn’t cut it for me. I would like to have the higher megapixels, to have the option to print really really big or to crop a photo.
My observations on the three brands are:
Nikon
- Highest Dynamic Range available currently. Even entry level cameras have higher Dynamic Range than Canon 5D Mark III.
- In entry level cameras, the low light performance is decent.
- Very engineer like. It’s difficult to find your way in the menus.
- The 3×00 series does not have Auto Exposure Bracketing (making it more difficult to make HDR’s)
- Good lenses
- Has got the best wide angle zoom lens available across all brands, the Nikon 14-24mm.
Canon
- Has got the worst dynamic range through out the entire range of cameras.
- Has got the worst low light performance, on entry level, but high end is up to speed.
- More user friendly than Nikon.
- Auto Exposure Bracketing is available on all models I have heard of.
- Good lenses
Sony E-mount cameras
- Mirror less and much smaller and lighter classic DSLRs
- Exists from entry level to semi-pro
- Entry level cameras have got the best low light performance
- Using an adapter, virtually any lens can be used on the E-mount.
- Has got similar performance in the Dynamic Range as the Nikons
- Lacks the option to have Auto Exposure Bracketing on timer. It may seem like a small thing, but if you shoot HDR photos, it is pretty annoying.
- The lens line up is not very impressive. Especially if you are looking into the full frame lenses, but this is compensated by the ability to use adapters for other brands. I use my Nikon lenses on the Sony Alpha 7R.
What is the real difference between high-end cameras, mid-range and low-end DSLR cameras?
What you pay the big bucks for is low light performance, low-end cameras simply have got worse low light performance. I have had entry level DSLRs, experience with mid-range DLSR cameras and owned several high-end DSLR cameras. They all take great photos if used right. Even the cheapest entry-level DSLR with a decent lens, can do awesome photos. This is a shot with my old Canon 400D using the kit lens:

The ability to take (hand held) shot’s indoor in poor lighting conditions, that is what you pay for, when you buy a more expensive camera. Then you also pay for a number of features, which are nice to have, but not strictly necessary for everybody.
This photo is shot at ISO 12800 using the Nikon D800:

My old Canon 400D could go to ISO 1600, and the quality was much too poor to use for anything. I could never have taken the shot above, using that camera. And the same goes for any entry-level or mid-range DSLR or mirror less camera. This IS what you pay for, when you buy the high-end professional or semi professional cameras.
The technology is working for us and the sensors are getting better and better at low light photography. But in a situation like this, I couldn’t have gone higher than ISO 12800 to get this image. I used the Nikon 24-70 at f/2.8 (as open/fast as it goes) at 1/100 sec shutter speed.
A faster lens, of course could have helped a bit. But the essence is, that you pay to get a camera that can do this. The really expensive pro cameras like the Nikon D3s, or the Nikon DF and probably also the new D4s are extreme in this discipline. That’s because the sports and press photographers, they need to be able to take a photo in any condition.
As you climb the ladder and buy more expensive cameras, you get more features. Auto Exposure bracketing is not available on the Nikon D3x00 series, but available in the Nikon D5x00 series. Canon 7D offers an 8 shots pr second.
Features also gets easier access; instead of rumbling around in menus you get buttons. You also get faster cameras (more shots pr second). And in some cases more megapixels. Some are better at videos than others and some better at low light photography than others.
The real jump comes, when you move from cropped sensors to full frame sensors (I have an article on full frame and cropped sensors here, if you don’t know what the difference is).
A larger sensor is much better at capturing light. It is quite obvious that the larger each little sensor cell is, the better it is. And a larger sensor (given same pixel count), obvious has larger cells to capture the light.
So unless you jump to the full frame cameras, my opinion is, that you don’t get a low light camera, not yet at least. A lot of research happens in this area, and the technology is improving, with each generation of the cameras.
The D800 is just … JUST good enough. The 5D Mark III is better and apparently the new Nikon DF is even better again. But they are all within the same ballpark. And the cropped sensors are playing in a different ballpark.
So if your budget isn’t cut for a full frame camera, get a cropped sensor DSLR and invest what you can in a decent lens. The lens is more important.
]]>

Nikon D800, Sigma 12-24mm, ISO 400, f/8.0, 0.8 sec (0-exposure)
This photo is from the small church in Mont Saint Michel, France, just outside the huge monastery.
In my review of Canon 5D Mark III, Nikon D800 and Nikon D600/D610 (you might want to read it here), I described my considerations on ultra wide angled lenses, and how it eventually made me switch from Canon to Nikon. A switch that first was more or less cost free, because I focused on fewer lenses, but as I have bought the lenses again, has become a very expensive switch.
For reasons I can’t explain clearly, I missed the fact, that Sigma does an extremely ultra wide angled 12-24mm zoom lens, for full frame cameras. I think the reason I missed it, might be that both Nikon and Canon does a 12-24mm for cropped sensors, and I just put the Sigma lens in the same basket, and that was a mistake!
Had I noticed this Sigma lens much earlier, I would probably never have changed from Canon to Nikon, because it is the ultra wide angle that I wanted. I do not regret the move from Canon to Nikon today, after having come to know and love the Nikons.
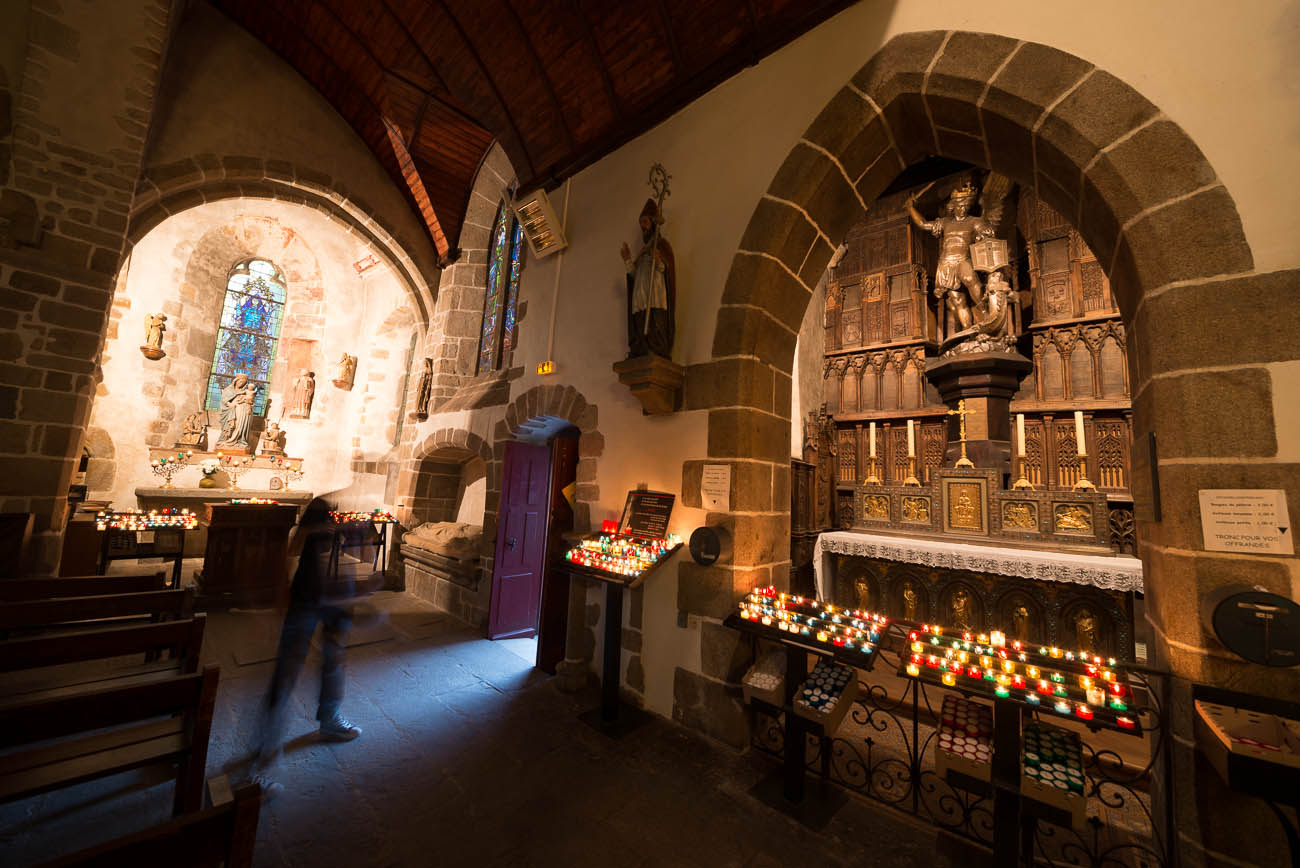
Why is it that you want to have an extremely wide angled lens? For me, it is to be able to include everything in a tight spot, like this very small church on Mont Saint Michel in France.
This is shot at 12mm on a Full frame camera. Even at 14mm I wouldn’t have been able to capture both arches, and include the alter in the near one, at the same time. I would have had to make a compromise on the composition and lose something.
This is the before photo:
The Sigma 12-24mm is the widest, non-fish eye lens there is on the market, for a full frame camera, and that alone is an argument for getting this lens. Because it is a Sigma, you can get it for several brands, including Sigma, Sony, Nikon and Canon.
Who can use this lens this lens?
I would say, that this lens is good both for Full Frame owners, and owners of cameras with a cropped sensor. And if you at some point in time think, you might just want to upgrade your cropped sensor camera, to a full frame, this is really a good option, because you can continue to use it. Yes, it is more expensive than e.g. the Sigma 10-20mm or the Sigma 8-16 for cropped sensors, but you can keep the lens, when you go to the full frame camera.
Check the prices on Amazon
Sigma 12-24mm f/4.5-5.6 EX DG ASP HSM II

or at B&H
Sigma 12-24mm f/4.5-5.6 EX DG ASP HSM II
Be sure to get the new one, because it’s much better than the old one.
Full frame alternatives to Sigma 12-24mm
Before going into the real review, let’s look a bit at some alternatives. There are alternative ultra wide angled lenses, but none that go as wide as the Sigma 12-24mm. You can check the prices on the alternatives.
Canon 16-35mm f/2.8
Expensive, much the same image quality as the Canon 17-40mm, but faster and wider.
Canon 17-40mm f/4,0
Cheapest of all. Image quality is soft in the corners and and chromatic aberrations are bad.
Canon 14mm f/2.8 prime
Very expensive and badly reviewed, in particular compared to the price.
Nikon 14-24 f/2.8
Very expensive, but it’s an awesome lens. Heavy and bulky. Requires special filters.
Nikon 16-35 f/4.0 VR II
Mid priced good lens with image stabilization. Only f/4.0.
There are other lenses, but they typically start at 16-18 mm. And of course this is ultra wide angled lenses, what I really wanted was the super ultra wide angled lens.
Cropped sensor alternatives
The one ultra wide angled lens, that I know on cropped sensors is the likewise Sigma 10-20mm, and that is a good lens. But if you at some point think, you will upgrade to a full frame camera, do consider using the Sigma 12-24mm, then you only have to buy one lens.
Sigma 10-20mm
Tokina 11-26mm f/2.8
Supposedly a good lens. It’s fast.
Sigma 8-16mm
This lens is more or less the equivalent to the full frame 12-24mm lens. And if you have a cropped sensor camera and want to go REALLY ultra wide, this is the lens.
Performance of the Full Frame Sigma 12-24mm
As all of my other reviews, this review is unscientific and very personal. The scientific ones exist in huge numbers, but what I find they sometimes lack, is the “how does it work in real life” perspective. I try to review from a real life usage perspective. If you want the scientific reviews find heaps of them on Google.
I have taken 2000 photos with this lens (many of which are HDR) and feel that I know it really well and I am very happy with it.
Lens distortion and vignetting
The first thing I noticed when I got the lens, was the barreling of the lens, which is quite strong at the low end. Both examples are shot at 12mm:
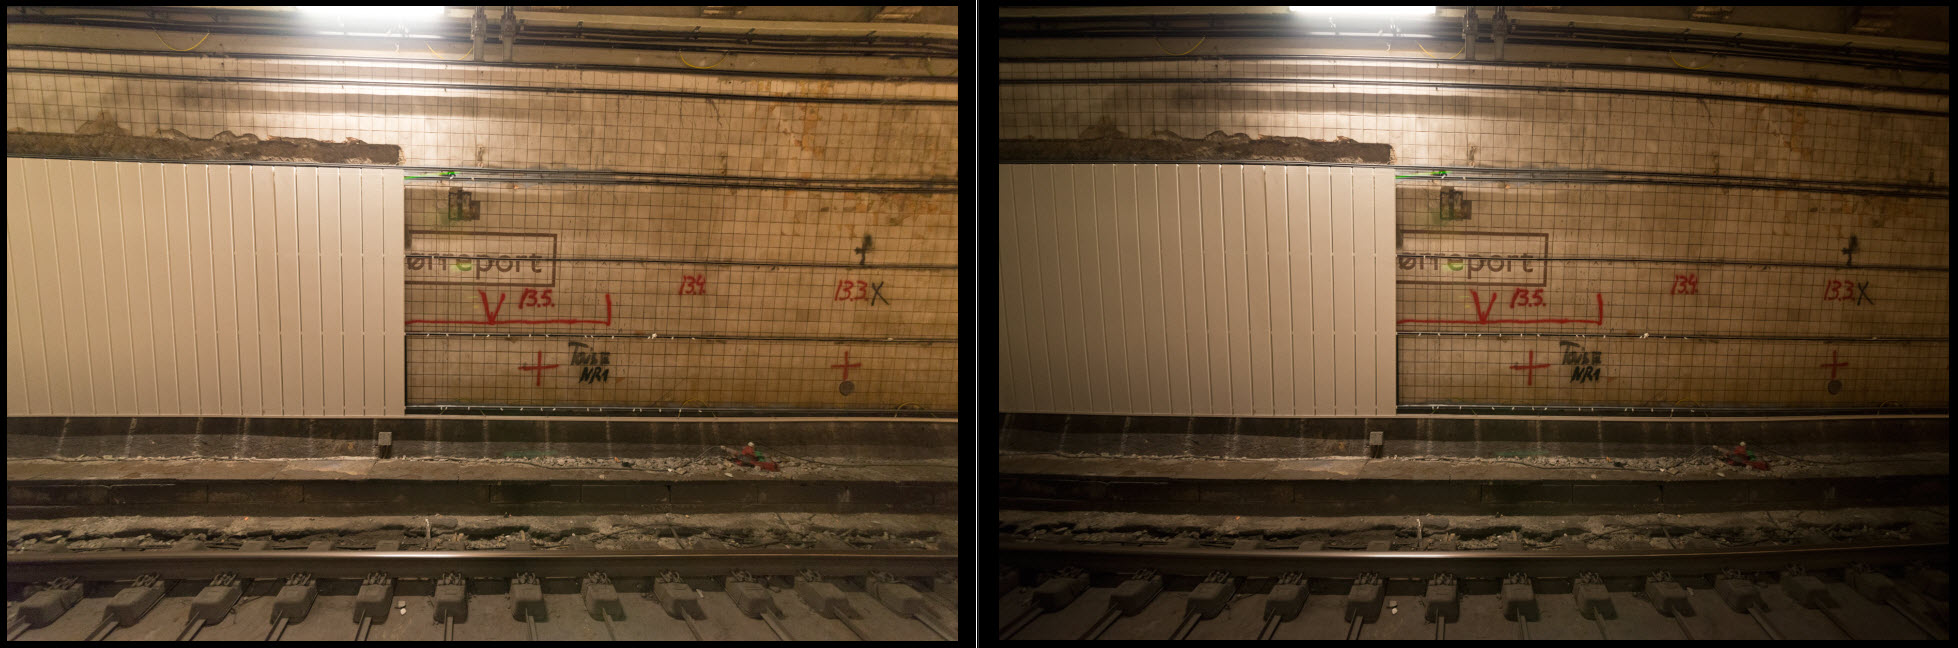
Left: Lens correction enabled in Lightroom. Right: Original.
Lightroom does a good job of un-barreling the photos. In real life, this has proved no problem to my photos at all. This is the photo from the church unprocessed:
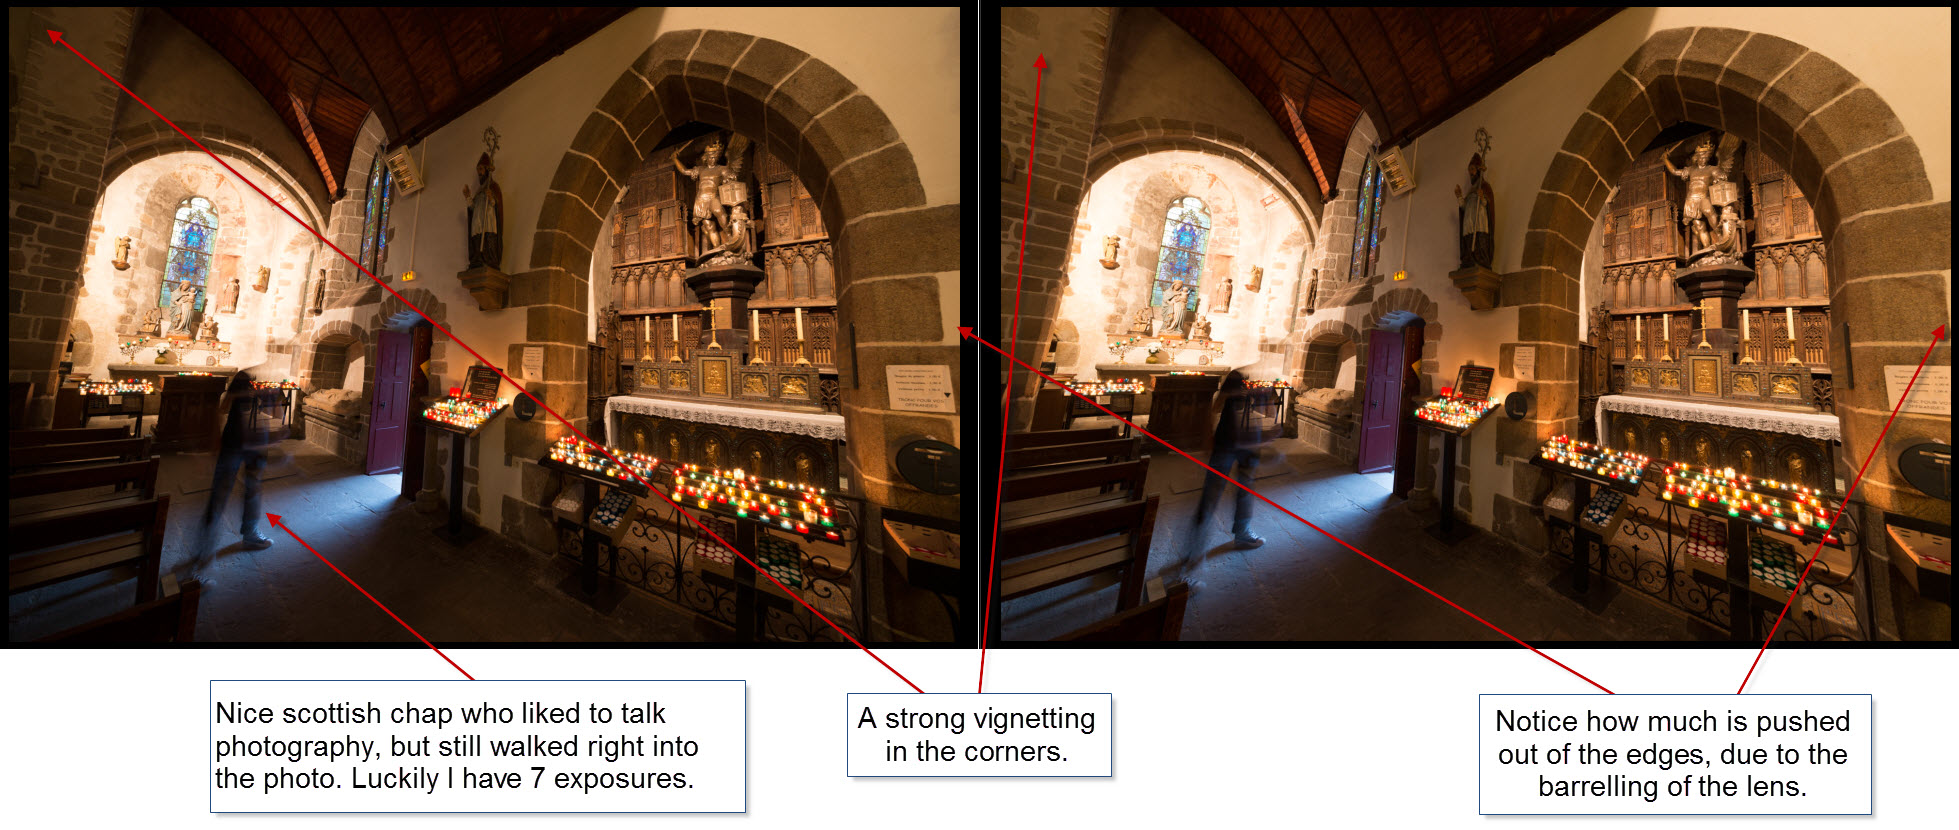
If you are doing something, with really delicate architectural lines, this might be an issue to you, but I find it no problem with my photos, even the ones with buildings and straight lines included. I shot all of my shots from Mont Saint Michel, with this lens.
(BTW: Notice the nice Scottish chap in the middle of my photo. Out of the 7 exposures I took, he managed to get himself included in the 5, but I only needed one with out him, to get remove him)
There is also a strong vignetting, but again the lens correction in Lightroom easily handles this, and this proves no problem to me.
Chromatic aberrations and Sharpness
One of the things that really annoyed me with the Canon 17-40mm lens, was the softness in the corners and the chromatic aberrations. So this has really been something that I focused on, when I got a new lens, and I expected the worst with the Sigma lens, because it is so extreme. But I got surprised.
The Sigma 12-24mm is a little bit soft in the corners, but it is no big deal and chromatic aberrations is well under control. I haven’t noticed them at all.
From this photo:
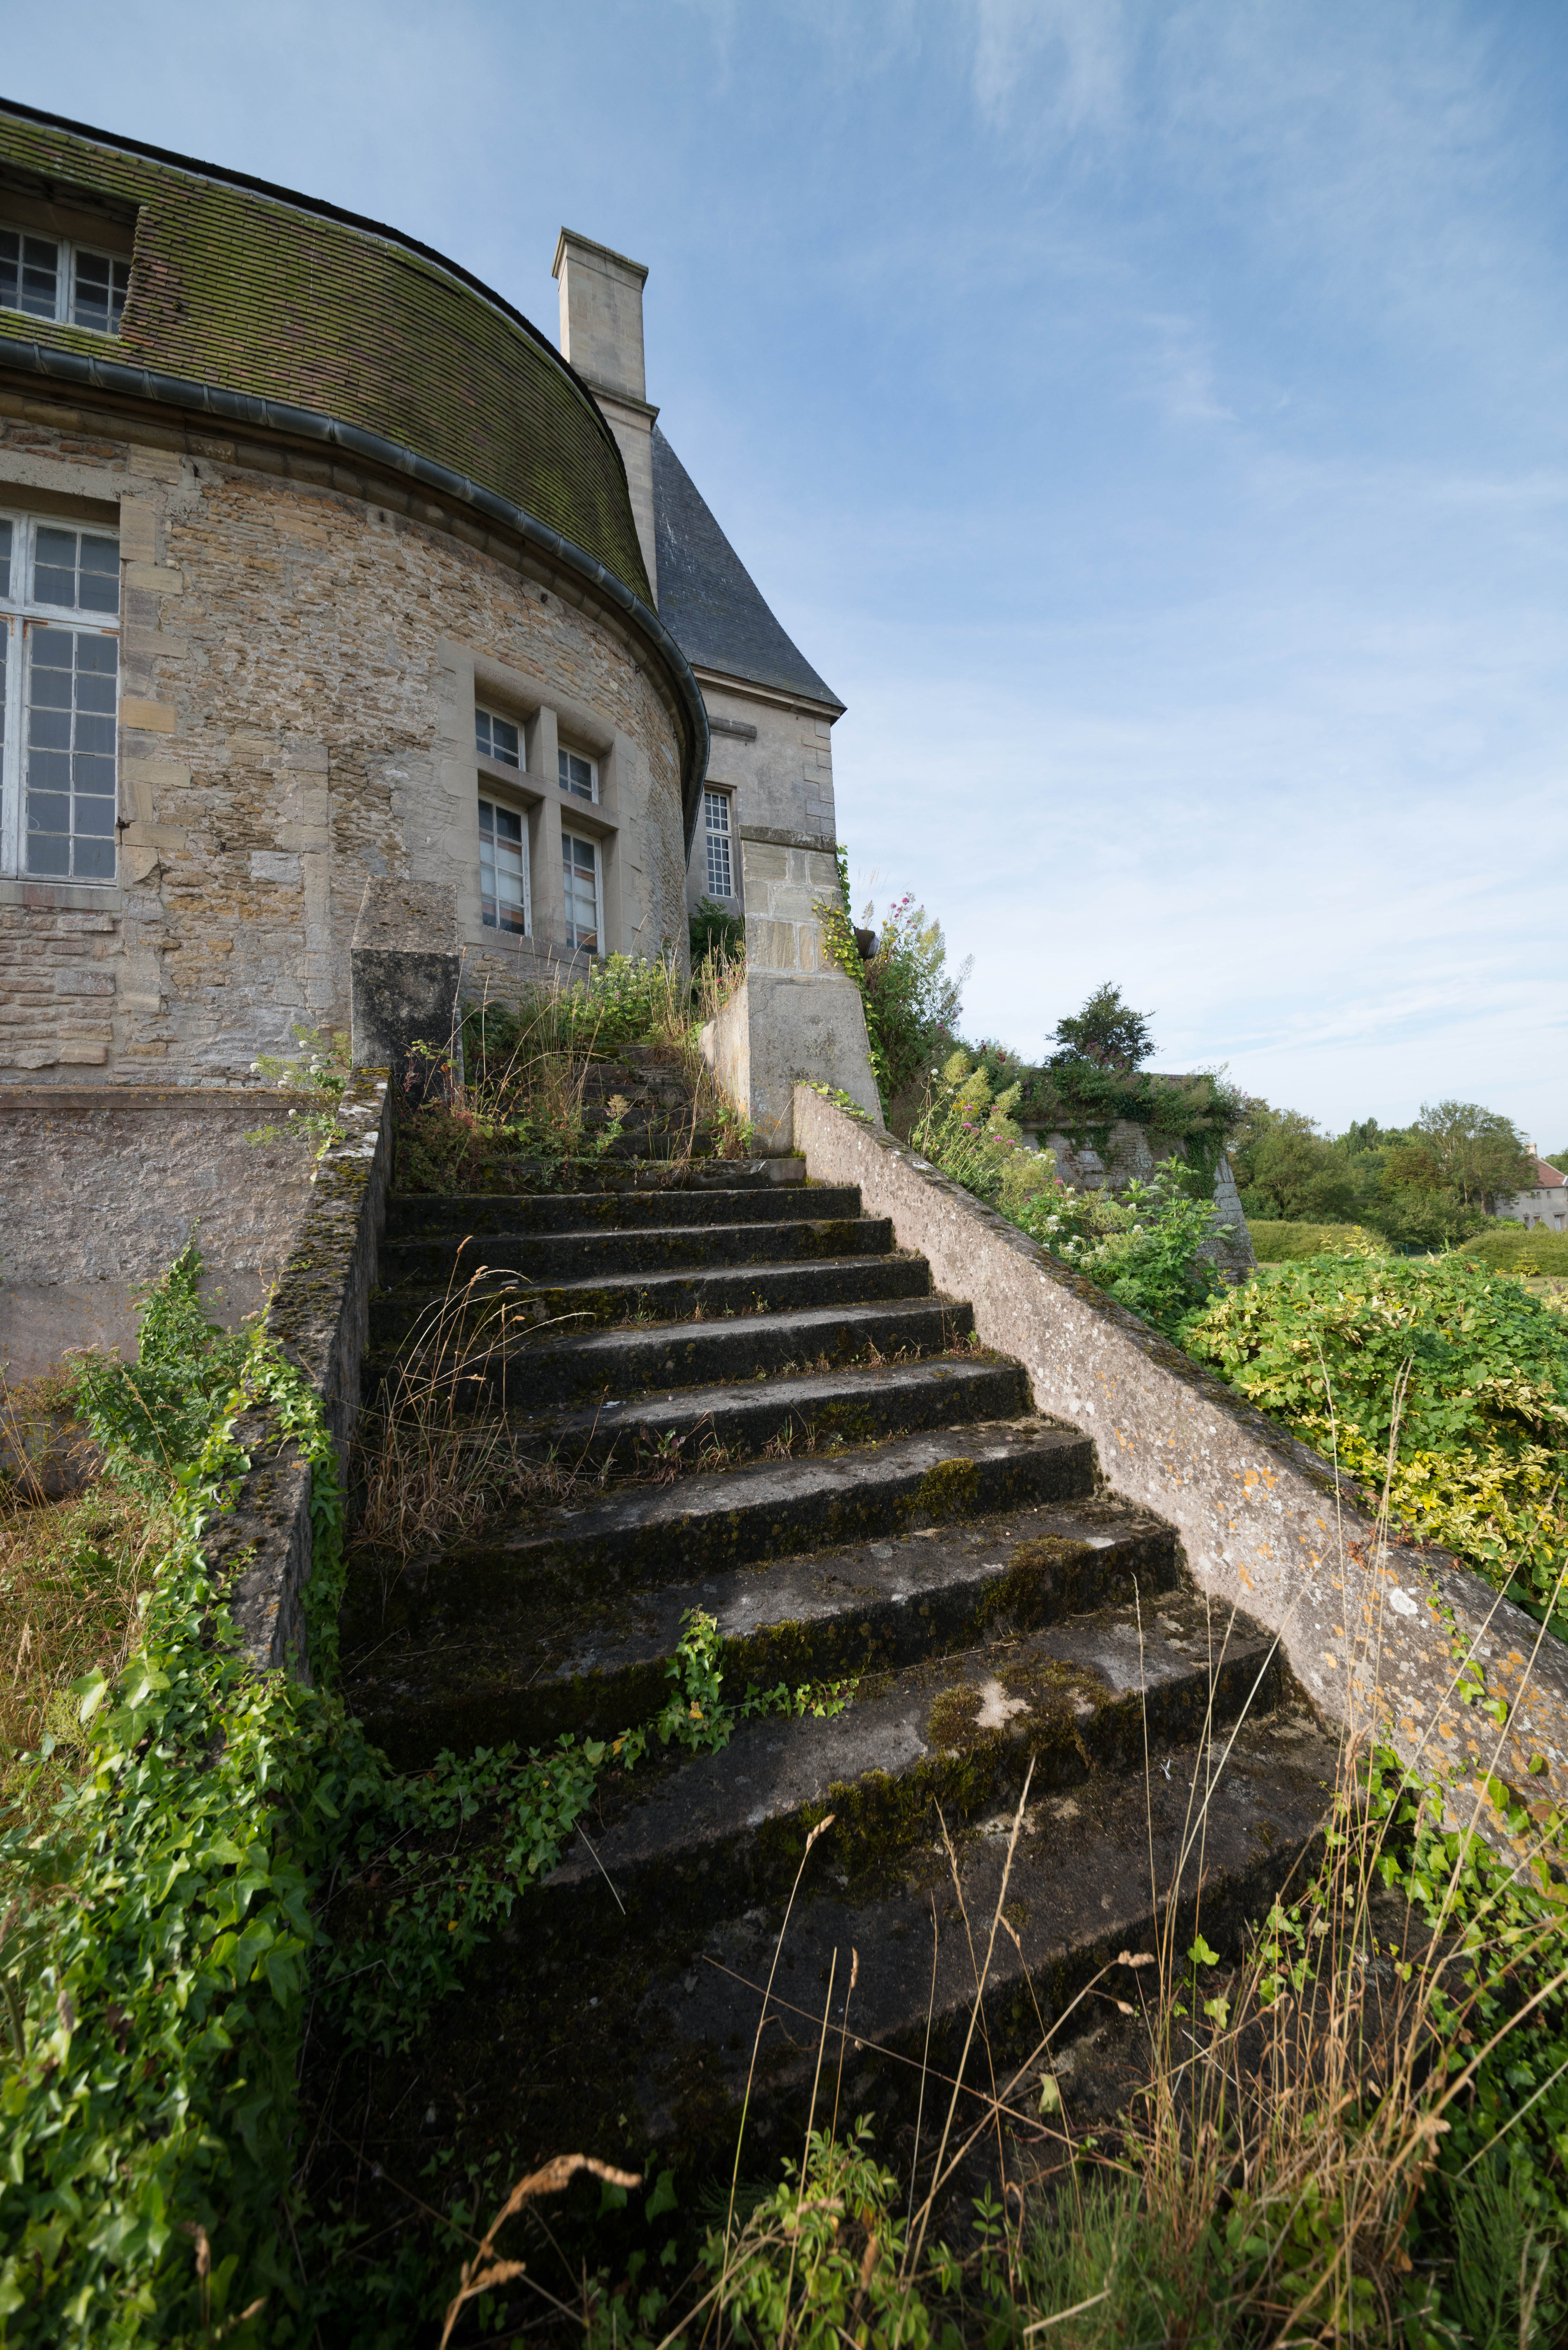
Let’s look at a 100% crop from the corner and the center:
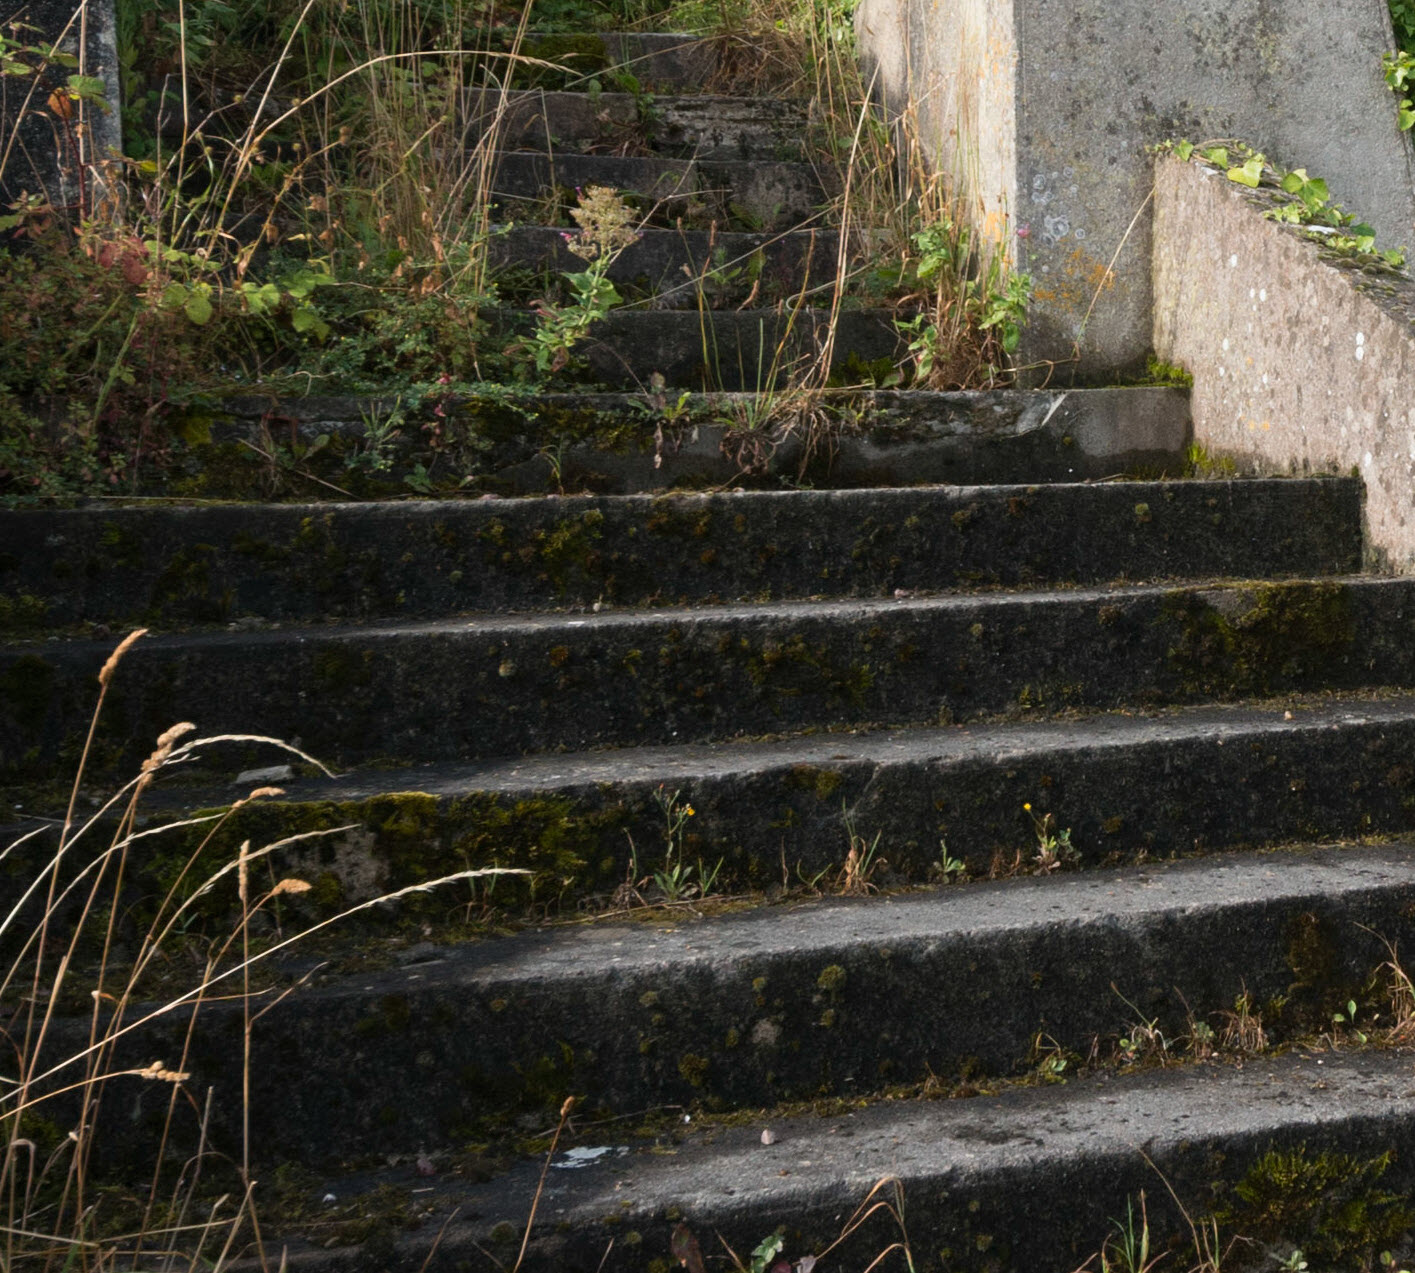
100% crop of the center. It is tack sharp.
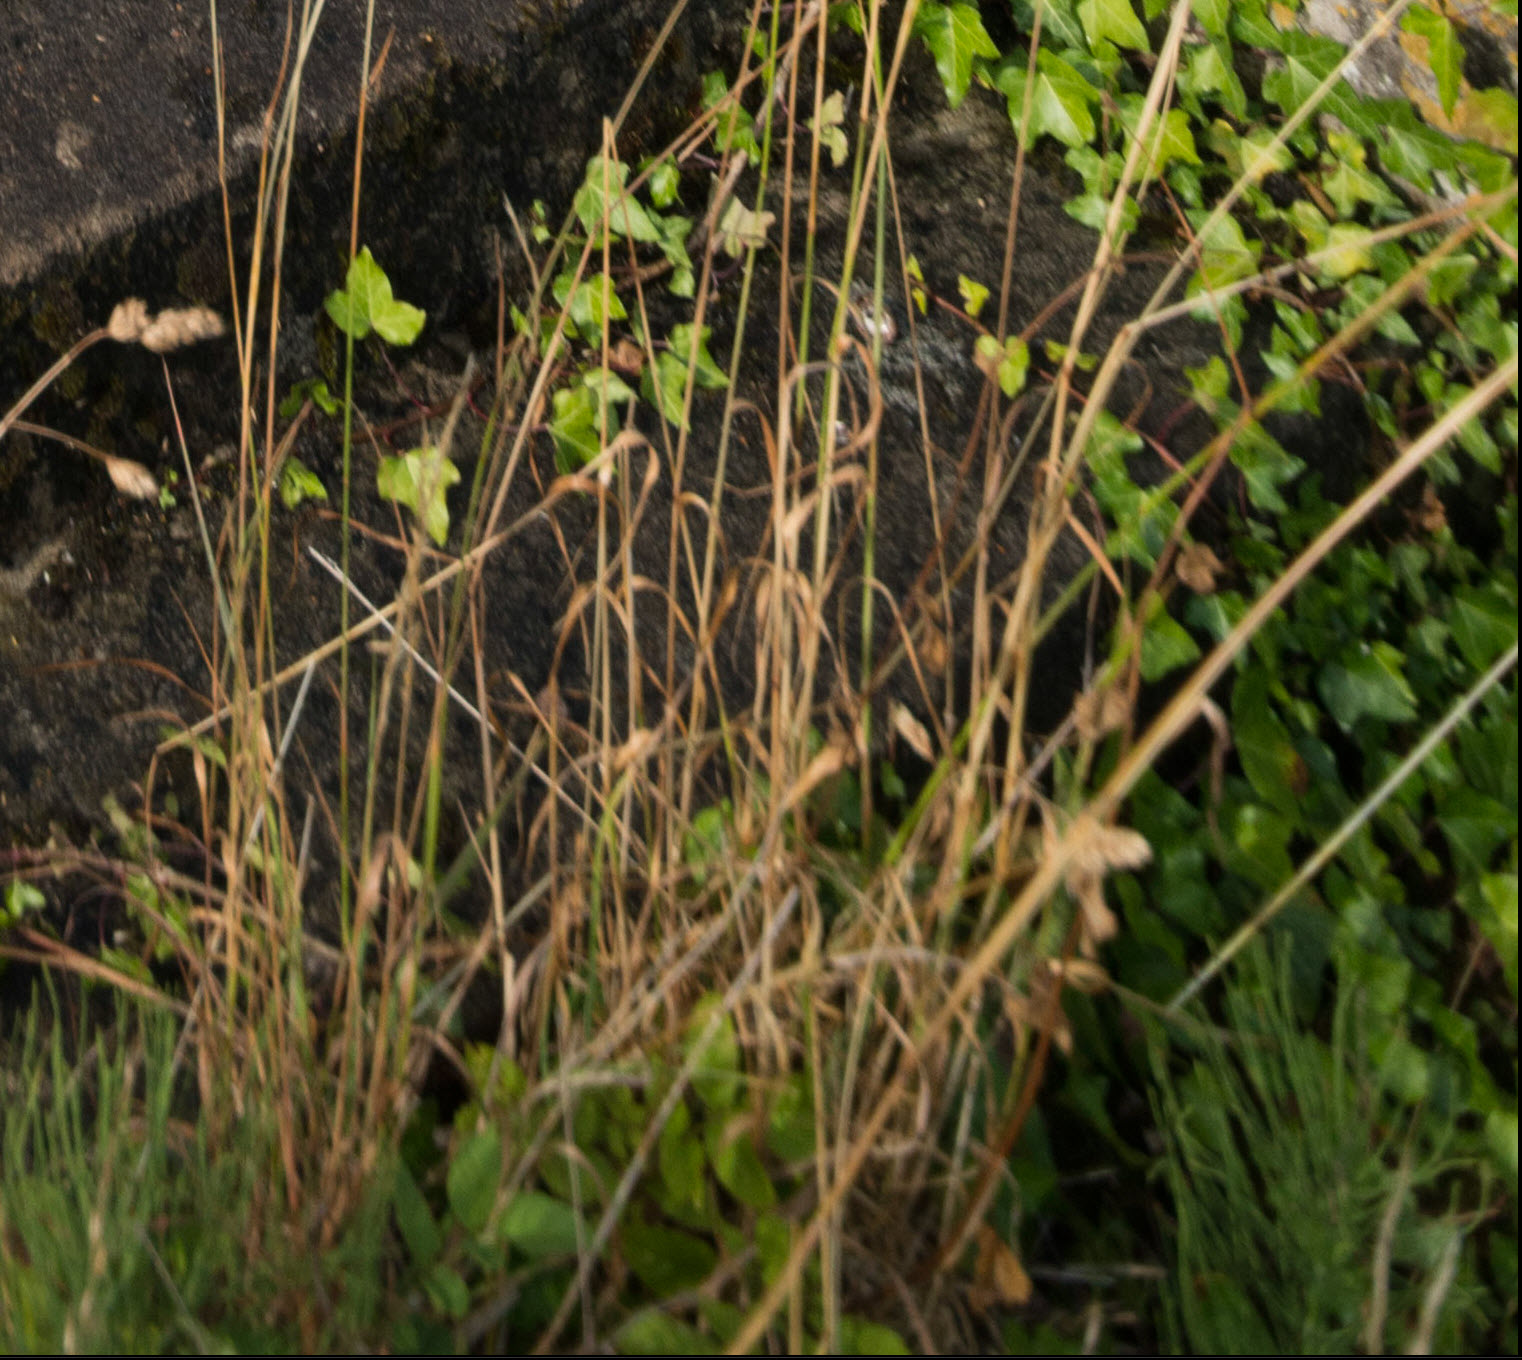 100% Crop of the corner. A bit soft.
The corner is a bit soft, but it quickly changes into sharpness as you close into on the center. This is a very small piece of the corner in a very large photo. Yes I can see the softness, but it has proven no problem to my photos. My flagship, the Nikkor 14-24mm, also has some softness in the corners, less than this, but it does have it.
Speed – the f-stops
The lens is what you will call a slow lens, and it does not have a fixed f-stop. This means that if you are on 12mm you can open it up to f/4.5 and on 24mm only to f/5.6. Is this a problem? Yes, if you are shooting in dark environments, otherwise not. You will get longer shutter times or will have to increase the ISO to a higher level.
I shoot a lot of night photos, and sometimes I like to use the f/2.8 the 14-24mm the Nikon lens offers, but all of my night shots from Mont Saint Michel are shot with the Sigma 12-24mm lens, and that worked really well for me. I chose that lens, because Mont Saint Michel has some really tight spots, and I didn’t want to have to cut something off, just because my lens wasn’t wide enough. And as you can see in this photo and the other examples, this has proved no problem.
Professional lenses are always fixed in the lower end, and I assume that if you shoot a lot on manual, fixed f-stop is nice, because it gives you fixed shutter speeds too. But I almost always shoot in aperture mode, and then the camera does the rest of the calculations. And then it’s no big deal – yes I do get a bit longer shutter times, but that’s OK. I’m on tripod anyway!
Flares
Yes, it produces flares. As does all of my wide angle lenses. It seems perhaps a little better than the Nikkor 14-24mm, but not as good as my Nikkor 16-35mm. But as in everything in photography, there are compromises. If you want to shoot at 12mm, you have to accept a lens that is prone to make flares. This is the only lens, that will give you 12mm on a full frame camera.
Verdict
My verdict on this lens, is that it does have some really bad barreling, but for my purposes, that is not problem. I have no hesitations on putting it on my camera. It’s even lighter and much smaller, than my flagship, the Nikkor 14-24mm. That is a nice change. And in a tight spot, those last 2mm from 14mm to 12mm, can be what does make the photo possible at all.
One drawback is, that you can attach 77mm filters too it. It does have an extra collar, that you can screw something on. However, if you leave it on, you can go to 12mm, because you will get black corners. In my world, this is a lens for use without filters.
The sharpness is good, a bit soft in the corners, but not more than I can live with it.
I other words, this is a lens that I can recommend.
Examples
These are some examples of my published photos, using this lens.


London Tower Bridge – a 5 shot HDR photo processed with Photomatix Pro 5 beta 4 and then mixed with a long exposure image for the fountain and the clouds. The Long exposure I made using my 10 stop ND filter from B+W. I did use a final filter High Key from Topaz Adjust to get the more pseuchedelic look.
Some of you might have noticed that a new version of Photomatix Pro 5 is on its way. The official beta 4 is now available and I have had a quick glance at it. After having played around with for a awhile I am a bit disappointed, but there are a few goodies too.
The wording – that is the usability – has changed in general to the better. By using the right words you can do a lot for the ease of use of a software program. For instance instead of calling a feature ‘Align source image – by correcting vertical and horizontal shifts’ it gets a lot easier to understand from the new wording: ‘Align source images – Taken on tripod’. I’m a great fan of usability and this is great usability in it’s essence. Straight talk for normal human beings to understand, not engineer talk that only a small group of people can understand.
There are a couple of others of these wordings that has changed for the better. The Button “Process” has been changed to “Apply and Finish”.
The algorithm for aligning images should be improved, but that is fairly hard to test. I have never really had any problem with the one from Photomatix 4 – but improvements of course is good.
The deghosting as been changed too and is better. However I never use the deghosting tool. I might give it a try or two, but basically I think you get a better result using by blending one of the source image in using layered masks in Photoshop or GIMP.
A couple of new processing methods has been added. Tone mapping has got a ‘Contrast optimizer’ method in addition to the Details Enhancer and the Tone Compressor:
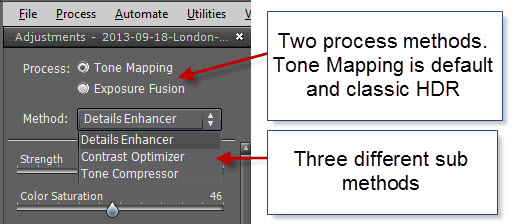
The ‘Contrast Optimizer’ is great for natural looking images, but is not worth much for more creative processing. I will probably not use it for much. The fusion also got an ‘Fusion/Real estate’ optimized for images to show both interior and the outside for real estate photographers. That’s not really me either. So I’m stuck with the Fusion/Natural and Tone Mapping/Details Enhancer.
The details enhancer has got a single change. Luminosity has changed to Tone Compression, but it does exactly the same. In fact the Details enhancer does exactly the same as before. I had hoped for more fun and creative options, but got disappointed on that. I have tried to process images with both Photomatix Pro 4 and Photomatix Pro 5 beta 4, with the exact same settings and the images are identical. That really disappointed me. The noise levels are the same. One of the weaker points in Photomatix Pro is the noise it produces. Of course there are other ways of handling the noise, would just have been nice if the algorithm had been better at handling noise.
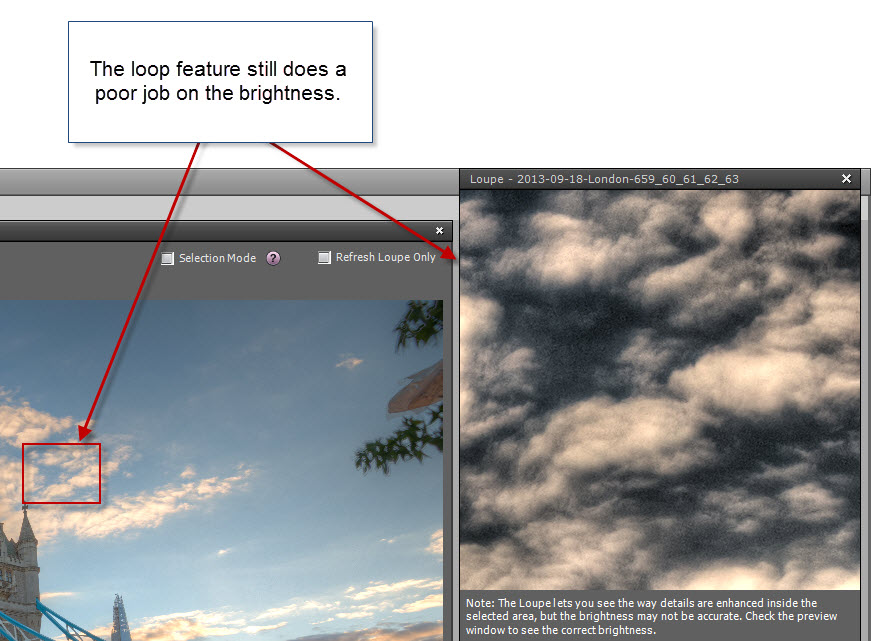
I had also hoped for the loop feature to do a perfect processing, so that you would see the real deal, but that is still very poor.
Conclusion of a preliminary review of Photomatix Pro 5 beta 4
There are number of usability improvements in the software, which really makes it easier to use, and some improvements in some of the more automatic parts of the software, like deghosting and auto aligning.
There are also a couple of new processing algorithms, but they are targeted to a different group than the more creative HDR photographers.
But for the more creative side this version is a more or less 1:1 with the old Photomatix 4.
Good thing that if you bought Photomatix 4.2 or later, you get the Photomatix pro 5 for free.
So I’m a bit disappointed.
Try out the beta of Photomatix Pro 5 here – it will still water mark the images if you haven’t purchased it.
Remember that I have a detailed Free HDR photo tutorial and by by using the coupon code “caughtinpixels” you can get 15% off when you buy Photomatix Pro.
]]>