Warning: Undefined array key "multiauthor" in /var/www/caughtinpixels.com/public_html/wp-content/plugins/post-layout/plugin.php on line 114
Warning: Undefined array key "mobile" in /var/www/caughtinpixels.com/public_html/wp-content/plugins/post-layout/plugin.php on line 352

London Tower Bridge – a 5 shot HDR photo processed with Photomatix Pro 5 beta 4 and then mixed with a long exposure image for the fountain and the clouds. The Long exposure I made using my 10 stop ND filter from B+W. I did use a final filter High Key from Topaz Adjust to get the more pseuchedelic look.
Some of you might have noticed that a new version of Photomatix Pro 5 is on its way. The official beta 4 is now available and I have had a quick glance at it. After having played around with for a awhile I am a bit disappointed, but there are a few goodies too.
The wording – that is the usability – has changed in general to the better. By using the right words you can do a lot for the ease of use of a software program. For instance instead of calling a feature ‘Align source image – by correcting vertical and horizontal shifts’ it gets a lot easier to understand from the new wording: ‘Align source images – Taken on tripod’. I’m a great fan of usability and this is great usability in it’s essence. Straight talk for normal human beings to understand, not engineer talk that only a small group of people can understand.
There are a couple of others of these wordings that has changed for the better. The Button “Process” has been changed to “Apply and Finish”.
The algorithm for aligning images should be improved, but that is fairly hard to test. I have never really had any problem with the one from Photomatix 4 – but improvements of course is good.
The deghosting as been changed too and is better. However I never use the deghosting tool. I might give it a try or two, but basically I think you get a better result using by blending one of the source image in using layered masks in Photoshop or GIMP.
A couple of new processing methods has been added. Tone mapping has got a ‘Contrast optimizer’ method in addition to the Details Enhancer and the Tone Compressor:
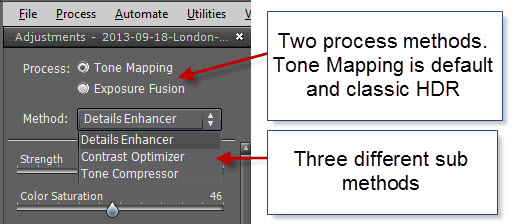
The ‘Contrast Optimizer’ is great for natural looking images, but is not worth much for more creative processing. I will probably not use it for much. The fusion also got an ‘Fusion/Real estate’ optimized for images to show both interior and the outside for real estate photographers. That’s not really me either. So I’m stuck with the Fusion/Natural and Tone Mapping/Details Enhancer.
The details enhancer has got a single change. Luminosity has changed to Tone Compression, but it does exactly the same. In fact the Details enhancer does exactly the same as before. I had hoped for more fun and creative options, but got disappointed on that. I have tried to process images with both Photomatix Pro 4 and Photomatix Pro 5 beta 4, with the exact same settings and the images are identical. That really disappointed me. The noise levels are the same. One of the weaker points in Photomatix Pro is the noise it produces. Of course there are other ways of handling the noise, would just have been nice if the algorithm had been better at handling noise.
I had also hoped for the loop feature to do a perfect processing, so that you would see the real deal, but that is still very poor.

Conclusion of a preliminary review of Photomatix Pro 5 beta 4
There are number of usability improvements in the software, which really makes it easier to use, and some improvements in some of the more automatic parts of the software, like deghosting and auto aligning.
There are also a couple of new processing algorithms, but they are targeted to a different group than the more creative HDR photographers.
But for the more creative side this version is a more or less 1:1 with the old Photomatix 4.
Good thing that if you bought Photomatix 4.2 or later, you get the Photomatix pro 5 for free.
So I’m a bit disappointed.
Try out the beta of Photomatix Pro 5 here – it will still water mark the images if you haven’t purchased it.
Remember that I have a detailed Free HDR photo tutorial and by by using the coupon code “caughtinpixels” you can get 15% off when you buy Photomatix Pro.