Warning: Undefined array key "multiauthor" in /var/www/caughtinpixels.com/public_html/wp-content/plugins/post-layout/plugin.php on line 114
Warning: Undefined array key "mobile" in /var/www/caughtinpixels.com/public_html/wp-content/plugins/post-layout/plugin.php on line 352

Mont Saint Michel, one of frances most important tourist attractions, with a history that spands more than a millinium. It’s a monastery built like a fortress on an island. Due to the tide, it’s sometimes an island and sometimes you can walk all the way to it, however you should only do it with a guide because of the danger of quicksand. It’s oozing of middle age and it’s so beautiful, however also very popular with the tourist. We arrived just around midday and we got almost lifted up and carried away by the crowd. We quickly bought a sandwich and found the wall and walk for a little while there and found a spot with fewer people. If you are planning to travel to Mont Saint Michel, do make sure that you are there in the evening as well. A lot of the people leave the small middle age town late in the afternoon and after dinner, you can get around much easier. You can also take a break from the people by walking around Mont Saint Michel, given that it is not high tide. The monastery itself is a master piece in architecture. The monastery gardens is so beautiful and the terrace in front of the church is so magnificent and the view… Wow! The Monastery is very popular and you will get to stand in line for some time.
How to take HDR shots at night
When you take night shots with stars above and some foreground you almost have to take two shots. One for the sky with the stars and one for the ground. In this case I have shot 7 bracketed shots with 1 EV step between each photo ranging from -3 to +3. It’s hard to shoot at night if you have really bright light sources as well as really dark areas. The dynamic range becomes enourmous. In this case there’s a strongly lit monastery with huge spotlights located on an island and surrounded by darkness. The spotlights real easy burn out.
To be sure to get everything I shoot 7 shots, which is only just enough.
How to photograph stars
Having solved how to capture all of the light, the next problem is to get a good shot of the stars. A thing that surprised me the first time I photographed stars, is that they actually move quite fast. As a consequence of that you have to have fairly fast shutter speeds to get round stars, otherwise this will become oblong or long trails. This can be an effect, but that was not what I wanted.
The longer focal length you are shooting your shot at, the more apparent the movement of the stars will be. If you use a really wide angle lens you can shoot exposures of shoot 15 seconds and get fairly round stars, I shot this at 70mm and at 13 seconds, and my stars are a bit too long for what I had hoped for. The 7th and lightest exposure is the shot aimed at getting my stars. In this shot Mont Saint Michel is burned out, but the sky well exposed. This is the EXIF data for the star shot:

Nikon D800, Nikkor 28-300mm, ISO 800, 70mm, f/5.0, 13 sec
As you can see the lights on the monastery is burned out, but the stars visible, but the stars are a bit long to what I had wished:
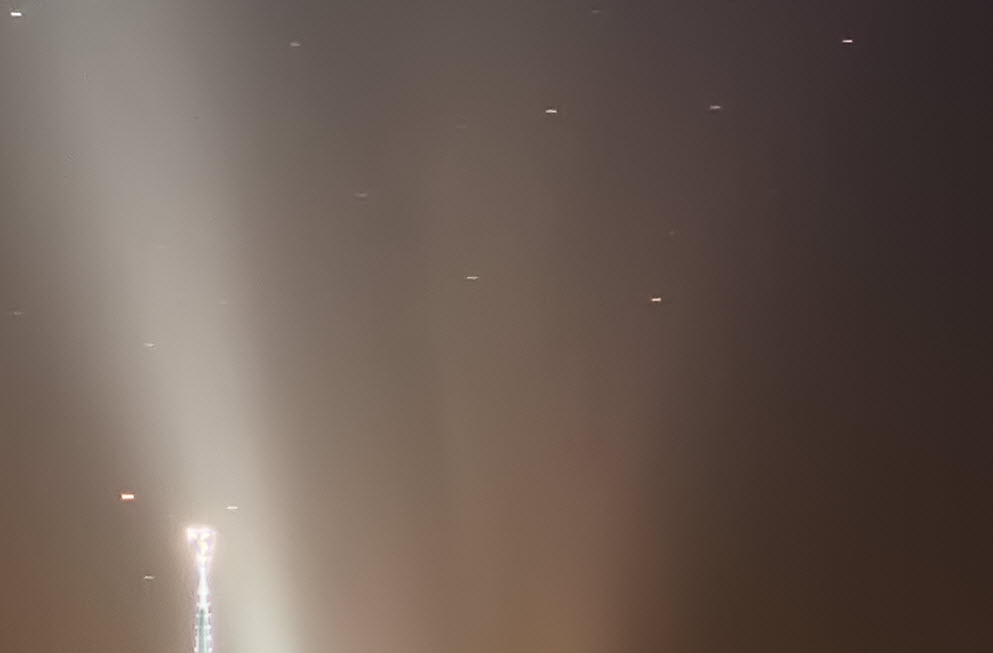
100% crop
Unfortunately I didn’t realize the problem until later in my shootings and at that time I had changed the focal length to 28mm. The solution was to increase the ISO. Eventually I went to ISO 2000. I was working under pressure, because it was getting very late and my son was tired and the buses kept coming by with their headlights pointed straight into the lens, so I had to time my 7 shots. And on top of that, I wanted a few different compositions.
At my 28mm shots the stars are much more round, and this is even at 20 seconds, which is 7 seconds longer. This means that focal length is very strong factor when photographing stars. The light changed rapidly and it rapidly grew darker:
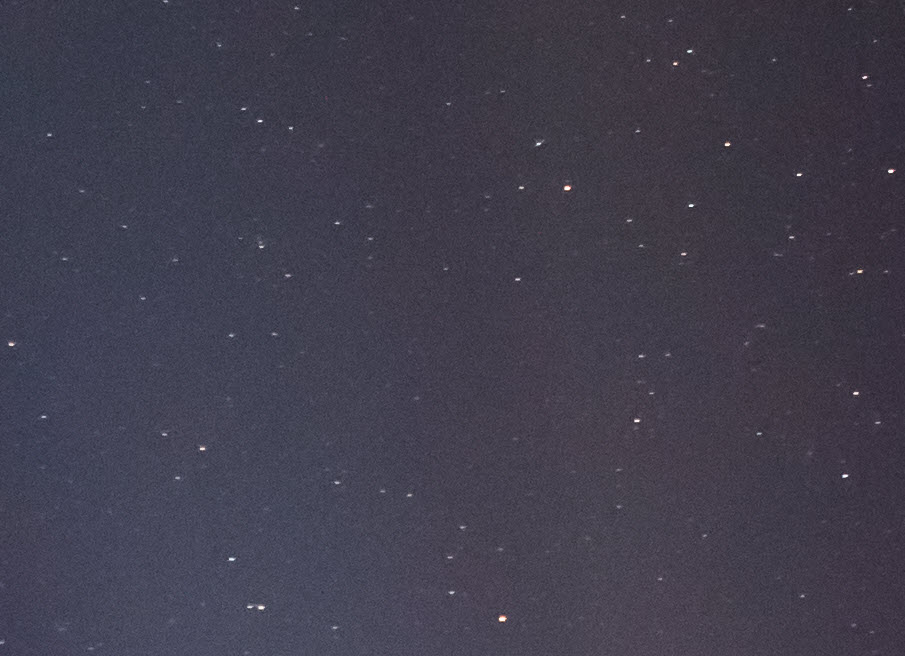
100% crop
The comprise with a higher ISO is more noise and when you remove the noise, you also lose some stars, because the noise reduction software can’t tell the difference between noise and stars.
Shooting stars is difficult and there are some trade offs you have to make.
Processing stars and monastery
Photomatix (and any other HDR software) handles star lit skies badly for at least two reasons.
1) There is no dynamic light – the sky is almost completely black with a few dot’s on it. Photomatix will try to expand the dynamic range and the result is really noisy and not very good.
2) The stars move – more than you think. Not one of the 7 shots has got the stars in the same place and when merged you will get duplicated stars.
The solution to this is only to use one exposure for the sky, the lightest shot. and make an HDR for the rest of your image.
The stars I processed in Lightroom using these settings:
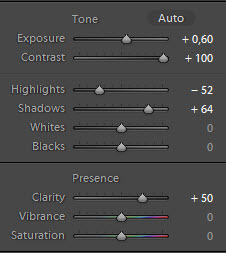
Contrast and Clarity is what really makes the stars pop. Because of the huge spotlights, my processing also takes that into account. It’s a balance of great stars and spotlights.
The noise in the sky I handled in Noiseware, which I find Noiseware good at handling noise without deleting too many of the stars. I have bought the Noiseware plugin for Photoshop and handle the noise from Photoshop later in the process.
The only part of the HDR image I end up using is the monastery, it being the only real object in the scene apart from the stars. This is the output from Photomatix:
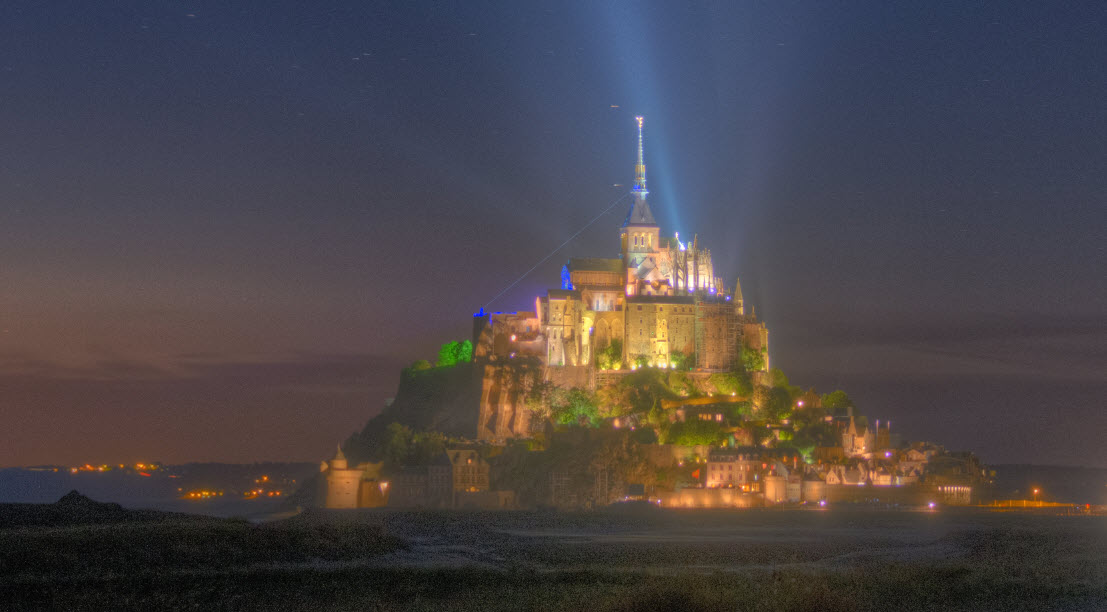
This is a bit more colorful than my final result and a bit more flat and washed out. It looks too HDR for what I wanted. It needs to be a little more contrasty, some of the gray areas must become darker and even black. Dark areas are important to get a strong image.
What I did was blend some of the original -3 and -2 to exposures gently into this tone mapped version and finally arrive at this result:
 Notice that some strong shadows have been introduced to replace washed out shadows and also the hyper green trees are more natural now.
Want to get started on HDR photography?
If you too want to get started on HDR photography and get make great HDR photos you can get a 15% discount on Photomatix by using the coupon code “caughtinpixels”. Get photomatix Pro.
And then read my thorough HDR tutorial and look at my images and learn a ton of different tips to improve your post-processing skills.
Warning: Undefined variable $pstl_comments_number in /var/www/caughtinpixels.com/public_html/wp-content/plugins/post-layout/plugin.php on line 43
Warning: Undefined array key "cid" in /var/www/caughtinpixels.com/public_html/wp-content/plugins/post-layout/plugin.php on line 46
Gracias por decir esos trucos, no soy profesional, al ver vuestras fotografias me gusta leer los trucos que teneìs, haceìs verdaderas obras de arte. Gracias.
Warning: Undefined variable $pstl_comments_number in /var/www/caughtinpixels.com/public_html/wp-content/plugins/post-layout/plugin.php on line 43
Warning: Undefined array key "cid" in /var/www/caughtinpixels.com/public_html/wp-content/plugins/post-layout/plugin.php on line 46
Muchas gracias. Me alegro de inspirar con trucos. Yo no soy profesional tampoco, sólo un hombre a quien le gustan la fotografía.