The Day to Night project

On the way home

On the way home

I always have various projects that I am working. Some can go on for years at a low intensity but then suddenly bloom. Like this Day to Night concept.

I have been working on adding computer-rendered effects to my images to a greater extent and I am having a lot of fun doing it.

Today I have been working on this Day to Night image, which is a boring daytime photo from a small village in the french alps. We were on the way to shoot photos in Queyras and had to drive across the Galibier pass. As it turned out it was closed due to snow, and we had to go all the way to Italy to get there. It cost us 3 hours.

This is a before and after of the photo.

How to create a composite image in Photoshop

X-Wing Squadron in Sweden

X-Wing Squadron in Sweden.

I had a lot of fun making this photo of three X-Wings from Starwars patrolling a Swedish night. I got the idea to make this image because I am working on a book on composition and I use a spaceship as a metaphor. I thought it would be cool to have a photo of a spaceship on those pages, but how do you get a photo of a spaceship? They don’t sit on every second corner.

My first thought was to use one my sons Lego spaceships (he has a ton of them). But before I acted I remembered this kind of cool shot of the ‘Space Mountain’ in Disneyland Paris and decided that would have to make do.
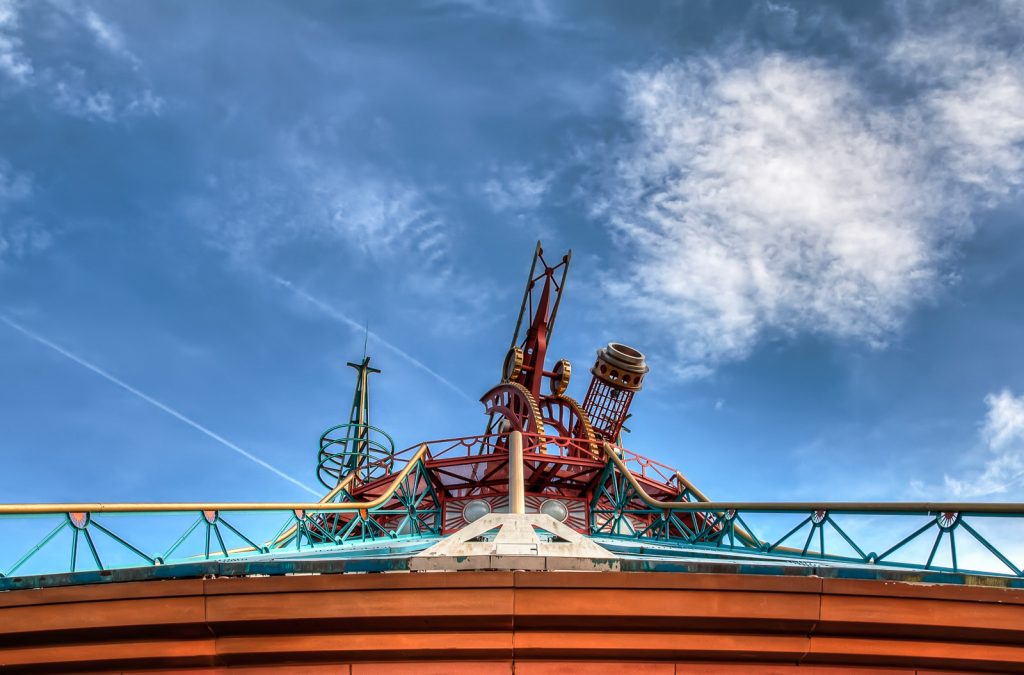
Space Mountain

But I then shuffled a bit around in the photos from that area, and I noticed a photo of the X-Wing and an idea came to me. An X-Wing is a proper spaceship, just what I needed. I would put that on a shot of the Milky Way that has no foreground object or main subject, other than a bit of wood and the Milky Way itself.

I had two shots of the X-Wings from the same angle, just shot on two different days, using two different cameras. Had I known what I would need photos of the X-Wing at a later time, I would have shot a series from different angles, but I didn’t.

Xwing photos

The original photo of the Milky Way looked like this:

The Milky Way in Karlskrona

This is the first shot I shot of the Milky Way. It requires an area low on light polution. This is place in Sweden is not too bad. You can see a bit of light polution just above the trees. However, the photo is not interesting in itself. There is a lack of interesting foreground.

The process of creating a believable composite

I wanted to make the illusion of three X-Wing fighters patrolling Sweden and to make that work and I could see some problems that I needed to be solved.

Problem #1: One photo is shot in the daylight, the second at night

I had to make the X-Wing fighters fall in, and I had two ideas, either a painterly cartoon-like approach or I could take a path on a more realistic look. I decided to try the painterly cartoon style first.

The photo is only a jpg, but I created two virtual copies in Lightroom and made an artificial -2 and +2 for an HDR processing workflow.

3 shot xwing

These three I put into my HDR software and got out a tone mapped HDR version. If the image, like this one, is shot in a low dynamic range situation like here, you can get fine results, when you tone map an image like this. It is only a pseudo HDR, but you still get the look from a real HDR.

At this time, I did not notice; but have a look at the darker image. That fits just perfectly into a night image. I figured that out later, but I only noticed this, because I had made this darker -2 version of the image. And that is the one in the final image.

Problem #2: Masking out the background from the X-Wing

The X-Wing is a pretty regular shape, and it is not too hard to cut out using the Pen tool. The Pen tool can create a Path, which can be converted to a very sharp mask, but it takes a little practice to use.

But for an object like this X-Wing, it was the only real option. I tried some of the magic tools in Photoshop at first, but it just didn’t work well enough in this situation.

XWing Mask

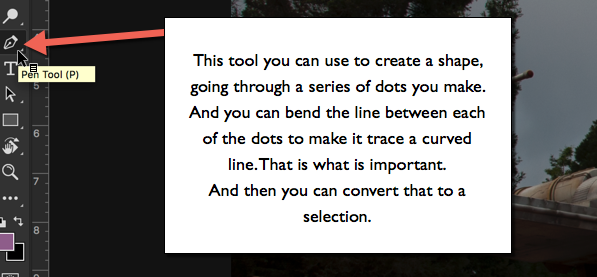
The Pen tool you will find here:

Use the Pen

The Pen Tool allows you to set a series of dots. Photoshop will play “connect the dots”, and if you end up closing the line, you will have a shape. That shape you can convert to a Selection.
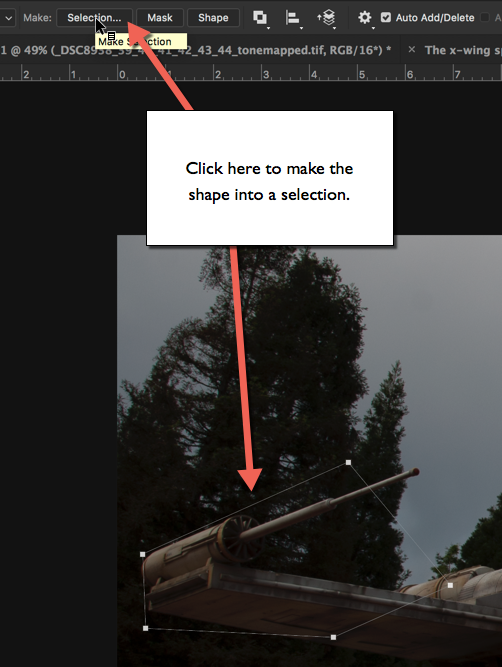
Create a selection

You get some options before you get your selection.
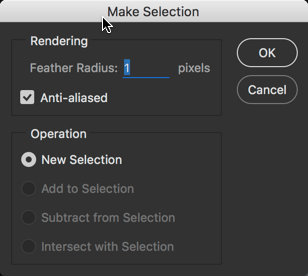
Feather selection

Starting from the bottom, you want to create a ‘New Selection’, and you also want to have it on ‘Anti-aliased’, because it makes a smoother transition between the neighboring pixels on the edge.

And the first option is ‘Feather Radius’. If you set this to zero, you will get a very hard edge, and it will not blend very well with a background. Typically I use values between 0.5 and 2, depending a bit on the size of the object, the resolution and what it is. For the X-Wing I used 1-pixel feather radius, and that looks great.

How to use the Pen Tool in Photoshop?

This takes a little practice before you get the hang of it. Start by setting the first dot at a location good for closing the path to a shape. A corner is always a good place.
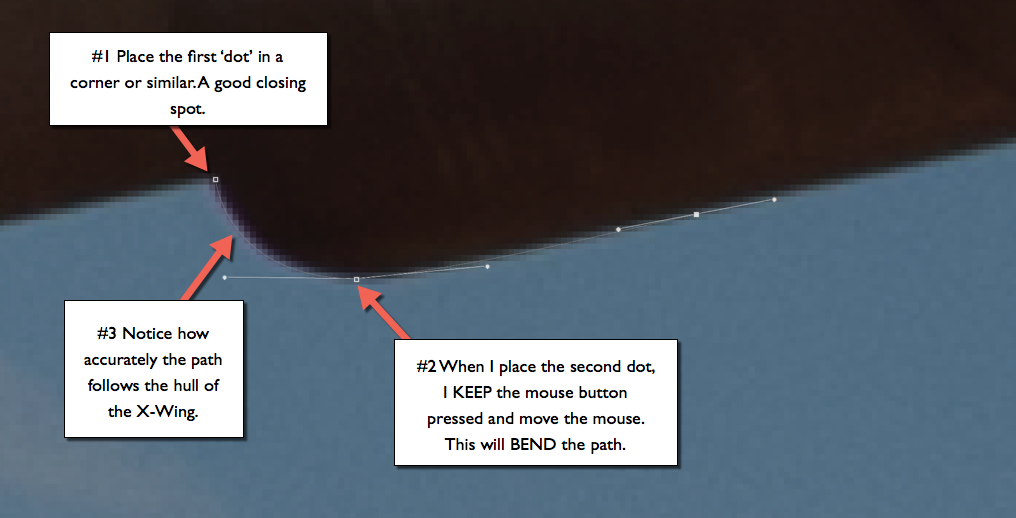
1 Making a path

When you place the second dot DO NOT let go of the mouse button. Keep it pressed and move the mouse, notice how the path begins to bend, depending on how you move your mouse. Use this to make the path follow the shape, you want to have a mask for.
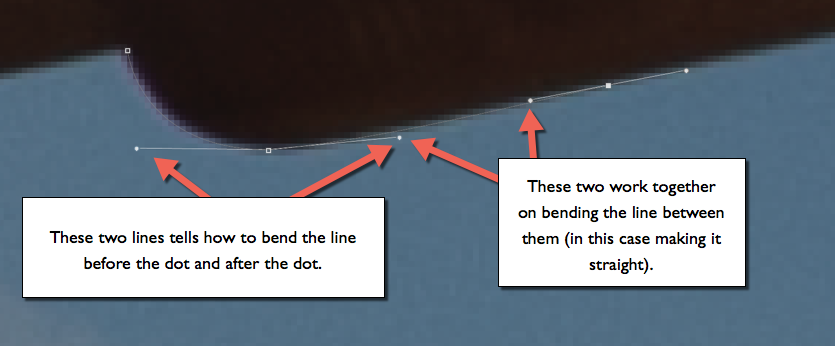
2 understanding the path

You also get two additional lines (handles). The handles tell Photoshop how to bend the path. Each dot has two handles, one for bending the path before the dot, and one for bending the path after the dot.

The path between two dots is controlled by two handles, one from each dot.

Moving handles: A handle can be moved if you carefully position the mouse exactly over the handle and press ALT. Then you can drag it around and change the path. It is necessary to use this in corners and whenever there is a need for a sudden change in the direction of the path.

And when you miss the handle, just press Undo. You will miss it 100 times because it is small.

Moving a dot: You can move a dot if you press CMD on a Mac or CTRL on PC. Again, be careful to place the mouse exactly on top of the dot, and as with the handles use Undo, whenever you miss. And you will miss.

It takes a little practice, but as soon as you get going, you can make a perfect mask for the X-Wing in less than 30 minutes.

Problem #3 making a seamless composite

As mentioned in Problem #1 I ended up using the darker exposure, and when I added the mask (just press the ‘add mask’ when your selection from the path is active), the X-Wing appeared on top of my Milky Way. As you can see in this 270% crop, the transition between the X-Wing and the background is seamless. This is because of the ‘Feather Radius’ of 1 pixel, as mentioned in Problem #2.
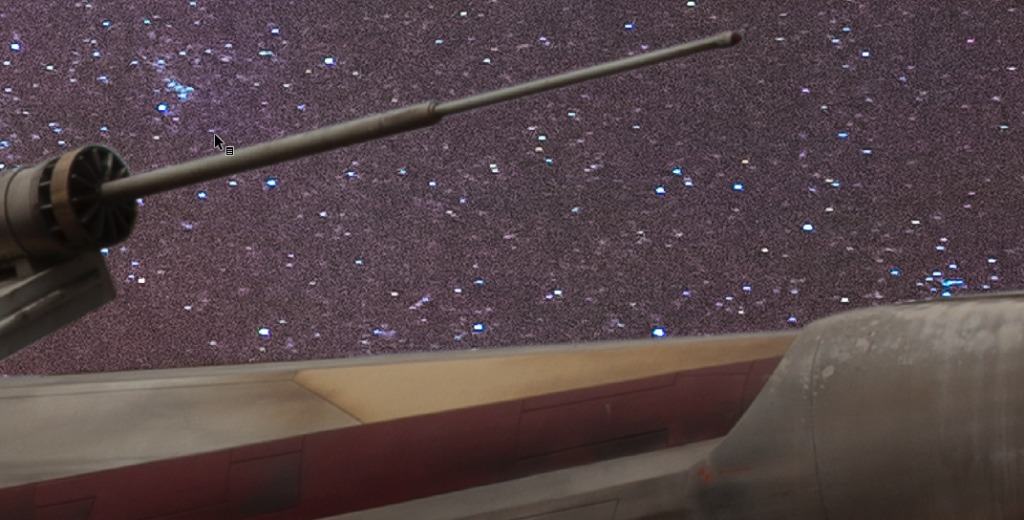
250 percent crop

I made three duplicates of the X-Wing layer, and resized and rotated them a bit, to make them look like three individual X-Wings. I also distored the shape slightly, but not too much. Too much would be obvious, because the perspective would be distorted.

The second part is to make the light match both in intensity and colors. The original X-Wing is shot in daytime, and the colors match a daytime.

X-Wing colors

To make it fit better I change the colors, using a curves layer. I have organized my three X-Wings in a Layout Group. I can target any adjustment layer to only the the layer just below, and if that is a Group of layers, they will all be targettet. But my background will not be targetted.
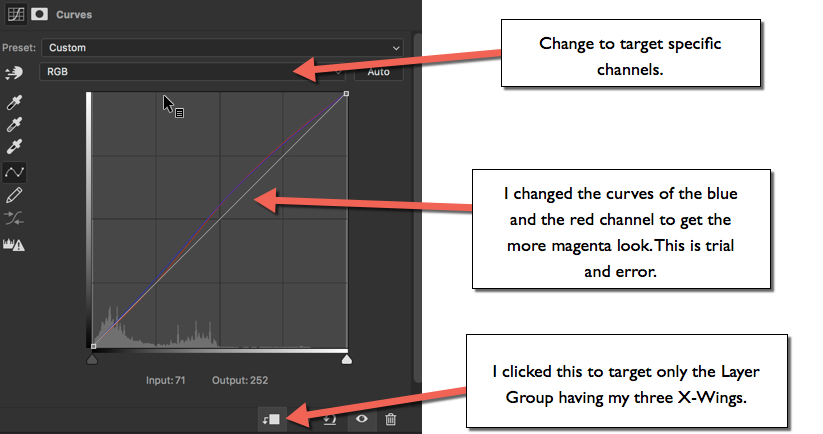
Colors on xwings

I also have a curves adjustment layer to make the ships slightly darker.
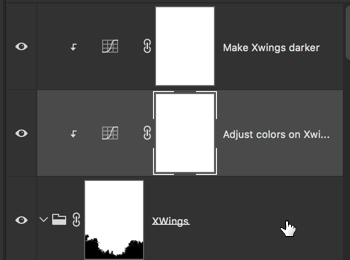
Adjustment layers

The X-Wings now have a good and transparent blend with the background.

Problem #4 placement of the X-Wings

I decided to go with the idea of three visible X-Wings on a patrol. It should look like they are flying at a low altitude, and just flying over the woods as I shot the photo.

The third X-Wing would have to be half hidden by the trees to make this work. To make this work I needed a mask for the trees only, to hide the part of the X-Wing that should look covered by trees.

In the latest version of Photoshop CC 15.5 there is a new Masking tool, and using that, I pretty quickly got a usable mask for the trees.
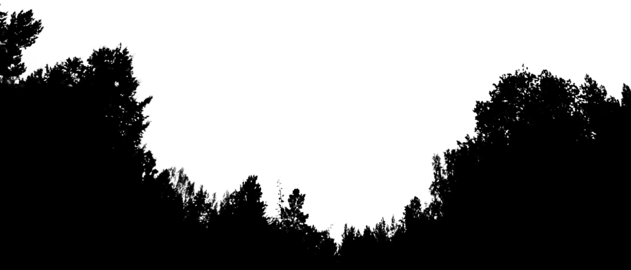
Tree Mask

The new masking tool is accessed by using:
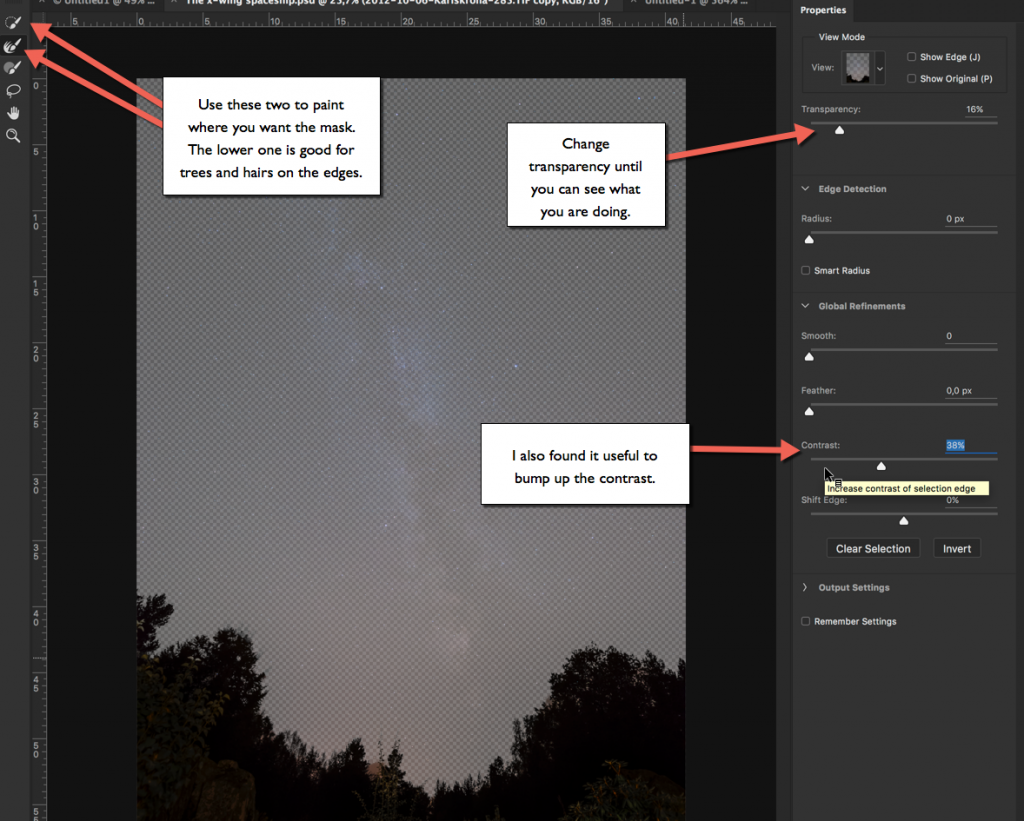
Photoshop new Select and Mask tool'

And putting this mask on top of the X-Wing Group allows me to half hide the third X-Wing behind the trees and the illusion is complete.

Thanks for reading

If you enjoyed reading this article, you might also enjoy my latest book “10 Essential Tips for Fine Art Photographers“. What you get from the book, that you don’t get from the blog is the mindset and organized rock solid tips on how to become a Fine Art Photographer producing professional images.

–Jacob


Tour de France will start at Saint Mont Michel

I know! It has been a bit quiet lately on my blog. But don’t worry I am working on some goodies. I am working on my next book, which will cover composition. There are a lot of so-called ‘rules of composition’. As I have grown as a photographer, my understanding of ‘rules of composition’ has changed, and I think I have found a good way of understanding and approaching composition.

I am a late bloomer as a photographer, and I think about everything that I do. I have put in a lot of hard work to get to where I am today,  but it is not longer ago than I can still remember what frustrated me in the beginning. Just like my first book ‘10 Essential Tips for Fine Art Photographers‘ (the 50% discount code “Welcome50” is still active), my new book on composition will be the book that I wanted 4 years ago. It will not only cover some theory on composition but also suggest ready-to-cook compositions, making it possible to go out and shoot a great photo using the recipe.

I believe in that you have to build a foundation before going for more advanced stuff. An important part of that is to learn from what others do, not only from a theoretic point of view but also from a practical ready-to-cook point of view. At least that is my belief.

Anyway, I am working on the book, and will try post a bit on my blog too, but time is not unlimited.

About the photo

I shot this photo a couple of years back at Mont Saint Michel in France. It is one of the most fantastic places I have been to, and it is the photographers wet dream. Recently I learned Tour de France would begin from here this year. What an awesome scenery for a start for the world’s biggest cycling race on the planet.

It is an HDR from -3 to +3. I shot it very late in the evening when people were leaving, and this couple just stood there to get a last look at this magnificent building. The Dynamic range in the scene is incredibly high and difficult to control. The spotlights are so bright, and the shadows so dark, that it got quite difficult to blend them together to and get a good balance in lights and shadows.

–Jacob

10 Essential Tips for Fine Art Photographers

Writing my first book has kept me busy for a while. I am pretty excited about it and I hope you will like it. It’s aimed at photographers, who want to get started on creating beautiful fine art landscape and cityscape photos.

The book I have written is the book that I wanted to read myself when I started out. I have learned the hard way, learned from bits and pieces here and there, and from a lot of great people whom I have interacted with, either through G+, Facebook, and The Arcanum.

This book will guide an aspiring Fine Art Photographer and show a shorter way through to be making great photos than I used.

$10 for 40 pages packed with rock solid tips.

Add to Cart

Because I am so happy about the book, I will start out with a 50% sale. Use the coupon code “Welcome50” to get the rabate.

–Jacob

Review of Voigtländer SUPER WIDE-HELIAR 15mm III for Sony FE mount

Sunset at Tadre Mill

Sunset at Tadre Mill in Denmark. One of the very first images I shot using my brand new Voigtländer SUPER WIDE-HELIAR 15mm III for Sony FE mount.

I have been waiting for this lens for what seems like AGES. Since I got my Sony A7R two years ago I have been looking for a good wide angle lens solution. I bought the Sony 10-18mm, and though some say you can use it for full frame, I do not agree. It is by far too soft in the corners, and the distortion is a mustache like distortion. And then I can use my Nikon lenses on my Sony cameras, using my Metabones adapter. But neither solution has been satisfactory.

The Metabones adapter has no electronic connection to the Sony camera, and does not transfer the EXIF information, and it does not trigger the focus peaking. Smaller things, and yet still annoying things. The reviews of the first automatic adaptor for Nikon to Sony FE mount, haven’t impressed me.

So Voigtländer SUPER WIDE-HELIAR 15mm III for Sony FE mount is the lens I have been waiting for, along with a native f/2.8 16-35mm.

At the time of writing, the lens is in pre-order most places. But if you like the review, and consider buying the lens, you can support me by using this link and buying it at BHphoto.

Overall remarks

The Voigtländer SUPER WIDE-HELIAR 15mm III for Sony FE mount is a prime full frame format lens. It also fits on APS-C cameras, like Sony A6000 and A6300, only it will be like a 22.5mm lens. Being prime means that it only has one focal length, in this case 15mm.

Continue reading

Fascination of Panorama Photos

Roskilde Cathedral Square. A 169 megapixel image stitched from 28 downscaled images.

There is something about panorama photos or stitched photos that fascinate me. It’s a bit like a fisheye lens, that shows the world in a way you can’t see with the naked eye.

A panorama photo serves multiple purposes seen from my perspective. The obvious reason is to include more of a scene in one photo, in a panoramic way.

Another reason is to compensate, for a missing lens. If you haven’t got that really wide angle lens in the bag, shoot two less wide angled images, and stitch them when you get home.

Continue reading

Artistic interpretation of Venice

Night view from Accademia Bridge

Night view from Accademia Bridge in Venice.

I just loved that three armed street lamp in that corner. I have a very soft spot for old-fashioned street lamps, and if you have a look at my portfolio, you will find many. If I see one, I have to shoot it.

It has been a while since the last post. I have been very busy on the art side of my activity. Me and my wife exhibited at Art Nordic 2016 last weekend, and the response was overwhelming. Our booth was full all the time. Thank you to everybody who attended and visited us.

The game I play with reality fascinated people. The way I control the light, and create my own reality, they clearly considered to be art.

Many people asked ‘is it photographs?’, and such a question I consider a big compliment to my work.

A photo like this of Venice is in many ways pretty far from what it looked in real life.

It still has the details of a photograph, but the light is something else. Something different. And that is what I work with.

–Jacob Surland
Easy to read and understand tutorials on
www.caughtinpixels.com

Art sale as limited prints. Photo by Jacob Surland, Licensed Creative Commons non-commercial v4.0. No Derivative Work. Protected by Pixsy.com.

The weekend post – AuroraHDR is very fast to work with

The old Maritime building

Karlskrona in Sweden processed using AuroraHDR.

A few weeks ago I posted my test drive of AuroraHDR. In the meantime, I have got my new MacBook Pro and have been using AuroraHDR a lot more.

One of the risks of taking a new tool into use is that you change your style because you adapt your style to that of the tool.

The photo above is an old one from Sweden and it has been one of my ‘test-cases’. I already had processed it using Photomatix and my standard processing flow. I had got a different, yet similar result. I did not try to get a 1:1 version.What I particularly like to have in this image, is a strong texture on the building and the reflection in the water, so this was what I chased in AuroraHDR.

What I particularly like to have in this image, is a strong texture on the building and the reflection in the water, so this was what I chased in AuroraHDR.

What I have done, is to research what is possible to get out of AuroraHDR, and when I have found something that I like, I have created a preset. I have been trying to create presets that support my style, rather than adapt AuroraHDR presets into my style. You might feel different about that, which is perfectly ok, I just like to be myself with my own style.

Continue reading

The Weekend Post – How to prepare for a huge print

Rubjergknude lighthouse

Rubjergknude Light house stands in the middle of a moving sand dune. The surrounding houses lies as debris around the light house. It is predicted, that it will fall into the sea in 10-15 years.

This Weekend Post is about, how I prepared this image for a huge print.

When you have to prepare a large print, you must be more careful, than with a smaller print. Even small irregularities and dust spots will be easy to see and can potentially ruin the whole print. And a larger print is more expensive.

So time spent preparing your photo, is time well spent.

Recently I had to prepare a 130cm / 52 inches wide print for an exhibition at Photographers Lab in Copenhagen, and some problems showed themselves.

Continue reading

Visiting Noravank Monastery

The Beauty of Noravank Monastery in Armenia.

I visited a Armenia a couple of years back. We were on a roundtrip by bus. Armenia is a fascinating country, and even if it is a small country, they have an incredibly strong history, and many ‘Worlds first’ or ‘Worlds largest’.

The Monastery of Noravank is among the most beautiful monasteries we saw. The road to get there is up through a canyon, and the road ends by the monastery. You might ask, why monks went to so solitude areas to live and study.

Canyon leading to Norevank

The Canyon leading to Noravank monastery.

Halfway up the canyon, there’s a small restaurant built into the cave, where we had lunch, before going the rest of the way up.

This photo from Haghpat Monastery is another of my favorite photos from Armenia.

The Sun is Setting by Church in Armenia

The Sun is Setting by Church in Armenia.

If you find my articles interesting and like post-processing images. Consider getting AuroraHDR, it’s a full fletched image processing tool, for editing not only HDR photos but also normal photos.

Please use the link on my webpage and support me that way. I only recommend software and tools that I use.

I am not ‘bought’ to say nice things with sugar on top. I say what I think and feel about products. I get nothing for writing these articles, but I do get a kickback if you use my link to buy AuroraHDR, as well as if you use my 15% discount coupon code “caughtinpixels” for buying Buy Photomatix Pro. Thanks.

If you like my work, why not follow me on Twitter, Facebook, and Google+. I post photos daily.

–Jacob Surland