Warning: Undefined array key "multiauthor" in /var/www/caughtinpixels.com/public_html/wp-content/plugins/post-layout/plugin.php on line 114
Warning: Undefined array key "mobile" in /var/www/caughtinpixels.com/public_html/wp-content/plugins/post-layout/plugin.php on line 352

The Wizard can feel the warmth as he enters his Tower of Wizardry, thanks to his is ever burning fireplace. Even though he has been on the road for a few days, the ever burning fireplace, keeps his tower nice and warm.
He has been out collecting components for his spells, and he is physically tired and cold to his very bones. He looks around, but everything is where he left it, nobody would be stupid enough to try to steal from a wizard.
He can’t wait to study his harvest. He closes the front door and goes straight to his laboratory. There are many strange smells and odors, but he likes it that way, some sweet and some more acid.
His workbench is an old table made of oak wood and full of magic silver rune inscriptions. The magic orb sits on its stand. He uses the orb to figure out, where he can find his components; it’s magical. He can look for specific components, but he can also search geographic areas, and the orb will show him, what he can find there. This way, he finds new components he which existence didn’t even know.
As he bends to puts down his Bag of Holding, containing the harvest from his trip, he notices mud on his robe, but he doesn’t care. The Wizard can’t wait to play with his new components, and see what magic he can produce. He found a few rare components, and he has been pondering on what to use them for all the way back to his tower of Wizardry.
He opens his bag and takes out the components, one by one, and he scrutinizes them and smells to them, before placing them on his work bench. When done, he studies them, roots out a few, that doesn’t have the quality he needs to work his magic. And then he picks up his Wacom wand and starts working.
I truly believe that post-processing is a kind of magic. The post-processing puts magic into a photo, and photos wouldn’t be the same if you didn’t do it. I have been thinking a lot about this for the last couple of years.
To begin with, it was the post-processing that triggered my interest for photography. Once I read someone who said ‘if you diguise a turd, it’s still a turd’ referring to that you can’t save a bad photo in post-processing.
Of course, to some degree, that is true, but I still like to disagree, because I believe, that you can do magic in the post-processing. And as a digital wizard, I have to feel that way. I am obligated to do that!
I started out three and a half years ago, and it started the very day, that I figured out the importance of post-processing. Going into details on what I have done and learned, would probably result in a spellbook.

In broad terms I have been exploring and working digital magic in Lightroom, Photoshop, Photomatix, various tools, and last but not least the new AuroraHDR.
I have found tons of tips and ways to do things, and I keep exploring, because I believe in being curious, and I love the digital magic. A famous Danish author once said: ‘I do not want to die curious’, and that’s my tagline.
I believe one of the most powerful tools a digital wizard has, is dodging and burning. Traditionally dodging and burning is the art of changing the exposure of your photo locally. It’s a term that stems from the old film days and dodging, and burning was a technique you used in the dark room; in the post-processing.
When the negative was exposed through the enlarger to the photographic paper, you blocked the light, shortly in various places. This way you gave some parts less exposure by moving a lollypop looking cardboard stick around. The photo would be lighter in these areas, and this is ‘Dodging.’
‘Burning’ is the opposite process. After having given a normal exposure, you give extra exposure to some parts of your image. By using a piece of cardboard shaped to fit your needs, you would more let light pass and darken these areas.
Remember that the photographic paper was sensitive to light and therefore less light, was lighter (dodging) and more light darker (burning). Ansel Adams was a pioneer in burning and dodging.

Modern digital dodging and burning is much more powerful. If classic dodge and burn was a wand of light, modern dodge and burn is a wand of fireballs. And as with all magic, use it with care.
Adobe Lightroom is the leading digital darkroom, and it has very powerful dodging and burning capabilities. Aperture for Mac is also a digital darkroom. However, it has been discontinued. Other options exist too, but Lightroom is by far the best digital darkroom on the planet.
Digital dodging and burning is a much wider thing, than the old film days dodging and burning. Not only can you change the exposure, you can change the white balance, sharpening, saturation, clarity etc., this is powerful stuff.
In Photoshop, there are classic dodging and burning tools. I have used these tools to lighten up dark leaves backlit on a bright sky, but they are destructive tools in their nature. But there are other and better ways of dodging and burning in Photoshop.
However, I do a lot my dodge and burn in Lightroom. Lightroom is a cool and strong tool, and in many ways much easier to use, it does a fantastic job and more important it is nondestructive work.
Let’s do some magic!
Let’s add and remove light magically

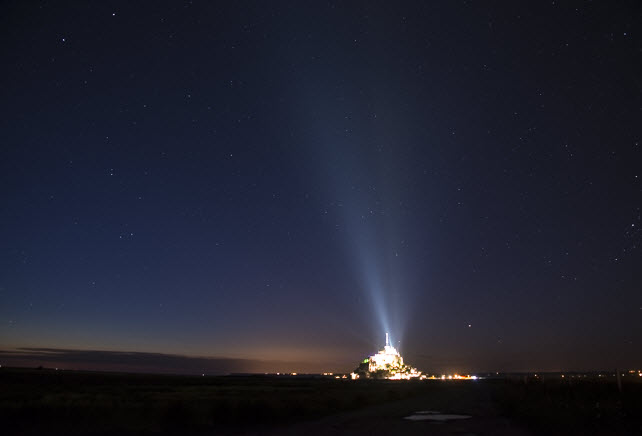
My goal with this photo from Mont Saint Michel in France was to create a rich warm, inviting and magic night shot of a medieval street and make you wish to be there. But to get there, I had to work some magic.
0-exposure Final photo
First I did my usual post-processing (my classic HDR Workflow Photomatix and blending layers). When I was done with that, I still felt, that I did not have quite the feeling of warmth that I wanted.
I had chosen to make the sky a bit darker than it actually was. It did some of what I wanted to achieve, but the houses and street lacked the warm feeling, that I wanted.
How to do magic dodge and burn in Lightroom
Let’s walk through the final steps I took, to complete my magic. First I reimported a 16-bit TIFF file into Lightroom. In Lightroom, I used the Adjustment Brush for dodging and burning. When using the adjustment brush you have these options:
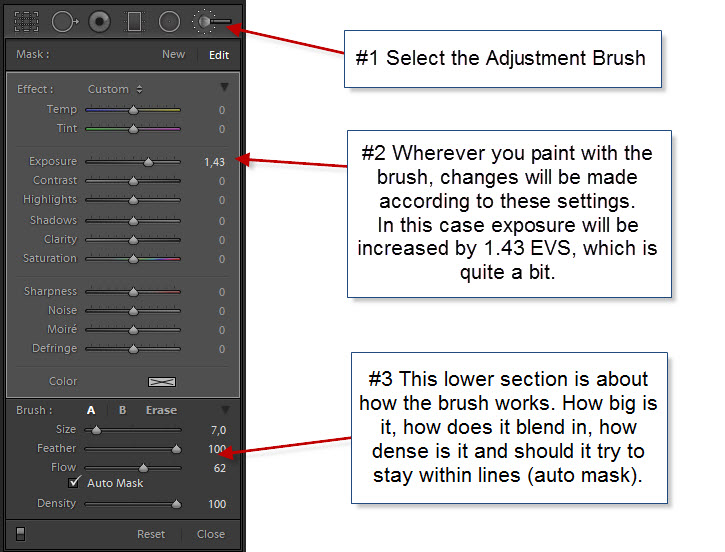
As you can see, there are many options. More than just changing the exposure as Ansel Adams could do in his darkroom.
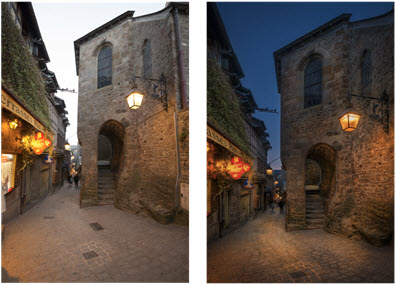
Let’s see how I did some artificial lights in the old medieval village of Mont Saint Michel just off the shore of Normandy:
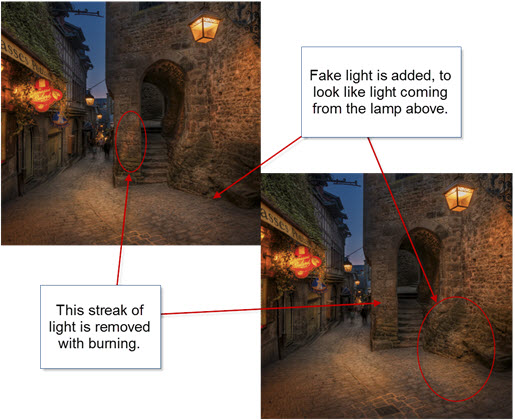
As you can see, I removed a streak of light on the wall in the middle of the image. It’s a streak of light coming from a spotlight just outside the image on the left. It doesn’t do anything good to the image.
I also added some artificial light below the lamp on the right-hand side. The eye believes the light to come from a light source, and it adds tothe mood of the image. Just what I wanted, but not everything I wanted.
To make the magic work, I have to simulate the already existing light sources. Brighter light in a different color typically characterizes a light source. Both light intensity and the color of the light have to match pretty good, to make the magic work.
In this case, the light is quite warm, and I increased the temperature by +71 and the tint by +57. I also increased the saturation by +36 and then I set the exposure to +0.67 (2/3 of a stop).
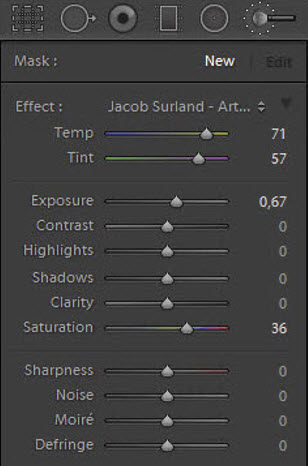
The exact values I have to try out for each image, because different color of light exists in almost any photo. The light in this particular image is rather warm, and by adding even more warm light, gives me more of what I wanted to achieve in my goal.
I added an artificial light source by painting (dodging) where I wanted it in order to make it warmer and lighter, giving exactly the same result as if real light source shun on the area. You could say that I painted with light. It is important that the light sources you add, fall in naturally. You don’t necessarily have to see the light source making it, but it has to be likely that a lamp could be making the light.
I removed the light streak on the wall, by doing just the opposite. I burned it (made it darker), but I also changed the temperature. By decreasing the exposure and adding Blue and Green instead of Yellow and Magenta I could paint on top of the streak, and it vanished. That’s burning.
Burning can be used for many different things. One of the things I like to use it for is to burn shadows to make them even darker and more prominent. This can have dramatic effect on images.
Adding more light sources the easy way
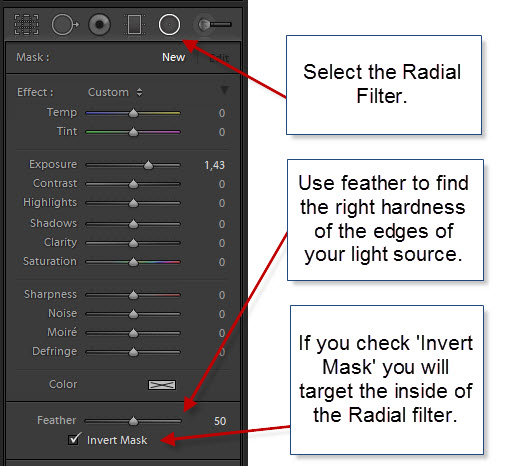
Adobe Lightroom 5 introduced Radial Filters and by using them you can quite easily simulate light sources. The light of a lamp is reflected as a round or elliptic shape on a surface. The Radial Filter is round or elliptical too, which makes it very easy to use for this purpose. The Radial Filter you can apply the same values to, as you can to the Adjustment Brush.
By default, the Radial Filter will target everything outside the radial area. This is great for making advanced vignettes, but luckily you can use ‘Invert Mask’ to target the inside of the Radial Filter, and that is exactly what we want:
I used the Radial Filter in several places in this photo:
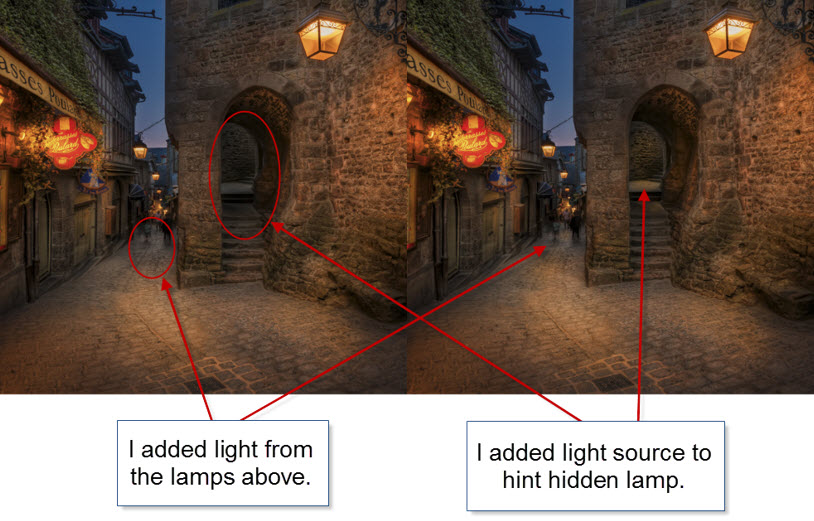
Notice how I have lit up the passage up the stairs and the platform at the far end of the passage, in order to make the viewer curious, and think ‘what’s up there?’
I also added some lights to the street, supposedly to come from the street lamps hanging above the street. Each Radial filter has its own size and slightly different values. I placed radial filters here:
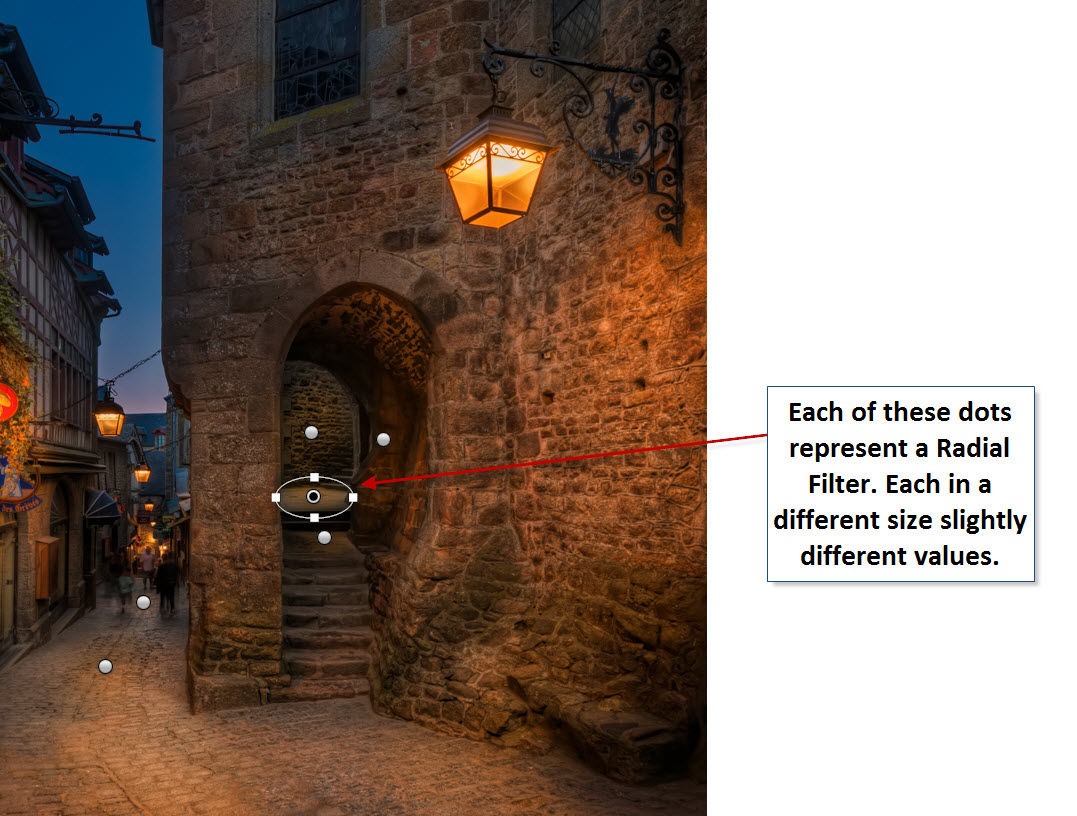
I started by adding one Radial Filter, with similar settings as I used for my Adjustment Brush. Then I duplicated and resized it to fit new areas.
You can duplicate a Radial Filter by pressing CTRL + ALT (and CMD + Option key on Mac) and then drag it to a new location. That will make a copy of the same size and with same settings.
Resize the new Radial Filter to fit the new location. You might also want to change the exact exposure adjustment and white balance settings because the light is different in the new spot.
By dodging and burning in this way, I achieved my goal of making a warm, inviting and magical image of a street the in the medieval village of Mont Saint Michel.
And when I am done doing an image like this, I feel like a Wizard.
The Weekend Post by Jacob Surland
If you find my articles interesting and consider getting AuroraHDR, please use the link on my webpage and support me that way. I only recommend software and tools that I use.
I am not ‘bought’ to say nice things with sugar on top. I say what I think and feel about products. I get nothing for writing these articles, but I do get a kickback if you use my link to buy AuroraHDR, as well as if you use my 15% discount coupon code “caughtinpixels” for buying Buy Photomatix Pro. Thanks.
If you like my work, why not follow me on Twitter, Facebook, and Google+. I post photos daily.
–Jacob Surland