Working with the White Balance in City Night Photography

Castel Sant'Angelo or in English Castle of the Holy Angel, was the Mausoleum of Hadrian, Emporer of Rome in the second century. It sits by the river of Tiber. It leaves one with a massive impression, not because it's particularly beautiful, because it isn't, but yet, it fascinates. It used to be the tallest building in Rome.--Jacob Surlandwww.caughtinpixels.comArt sale as limited prints. Photo by Jacob Surland, Licensed Creative Commons non-commercial v4.0. No Derivative Work. Protected by Pixsy.com.

Castle of the Holy Angel seen from Ponte Sant’ Angelo.

Castel Sant’Angelo or in English Castle of the Holy Angel, was the  Mausoleum of Hadrian, Emporer of Rome in the second century. It sits by the river of Tiber. It leaves one with a massive impression, not because it’s particularly beautiful, because it isn’t, but yet, it fascinates. It used to be the tallest building in Rome.

Shooting photos in Rome at night, is great fun, but also a big problem when you start post processing the photos. The city lights are VERY yellow, even when you are on location and looking at it. When we walked around and shot photos along the River of Tiber, I just knew that colors would be a problem. This is not the first time I have encountered such yellow city lights. I also experienced it Rothenburg ob der Tauber in Germany. They use some kind of LED lamps, with a very yellow glow.

The problem with yellow lamps is that you don’t really get a lot of colors reflected back. Think back to the old days with a dark room. The red light bulb made a white piece of paper seem complete red, even if you knew it was white. The same thing happens with a yellow lamp. The light almost only has yellow colors in it, and the only colors they really reflect is yellow. It’s a strange concept the first time you run into it. A surface can only return, the colors that the light source contains.

Once I heard a question ‘what color is the Moon really?’ and the answer got very complex, exactly because of the colors the light contains, and that different colors have different wavelengths.

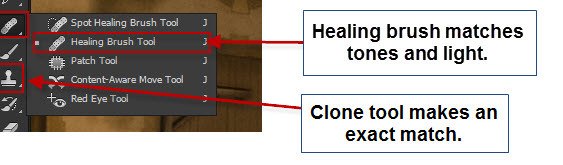
In my world, the color of light is less complex than wavelengths, it’s just a couple of sliders in Adobe Lightroom.

Castle of the holy angel before

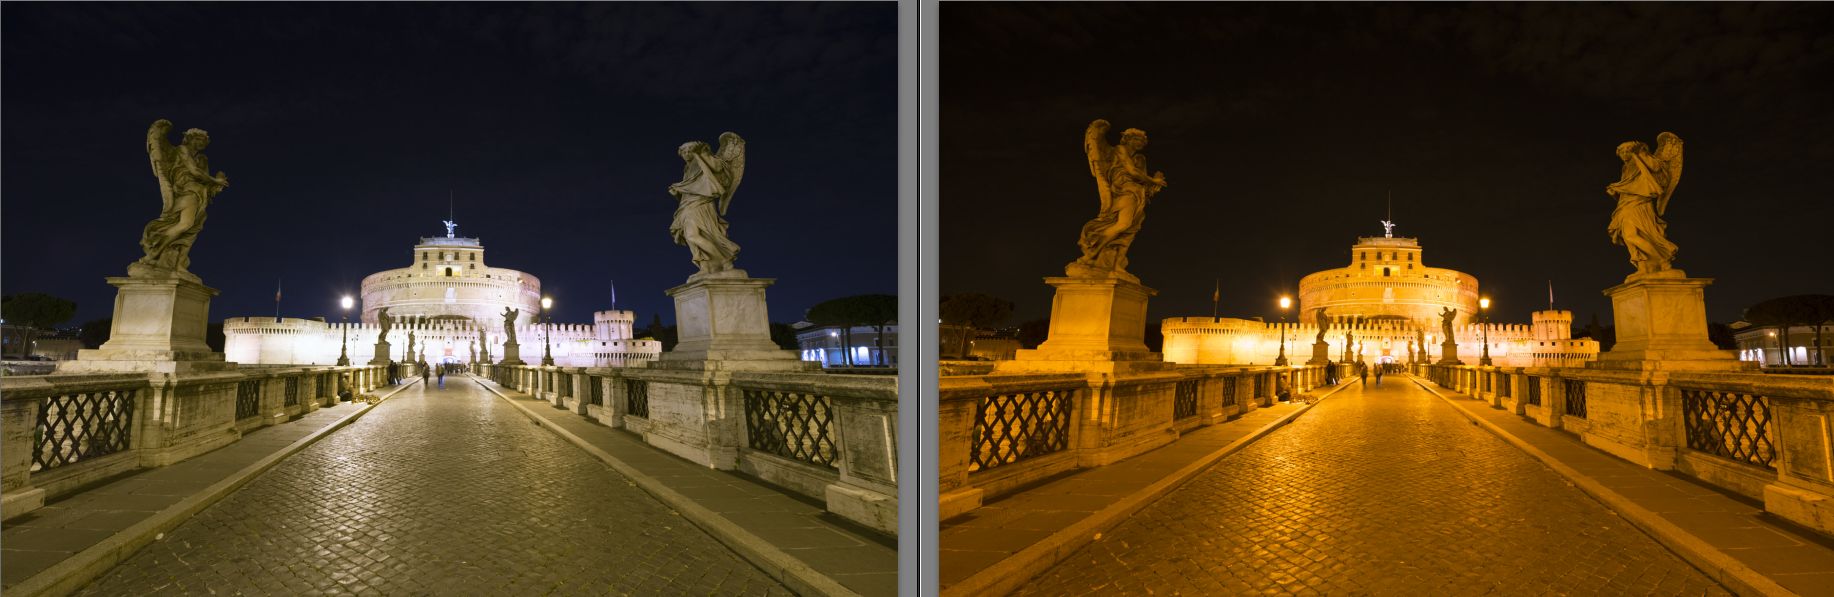
On the left you see the fixed white balance, and on the right you see the out of camera white balance.

Usually, the color of city lights is somewhere between 2200 kelvin and 3300. Modern LED lamps tend to be in the lower end of the span, but there is only way to find out, and that is by adjusting the temperature.

Castle of the holy angel before white balance

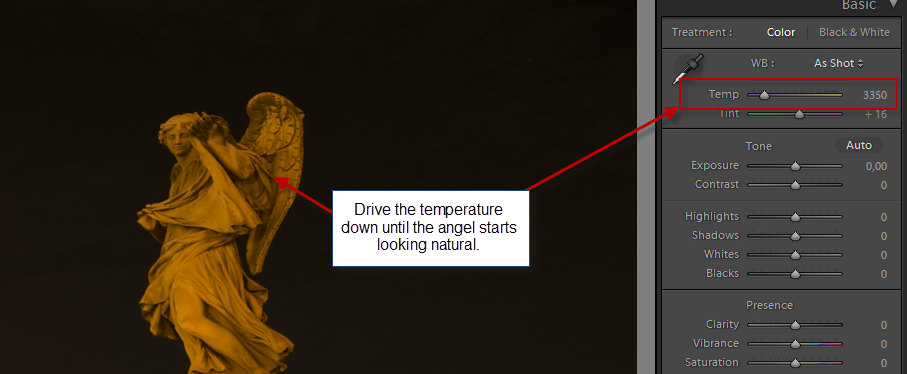
This usually brings you to the right temperature, but with the city lights of Rome, I found that I hit the bottom, which is 2000 degrees Kelvin, before I am happy. And I am only JUST happy and not really happy. No flexibility at all.

Castle of the holy angel before white balance adjusted

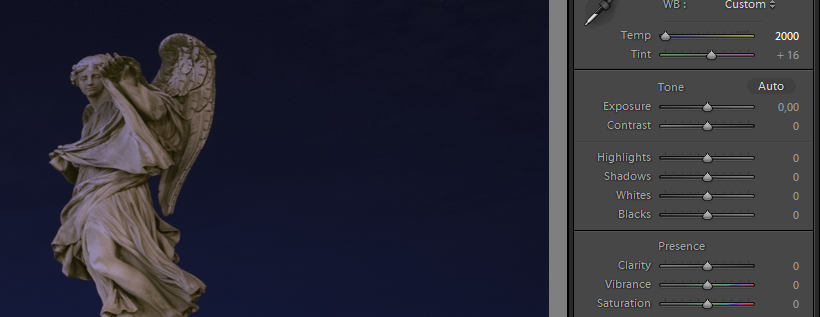
This is much better, but there is still a purple and yellow hue to the statue. To adjust this, I can use the Tint slider, but before doing that, I will show you a little trick. The trick will make it quite easy to find the best possible white balance much easier.

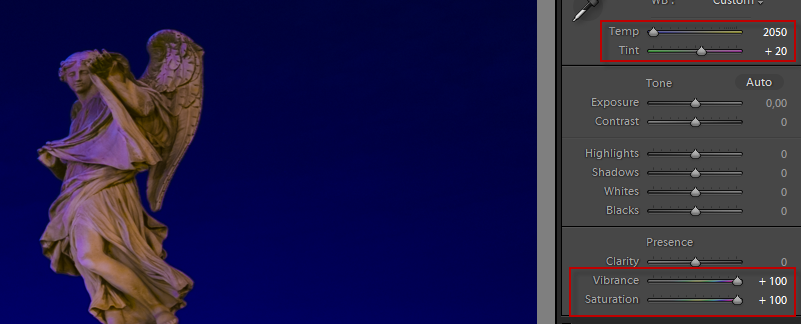
Tip: Before adjusting the temperature and tint slider, I dial up the Vibrance and the Saturation to 100. I am not going to leave them in this place, but it makes it easier to spot color casts because they are exaggerated.

Castle of the holy angel before white balance trick


I adjust the Temperature and the Tint to find a compromise. My aim is to balance the amount of blue and yellow and purple or green. This IS a compromise, but when the balance is found, I have found the best possible white balance. I will have to make local adjustments to make changes to it.

Typically this is a real problem if there are mixed light source, it could be electrical and natural light or just different sorts of electrical light.

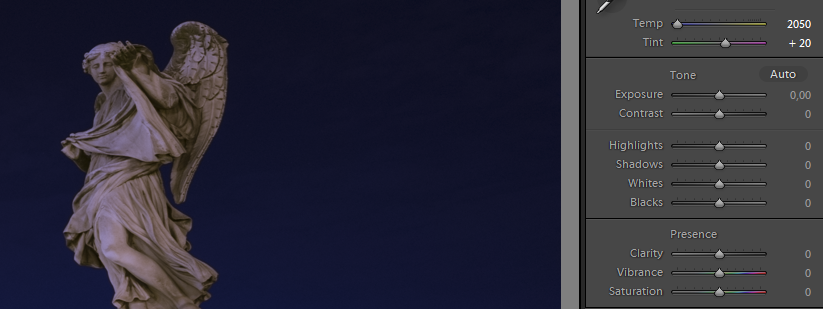
This is what I ended up with, after using the trick:

Castle of the holy angel before white balance trick adjusted

While this has got a little more purple, it also has less yellow. It turned out, that some of the yellow really was too much green. The compromis is to accept a bit more purple in the image over all, but purple can be removed, using the HSL panel, in Lightroom, if need be (so can yellow for that matter).

When I dial the Saturation and Vibrance back to 0 I get this acceptable result:

Castle of the holy angel before white balance trick adjusted desaturated

And the full image looks like this:
Castle of the holy angel before white balance trick adjusted desaturated full image

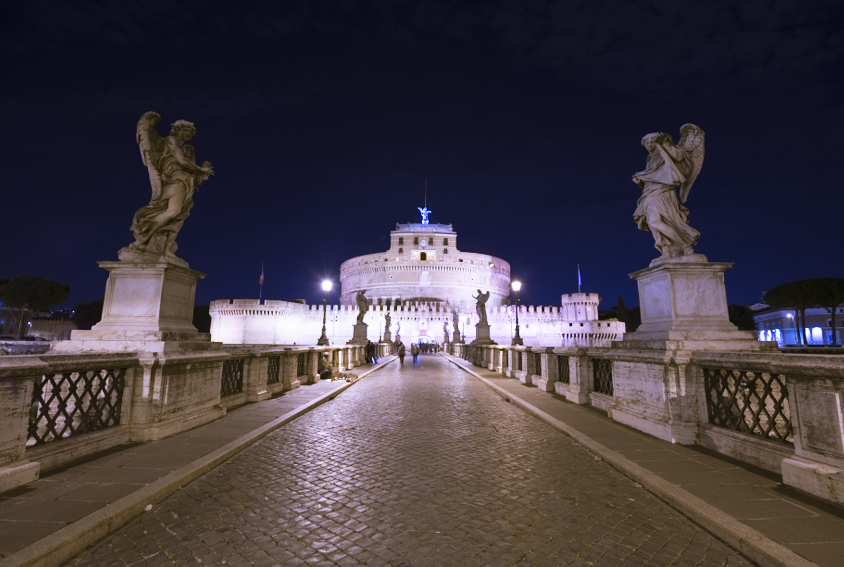
I still had to work with the colors, but in general I have am rid of the super duper yellow image, and have something in the natural world. There is a purple hue, but that can fairly easy be removed using either Photoshop or Lightroom.

From here I did my Photomatix and Photoshop blend images show.

These are a couple of other examples of city night shots, that had a real strong yellow orange glow to them before I started processing them:

During the day, The Bean in Chicago is crowded with people, enjoying the wild reflections. It is insanely fascinating, such a large curved mirror, and I shot a ton of photos during both day and night of The Bean.Read about the making of this photo here: http://goo.gl/EC0lGF--Jacob SurlandPhoto by: Jacob Surland. Buy limited prints on www.caughtinpixels.com Licensed creative commons non-commercial v4.0. No derivative Work. Protected by Pixsy.com.

Cold evening at the Bean in Chicago.

Rothenburg ob der Tauber is one the most idyllic German medieval towns I have visited. Fot that reason I have been there three times. This split road is particularly lovely I think. Photo by: Jacob Surland, www.caughtinpixels.com

Rothenburg split road. Not as vibrant as it could have been, if not for the strong yellow city light.

This trick on white balance I have showed you here is the easiest and fastest way I have found so far to do a pretty accurate white balance.

–Jacob Surland

Chateau Queyras sitting on the top of the World

Sitting on top of the world, or so it seems. Like many other castles and fortress in mountain areas, Chateau Queyras sits overlooking a pass for protection. --Jacob Surlandwww.caughtinpixels.comArt sale as limited prints. Photo by Jacob Surland, Licensed Creative Commons non-commercial v4.0. No Derivative Work. Protected by Pixsy.com.

Chateau Queras in the French Alps.

Sitting on top of the world, or so it seems. Like so many other castles and fortresses in mountain areas, Chateau Queyras sits overlooking a pass for protection. While Chateau Queyras might not be the most famous castle in the world, it certainly is picturesque. I shot this photo, as I was coming down from the mountain, after having shot this one:

Chateau Queras is placed like the old fortress it is, to guard the entrance to Queras, a beautiful area in the French. Quite a gem really, full of beautiful places and then this beautiful old castle. Photo by: Jacob Surland, www.caughtinpixels.com

Long exposure photo of Chateau Queyras.

I shot these shots while attending a photo workshop by Duncan MacArthur. One of the advantages of going on a photo workshop is, that you get the photo locations served right in front you.

About the processing of the first photo

The top photo is a combination of an HDR photo and long exposures. Cars don’t come by very often, and I had to wait for at least 5 minutes, after having shot my HDR series. I think the light trails adds a nice touch to the photo, and it fills an empty space area in the lower left corner. If you are interested in my general HDR workflow, you can find it here.

I did a lot of cloning in this photo. As a Fine Art photographer, I see myself as an artist I am not trying to portray reality in any way. I am bridging between reality and surrealism, and I do to photos what I like, and what I find fun. And actually I sometimes find it a great sport, to see how much you can remove from a photo, and still not notice, without scrutinizing it.

In the case of the top first photo of this post, I removed a fence and a phone booth.

Chateau Queyras - clone away

In this case I found it a great sport to remove in particular the phone booth. I end up feeling like a painter.

I use a combination of the Healing Brush Tool and the Clone tool. The Clone tool makes an exact match, while the Healing Brush Tool does some magic, to match both lights and tones. And to be honest, it quite often fails in doing a good job.

Chateau Queyras - clone away - tools

In this image I used the Clone tool a lot, to get exact match texture control. This resulted in a too bright piece of wood (see #2 below). This area is more in the dark, than the areas above, I used to clone from. To fix that, I added an Exposure layer mask, set the exposure to approx -1.27 stop, inverted my mask (CTRL+I or on a Mac CMD+I). My adjustment layer is now hidden, but I can paint it in using the brug tools. And by doing this with a 30% opacity I can dark areas I want to darken.

Chateau Queyras - clone away - fix light

I ended up darkening the two areas #1 and #2 (se image above).  The first area was just ‘too bright’, as a result from the HDR tone mapping and it attracted too much attention, to my liking. But #2 was a real problem, because it was obvious it was faked.