Warning: Undefined array key "multiauthor" in /var/www/caughtinpixels.com/public_html/wp-content/plugins/post-layout/plugin.php on line 114
Warning: Undefined array key "mobile" in /var/www/caughtinpixels.com/public_html/wp-content/plugins/post-layout/plugin.php on line 352

The ‘Skerpi’ is a house made of sticks, and put on wheels. The gourmet restaurant ‘Koks’ from the Faroe Islands has this as a pop-restaurant in Copenhagen these days.
For the past week, I have been playing around with AuroraHDR by Trey Ratcliff and Macphun. It’s one of the latest products for creating HDR photos, and I have been pretty excited about getting to know it.
This article covers my first initial impression of AuroraHDR. My overall impression is positive. There are lot’s of good stuff, but there are also a couple of bad bits.
Let’s start with one of the bad bits. It’s Mac… Only… However, Macphun is working on a Windows version, but there is no official date for this yet. Maybe they will brand it under ‘Winphun’? Probably not!
Anyway, I am or was a Windows user, but I do have a MacBook Air 13″ from mid-2011, equipped with an i7 1.8 GHz and 4Gb ram. It was the most powerful MacBook air back then. And this Mac has been my test drive computer.
I think that has been a good exercise and I can give a couple of additional input because I used this older computer.
First run of AuroraHDR
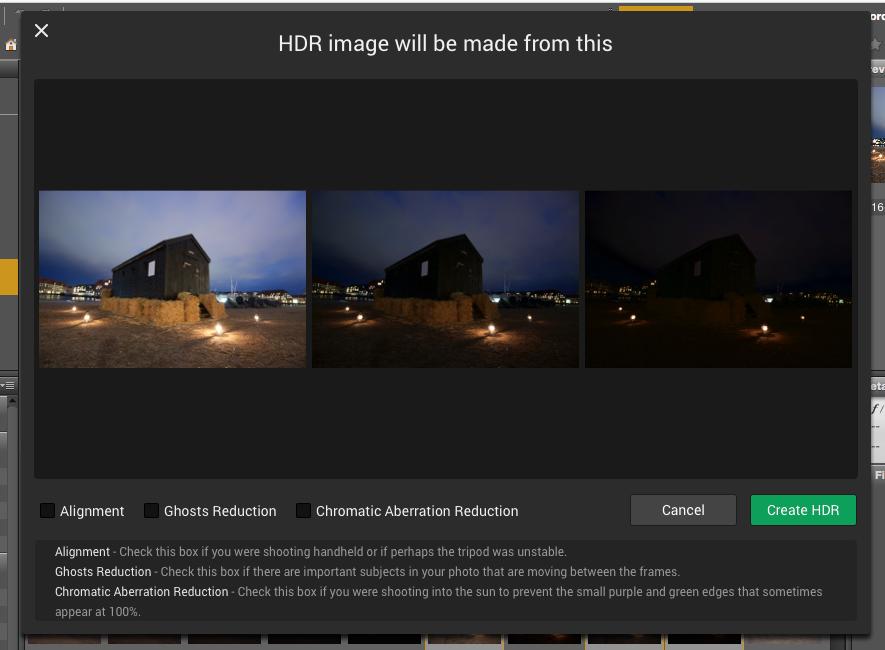
I picked a series of bracketed photos from my latest photoshoot. I exported seven exposures from Lightroom as DNG (Adobe’s device independent RAW format) files, as I always do, and dragged them into AuroraHDR.
And I waited for the preview screen getting ready to show the images.
It was 7 36.3 megapixel photos from my Nikon D800, and it took a while, so I waited a bit more. Fair enough, it is big image files.
And then I waited a longer bit more.
After 30 minutes of waiting and nothing had happened, I shut off the computer. I was VERY disappointed.
I tried once more, and picked only 3 of the 7 exposures, and after a couple of minutes the previews did show up, and I could start up AuroraHDR.
I wondered because I had heard that AuroraHDR should be fast. I looked up the minimum requirements, but my oldish Mac was above the minimum requirements. What could be the problem? Had Macphun really made a piece of software that couldn’t run on an older Mac?
No, of course, they had not. It took a little experimenting to figure out, what the problem was. It was the file format DNG. For some reason, the DNG files are insanely slow loading in AuroraHDR.
As soon as I used JPEG or native RAW files, it’s pretty snappy. 36 megapixel files are slower to work with, than 12 megapixel, which is no big surprise. But it works.
I did a test using three 3 images of 36 megapixels. The native Nikon RAW files took 1 minute and 55 seconds until it was ready to process. The DNG files took 11 minutes and 11 seconds. The first is comparable to other tools, but DNG is just too slow.
AuroraHDR tip #1: Do not use DNG files. Use native RAW files or JPEG files.
Now that I had found a solution to my initial major disappointment, I began exploring the tool itself. After looking for a little while, I realized, that AuroraHDR is a stand-alone image processing tool.
You can (almost) use ONLY AuroraHDR; it’s like a studio.
AuroraHDR high-level feature overview
The software loads and merges the images into the 32-bit HDR image, as is expected from HDR software. And then what? What is available?
As I said before, AuroraHDR is a Studio, and what do I mean by that? You don’t need much else. You can do almost everything inside AuroraHDR.
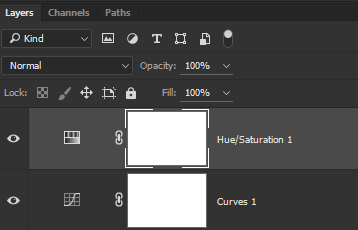
It offers layers with masks, as you know it from Photoshop and GIMP. It has a ton of tools to adjust including: White Balance, Clarity, Contrast, Color balance, toning, Gradient adjustment, split toning, and these are just some of the tools available.
The initial HDR image will be the first layer. On top of that, you can add other layers, and each layer has the same set of adjustment tools available.
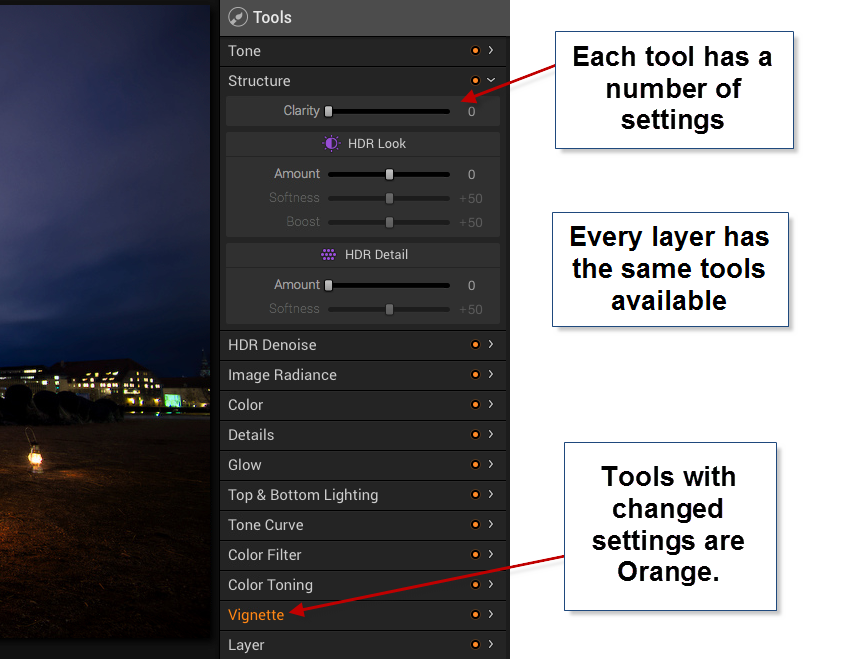
In Photoshop, you can add a curves adjustment layer and a Hue and Saturation layer etc., and they appear as individual layers. In AuroraHDR if you add a layer, that layer has everything, all adjustment tools are available.
The first mistake I made, was to forget about the layers and try to do everything in one layer – the Original HDR image layer. And of course, I can’t do that. I can try, but the result is not very good.
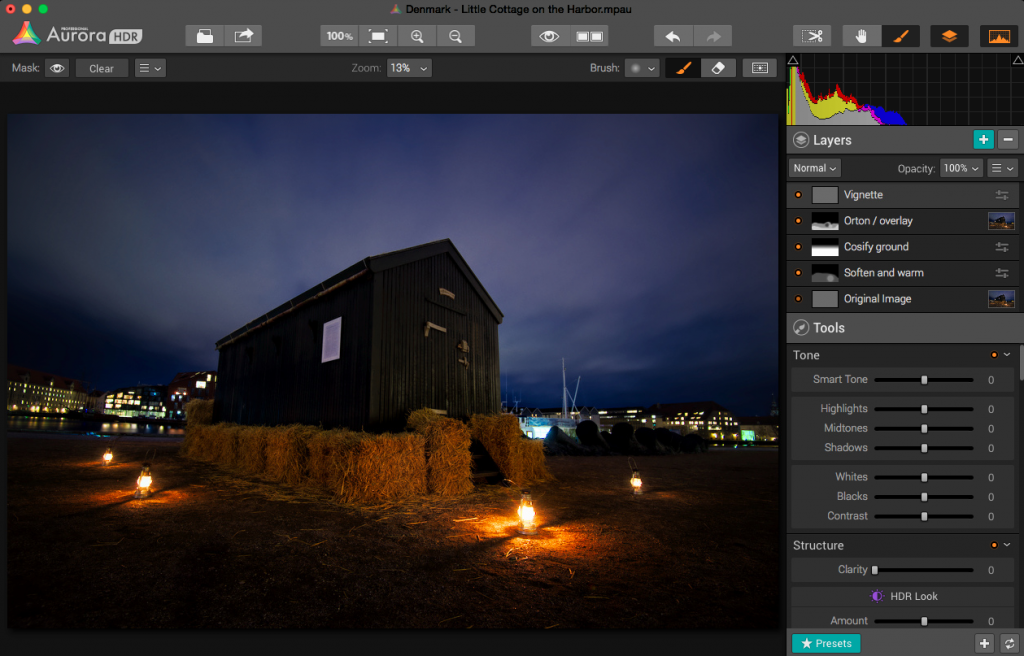
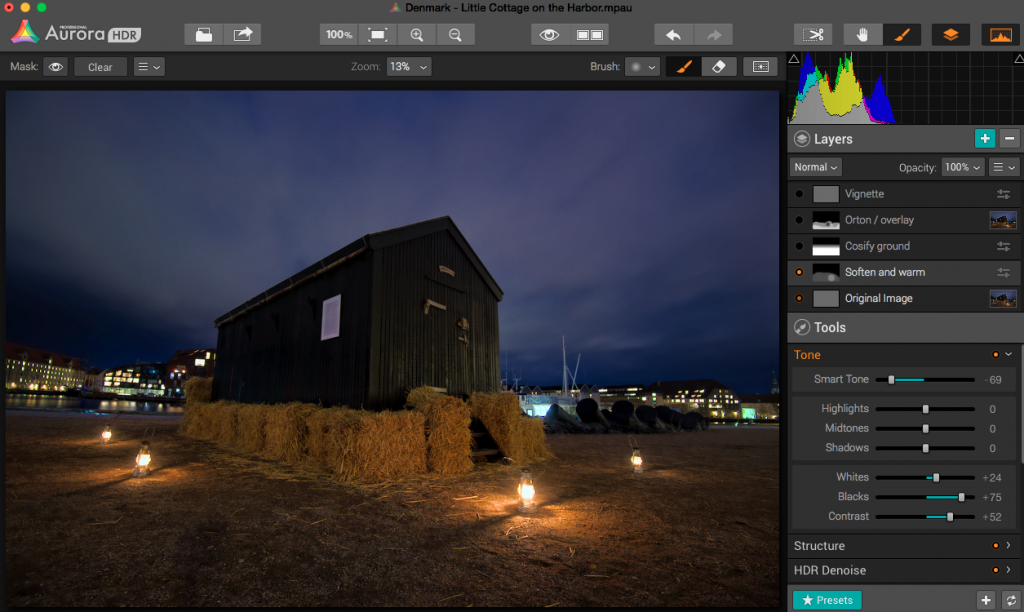
After having played around with a couple of images, I decided to do this little cottage standing in the harbor in Copenhagen. I ended up with 5 layers.
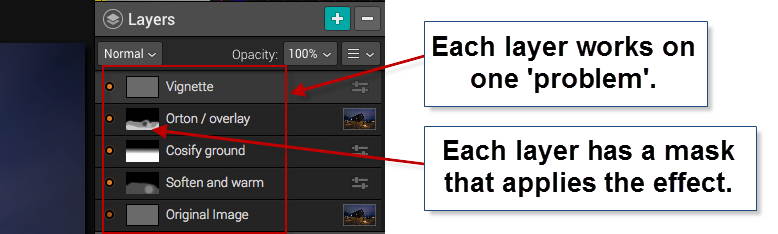
In a way, this is similar to what I would do in Photoshop. I start out with an original image, and I begin to apply effects, to solve ‘problems’.
Those of you who follow my blog will know, that I the way I post-process my images, is by identifying problems and solving them.
The problems I worked with on this image, were like this ‘The ground is too gritty’, ‘It’s not cozy enough’, ‘It’s not warm enough’. All problems leading to the creation of an inviting warm image.
The second layer enhances the warm light coming from the small lamps.
As it turned out, I adjusted no more than 3 tools in one layer, and I think that was the right strategy. If you try to do too many things in one layer, you end up with unwanted effects in some areas.
AuroraHDR Tip #2: Limit the number of tools you use in each layer. This way you can make changes locally, rather than globally.
I am pretty happy with the final result of this image. I could have reached a similar result, using Photomatix and Photoshop, as I usually do, but in this case, I was able to create everything inside AuroraHDR.
What’s missing in AuroraHDR?
AuroraHDR is almost a complete Studio; only a few pieces are missing. In my workflow, it’s the ‘finalizing’ that I can’t do in AuroraHDR.
The Crop and Rotate tool work nicely, but it does not have perspective correcting options. If you need to do perspective corrections, you will need another program. It’s not a big issue, AuroraHDR comes with export to Photoshop, but the feature is not inside AuroraHDR.
There is no healing brush or clone stamp, which again force you out of AuroraHDR, again not a big issue, but if… That would have been nice.
There might be a couple of other things I discover when I get around in AuroraHDR. But I haven’t found them yet.
What’s not so good in AuroraHDR?
One of the big issues with creating HDR photos is the noise. Digital cameras produce noise in images, especially at higher ISO levels, and HDR increases that noise.
Photomatix Pro, which I am very fond of, has a bad reputation for creating a lot of noise. But Photomatix can create noiseless HDR photos if you set the settings right. The question is if you like that output.
AuroraHDR comes with a built-in adjustable noise reduction. A very nice touch I must say. However, if your photos have areas, that are underexposed, AuroraHDR handles those areas badly, at least if you try to lift the shadows.
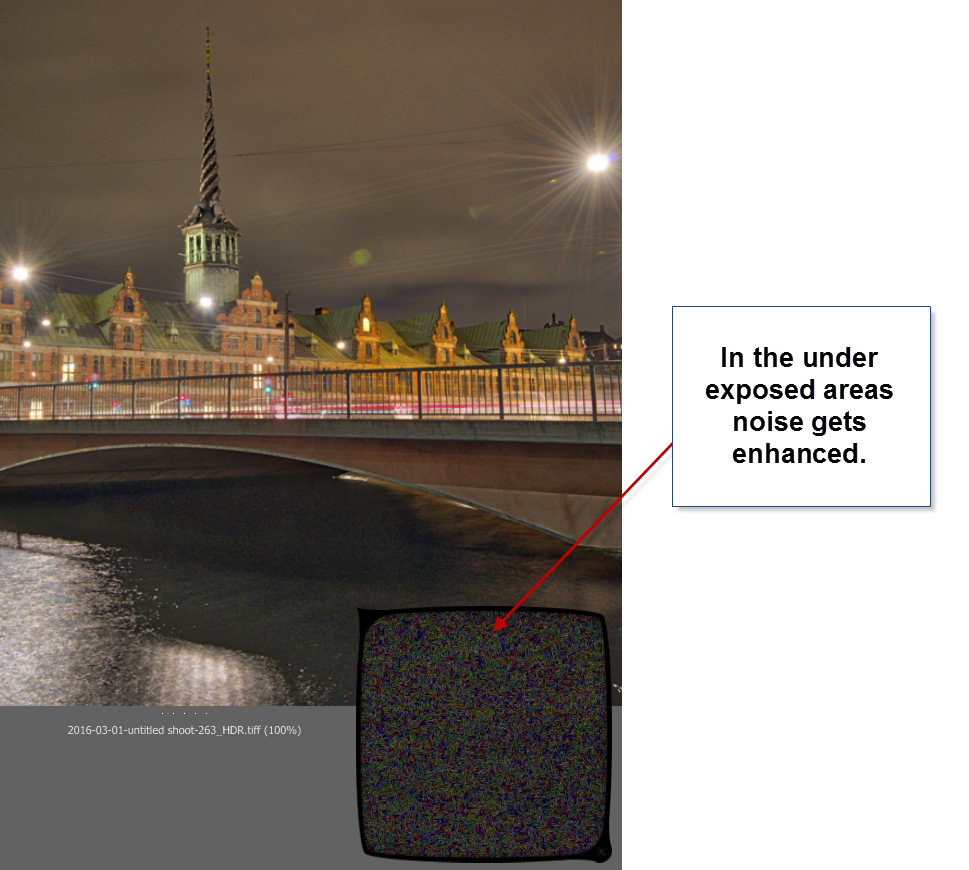
In my first test drive of AuroraHDR, I didn’t find a good solution for handling underexposed areas. Not the built-in HDR Denoise tool. By the time the noise is gone, so is the details. So the solution I found best, was to leave the dark, in the dark.
You could argue, that this wouldn’t have been a problem, had I shot some brighter exposures. In reality I had shot too few shots, to cover all of the dynamic range, so, in a way, it’s a self-inflicted problem.
AuroraHDR tip #3: If you have noise levels beyond control in AuroraHDR, you can make a version of the image in Lightroom, treating these dark areas as you would like them treated. Then export that version and blend it in, in Photoshop or GIMP.
Conclusion after the test drive of AuroraHDR
Will I use this tool again? Definitely. Will it be the only tool I use? I think not, but it will play a major role I think.
It will not replace my beloved Photomatix, but it will be a strong alternative. And thinking about it, I will be able to use AuroraHDR in the same way, as I use Photomatix, just as well as I can use the ‘Studio’ to make a final photo.
The initial HDR image created by AuroraHDR, you can process using the various tools included. But even before you do anything, you get a pretty good start:
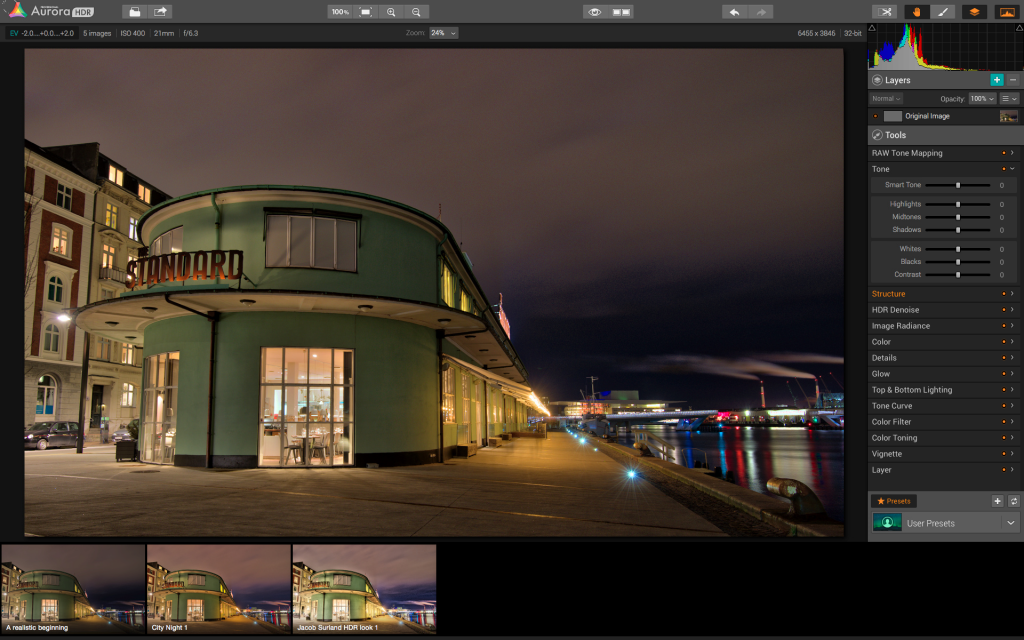
The Standard is an old ferry terminal in Copenhagen. This is the initial HDR, and it is really good looking already.
AuroraHDR does a lot of things in a cool way. I think the biggest danger of using AuroraHDR, is that you get lazy and get stuck on presets.
For some people AuroraHDR might just be the tool they need to create better quality HDR photos, with less effort. I am not on that road. I am not searching for less effort, but for new interesting paths to walk. AuroraHDR offers that.
Because there are so many tools built into AuroraHDR, you can get tempted to stop right there, on ‘just one layer’. And if you get real lazy, that layer is just a preset.
The problem of getting stuck using just one layer is that you don’t reach the full potential of your image. You apply all changes globally with a few exceptions like the gradient tool.
What pushes a photo from 80% to a 100% is the local optimizations. AuroraHDR raises the bar, from the ‘out-of-the-box’ HDR photo, but it is still not a 100%, and what fun would that be, if it was? I love post-processing.
What is new, is that you can move from 80% to a 100% without leaving the software. AuroraHDR offers new ways of working, and it will be refreshing to try it out.
I have been planning a switch to Mac for a longer period. As it happens, my old Windows computer has numbered days and is waiting for retirement or burial.
AuroraHDR is what tipped the decision, and I have now ordered a MacBook Pro. When I get that, I can dive further into AuroraHDR. And that I am looking very much forward to!
The Weekend Post by Jacob Surland
If you find my articles interesting and consider getting AuroraHDR, please use the link on my webpage and support me that way. I only recommend software and tools that I use.
I am not ‘bought’ to say nice things with sugar on top. I say what I think and feel about products. I get nothing for writing these articles, but I do get a kickback if you use my link to buy AuroraHDR, as well as if you use my 15% discount coupon code “caughtinpixels” for buying Buy Photomatix Pro. Thanks.
If you like my work, why not follow me on Twitter, Facebook, and Google+. I post photos daily.
–Jacob Surland