The Day to Night project

On the way home

On the way home

I always have various projects that I am working. Some can go on for years at a low intensity but then suddenly bloom. Like this Day to Night concept.

I have been working on adding computer-rendered effects to my images to a greater extent and I am having a lot of fun doing it.

Today I have been working on this Day to Night image, which is a boring daytime photo from a small village in the french alps. We were on the way to shoot photos in Queyras and had to drive across the Galibier pass. As it turned out it was closed due to snow, and we had to go all the way to Italy to get there. It cost us 3 hours.

This is a before and after of the photo.

Tour de France will start at Saint Mont Michel

I know! It has been a bit quiet lately on my blog. But don’t worry I am working on some goodies. I am working on my next book, which will cover composition. There are a lot of so-called ‘rules of composition’. As I have grown as a photographer, my understanding of ‘rules of composition’ has changed, and I think I have found a good way of understanding and approaching composition.

I am a late bloomer as a photographer, and I think about everything that I do. I have put in a lot of hard work to get to where I am today,  but it is not longer ago than I can still remember what frustrated me in the beginning. Just like my first book ‘10 Essential Tips for Fine Art Photographers‘ (the 50% discount code “Welcome50” is still active), my new book on composition will be the book that I wanted 4 years ago. It will not only cover some theory on composition but also suggest ready-to-cook compositions, making it possible to go out and shoot a great photo using the recipe.

I believe in that you have to build a foundation before going for more advanced stuff. An important part of that is to learn from what others do, not only from a theoretic point of view but also from a practical ready-to-cook point of view. At least that is my belief.

Anyway, I am working on the book, and will try post a bit on my blog too, but time is not unlimited.

About the photo

I shot this photo a couple of years back at Mont Saint Michel in France. It is one of the most fantastic places I have been to, and it is the photographers wet dream. Recently I learned Tour de France would begin from here this year. What an awesome scenery for a start for the world’s biggest cycling race on the planet.

It is an HDR from -3 to +3. I shot it very late in the evening when people were leaving, and this couple just stood there to get a last look at this magnificent building. The Dynamic range in the scene is incredibly high and difficult to control. The spotlights are so bright, and the shadows so dark, that it got quite difficult to blend them together to and get a good balance in lights and shadows.

–Jacob

The Weekend Post – The Wizard at Work in his digital Laboratory

The Wizard is working late in his tower
The Wizard can feel the warmth as he enters his Tower of Wizardry, thanks to his is ever burning fireplace. Even though he has been on the road for a few days, the ever burning fireplace, keeps his tower nice and warm.

He has been out collecting components for his spells, and he is physically tired and cold to his very bones. He looks around, but everything is where he left it, nobody would be stupid enough to try to steal from a wizard.

He can’t wait to study his harvest. He closes the front door and goes straight to his laboratory. There are many strange smells and odors, but he likes it that way, some sweet and some more acid.

His workbench is an old table made of oak wood and full of magic silver rune inscriptions. The magic orb sits on its stand. He uses the orb to figure out, where he can find his components; it’s magical. He can look for specific components, but he can also search geographic areas, and the orb will show him, what he can find there. This way, he finds new components he which existence didn’t even know.

As he bends to puts down his Bag of Holding, containing the harvest from his trip, he notices mud on his robe, but he doesn’t care. The Wizard can’t wait to play with his new components, and see what magic he can produce. He found a few rare components, and he has been pondering on what to use them for all the way back to his tower of  Wizardry.

He opens his bag and takes out the components, one by one, and he scrutinizes them and smells to them, before placing them on his work bench. When done, he studies them, roots out a few, that doesn’t have the quality he needs to work his magic. And then he picks up his Wacom wand and starts working.

I truly believe that post-processing is a kind of magic. The post-processing puts magic into a photo, and photos wouldn’t be the same if you didn’t do it. I have been thinking a lot about this for the last couple of years.

To begin with, it was the post-processing that triggered my interest for photography. Once I read someone who said ‘if you diguise a turd, it’s still a turd’ referring to that you can’t save a bad photo in post-processing.

Of course, to some degree, that is true, but I still like to disagree, because I believe, that you can do magic in the post-processing. And as a digital wizard, I have to feel that way. I am obligated to do that!

I started out three and a half years ago, and it started the very day, that I figured out the importance of post-processing. Going into details on what I have done and learned, would probably result in a spellbook.

The Dungeon

In broad terms I have been exploring and working digital magic in Lightroom, Photoshop, Photomatix, various tools, and last but not least the new AuroraHDR.

I have found tons of tips and ways to do things, and I keep exploring, because I believe in being curious, and I love the digital magic. A famous Danish author once said: ‘I do not want to die curious’, and that’s my tagline.

I believe one of the most powerful tools a digital wizard has, is dodging and burning. Traditionally dodging and burning is the art of changing the exposure of your photo locally. It’s a term that stems from the old film days and dodging, and burning was a technique you used in the dark room; in the post-processing.

When the negative was exposed through the enlarger to the photographic paper, you blocked the light, shortly in various places. This way you gave some parts less exposure by moving a lollypop looking cardboard stick around. The photo would be lighter in these areas, and this is ‘Dodging.’

‘Burning’ is the opposite process. After having given a normal exposure, you give extra exposure to some parts of your image. By using a piece of cardboard shaped to fit your needs, you would more let light pass and darken these areas.

Remember that the photographic paper was sensitive to light and therefore less light, was lighter (dodging) and more light darker (burning). Ansel Adams was a pioneer in burning and dodging.

Tower Bridge and City Hall under the Stars

Modern digital dodging and burning is much more powerful. If classic dodge and burn was a wand of light, modern dodge and burn is a wand of fireballs. And as with all magic, use it with care.

Adobe Lightroom is the leading digital darkroom, and it has very powerful dodging and burning capabilities. Aperture for Mac is also a digital darkroom. However, it has been discontinued. Other options exist too, but Lightroom is by far the best digital darkroom on the planet.

Digital dodging and burning is a much wider thing, than the old film days dodging and burning. Not only can you change the exposure, you can change the white balance, sharpening, saturation, clarity etc., this is powerful stuff.

In Photoshop, there are classic dodging and burning tools. I have used these tools to lighten up dark leaves backlit on a bright sky, but they are destructive tools in their nature. But there are other and better ways of dodging and burning in Photoshop.

However, I do a lot my dodge and burn in Lightroom. Lightroom is a cool and strong tool, and in many ways much easier to use, it does a fantastic job and more important it is nondestructive work.

Let’s do some magic!

Let’s add and remove light magically

Street in Mont Saint Michel

My goal with this photo from Mont Saint Michel in France was to create a rich warm, inviting and magic night shot of a medieval street and make you wish to be there. But to get there, I had to work some magic.
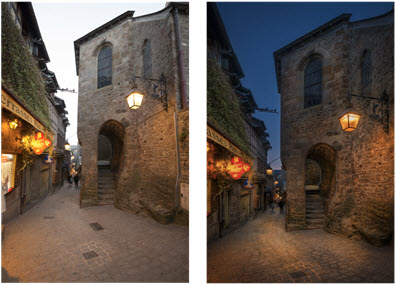
Mont Saint Michel before and after

0-exposure                                    Final photo

First I did my usual post-processing (my classic HDR Workflow Photomatix and blending layers). When I was done with that, I still felt, that I did not have quite the feeling of warmth that I wanted.

I had chosen to make the sky a bit darker than it actually was. It did some of what I wanted to achieve, but the houses and street lacked the warm feeling, that I wanted.

How to do magic dodge and burn in Lightroom

Let’s walk through the final steps I took, to complete my magic. First I reimported a 16-bit TIFF file into Lightroom. In Lightroom, I used the Adjustment Brush for dodging and burning. When using the adjustment brush you have these options:
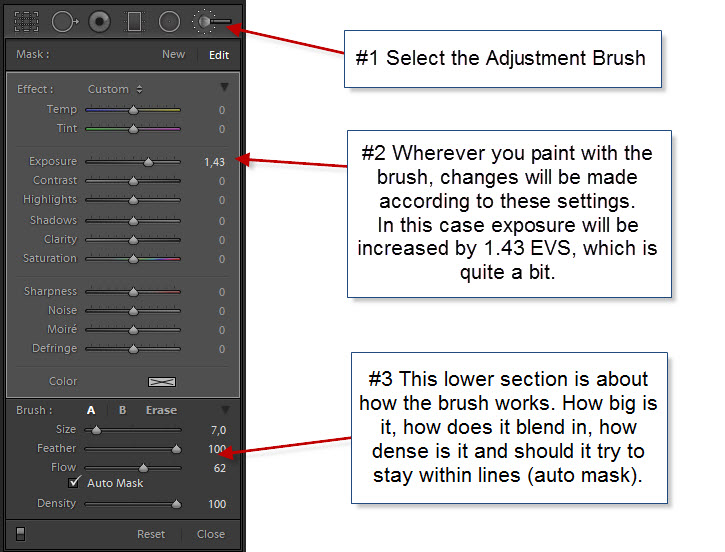
Lightroom Adjustment Brush options

As you can see, there are many options. More than just changing the exposure as Ansel Adams could do in his darkroom.

Let’s see how I did some artificial lights in the old medieval village of Mont Saint Michel just off the shore of Normandy:
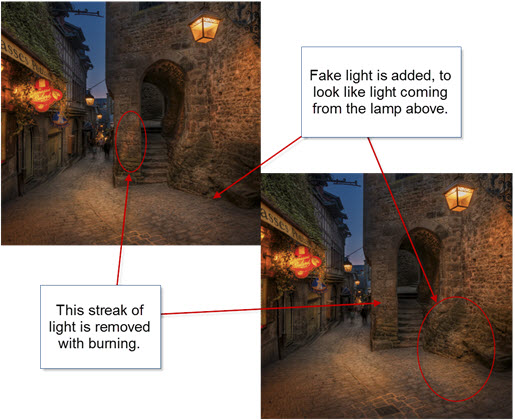
Mont Saint Michel Light up 4

As you can see, I removed a streak of light on the wall in the middle of the image. It’s a streak of light coming from a spotlight just outside the image on the left. It doesn’t do anything good to the image.

I also added some artificial light below the lamp on the right-hand side. The eye believes the light to come from a light source, and it adds tothe mood of the image. Just what I wanted, but not everything I wanted.

To make the magic work, I have to simulate the already existing light sources. Brighter light in a different color typically characterizes a light source. Both light intensity and the color of the light have to match pretty good, to make the magic work.

In this case, the light is quite warm, and I increased the temperature by +71 and the tint by +57. I also increased the saturation by +36 and then I set the exposure to +0.67 (2/3 of a stop).
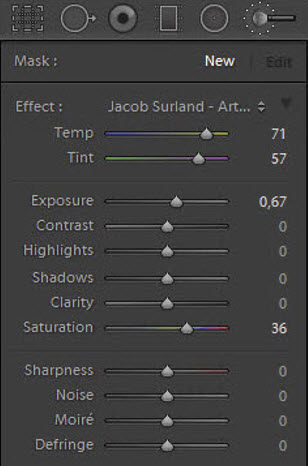
Mont Saint Michel Light up 5

The exact values I have to try out for each image, because different color of light exists in almost any photo. The light in this particular image is rather warm, and by adding even more warm light, gives me more of what I wanted to achieve in my goal.

I added an artificial light source by painting (dodging) where I wanted it in order to make it warmer and lighter, giving exactly the same result as if real light source shun on the area. You could say that I painted with light. It is important that the light sources you add, fall in naturally. You don’t necessarily have to see the light source making it, but it has to be likely that a lamp could be making the light.

I removed the light streak on the wall, by doing just the opposite. I burned it (made it darker), but I also changed the temperature. By decreasing the exposure and adding Blue and Green instead of Yellow and Magenta I could paint on top of the streak, and it vanished. That’s burning.

Burning can be used for many different things. One of the things I like to use it for is to burn shadows to make them even darker and more prominent. This can have dramatic effect on images.

Adding more light sources the easy way

Adobe Lightroom 5 introduced Radial Filters and by using them you can quite easily simulate light sources. The light of a lamp is reflected as a round or elliptic shape on a surface. The Radial Filter is round or elliptical too, which makes it very easy to use for this purpose. The Radial Filter you can apply the same values to, as you can to the Adjustment Brush.

By default, the Radial Filter will target everything outside the radial area. This is great for making advanced vignettes, but luckily you can use ‘Invert Mask’ to target the inside of the Radial Filter, and that is exactly what we want:
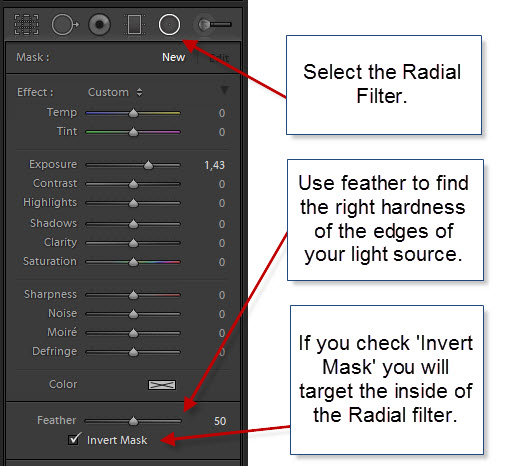
Mont-Saint-Michel-Light-up-Invert-Mask-Radial-Filter-settings

I used the Radial Filter in several places in this photo:
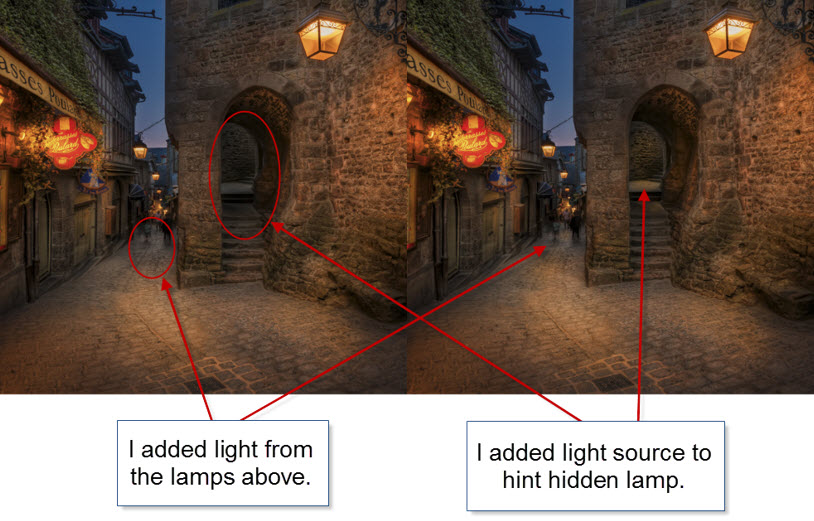
Mont-Saint-Michel-Light-up-Locally

Notice how I have lit up the passage up the stairs and the platform at the far end of the passage, in order to make the viewer curious, and think  ‘what’s up there?

I also added some lights to the street, supposedly to come from the street lamps hanging above the street. Each Radial filter has its own size and slightly different values. I placed radial filters here:
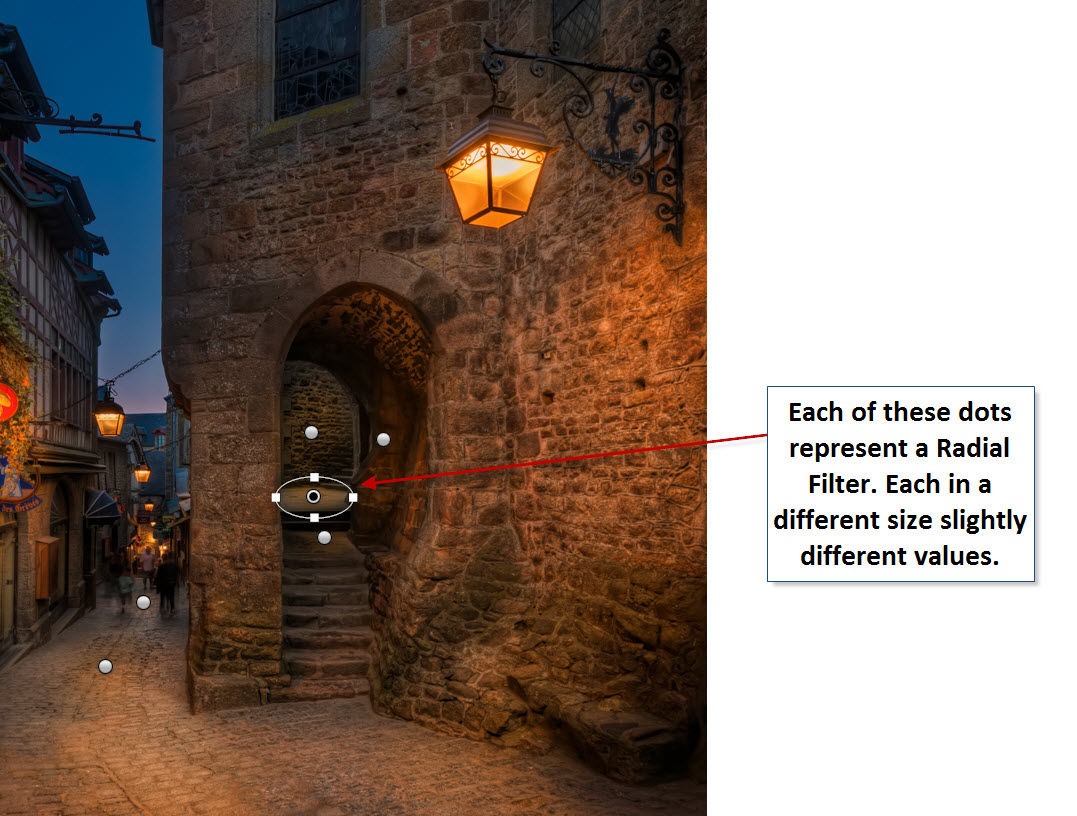
Mont-Saint-Michel-Light-up-Radial-Light-Locations

I started by adding one Radial Filter, with similar settings as I used for my Adjustment Brush. Then I duplicated and resized it to fit new areas.

You can duplicate a Radial Filter by pressing CTRL + ALT (and CMD + Option key on Mac) and then drag it to a new location. That will make a copy of  the same size and with same settings.

Resize the new Radial Filter to fit the new location. You might also want to change the exact exposure adjustment and white balance settings because the light is different in the new spot.

By dodging and burning in this way, I achieved my goal of making a warm, inviting and magical image of a street the in the medieval village of Mont Saint Michel.

And when I am done doing an image like this, I feel like a Wizard.

The Weekend Post by Jacob Surland

If you find my articles interesting and consider getting AuroraHDR, please use the link on my webpage and support me that way. I only recommend software and tools that I use.

I am not ‘bought’ to say nice things with sugar on top. I say what I think and feel about products. I get nothing for writing these articles, but I do get a kickback if you use my link to buy AuroraHDR, as well as if you use my 15% discount coupon code “caughtinpixels” for buying Buy Photomatix Pro. Thanks.

If you like my work, why not follow me on Twitter, Facebook, and Google+. I post photos daily.

–Jacob Surland

The Ever Searching Eiffel Tower

The Ever Searching Eiffel Tower

The Ever Searching Eiffel Tower.

It’s been a while since my last post. I have been doing a lot exciting other stuff, that I will tell you about in some posts. I have been exhibiting in France, USA and UK, and I am preparing a solo exhibition too. It does take some time. I have learned quite a lot recently, on printing photos and getting a good result, and I will tell you all about it soon.

I have also learned some new fancy techniques, one I have used in this photo. I will tell you about this too.

I already had left the roof of the Arc of the Triumph in Paris, when I decided to go back up. I am glad I did because I got this shot. I did one with a similar angle with my iPhone, earlier, and when I saw it on the phone, I went straight back to the roof, to do a version with a proper camera.

–Jacob Surland

National Natural History Museum in Paris

Muséum national d'Histoire naturelle in Paris is worth a visit, alone because of the building. I had some expectations but I was still completely blown away when I got there. So incredibly beautiful and dynamic lighting for a fantastic room. I only had 1,5 hours before it closed, and I didn't even get time to see the exhibition.--Jacob Surlandwww.caughtinpixels.comArt sale as limited prints. Photo by Jacob Surland, Licensed Creative Commons non-commercial v4.0. No Derivative Work. Protected by Pixsy.com.

The colors of the roof and walls keep changing colors, to simulate day, night and the weather.

I knew that the ‘Muséum national d’Histoire Naturelle’  would be something special, but I was still blown completely away with the beauty of this enormous old room.

I arrived in the midst of a tropical thunderstorm. The roof changes colors, along with the one wall, to simulate the weather. It can show lightning, day and night, and a rainbow … at least that was what I saw, during my 1,5 hours I had there until it closed. I didn’t even get much time to look at the exhibition, but that looked really awesome too. This place I would require a day, to do it full justice I think.

I could just squeeze in visiting the Museum between I hung up my artwork at Carousel du Louvre, and the VIP grand opening later in the evening.

About the processing of this photo

This photo is shot with a Sony A7R using my metabones Nikon adapter attached with my 16mm Nikon Fisheye lens. The fisheye is obvious. I used a fisheye in this location, to got something out of the ordinary classic shot from this museum, and I think I managed to get that. At least, I have never seen anything like this before.

It is an HDR shot bracketed -2, 0 and +2.  The Sony A7R is somewhat limited regarding shooting bracketed HDR photos. I need at least 1 stop between each shot, and prefer 2 stops. When choosing this option, the A7R can only shoot 3 bracketed photos. If I shoot less than 1 stop between each stop, it can shoot 5 shot, a ridiculous limitation.

I shot it at an f/stop somewhere in the middle. One of the drawbacks from using the Metabones adapter for Nikon is, that no EXIF information is transferred from the lens. But I know I had the f-stop somewhere in the middle, my guess is f/8-f/11. And then I had the camera at ISO 100 and the longest shutter speed was 5 seconds. This allows me to blur most of the people fairly much away.

I used my standard processing workflow for this image. I processed it in Photomatix (you might want to see my tutorial here), and afterwards i took the three originals along with the output from Photomatix into Photoshop and blended it to this final result. These are my three original unprocessed photos:

Paris - Natural History Museum

One of the important things, when you shoot a photo symmetric like this one, is that symmetry is as exact as possible. I could spend a long time while shooting, to get it exactly right in the camera, by shooting, checking and re-shooting. I work in a different way. I need to be ‘close enough’ to the final framing, but I do not mind, doing a final more exact crop at home on the computer. This way I get more time, to do more shots, instead of working one composition into death. This might be a different way, than others work, but I like it that way. Of course I sometimes get stuck, if I can’t get a “good enough” result quickly. I hate getting home with something, that I cannot use.

I am far from puritan about ‘getting it right in the camera house’. I see no point in doing that, it would only require more time, at each location, giving me less to time, to do more compositions.

In Photoshop I first got an “overall” good blend of the tonemapped output from Photomatix, and the three original images. Then I added some effect, by using Topaz Adjust. Afterwards i used two of the original shots ones more to fix or improve very specific areas.

Paris - Natural History Museum - Photoshop layers

How do I determine what ‘needs to be fixed’ in an image? What I get out of Photomatix is next to NEVER a final image. This I know, and I just have to look for the ‘problems’ with the image from Photomatix. There is always something, that doesn’t look too good. Something that is too extreme, a nasty halo or a to hard contrast. How do I spot that? I look closely at the image, both in a smaller thumbnail seized image, and in a closer to 1:1 version. But in the end it comes down to a mix of taste and experience/practice. The more images you have processed, the better you get at doing this. In the beginning, this was pretty much a lot of guessing work and less qualified work. Most of this early work, I have withdrawn from my public stream. The more images you process, the better you get at it, and some of the ‘problems’ gets so obvious to fix, that you hardly think about it.

In this particular image, I first got the ‘basic’ image, by blending the Photomatix version, with the three originals. Then I made some effect using, Topaz Adjust, and afterwards I fine tuned the image, by picking some very specific areas from the original images, to fix some problems.

–Jacob Surland

Paris seen from the rooftop of the Arch of Triumph

A grand view of Paris seen from the top of the Arch of Triumph. The weather was not very good for photography, but it was the only chance I had to get up there, so I stayed stubbornly and covered my camera from the rain. And I am happy that I did, I got many good shots from up there. This one is one of my favorites.--Jacob Surlandwww.caughtinpixels.comArt sale as limited prints. Photo by Jacob Surland, Licensed Creative Commons non-commercial v4.0. No Derivative Work. Protected by Pixsy.com.

Paris seen from the top of the Arch of Triumph in bad weather.

I was in Paris last week to exhibit at Art Shopping at Carrousel du Louvre 2015. A pretty exciting thing. As a photographer, I, of course, could not go to Paris, and not shoot photos, and I carefully planned what to photograph, and when, while not exhibiting.

I did a very careful planning of what I want to shoot mornings and evenings, and what to shoot while driving down there, and back again. It’s the first time I have been the so prepared – and yet you can still meet obstacles.

I will only have one blue hour evening, and where did I want to go? In the end, I decided for the rooftop of the Arch of Triumph. There is a magnificent view of Paris from up there. I got there in good time and waited in the line. After waiting 30 minutes in the line, I got so close to the ticket office and saw a sign which said ‘no bags larger than 40cm’ mine is 53cm and my hope sank. What a stupid mistake to make. I knew that I could not use tripods up there, but no big bags? I took a deep breath, and went took a shot at it, anyway, and I slipped through. The security guard just received a large group to pay his attention to and did not pay attention to the size of my bag. Lucky me.

I thought I was home free from there, but noo… There was a more specific security check, before going up to the top of the roof. The security lady started saying something about the size of the bag, but I just opened it and showed her my camera equipment. She said ‘no tripods’, but I knew that and had prepared for that, and she let me through.

I got to the roof, after climing a small narrow winding staircase. It really was taller than I expected, and when I got up there, the view was magnificent. I had taken no chances and was there almost two hours ahead of the sunset. So I had to wait.

Instead of a tripod, I had brought my Manfrotto Super Clamp which I bought at Amazons. This really is one of the best pieces of photo equipment I have, and especially if you compare it to the price. All photo equipment is insanely expensive, except for this one. It allows me to screw a ball head on, and then I can screw the Super Clamp onto my tripod, and have two cameras or as I had planned for the rooftop. It looks like this:

The Super Clamp is really made for filming equipment, but it works with cameras too.

Because I knew tripods wasn’t allowed, I had researched the nature of the roof and had seen from photos, that there was a spiked fence, which the Super Clamp would be super easy to attach to. And that was my plan. But I had not considered that the fence might be wobbly, and it certainly was. It turned out, that people leaned against it, while taking selfies, and children yanked in it. My camera would fly back and forth on long exposures.

While I waited, I searched for my compositions. This one I liked particularly well because it is different from the classic shot from up here. I also got the classic one, but this one I liked rather much. And guess what? It’s shot with a fisheye lens. You can hardly even tell!

While I waited, bad weather came. La Defense in the distance disappeared completely, and it got closer. At this time I did not feel very lucky at all, but in the end we only got a small portion of the bad weather; enough to have minor problems with rain, but not enough to ruin the photos.

Back to the wobbly fence. When it was time, and the exposures got longer, I waited until the fence was still, or if didn’t stay still, I held my breath and I put my full weight against the fence (hoping it would hold). I shot a lot of photos of the same composition and hoped that enough would be sharp enough to work with. As it turned out, it was not so bad at all. I got a lot useable photos.

So this photo I am quite happy with, not only because I like it, but also because I went through a lot of trouble to get it.

How to use ND filters in Long exposure photography

Chateau Queras is placed like the old fortress it is, to guard the entrance to Queras, a beautiful area in the French. Quite a gem really, full of beautiful places and then this beautiful old castle. Photo by: Jacob Surland, www.caughtinpixels.com

Chateau Queyras in the French Alps looks fantastic lit up in the night. This is a long exposure of no less than 370 seconds.

Long Exposure Photography is fascinating. By changing the exposure time, you achieve dramatic changes in the final result. The two photos featured in this post, are shot within a 25 minutes of each other. The first one is a long exposure og 370 seconds, and the second is a normal exposure of 0,5 seconds. Even if the images are processed different, you can easily tell the difference, if you look at the clouds.

When I went on photo workshop in the French Alps, I also got the chance to shoot the beautiful Chateau Queyras. If you walk up the mountain across the castle, you get a fantastic view of the castle. Photo by: Jacob Surland, www.caughtinpixels.com

This is a normal exposure shot 25 minutes earlier than the first one. It is only 0,5 seconds, and is processed as an HDR image.

Continue reading

Mont Saint Michel lonely street at night

During the day Mont Saint Michel is crowded with people. All most too much. But as the begins to set, people disappear, and when darkness comes to Mont Saint Michel, and the small street lamps are turned on, you can wander around in empty alleys. Photo by: Jacob Surland, www.caughtinpixels.com

During the day, Mont Saint Michel is crowded with people. All most too much. But as the begins to set, people disappear, and when darkness comes to Mont Saint Michel, and the small street lamps are turned on, you can wander around in empty alleys. This street wasn’t quite empty. I triggered the five exposures manually, I can control, when to shoot, and make sure I didn’t shoot with people in the same location, and that way remove them in the post processing. The longest exposure was 8 seconds, which also allows moving people to disappear in the long exposure.

How to make textures to save a gray photo

Strasbourg city of administration and city of beauty. Known for it's EU administration. But Strasbourg is much more than administration, the old center of Strasbourg has a long and very interesting history. One of the pearls is the Pont Saint-Martin. There's lock between the lower and the higher canals. You can sail the canals, and walk the narrow old streets. Photo by: Jacob Surland, www.caughtinpixels.com Once in a while, you just don’t have either the time of day or the weather with you, when you shoot photos. Take this example from Strasbourg. I had researched Strasbourg from home, and had a pretty good idea, what I wanted to shoot. But two things turned out to be a problem. 1) I could not stay in the city until sunset, due to time schedules, but I could stay until an hour before sunset, which could have been good enough. 2) It was grey, and there was drizzle. I shot my shots using an umbrella, and left Strasbourg not quite satisfied with the result. It’s a long exposure, to at least try to make the water interesting enough. I love this place Pont Saint-Martin in Strasbourg. I think it is also probably the most photographed place in Strasbourg, nevertheless I love the place, and I did not want to let my photo go. I looked into alternative processing methods. I did not have any success on the light, so I had to add something else, make it stand out. And as it turned out, it was in using textures I found the answer. This is the before photo: Pont Saint Martin before And this is what I did: Continue reading

Preparation for Art Monaco 2014

Saint Mont Michel in France is one of the biggest tourist attractions in France with more than 1.2 million visitors a year. Disneyland Paris has got 14,5 million. And Disneyland is probably 5-10 times larger than Mont Saint Michel. That kind of put's it into perspective how many people come to visit Mont Saint Michel. However, if you venture of the mainstreet after you have had your traditional ommelet for dinner, you can find empty streets and alleys like this one. Photo by: Jacob Surland, www.caughtinpixels.com

I am going to Art Monaco 2014 to exhibit two of my photos. Art Monaco receives about 10.000 visitors from all over the world, in just 4 days. That’s an incredible lot of people in a very short time. This is going to be very exciting.

Art Monaca 2014

It is the International Fine Art Realist Painter  and gallerist Mona Youssef, who has invited me, and I am very proud and I am looking very much forward to work with her. Mona does realistic landscape paintings, while I do a lot photos that looks like paintings. Have a look at some of paintings, they are absolutely beautiful. You can find them on her web-site www.mona-gallery.com.

Booking my hotel in Monaco, proved to be more difficult, than first anticipated. The first couple I wanted to look at, had no vacancy at all, but I managed to find one, a bit further away, than I had hoped – but at least within walking distance! The prices in Monaco, really can really go over the top!

While I do like the prints I have made so far, I would like to go a notch higher in quality, if possible at all. I have been searching and searching, and asking people where to get the best quality. It really is the framing, I am only 98% satisfied with. In a couple of weeks I am going to a showroom, to see various print types.

About this photo

I shot this photo in Saint Mont Michel in France. Saint Mont Michel is one of the biggest tourist attractions in France with more than 1.2 million visitors a year. Disneyland Paris has got 14,5 million. And Disneyland is probably 5-10 times larger than Mont Saint Michel. That put’s it into perspective, how many people come to visit Mont Saint Michel.

However, if you venture of the main street after you have had your traditional omelet (in the old days travelers had an omelet, when they arrived to Mont Saint Michel) for dinner, you can find empty streets and alleys like this one.

The making of this photo

This photo is one the photos I have pushed furthest away from the original photo. This is the original:

France - Deserted Alley in Mont Saint MichelAs you can see, quite a different image. What I did, was to add a lot of artificial light sources. Things that are not present in the photo at all, and then I added some warmth to the photo as well. I also made it darker, to simulate night time.

France - Deserted Alley in Mont Saint Michel-2

But what really pushed the image home, towards the final look, is putting it through Photomatix Pro.  Photomatix does wonderful stuff to artificial light sources, this I have shown in detail in this post. It’s the same method I have applied here. The result has to be fixed, because it goes over the top, but that is the same you have to do with everything you put through Photomatix Pro – it is only 2/3 of the final photo.

If you too want to experiment with Photomatix, either for doing HDR photos or more painterly like photos, you can try it for free, but you can also buy it with a 15% discount, by using “caughtinpixels” coupon code. You find Photomatix Pro here.