How to tackle illegal use of your photos

Regent Street in London is ever busy. Even early in the morning, before the Underground has opened, the double decker busses are driving up and down the street. Photo by: Jacob Surland, www.caughtinpixels.com

This photo has been used illegally by Hugo Carter.

Recently I have begun to track down companies, that use my photos illegally. I found quite a few. Some do come and ask to buy my images, but it seems that there are more than a few that don’t. All of my images are Creative Commons, Non-Commercial 4.0, and there is nowhere where this is unclear. This means that my images can’t be used for commercial use, without an agreement.

I really appreciate, that people like my images, reshare them. The only thing is, it can’t be a for a commercial interest. But what is commercial? How do you judge, when something is commercial? According to my dictionary it is commericial means

Commercial: Have profit as chief aim

Unfortunately, it becomes slightly more complicated because I also have a Creative Commons part on my license. What is commercial and what is Creative Commons? It really takes a lawyer to understand it properly. Sites with News can cover themselves under Creative Commons, for reasons I find unreasonable, but the license isn’t clear enough. It’s a gray area.

Continue reading

The Famous View from Rialto Bridge

Crossing the Rialto Bridge is a must do experience when visiting Venice. And if you have the option to plan it, try to do it at sunset. The houses along Canal Grande look just awesome with the lights and colors. Stay and watch the traffic for a while. Gondolas, Varporettos, taxi boats, and ordinary people cruising in their small speed boats. It's a very busy area. Photo by: Jacob Surland, www.caughtinpixels.com

The famous view of Canal Grande seen from the Rialto Bridge.

Crossing the Rialto Bridge is a must do experience when visiting Venice. And if you have the option to plan it, try to do it at sunset. The houses along Canal Grande look just awesome with the lights and colors. Stay and watch the traffic for a while. Gondolas, Varporettos, taxi boats, and ordinary people cruising in their small speed boats. It’s a very busy area, the bridge itself included.

This photo I shot using my 24-70mm Sony Zeiss lens attached to my Sony A7R. As you can see, the light is fading quickly, but I really didn’t want a long exposure. Opened the lens to it’s maximum, which is ‘only’ f/4, and then I cranked up the ISO to 2500. I got a shutter speed fast enough to freeze the three gondolas navigating.

I shot it as a 3 shot HDR photo, but the gondolas and for the water and boats, I only used the one exposure, the middle one. The bright exposure is too long, and the boats get blurry, and the dark was, well too dark.

How to make something out of nothing

Birds flee from the Church of Hallgrim. In Danish Hallgrim means 'half ugly', hopefully, that's not why the bird flees. The Church is named after a poet from the 17th century, and perhaps he should be happy, that he wasn't completely ugly, but only half ugly. Photo by: Jacob Surland, www.caughtinpixels.com

 Birds flee from the Church of Hallgrim. In Danish Hallgrim means ‘half ugly’, hopefully, that’s not why the bird flees. The Church is named after a poet from the 17th century, and perhaps he should be happy, that he wasn’t completely ugly, but only half ugly.

I have a bunch of photos in my library, from great locations around the world, but because the light wasn’t right, I have to add something, to make it into something. This image is an example from Hallgrims Church in Reykjavik in Iceland. A fantastic and beautiful modern church. I shot the photo on a gray and rainy day. The sky was gray as it gets as you can see in the original unprocessed image:

Hallgrims church

Continue reading

Thoughts on Inspiration

Zurich Central Station has a huge pretty empty hallway. The trains leave from out side the building and nothing takes up the wast amount of space. Except for a man with a tablet. Photo by: Jacob Surland, www.caughtinpixels.com

This photo is from Zürich train station. For some reason I do not know, this enormous hall is empty, except for a couple of cafes and supermarket along the edges. Inspiration came during the post-processing, the roof I enhanced to have a kind of a steampunk feel.

My current assignment in The Arcanum is to think about inspiration and to be ‘inspired’ by others. I have put a lot of thought into this topic over the last couple of weeks. What inspires me? What influences what I do? I have made a number of sub conclusions, but I have also realized, that I may use inspiration, in a different way than many others do.

I have a strong antipathy of copying other people’s work. This antipathy goes all the way back to my school days and early days as a programmer. I didn’t want to copy my friend’s school assignments, even if I had trouble making my own. I didn’t want to copy other coder’s code; I wanted to understand what’s going on, and make my version of a feature.

This antipathy is still strong and goes into photography as well. What I have come to terms with, is that there exists “my version of a classic view”. But, I will try do make it “my version”, and not just a copy.

Anyway inspiration is a good thing. It works as fuel for your brain and your creativity. The question is how to get inspired, and how to use that and what you want to obtain.

Continue reading

How to cross process photos in Lightroom

I always find that churches are interesting and I love to photograph them. Each country has it's own style, and yet you can almost always recognize a church. This particular church is from Hishult in Sweden. A typical Swedish village church. Photo by: Jacob Surland, www.caughtinpixels.com

Location location and location. Three of the most important things for photographers, at least for cityscape and landscape photographers like myself. The three next important things are light light and light. But what if you only have one them, the Location? Will you then have nothing?

Usually my mantra is ‘Light is everything’, but as recent events has turned out for me, I have ended up with a whole bunch of daytime photos. And instead of discarding them, I have started working on them, to see if I can get something interesting from them. Something more artistic.

This is the original of the photo above:

A swedish church - before photo

As you can see quite different, and not really interesting. There is one good thing, to say about the light; it’s slightly defused, due to the slight overcast. And this does give me more flexibility. Lucky me!

This photo needs a kick. A kick to send it somewhere more interesting. The first thing you have to realize, and accept, is that you have to leave reality behind you, and enter the world of art.

The making of this is photo

Since I ended up with all of these daytime photos, I have been playing with toning and cross-processing photos Lightroom. There are number of ways of doing this, to get something really interesting out of it. Cross processing was invented in the film days, and you did it by developing in the wrong chemicals. This of course was a very unpredictable process. Today you can do it digitally, and you have full control.

These are some tricks, that I use when I cross process my photos in Lightroom.

Split toning: There is a panel in Lightroom called split toning. This I use more often than not, on my photos, daytime or not. Sometimes only to nudge a photo ever so gentle in a direction. This photo is split toned like this:

Swedish church split toning 2

I often end up with some kind of yellow in the highlights and some kind of blue in the shadows, this case is no different. But when you try it, do try to move the cursor around, slowly to digest the changing colors and see what you can get, that you like. Remember that not two photos are alike.

Hue / Saturation / Luminance (HSL): This panel in Lightroom is really powerful, when it comes to Cross Processing the colors.

Swedish church HSL panel

But how do I end up with these values? Exactly these values? I do it, by using this button for each of the panels. This example is for the Luminance, but you can do the same for the Hue and the Saturation panel.

Swedish church HSL panel 2

This way, you typically adjust two or three sliders, at the same time, but not at the same rate, because the pixel you clicked on will not have all colors represented to the same extend.

Colored Gradients: The last thing I used to tone this image, is toned gradients, like this:

Swedish church Gradients

As you can see this image has three gradients. Each touches the image in an individual way. Two has got toning, a blue color and a yellow color. The last one, makes sure that the upper right corner has a similar brightness as the left hand corner has. The before photo has a bright and less bright corner, but I like a more symmetric look in the sky, and therefore darken the right hand corner a little bit.

Final steps in Photoshop

After having “toned” and “cross processed” my photo in Lightroom I brought it into Photoshop. What I still didn’t like, was too much contrast and I wanted the gate to be a little more prominent.

First I added some Orton Effect (you might want to learn about that here – it’s digital magic). I used the “Overlay” blend mode, this way, I could stick to my normal exposure. The Orton Effect I added using A mask. I rarely use global changes in Photoshop. The reason why I bring things into Photoshop is to tune specific parts of an image, and by applying global changes, I shortcut my purpose.

Swedish church Photoshop in changes

After having applied the Orton Effect to the extend that I liked, I merged all layers into a new layer (not flattening!), by pressing SHIFT + CTRL + ALT + E (or on Mac SHIFT + CMD + ALT + E). This is probably the feature that I use the most in Photoshop.

This new layer I changed the Shadows and Highlights in, using this feature:

Swedish church Photoshop Shadows and HighlightsThis tool I used to increase the shadows, making the photo less contrasty, which I think improved the photo in general. However, I still took what I needed, using a layer mask.

The final step was to change the perspective. I know, that there is a Perspective Crop in Photoshop, but I really prefer to use a different tool, that is much more visual. But to use that, I once more merge all layers into a new layer (still not flattening) using my favorite feature in Photoshop SHIFT + CTRL + ALT + E (or on Mac SHIFT + CMD + ALT + E).

Correcting perspective

The feature I use for correcting perspective, is transform->Distort. The advantage of this feature, is that it is visual, you can actually see what you are correcting. The disadvantage is that it only targets one layer, and for that reason I created the new merged layer.

If I used the perspective crop, I would correct perspective in ALL layers. However, if I do that, I would not be able to bring in a new version of the photo or a different exposure from Lightroom to blend in. Because I shoot normally HDR, I often go back into Lightroom to export another version/exposure of my image, to use along with the ones I have in Photoshop already. But if I corrected perspective using crop, this path would be closed to me.

By using the Transform->Distort, all I have to do is to remove that layer, and then import the extra photo into Photoshop. Do what ever I want to do, and then do a new Transform->Distort on a new merged layer.

Let’s see how this is done:

Swedish church Photoshop Correct perspective


And then you get a frame, that you can move around, and you see the result instantly. This I like, because I can really fine tune what I want.

Swedish church Photoshop Correct perspective step 2

And this is basically what I did to bring this ordinary daytime photo, into an artistic photo.

Follow my blog

If you found this tutorial helpful or interesting, you might want to receive my other posts. In the right hand corner you find a “Follow” button – click on that, fill in your email address and you will receive my posts on email.

The Orton Effect tutorial – digital magic

In Sweden there is an old junk yard, that closed sometime in the seventies. The old cars were just left, and as time passed by, a forrest grew up around the cars. Today this is an open air museum, and it is great fun to walk around looking at this ghost junk yard in Ryd, Sweden. Photo by: Jacob Surland, www.caughtinpixels.com

Ryd Junk Yard in Sweden.

The Orton Effect is named after photographer Michael Orton, who invented the method back in the 1980’s – that’s in the film era, but you can apply it to digital photos too. It’s like digital magic. And digitally you can even control it much better and easier than you could in the old film days.

The Orton effect applies a magical soft and dreamy look to your photos, you could call it Glow. It has a softness to it, and yet it remains a sharp photo, if zoomed in.

The junk yard photo above, has Orton Effect applied in the trees and the leaves, and the tree below also has Orton Effect (click to see larger version). And as you can see, it is both sharpness and unsharpness at the same time. That is what gives the magic dreamy look.

Example of Orton Effect

It really can be that piece of digital magic, you add to a photo, that makes it really unique and special, but you must use it with care. I fairly often use it (or one of it’s sisters – which I describe later). I use it in perhaps 20% of my photos, but I only use it selectively and sometimes even only in very subtle ways. If you compared to a version without, you would be able to see the difference, but otherwise you wouldn’t notice it, because I use it with care.

This is the final version of the tree from Wanaka in New Zealand, and it has one of the strongest uses of the Orton Effect I have ever used:

To anyone who has been to Wanaka on the South Island of New Zealand, they would know what the THE tree is. And this is NOT the one, but it is a tree in Wanaka that I liked too. Photo: Jacob Surland, www.caughtinpixels.com

How to make the Orton Effect step by step

There are some requirements for making the Orton Effect, and these are:

  • You need to have Photoshop (any version) or Gimp.
  • You also need an over exposed photo. But don’t worry you can make one artificially.

The Orton effect works best on overexposed photos. If you do not have an over exposed photo, you can increase exposure artificially both in Photoshop and in Lightroom. I shoot HDR photos most of the time, which gives me over exposed photos that I can use for the Orton Effect. Later in this tutorial I will show how to make artificial overexposed photos, but also a couple of alternatives to the Orton Effect.

Let’s make some Orton Effect.

Step 1: First open your overexposed photo in Photoshop or Gimp. Duplicate the layer twice, so that you have three layers with the same image.

Step 1 - Duplicate layer

Step 2: On the top layer you have to change the Blend Mode to “Multiply”.
Step 2 - Set blend mode to multiply

Step 3: The second layer must be out of focus, that is you have to blur it. You use Gaussian Blur to do that.
Step 3 - Select gaussian blur for the middle layerStep 5: Try moving the slider between different pixel levels. As you can see in the preview, the Orton Effect changes, as you change the blur levels. It changes quite a lot.

There really are no rights or wrongs, just different effects, and you pick one that you like.
Step 4 - Blur the middle layerStep 7: Don’t always use the same blur level, experiment for different effects, before picking one.

Step 5 - Experiment with blur levelStep 8: Merge the two layers forming the Orton Effect into one layer, that makes it easier to work with.

You can merge the two layers by selecting them and pressing CTRL + E or selecting it from the context menu.
Step 6 - Merge layersStep 9: Using the effect globally is generally not a good thing and by merging the two layers, you can add a layer mask, and the mask in what you like.

Create a black layer mask to hide the layer. This allows you to paint in what level of “Orton Effect” you want to apply in your photo, and more important, where to apply it.

You can add a Layer Mask by pressing the button, and then invert the layer mask by pressing CTRL+I, while having the mask in focus. Or you press ALT (or CMD on a Mac) and press the button, and you will get a black mask.
Step 7 - Add a layer mask

Step 10: Using the brush tool (read about layer blending here, if it’s new to you) you can paint in what level of Orton Effect you want in your photo. As you can see I only use it selectively.
Step 8 - Blend layers

The Sisters of the Orton Effect

You might already be thinking ‘What happens if I use some of the other blend modes?’ Well, most gives something that is quite unusable and psychedelic, but ‘Soft light’ and ‘Overlay’ gives something that you can use. The method is otherwise exactly the same, and the effect is somewhat similar, in particular for the ‘Soft light’.
Step 9 - There are other blendmodes

The advantage of using the Soft light and Overlay is that you can easier stick to your ordinary exposures.

As you can see, you still end up with a a nice and glowing images, that has a dreamy touch. This is Soft Light:
Step 10 - try other blend modesAnd this is Overlay:
Step 11 - This is Overlay mode

As it happens I often end up using either blend mode ‘Soft light’ or ‘Overlay’, rather than ‘Multiply’ because it works better with normal exposures, and therefore is easier to incorporate in my existing processing workflow. Or maybe I am just lazy.

Changing the Exposure to Overexposed

It’s really no big deal to make an over-exposed photo artificially. In Lightroom there is a slider for it, and you can make a virtual copy of the normal exposure, increase the exposure of it and export it along with the normal exposure.

Step 12 - Change exposure to overexposed

And in Photoshop you can add an Adjustment Layer for exposure, and do the exact same thing. And if you duplicate your layer, and merge the Adjustment layer to the duplicate, you will have both the normal exposure and the overexposed as two layers.
Step 13 - Changing exposure in PhotoshopAdjust the exposure to overexposed by 2 stops.
Step 14 - Photoshop exposure layer

And then you can do the Orton Effect easily:

Example 2 of Orton EffectEnjoy using the Orton Effect or one of it’s sisters, but remember, to use it with care. Too much of everything is not great.

Understanding HDR part II – The Dynamic Range

Churches in Denmark are usually small white churches, but once in while you come by a red one. This one is in Gershoej on Zealand. Photo by: Jacob Surland, www.caughtinpixels.com

What does High Dynamic Range exactly mean? To understand High Dynamic Range, you need to understand Dynamic Range first. Now that we are clear on what EVS is, we can talk about the Dynamic Range in terms of Exposure Value Steps  (If you missed Part I of this series, you might want to read Understanding Exposure Value Steps first).

In photography the Dynamic Range is the difference between the darkest and brightest part of a scene. Some scenes have a bigger difference (brighter or darker areas) than others do, they have a higher dynamic range.

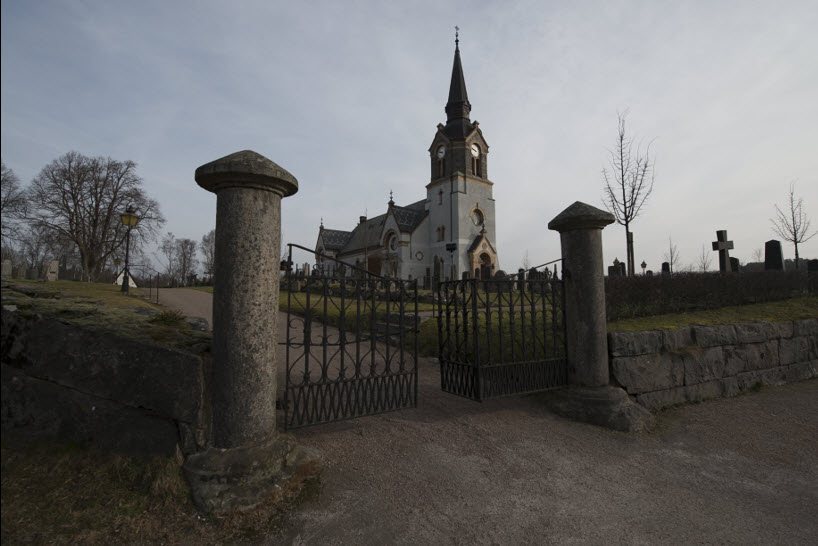
Imagine a scene with some really dark shadows, like under trees, and some really bright sunlit areas and the Sun itself included (like the photo above). If you take a photo of this scene, your camera will leave some areas either completely white or completely black. This is because the dynamic range is incredibly high. The difference in the intensity of the light is huge and a camera can not record it all in one photo. Infact, the human eye is much better at that.

How much light a camera can capture, from the darkest area to the brightest area is called the Dynamic Range of the camera and it is measured in Exposure Value Steps or EVS.

Not two brands or camera models has got the same dynamic range and the difference from camera to camera is quite big. In the end it comes down to, how sensible to light the sensor inside the camera is, but also how the camera uses the sensor. Two camera models using the same sensor, might not have the same performance.

If you have a scene and you can’t get a good shot of it, without blowing either the highlights or the shadows, you can extend the dynamic range, by shooting two additional photos, one darker and one brighter.

Now you have three photos, including one to cover the highlights better and one to cover the shadows better. These must be merged using a piece of software. And this new merged photo is the High Dynamic Range photo. A photo that has extended the native dynamic range of the camera.

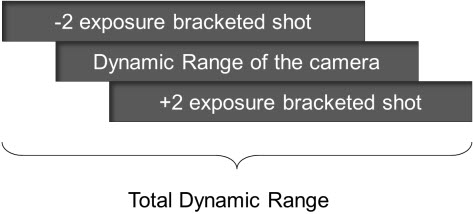
Let’s say, that you shoot the dark one at exposure compensation -2 and the bright one at exposure compensation +2. This way you extend the cameras limited dynamic range by 4 EVS, (that is -2 in the dark end and +2 in the bright one).

Dynamic Range in three shots

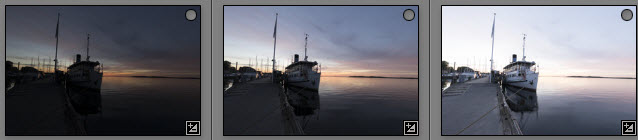
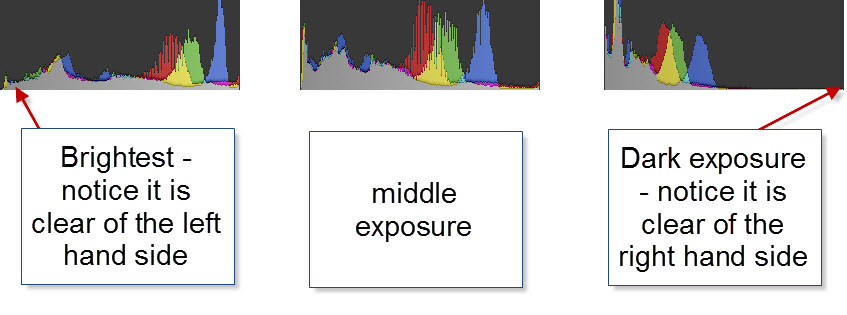
Three exposure bracketed shots at -2, 0 and +2.

A camera has a native dynamic range. My Fuji Finepix x100 has got a dynamic range of 12.4 EVS, while my Nikon D800 has got a dynamic range of 14.4. The Canon 5D Mark III only has got 11.7 EVS in the dynamic range. All cameras are different.

But what does this mean? Let’s stick to the example of -2, 0 and +2.

Dynamic Range example

In case of the Canon 5D Mark III, then it has got a dynamic range of 11.7 EVS, the total dynamic range will then be 11.7 EVS +4 EVS  (2 EVS extra for dark and 2 EVS extra for the bright exposure) = 15.7 EVS. That’s an increase of the dynamic range covered of 34%!

The Nikon D800 will be 14.4 EVS + 4 EVS = 18.4 EVS. An increase of approx. 28%.

Sony A7R is 14.1 EVS + 4 EVS = 18.1 EVS. An increase of approx. 28%.

As you can see from these three high end cameras mentioned, even high end cameras from leading camera brands are very different. Canon in general has got less dynamic range, than Sony and Sony has less than Nikon. And this pattern goes all the way to entry level cameras.

How do you find out about such things? Well, I always find my information on specific cameras at www.dxomark.com. They have an extensive database of sensor tests and it is very likely that you will find exactly your camera there too.

And if you are in the market for a new camera, and haven’t chosen brand yet, this is something you seriously should take into consideration, before choosing your brand.

Auto Exposure Bracketing (AEB) options are important!

As an HDR photographer, you are very interested in what options you have for bracketing your shots. How many shots can you bracket? Can you do it on a timer or remote control? How many EVS can you have between your shots?

This is really important stuff for the HDR photographer!

While the Canon 5D Mark III, from the example above, is the camera with the lowest dynamic range, it does have the most flexible bracketing system of the three and it it can cover more dynamic range, than any of the others. It allows 7 shots of up to 3 EVS between each shot.

7 shots at 3 EVS between each shot will be: -9,-6-,-3, 0, +3, +6 +9. That is a HUGE dynamic range covered. However, having 3 EVS between each shot can give bad results in post processing, and I don’t recommend it, but even at 2 EVS you get a huge dynamic range coverage.

Most cameras only allow to bracket 3 shots at maximum 2 EVS, as shown in the figure above (giving -2, 0 and +2 exposures). This extends the cameras native dynamic range with 4 EVS. And for many situations this is just fine.

If you are in the market for a camera, investigate the options! I was surprised to find out, that Nikon D3100 didn’t have any bracketing options. But there might be others, that don’t have it, and some models have more flexible bracketing options.

Personally I find it very important, that the native dynamic range of the camera is high. Using my D800 or D600, I capture almost the same in one shot, as the Canon 5D Mark III does in a -2, 0, +2 series. And this I personally find a huge advantage.

How to compensate for lacking bracketing options

I also have cameras that only do 3 exposures in bracketing, and they also support 3 EVS between each shot, but I really avoid doing this, unless I am caught in a difficult situation.

The reason why I avoid 3 Exposure Value Steps in my bracketing, is that I end up with nasty artifacts, in the post processing, because the HDR software can not put it together properly. What I do instead of increasing it them to 3 EVS in bracketing steps, is to shoot two series.

If you shoot a scene at -2, 0 and +2, then you can adjust the exposure compensation on your camera (the +/- button – look for it, and you will find it). If you adjust it to -1, and then shoot your series again, you will then get: -3, -1, +1. And if you kept your camera on a tripod and was careful, when you adjusted the camera, you know have 6 shots:

-3, -2, -1, 0, +1 and +2

And if your scene was too dark, you just adjust +1 instead of -1, and get 6 shots of:

-2, -1, 0, +1, +2 and +3

This you can do on almost any camera, and this is what I do, if caught between a rock and a hard place. And in really extreme situations you can shoot 3 series or adjust the compensation different. The camera is flexible enough, if you accept a little manual work.

If you are considering to buy a new camera and intend to shoot a lot of HDR, this is important stuff, that needs to be investigated before buying a new camera. I was misguided when I bought my Fujifilm X100 Finepix camera. It does have AEB, but not at 2 EVS, only at 1 EVS. I can take -1, 0, +1 and because it has a native dynamic range of 12.4 EVS, that sums up to 14.4 EVS in the high dynamic range photo, which is exactly what my D800 delivers in one photo. This is clearly not very optimal for me, and I end up using the X100 far too little.

And a funny thought – does that make the Nikon D800 photo a less High Dynamic Range photo, just because it can cover the same dynamic range in one photo, while the X100 needs 3 shots? What is High Dynamic Range? It is not clearly enough defined.

How to trigger the bracketed series is important too

When you start shooting HDR photos, you pretty quickly learn that, using a tripod is worth the effort. Even slightly moving cameras, can make a post-processing difficult. The most optimal thing, is not to touch the camera at all, while the camera shoots the bracketed shots.

Canon and Nikon offers the option of a timer 2 seconds, before the camera starts shooting the bracketed series. Usually two seconds is enough for the tripod stop stirring after you touched it.

Sony A7/A7R allows the use of a remote control. It would have been nicer to be able to use the timer (one device less to keep track of). The Sony NEX-7 does not allow any kind of remote triggering.

But as mentioned several times in this article, investigate the specific camera model, before buying it. Otherwise you might end up being disappointed. And it is expensive to be disappointed with a camera.

CONTINUE TO PART III about Histograms here.

Further readings

5 Most important things to understand about HDR

Monaco is very known for its money and Formula 1. However, Monaco is a very beautiful city too. It is the second smallest country in the world. Only the Vatican is smaller. You find all sorts of beautiful old buildings. This flowerist on the corner I particularly liked. Photo by: Jacob Surland, www.caughtinpixels.com

This is the first article in a series of 5 articles to explain the most important things there is to understand about HDR photography. If you want to make sure, that you don’t miss anything, you can follow me on Google+ or Twitter or sign up on new posts from my blog.

The first topic will be to understand f-stops and exposure value steps (EVS). These are very important factors for any HDR photographer.

The next article will be about understanding the details of Dynamic Range. We will build on the understanding of EVS covered in this article.

Please read the full article here on EVS here.

5 easy steps to improve your HDR photography

Monaco is a beautiful little country. At the center you find the old Casino Monte Carlo. Rich people come and park their cool cars and people gather to envy the cars and take pictures of them. Photo by: Jacob Surland, www.caughtinpixels.com

I often hear someone saying about my photos “Usually I do not like HDR photos, but I this one I like. You have not overdone it.” This kind of comment of course makes me happy; who doesn’t like to get appraisal of ones work? But I also think to myself “You should know how much I have treated this photo – this is HDR extreme!“.

I have heard it so many times, that I have started thinking about, what it is that people “who don’t like HDR’s” don’t like. Because, clearly, it is not the HDR they don’t like. It must be something else.

I believe that one of the things they don’t like, is when the HDR photos are badly processed. If you want to make great HDR’s, there are some rules, you have to oboy, no-matter if you are doing extreme HDR’s or more natural looking HDR’s.

Save 15% on Photomatix Pro. Remember that by using the coupon code “caughtinpixels” you will get 15% discount on Photomatix Pro here. Photomatix is the HDR tool in the world.

Tip #1 Do not have halos in your HDR’s

Halos tells that you are not very good at processing your photos – or at least sloppy about it. Halos can in some cases be really really difficult to fix. But in most cases I find it easy, to moderate easy. The problem usually comes, when you start boosting your effects.

Monaco halosLearn to control your boosting of effects. Do not apply the strongest effect you possible can. Do go either one step at a time or do it more moderately. It is not a competition of going most extreme. It is all about making an awesome photo. This is NOT awesome.

You can do almost anything with your HDR, go lightly, extreme etc. Just do not have halos!

Check out my HDR tutorial to see how to remove halos. And here you will also see how to use effects selectively. One of the most important rules, is that you don’t have to use an effect globally in your photo. If the effect only improves 10%, of the photo, by all means, only use it in 10% of the photo and throw away the rest.

Tip #2 Be there at the right time

I am not a great fan of daylight HDR’s. Yes, often you do have a very high dynamic range in the middle of the day, and you can only cover it using HDR technology, but you usually do not get the coolest photos. Yes, you can usually hand held the camera, because there is much more light, and therefore the shutter speeds will be much faster, but it shows in the final result.

This is 20 minutes difference. Do you agree, it was worth waiting for those 20 minutes? And it is not only the much cooler car, that does the trick. It is the light.

Monaco - timing

The timing goes for all photography really, but HDRs kick in the turbo, when it get’s low light.

Tip #3 Use a tripod

If you already have learned to accept tip #2, then do not be tempted to shoot with out a tripod. If you do not use a tripod, you will have to compensate in other ways. First you will open your lens to the lowest f number and will end up at f/2.8 or f/3.5 or whatever your lens supports. Second, you will get longer exposure times, and when they get so slow, you can’t keep the camera still, you will increase the ISO.

A nasty side effect of making HDR’s, is the noise. It kind of comes with the concept, because details are enhanced. Some HDR products are better at handling the noise than others. And you can do a lot with noise reduction, but still… You loose quality and details.

The only way around it, is to use a tripod and have those longer exposure times, too keep the ISO as low as possible.

It took some convincing for me to use the tripod … always! And I felt stupid the first times I used the tripod among people, but I have learned, that you gain respect. And whenever you put up the tripod, people stop up, and take the “same” photo using their cell phones.

Tip #4 Setup the camera right

Setting the ISO

Fix your ISO to as low a setting as possible – do not use auto ISO! You will get far too much noise in the bright exposures.

It is a compromise, when it get’s darker, you will have to increase the ISO, to stay within the 30 second exposure, for the longest exposure. If you need to have a longer exposure than 30 seconds, you can either increase the ISO or the aperture (a lower aperture number). This is a compromise.

Use aperture mode

Always use fixed aperture mode (A or Av depending on the brand) when you shoot your bracketed shots. You can also do this in manual mode, but I only use manual mode in extreme cases. If you using aperture mode, you will be just fine in 99.9% of all cases.

But why not use Shutter speed (S or Tv) mode? Because what the camera will do, is to change the aperture for each photo. And changing the aperture changes the depth of field. And if the depth of field changes, you will end up with photos, that are not identical.

A scenario you could end up with, is that the dark -2 exposure might be tack sharp, because it has the lowest aperture (highest number), and largest depth of field.

The normal 0 exposure will have slightly blurred background and the bright +2 exposure will have both blurred foreground and even more blurred background, because the brightest will have the lowest depth of field.

Three photos with changing Aperture you can not blend. They are not identical and the result will not be good.

Use a timer or remote control

Use a remote control, cable release or a timer to set off the bracketed series of photos. If you touch the camera, the photos might be shaken.

Tip #5 remember to check out your histogram.

If possible at all, make sure, that you have all light covered. The reason why you are shooting more exposures in the first place, is to cover all light, from the darkest shadow to the brightest light source. And if you miss out, when you are doing the bracketed serie, you are not much better off, than you were in the first place with only one photo.

Check your histogram on the cameras playback function and check that you have all light covered.

Monaco - histogramsSome situations are harder to cover than others, and might require more shots than others.

Some of the more difficult ones, are city night shots or shots having the Sun in the frame. Many of my city night shots, I often cover from -4 to +4 to get all information from the darkest shadows to the brightest light bulbs in the street lamps.

About the photo

I shot this photo in front of Monte Carlo Casino in a wild crowd of people with cameras. I only got four of my 5 planned shots, because a guard noticed my tripod. He was a senior member of the tripod police, and certainly did not like no tripods. I did not enter a discussion about, this being a public square, because I knew I had covered the light well enough, and got my cool car. I packed up my tripod and left the location happy.

Making the photo was really much more about mixing the four photos I had shot. The cool car is only present in the two of the four photos.

What I did, when I shot the serie, was a bit unusual, because of all of the crowd and the many cars passing by. I very carefully broke with my tip #4, and pressed shutter release manually for each exposure. Looking carefully at the scene for each photo. This way, I got my cool car, and made sure that I had photos with no people in more or less all parts.

Monaco beforeAs you can see, it was quite a challange because of all the people and cars.

Another problem was, that I had positioned the camera for the pedestrians crossing instead of the Casino. This was a bigger mistake than first anticipated. I ended up spending quite some time correcting the perspective. It wasn’t easy.

Removing the people required a very delicate mixing of the layers in Photoshop, and then some cloning too. But I ended up with a fairly clean photo.

When my photo was clean, I started to apply my effects on the lower half of the photo. The casino itself is HDR, but the rest is a handful of effects from various tools.


The Wizard is working late – is he a Photographer?

The Wizard is working late in his tower, or so it seems. The town of Rothenburg ob der Tauber, is one of the most well preserved medieval towns in Germany. It is surrounded by a wall all the way around, and you can walk 95% of it. You really feel like a soldier with a crossbow walking there. Photo by: Jacob Surland, www.caughtinpixels.com

The Wizard is working late in his tower, or so it seems. The town of Rothenburg ob der Tauber, is one of the most well preserved medieval towns in Germany. It is surrounded by a wall all the way around, and you can walk 95% of it. You really feel like a soldier with a crossbow walking there.

I have visited this town 3 times and this summer it will be the fourth time!