The Church of the Good Shepard


Warning: Undefined array key "multiauthor" in /var/www/caughtinpixels.com/public_html/wp-content/plugins/post-layout/plugin.php on line 114

Warning: Undefined array key "mobile" in /var/www/caughtinpixels.com/public_html/wp-content/plugins/post-layout/plugin.php on line 352

Church of the Good Shephard

Lake Tekapo in New Zealand is a fantastic place. There is the great big lake, that due to sediments in the lake, has got the weirdest awesome blue color. Then you have the mountain range with snow on top, the largest observatory in New Zealand lies on top of Mount John, with awesome views. And then there is the Church of the Good Shepard. It must be one of the most photographed buildings in New Zealand. The view is fabulous from the windows inside the church.

About the photo

When I shot this photo there was a lot people going around, so I had to wait quite patiently and finally only a few people where in the shot, down by the beach. I then shot my 7 shots of bracketed exposures hand held. I have used the big rocks as foreground and the path that takes the viewer into the church. Behind the church, the lake can be seen. It seems more distant than it really is, and that is because I shot it with a wide angle lens. The church it self points to the lake, and takes the viewer there.

About the processing

This is the before photo and as you can see, it is much more flat and dull. Let’s see what I did to it.

Church of the good shepard - Before

This is an HDR photo. I initially shot 7 shots, but I only used the 6. I shot the photo handheld, and the last and brightest image was shaken. I processed the photo in Photomatix pro and saved that image, without closing the output window. I then pressed the ‘Tone mapping’ button once more, this gives a double tone mapped image. This photo I saved too. I then loaded all of the original 6 plus the 2 tone mapped images into Photoshop as layers. Aligned them (Edit->Auto align layers) – Photoshop does a great job of auto aligning, just as Photomatix does.

Let’s look at the specific processing areas:

#1: The lake. It looks dull and not even close to the color it really was. I increased the saturation for that particular area and the lake came to life.

#2 The photo is taken in the middle of a grey day. Not ideal, but that was the time I was there, and I wanted a shot. To make the photo pop a bit more and make the texture on the church and the rocks stand out, I have used the double tone mapped image for the church and the stones, but also the grass. The double tone mapping makes it more painterly, but it also enhances texture quite dramatically. You can make some really awesome effects from this, however, the first impression, when you press ‘Tone mapping’ is that the photo has gone hay wired. The colors go crazy, so you have to dial back the saturation slider quite a bit, to around 45 (which is neutral). And then the luminosity slider must also go almost all of the way to the left. This is a very potent slider the second time you tone map an image. Find somewhere you like, but be careful not to blow the highlights completely. I wanted the double tone mapped image for the church and the rocks in the foreground, and maybe the grass. This is what the church ended up looking like in a 100% crop. Look at all these lovely enhanced  texture details with a lot of colors.
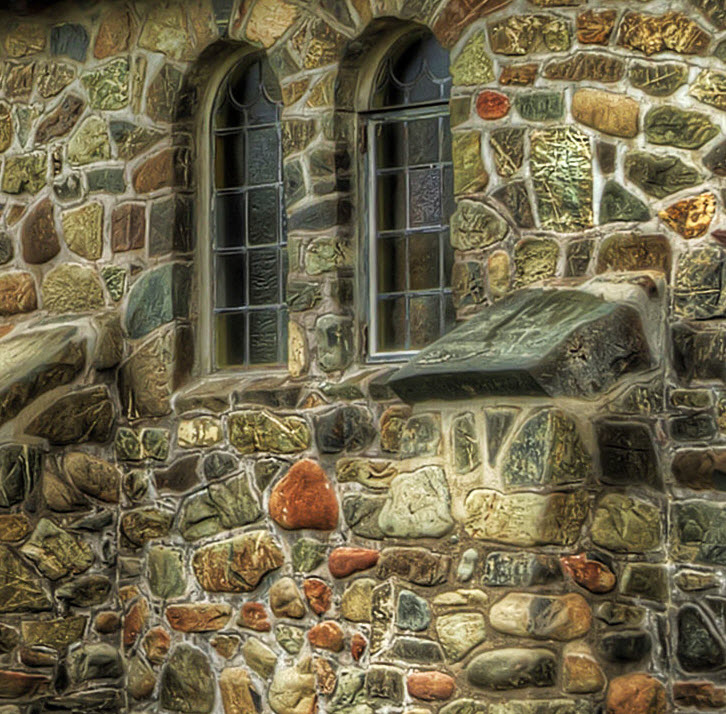
Church of the good shepard - Close up

#3 I didn’t get a shot without people, but by using the clone stamp and content aware fill, I was able to remove the people. I also removed a lot dust spots from the sensor. My camera needs to be cleaned.

#4 The grass became crazy green when I double tone mapped it. This is a common problem was grass and trees. Another common problem is that a grey sky usually get’s so full of noise (grain), that it is unusable. The grass is made less green, by duplicating the layer, and then using the Hue/Saturation dialog (CTRL+U) and then select the Yellow color channel and lower the saturation to something more natural looking. You will be surprised to see how much yellow there is in green. I then mixed the more natural looking grass into the photo. The sky, you use one from one of your original shots.

#5: I also used the double tone mapped image for the rocks. I also cropped away some of the rocks, to make the path start more elegantly at the bottom of the image.

The Tip of the Peninsula


Warning: Undefined array key "multiauthor" in /var/www/caughtinpixels.com/public_html/wp-content/plugins/post-layout/plugin.php on line 114

Warning: Undefined array key "mobile" in /var/www/caughtinpixels.com/public_html/wp-content/plugins/post-layout/plugin.php on line 352

The tip of the peninsula

This one I’m quite anxious about. I have really worked this photo hard and don’t know if I went over the edge and over processed it. The sky was dramatic and had wonderful colors, but I have really extracted them quite brutally, but I do like the result. I think it’s nice.

About processing

It’s an 5 exposure HDR. Just by processing it as an HDR I really get a lot of nice texture both from the rocks and the sky. That’s one thing that HDR and tone mapping is good for. I then used OnOne photo filters to emphasize the sky even more. This I could have done in Photoshop as well, but it’s just easier to use a filter, which is a kind of a template.

The water I have left as the HDR version, which gives this ghosted water, which I sometimes like and other times don’t like. In this case I like it. However, in the lower right hand side corner I merged in the water from the brightest exposure. The brightest exposure has got the longest exposure time and has this wonderful smokey water as you can see.

Before and after

So far so good – but I had a problem. The composition of the original photo had failed, but I did like the sky so much, so what to do? Let’s look at the original:

The tip of the peninsula - before

As you can see quite different from the final photo and much more flat and boring. But look at the stones. The sky is more or less the same, but the stones I have changed … a lot!

#1 The sky is really flat and is nowhere near what it looked like for real. What I have created is not what it looked like, either, but that wasn’t my purpose. Sometimes I make a portrait of reality, and at other times it’s more like a painting I make. This is a painting.

#2 I clean up the photo. There are dust on my sensor – these must be removed. The ship in the horizon; gone too. And the other thing in the water I also removed. I prefer to use Photoshop’s spot removal or the content aware fill to clean up in my photos. The spot removal is good for small spots, and thin lines. Content aware fill is used to remove a larger areas, but I did not use content aware fill in this particular photo. I only used the the spot removal tool.

#3 The stones I stretched a lot. What I did was that I selected the square going from the horizon and down to the bottom. It is easy in this case, because the horizon is straight, otherwise I wouldn’t have been able to do it. I then used used the Edit->Tranform->Scale feature of Photoshop, and extended the lower part of the photo, until the large boulder in the left hand side of the photo was completely out of the picture. And that helped on the composition. Of cause it would have been much easier to get it right ‘in the camera’ when I shot it, but I failed to do that in this case, and I didn’t want to let go of the sky.

No Moeraki Boulders in Kings Garden


Warning: Undefined array key "multiauthor" in /var/www/caughtinpixels.com/public_html/wp-content/plugins/post-layout/plugin.php on line 114

Warning: Undefined array key "mobile" in /var/www/caughtinpixels.com/public_html/wp-content/plugins/post-layout/plugin.php on line 352

No Moeraki Boulders in Kings Garden

There are no Moeraki boulders in Kings Garden in Copenhagen. They are round stones however only half the size of a real Moeraki boulder. Everyday for the last 7 years I have walked through Kings Garden to get to work. Until a year ago the stones were just round stones to me, but then I started to prepare a long vacation in New Zealand. Along with that, came the knowledge of the Moeraki Boulders. Ever since I have been to the Moeraki beach, these round stones, though only half size, reminds me with great joy of New Zealand. Oh what a wonderful place – I want to go there once more!

About the photo

This is a 5 shot HDR from -2 to +2. The sun I have placed in the leaves, to take some of the strength out of it and then I used a 5 inch tall tripod to get close to the ground. That makes the boulder look quite large and gives the viewer a feeling of 3D in the photo.

About the processing

I processed this in Photomatix and then blended the layers in Photoshop to get rid of nasty halos in the sky (see my too tutorial on blending layers). I wasn’t quite satisfied with the result and have had the photo lying around for some months, without a fixed solution. But then the other day I picked it up again. I added a shadow to the stone, adjusted the light about in the leaves, in particular in the right hand corner. For some reason they kept coming out too black. What I have found out in the mean time, is to use the Dodge and Burn tools in Photoshop. The Dodge tools makes things brighter, where ever you paint, and the Burn tool makes things darker. In this case I used the Dodge tool to brighten the leaves. What’s cool is that, I specify to make the shadows brighter, and then it will leave the bright sky untouched, and that really worked, and I got green leaves instead of black.

A Moeraki Boulder


Warning: Undefined array key "multiauthor" in /var/www/caughtinpixels.com/public_html/wp-content/plugins/post-layout/plugin.php on line 114

Warning: Undefined array key "mobile" in /var/www/caughtinpixels.com/public_html/wp-content/plugins/post-layout/plugin.php on line 352

A Moeraki Boulder

On a beach on the South Island of New Zealand they have these really odd completely round boulders. The are pretty large, about 1 meter in diameter and nobody knows how they were created – one of natures small wonders, like the crawling stones in Death Valley.

About this photo

This is a 9 shot HDR. As you can see the sun is still very very bright. If I had wanted the sun to be less burned, I would have had to use an Neutral Density filter (ND-filter). An ND filter is like sunglasses for the lens. I actually did use an ND filter on the same beach, to take some shots of the moving water behind me. That slowed down my shutter speed to a few seconds making wonderful stuff to the waves.

About the composition

What I did with the composition was to merge in the Moeraki Boulder into the edge of the sand cliff, but made sure not to place it above the trees, so it merges into the edge between the sand cliff and the trees on the top of the sand cliff. That gives three repeating shapes, that looks a bit like three waves.

About the processing

I have spend a lot of time making this photo. My aim was to get something that looked Classic HDR, and I wanted a strong shadow cast by the boulder. I have used the edges of the shadow as lead in lines. The reflection in the water I made sure was bright to make a bold reflection. And the last thing I did was a lot of clean up. I have really realized how much cleaning up my photo affects the impact of the photo. I decided to clean up small rocks, leaves etc and it really became a much better photo. One of the things you have to keep in mind, when you take photos, is to keep it simple. To many things in your photo, will just confuse the viewer and it will be like noise for the viewer. Rubble, stones, leaves etc creates a noise too, so either clean up the scene before taking it or do it in Photoshop later. Try at least cleaning up in the foreground of your photo, and be amazed how it affects the impact of your photo.

New York Grand Central in Golden Light


Warning: Undefined array key "multiauthor" in /var/www/caughtinpixels.com/public_html/wp-content/plugins/post-layout/plugin.php on line 114

Warning: Undefined array key "mobile" in /var/www/caughtinpixels.com/public_html/wp-content/plugins/post-layout/plugin.php on line 352

New York Grand Central In Golden Light

Grand Central in New York – a must for photographers coming to New York. I didn’t have much time in New York, but I’m glad that I got the opportunity to see the Grand Central. It’s totally awesome.

About the processing

It’s a 9 shot HDR ranging from -5 to +3 with 1 EV step between each shot. My problem was, that the window in the middle has very strong sunlight coming in. So strong, that it spills over the walls and really ruins the photo. Even though I manage to capture all of the darkest and brigtest parts. In the processing in Photomatix, it turned out to be a gray and very ugly wall around the window in the middle, ruined by the sunlight. Even if the window it self is perfect. Finally I got the idea to use a ‘sunlight’ filter in one of my Photoshop plugins, to turn white grayish light golden and also reflect the golden color on the floor. That worked!

The Royal Stables


Warning: Undefined array key "multiauthor" in /var/www/caughtinpixels.com/public_html/wp-content/plugins/post-layout/plugin.php on line 114

Warning: Undefined array key "mobile" in /var/www/caughtinpixels.com/public_html/wp-content/plugins/post-layout/plugin.php on line 352

The Royal Stables

Right behind the Govermental building Christiansborg lies the Royal Stables. The Queen has got a set of white horses, which apparently are rare, if they have to be really white. The horses stays in the building in the left.

About the processing
This is a typically double tone mapped HDR. I created it from 5 exposures in Photomatix. The double tone mapping gives this much more painterly and surreal style, which works well for some images. The idea of the double tone mapping is that, you first do one HDR photo and tone map it, and the image that you get from that process, you tone map too. This is done by pressing the “Tone mapping” button once more. A side effect of the double tone mapping is, that you get a lot more noise (grain) into the image. You have to clean some of it up, but not all. The noise adds some of the grittyness to the image, which is part of the effect.

The second time you tone map, the colors go crazy, and you have to lower the saturation. The luminosity you also want to bring far down. Exactly how far depends on your photo. But this step is what creates the mood of your photo. Try some of the other sliders, and see how they affect your photo.

I brought the double tone mapped image into Photoshop and did a lot of clean up and some noise reduction here. I took the sky from one of the original shots and masked that in. If you are unsure of how to mask/blend layers in Photoshop, have a look at my tutorial on blending layers.

Kings Square Metro


Warning: Undefined array key "multiauthor" in /var/www/caughtinpixels.com/public_html/wp-content/plugins/post-layout/plugin.php on line 114

Warning: Undefined array key "mobile" in /var/www/caughtinpixels.com/public_html/wp-content/plugins/post-layout/plugin.php on line 352

After a barbeque evening at work, I walked slowly through the center of Copenhagen towards the Central Station. At Kings Square, next to the Danish Royal Theatre (the building on the left) is entrance to the Metro. The Copenhagen Metro is a new one, only about 10 years old. It has driverless trains and a very futuristic look. I may go down at shoot some there aswell.

About the composition

I rested the camera on the rails going down into the metro. This gives strong lead in lines from the rails. The edge of the stairwell also works as lead in lines. Above ground the buildings also works as lead in lines. There’s a lot of lead in lines in this photo.

About the processing

This is a 5 shot HDR photo, ranging from -2 to +2, with one EV step between each. Actually this is the second time I processed this photo. The first time I missed the fact that my camera had moved slightly between two shots. This was visible only in some parts of the photo if viewed at a 100%. This time I made sure, that auto-align was selected in Photomatix. This is a photo with mixed light. Electrical underground and natural evening light above ground. This gives two different white ballances. This gave me a very bluish color to everything outside of the metro. I removed a lot of the blue and cyan colors by duplicating the layer in Photoshop, pressing CTRL+U and then select the blue color. I then turned down the saturation. And then I did the same for cyan. Then I closed the dialog, added a layer mask, and then painted on the layer mask so that I mixed in what I liked from each layer. You can see details about how to blend layers in Photoshop here.

How to handle moving things

There was a lot of trafic of people going up and down the stairs, the guy with bicycle and cars and busses going by. I had fairly long exposures, so everything was kind of blurry, which looks cool with the cars. I waited until there were fewer people and then I was able to combine a complete staircase with no people, by mixing in 3 of the 5 shots. Being an HDR photos I had to adjust the exposure and look and feel of each of the photos before blending it in. If I hadn’t done that I would had light and dark patches of staircase, depending on which photo I used to blend in.

The spider at the gates of the old Citadel


Warning: Undefined array key "multiauthor" in /var/www/caughtinpixels.com/public_html/wp-content/plugins/post-layout/plugin.php on line 114

Warning: Undefined array key "mobile" in /var/www/caughtinpixels.com/public_html/wp-content/plugins/post-layout/plugin.php on line 352

The spider at the gates of the old Citadel

In the middle of the old center of Copenhagen lies an old citadel. The military still uses it, but there is public access. This is the exit tunnel on a cold winter’s day. I only got 4 of my 5 shots for HDR, because I had to run for my life, because a car came.

This is an 4 HDR photo (-2 to +1). I have worked this image quite a bit. First I did two tone mapped images in Photomatix. When I got the first one I closed the “final touch” dialog (I rarely use that), saved the first tone mapped image. Then I simply press tone mapping button once more. This gives a wildly colored image, so I have to lower the saturation to somewhere in the mid 40’s, and then I lower the luminosity to the minus area. This really gets the grittiness out of the image. In some places too much, but this I fixed in Photoshop later.

In Photoshop I blended in the lamps from the -2 image, and the closest area to the lamp in front comes from the single tone mapped image. The double tone mapped was burned out. The same goes with the cobbles in the road down in the middle. They burned out too in the double tone mapped image, so I had to take approximately 25% of the single tone mapped. Then I had to extract blue colors in Photoshop to get the right light outside (mark the layer and CTRL + U. and select the blue color and lower the saturation).

University of Copenhagen


Warning: Undefined array key "multiauthor" in /var/www/caughtinpixels.com/public_html/wp-content/plugins/post-layout/plugin.php on line 114

Warning: Undefined array key "mobile" in /var/www/caughtinpixels.com/public_html/wp-content/plugins/post-layout/plugin.php on line 352

University of Copenhagen

This is the main building of the University from 1836. The University has fostered a few known people, one of the more famous is Hans Christian Oersted, who discovered elektro magnitism in 1820. This particular photo I took on 22nd of December 2012. I have been waiting to take it, but the square in front is always crowded with people, busses, cars etc. But this day, only one single car was there.

It’s a single RAW file that I have tonemapped to achieve this result.

New Zealand – Otika Gorge on the South Island


Warning: Undefined array key "multiauthor" in /var/www/caughtinpixels.com/public_html/wp-content/plugins/post-layout/plugin.php on line 114

Warning: Undefined array key "mobile" in /var/www/caughtinpixels.com/public_html/wp-content/plugins/post-layout/plugin.php on line 352

This picture I have taken on the road through Arthurs pass on the South Island on New Zealand. It is one of the most beautiful roads I have ever driven on. This is Otika Gorge. Before the bridge was build, you had to drive this insane road this picture was taken on. Actually you can kind of see were it goes, if you look closely at the photo on the right hand side.
Technically, this is made from three exposures, with 3 EV steps between and then I made two tonemapped versions, giving me altogether 5 images that I merged together in Photoshop. And at last I did a little filtering and sharpening, without removing the dreamy impression.