Warning: Undefined array key "multiauthor" in /var/www/caughtinpixels.com/public_html/wp-content/plugins/post-layout/plugin.php on line 114
Warning: Undefined array key "mobile" in /var/www/caughtinpixels.com/public_html/wp-content/plugins/post-layout/plugin.php on line 352

Last year just before Christmas I took a late walk in the streets of Copenhagen with my tripod and my camera. For a long time I stood in front the entrance of the worlds second oldest amusement park: Tivoli.
It’s always incredible busy in in front of Tivoli and I really wanted a shot not too crowded with people, so I had to wait. I think I stood for 20 minutes waiting for the shots with the fewest people and allowing a long peek into the old garden. And this was what I got and I’m pretty happy with it.
However, it’s not perfect. One of the good things about taking several shots as you do in HDR, is that you get several options to merge from. In this case I had 7 different exposures ranging from –3 to +3. The longest exposure is 10 seconds, which is enough to make fast moving people disappear.
Let’s look at the untouched 0-exposureand, and see what immediate problems there is with this image:
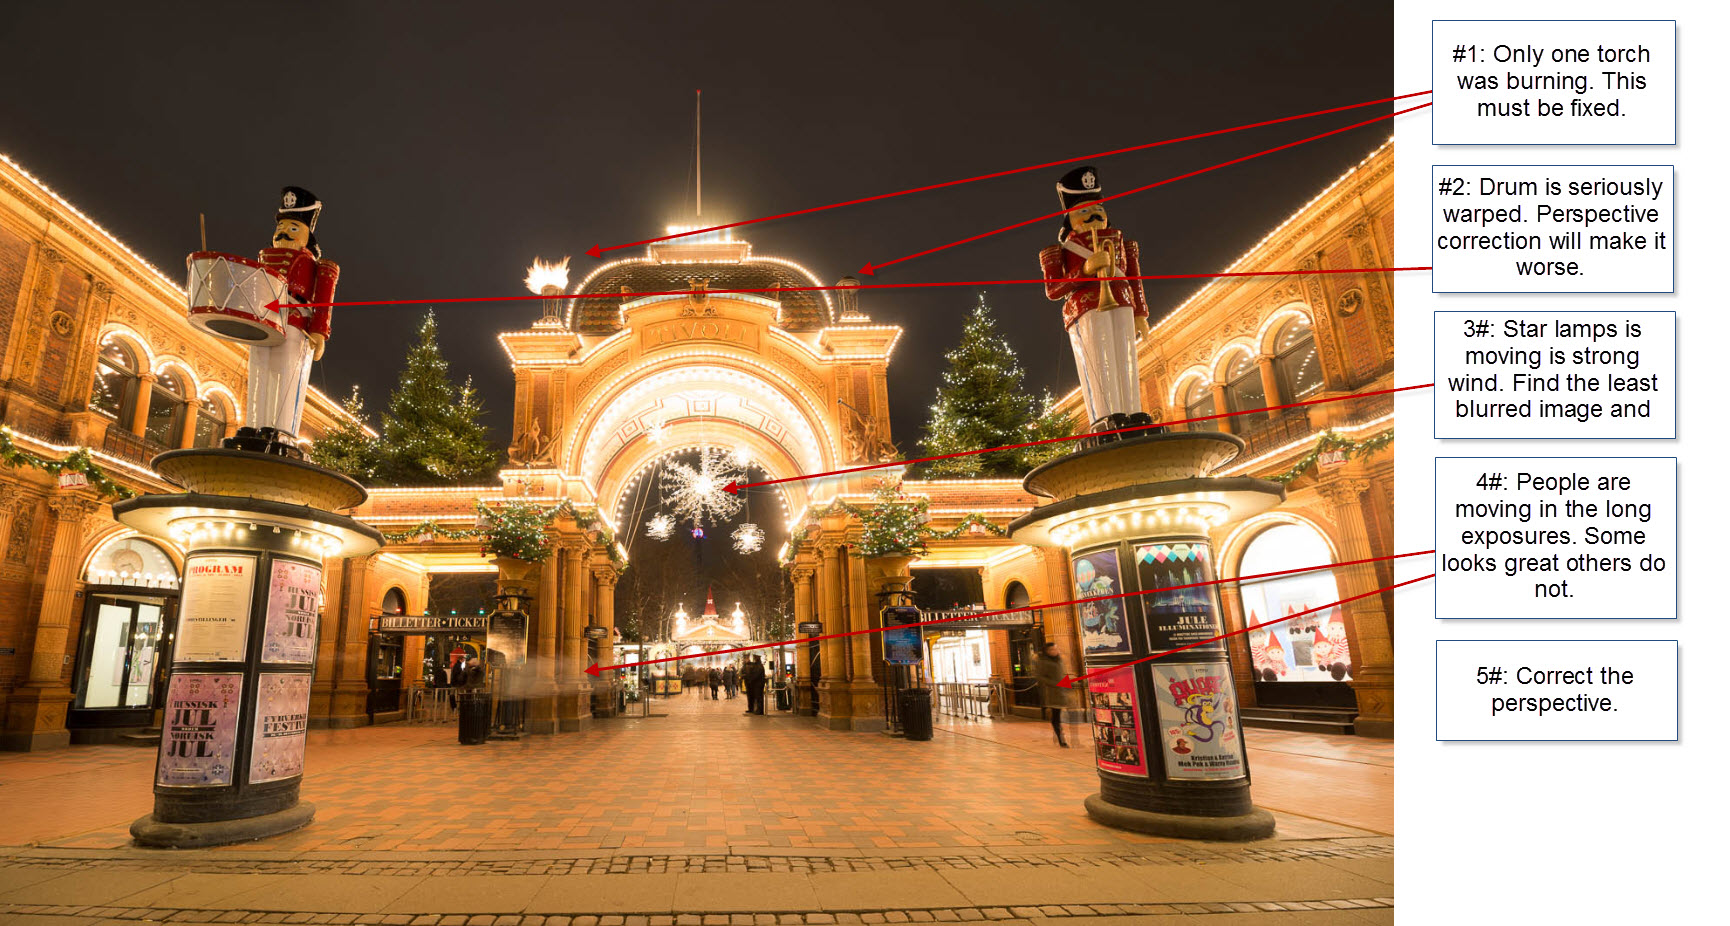
#1: They forgot to turn on one torch (or it had blown out, it was quite windy). Fortunately this photo is symmetric, and I can just mirror it to get a torch for the right hand side, and because I have 7 images, I will be able to get a torch that is not an exact mirror of the first one.
#2: The photo is taken on a 14 mm lens, which is extremely wide angled. Things in the corners of a wide angle lens does get warped, and this drum doesn’t look good. I can’t really fix it, without some kind of compromise.
#3: The stars hanging from the roof of the main gate is swinging in the strong wind. By using one of the images with a faster shutter speed, it might be good enough for a fairly sharp star. I did try to take the photos while the wind was less intense.
#4: It’s a busy area and people are moving around. Some blurry people can look quite cool, but others looks bad in the image. The goal is to get leave the cool ones and remove the ugly ones.
#5: Because this shot is shot with a wide angled lens that is tipped slightly upwards, the buildings leans. Sometimes this looks cool, but in this photo it’s not particular flattering. However, I will be in trouble when I start fixing it, because of the drum on the soldier. But more about that later.
Making the tone mapped image
First I merged the 7 shots in Photomatix Pro (by the way I just found out that there is a Photomatix Essentials. As far as I can see this gives you less artistic options, which I really can’t recommend if you want to do more artistic HDR photos).
There is a lot of dynamic light in this photo, because of all of the lights and the really dark sky and shadows. It’s difficult to capture all light, for that reason I shot from –3 to +3.
My main focus when doing the tone mapped image, was to get some nice texture on the walls of the buildings. The sky went crazy in noise and I knew I had to replace it. This came out of Photomatix Pro:

The blending of the layers
While the tone mapped image was a good start, it was just a little too dark and too gritty to what I wanted. And there were ghosted objects. The torch (from #1) was really bad and I had to fix that.
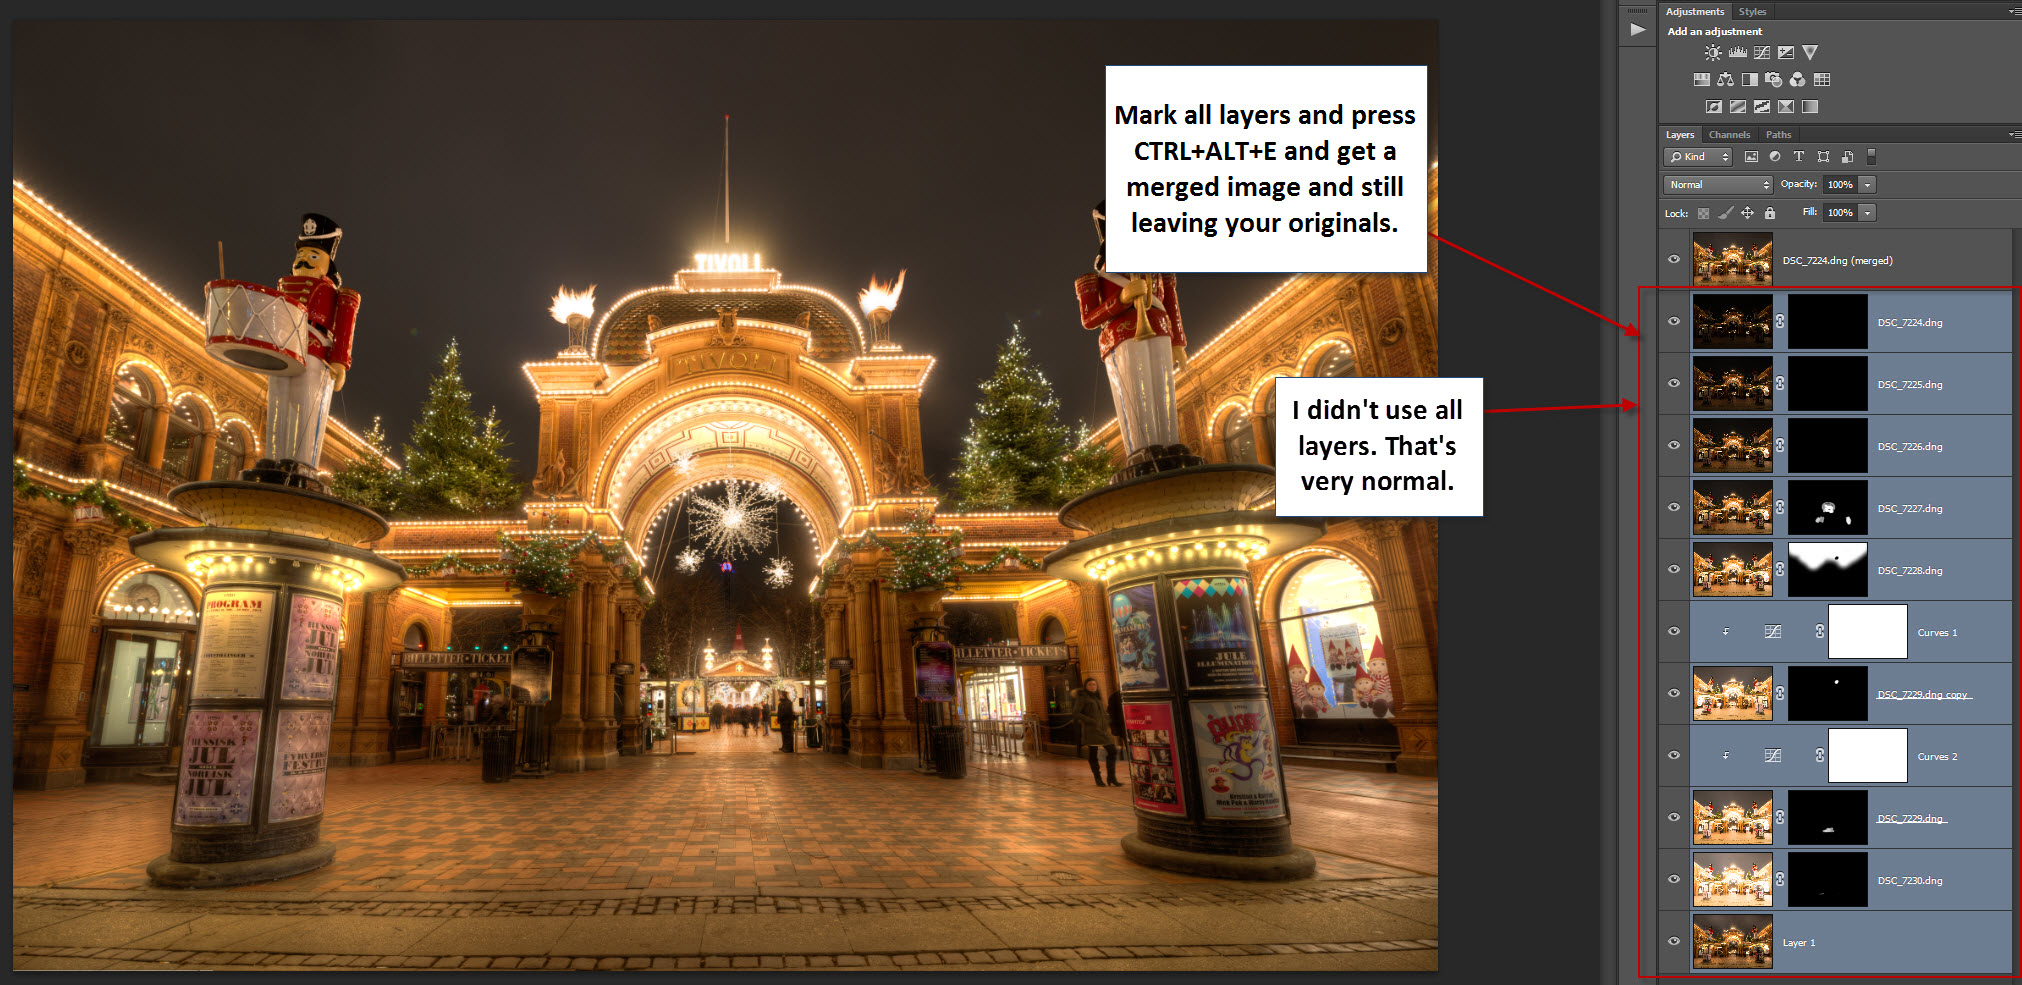
I started by loading all of the original images and the tone mapped image into Photoshop. I ordered them, so that the tone mapped image was in the bottom. I then added Layer masks to all other layers. I did this by clicking on the Add Layer mask while I held down the ALT key (see #a on the image below). This gave me a black layer mask. A black layer mask makes the entire layer invisible.
TIP: If I wish to see whats on a layer, I can mark the layer mask and press CTRL+I. That will invert the layer the layer mask (it will also invert the image, if you select that by accident!).

The torch on the left was ghosted. I needed to find one of the images with a nice torch. I had the 7 original shots available in individual layers, but I had put a black Layer Mask on each of them to make each invisible.
To see one of the images I had to make the layer mask white and I did that, by selecting the Layer Mask and then pressed CTRL+I. This inverted the layer mask to white and made it possible to see the layer. I then shuffled through the layers from the top layer (white layer mask, no I didn’t like that torch, back to black layer mask, next layer, white layer mask, no I didn’t like that torch either, black mask again etc.).
On the fifth layer from the top I find a torch that I like.

I then inverted the layer mask once more to black, and took the pen tool and painted white on top of the torch (on the layer mask!).

In fact I ended up painting all of the sky in. A dark sky usually gets very noisy in Photomatix and therefore it needs to be replaced with one of the originals. Now I had a great sky and a great torch on the left. Now I wanted the torch on the right too.
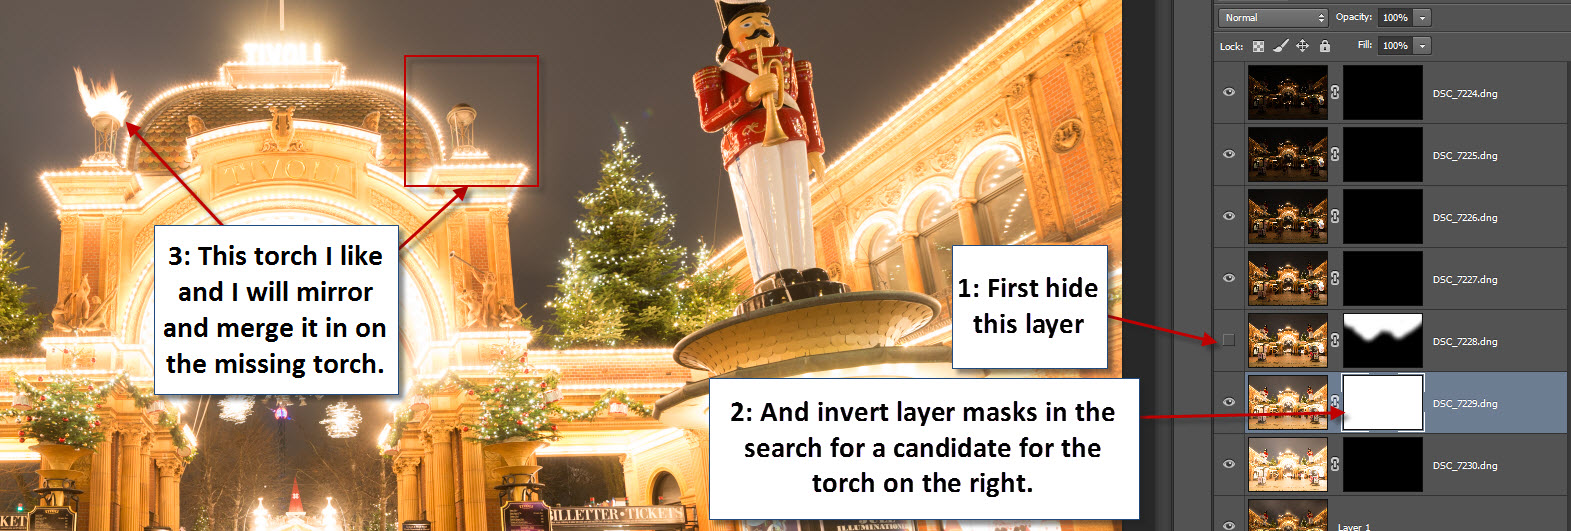
To find a torch for the right hand side, I continued my search for torches by inverting the 6th layer mask from the top. I did not want to just mirror the same torch, that would have been too obvious and therefore a bad result. It had to look like two different torches had been burning. I had painted the sky in on the 5th layer and to avoid seeing this I hid this layer momentarily.
On the 6th layer from the top I found another good torch. .
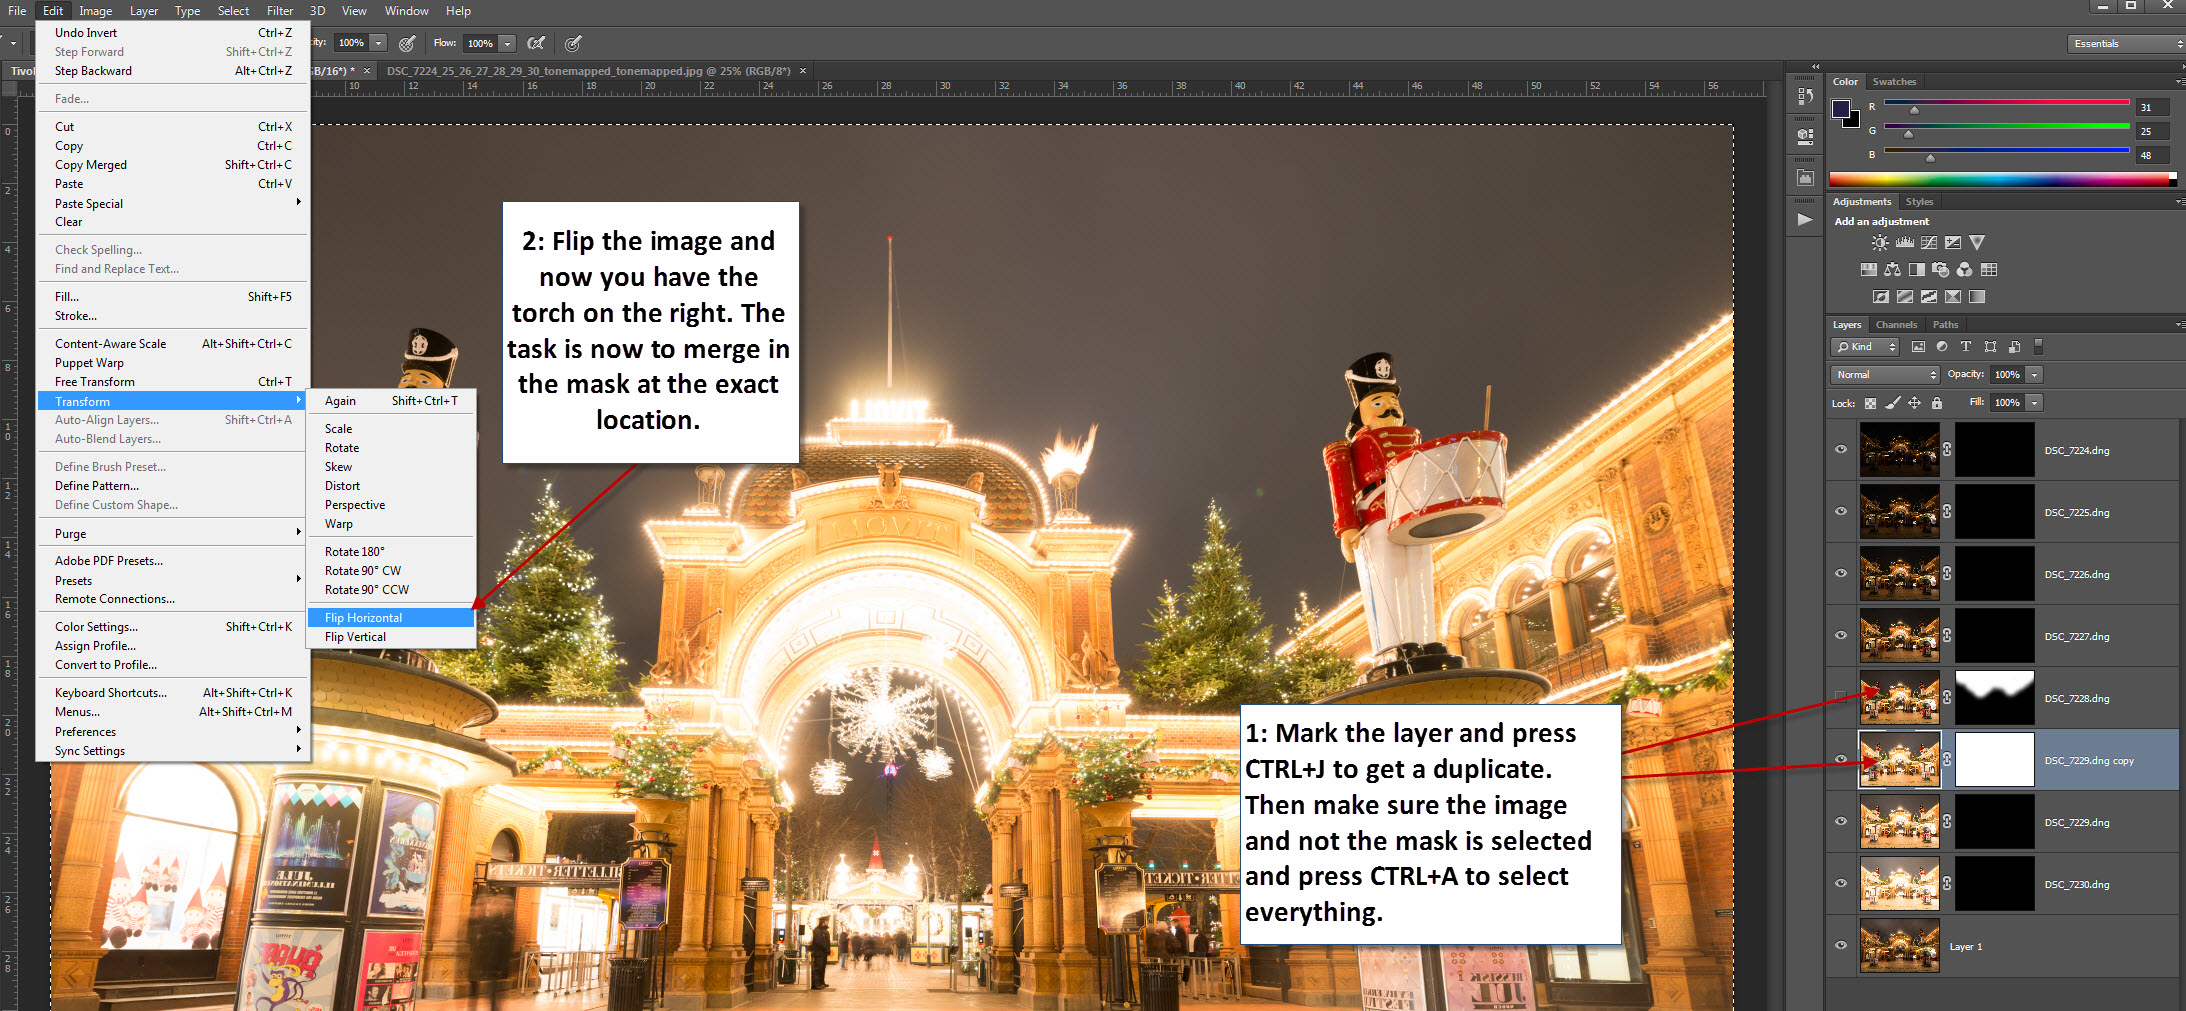
I duplicated layer 6 by pressing CTRL+J. Then I selected the image (not the mask!) and pressed CTRL+A. I now got a selection of all of the image. This selection I flipped horizontally to get a mirrored torch. The photo, is not exactly symmetric, but very close, and I only needed to move the layer with the mirrored torch slightly. I made the new mirrored layer visible by selecting the mask and inverted it into white.
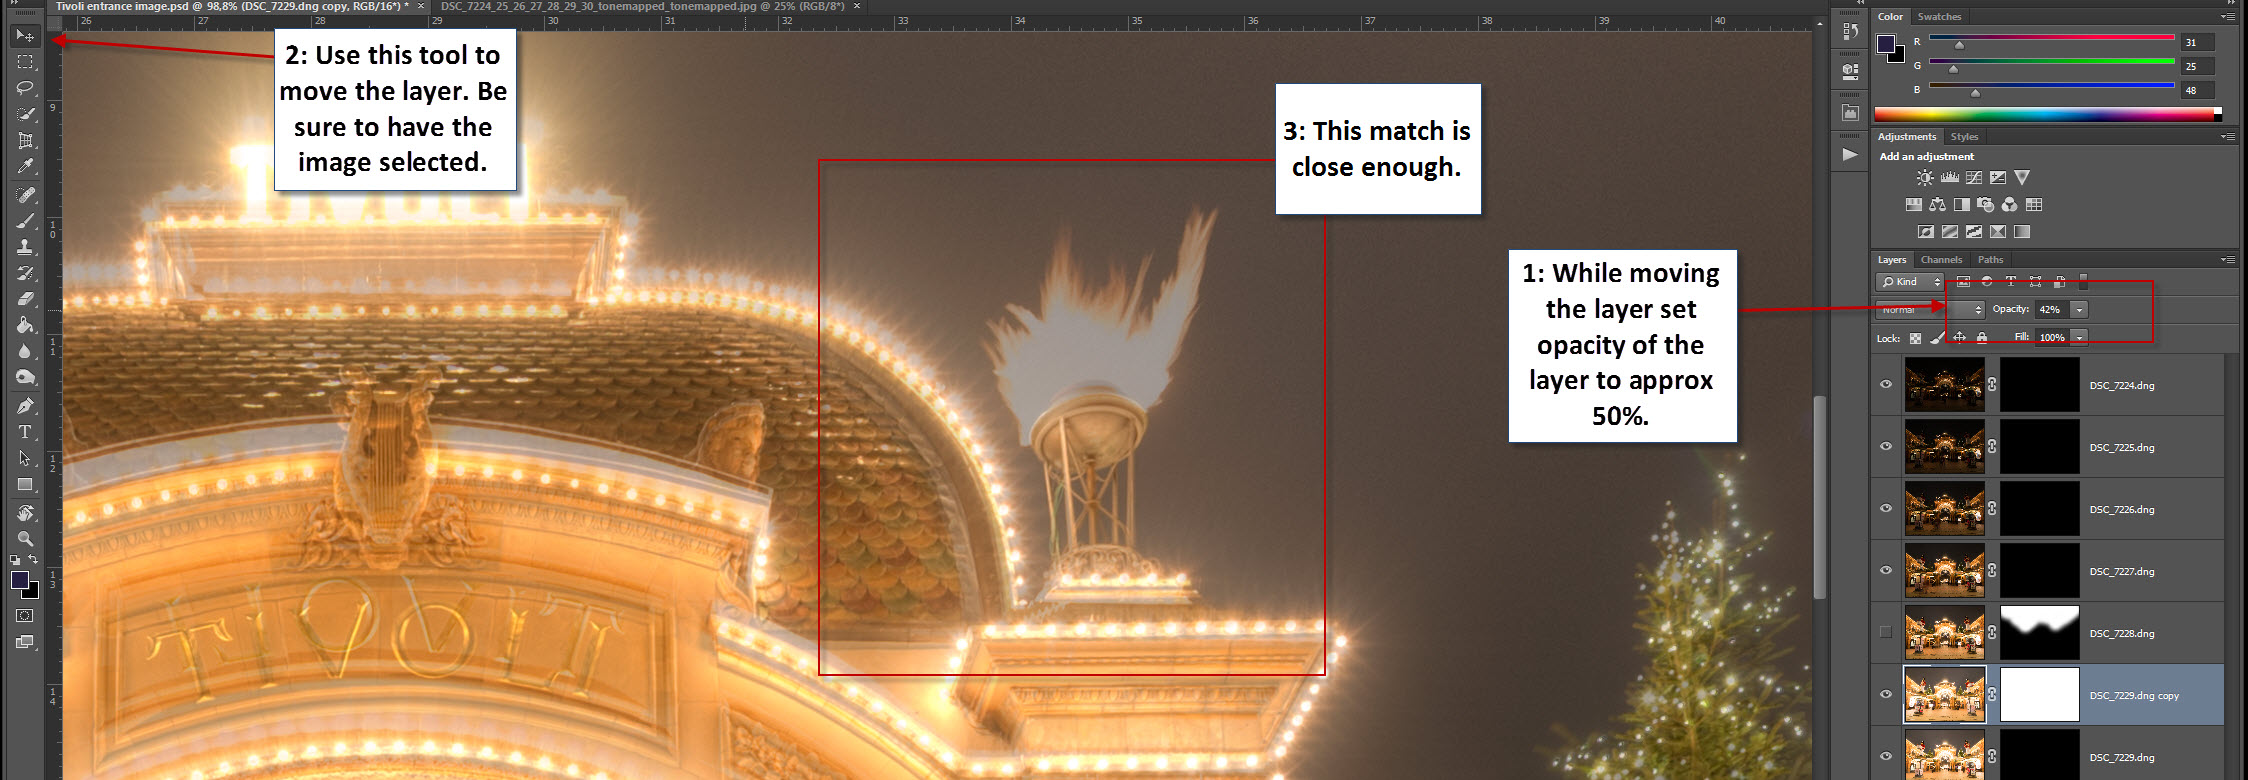
To be able to move the torch into the right position I momentarily changed the opacity of the mirrored layer to approximately 50%. This allowed me to see the destination layer beneath my mirrored as well as the mirrored layer. Notice how only the torch has the right placement. The rest of the building is ghosted, but that didn’t matter, because I only intended to use the torch.
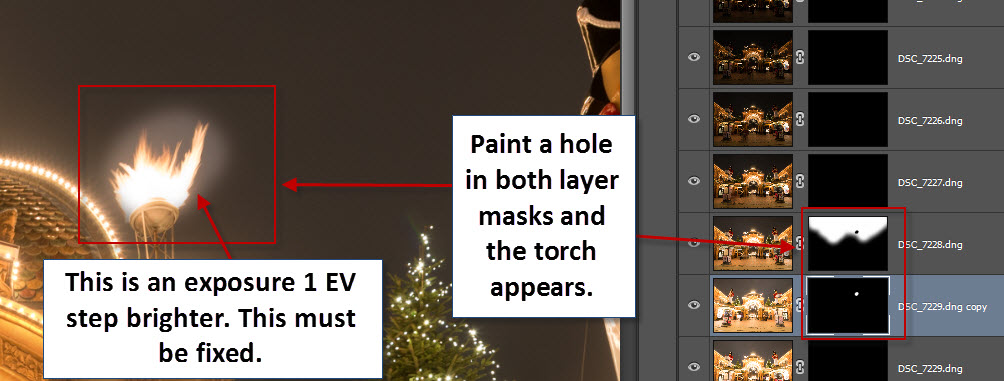
To make the torch be visible, I had to paint on two layer masks, number 5 and 6. I had masked the sky from Layer number 5 into the image, but now I want a “hole” in the sky to pass my torch from my mirrored layer 6 through. Therefore I painted black on top of the torch on Layer mask number 5 and white on layer mask number 6 (see the image below). And viola, the torch appeared!
But! The new torch was from a different exposure with a lighter sky and that didn’t look good.
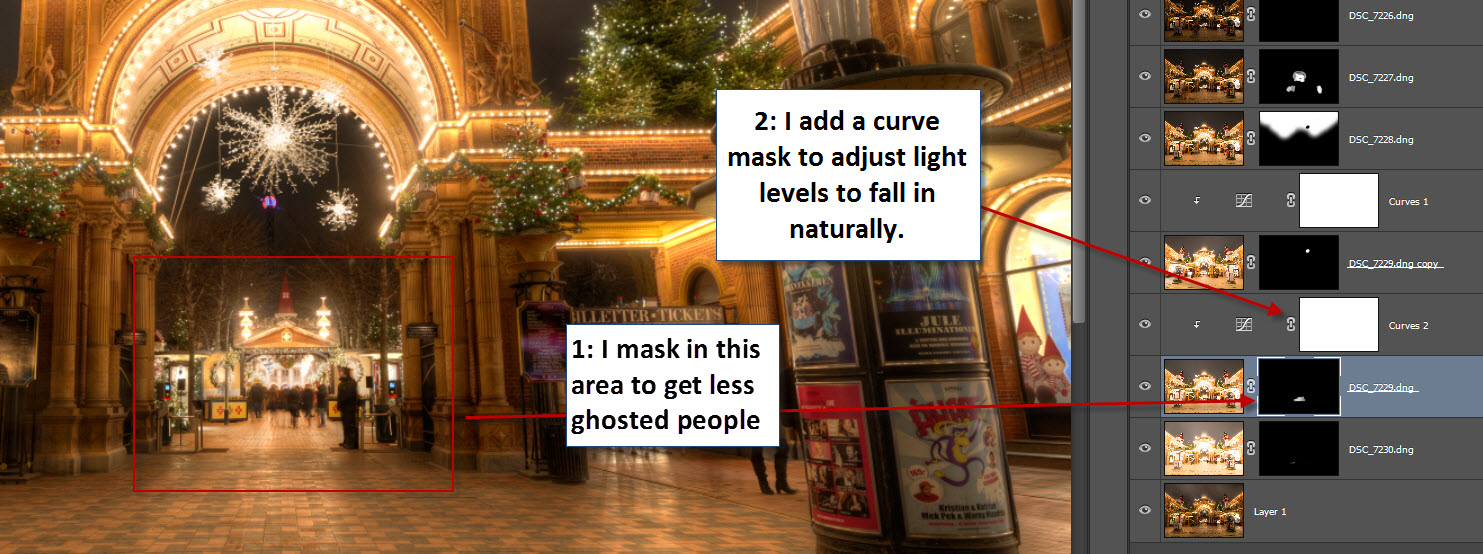
I made the sky darker by using a curved adjustment layer and dragging the curve downwards until the sky had the same level of light as the rest of the sky:
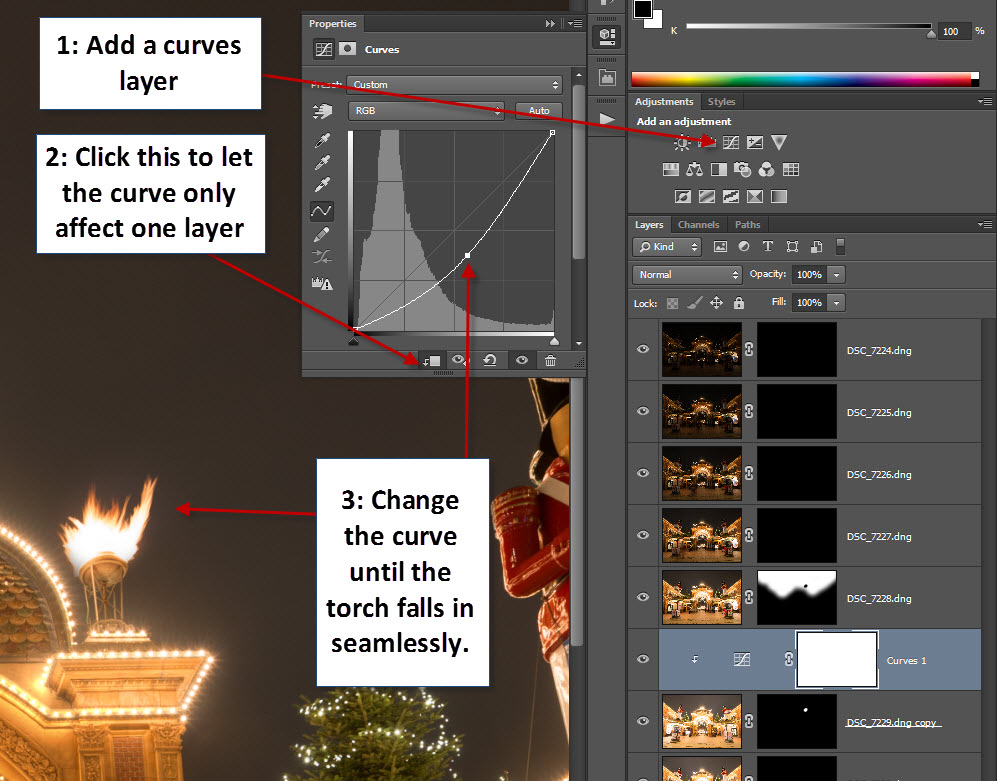
The adjustment layer I made sure only worked on the layer right beneath, by click the small arrow pointing down. And then by dragging the curve downwards the merge became perfect.
The The next thing I wanted to fix was the stars in the large gate. They were ghosted too. Once more I started on the first layer and used CTRL+I on the Layer Mask to see which image had the best stars. I also looked at the archway itself, because I had to include that, because two of the stars is visually placed in the ceiling of the archway.
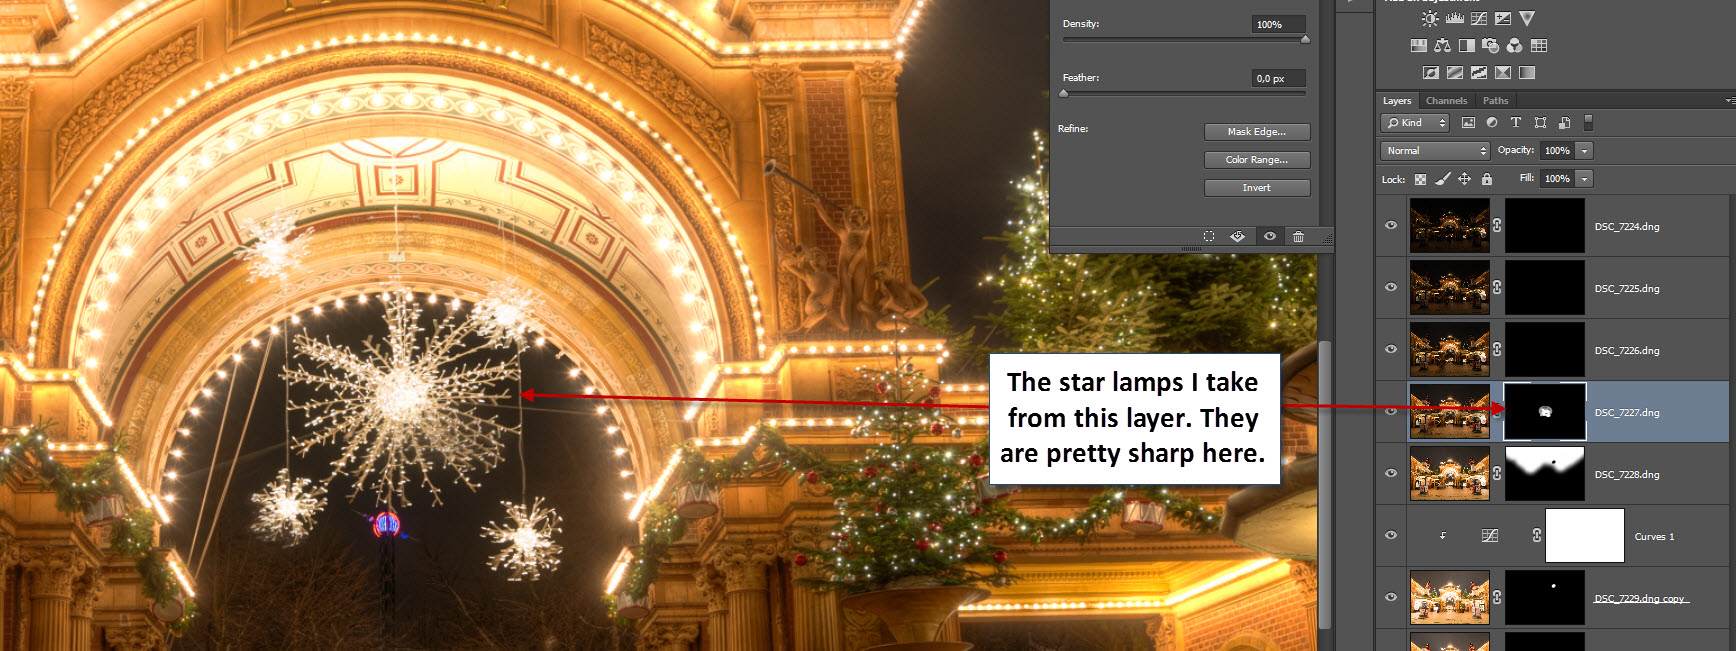
On the fourth layer from the top I found a nice set of stars and roof. I painted white on the layer mask and included the new stars.
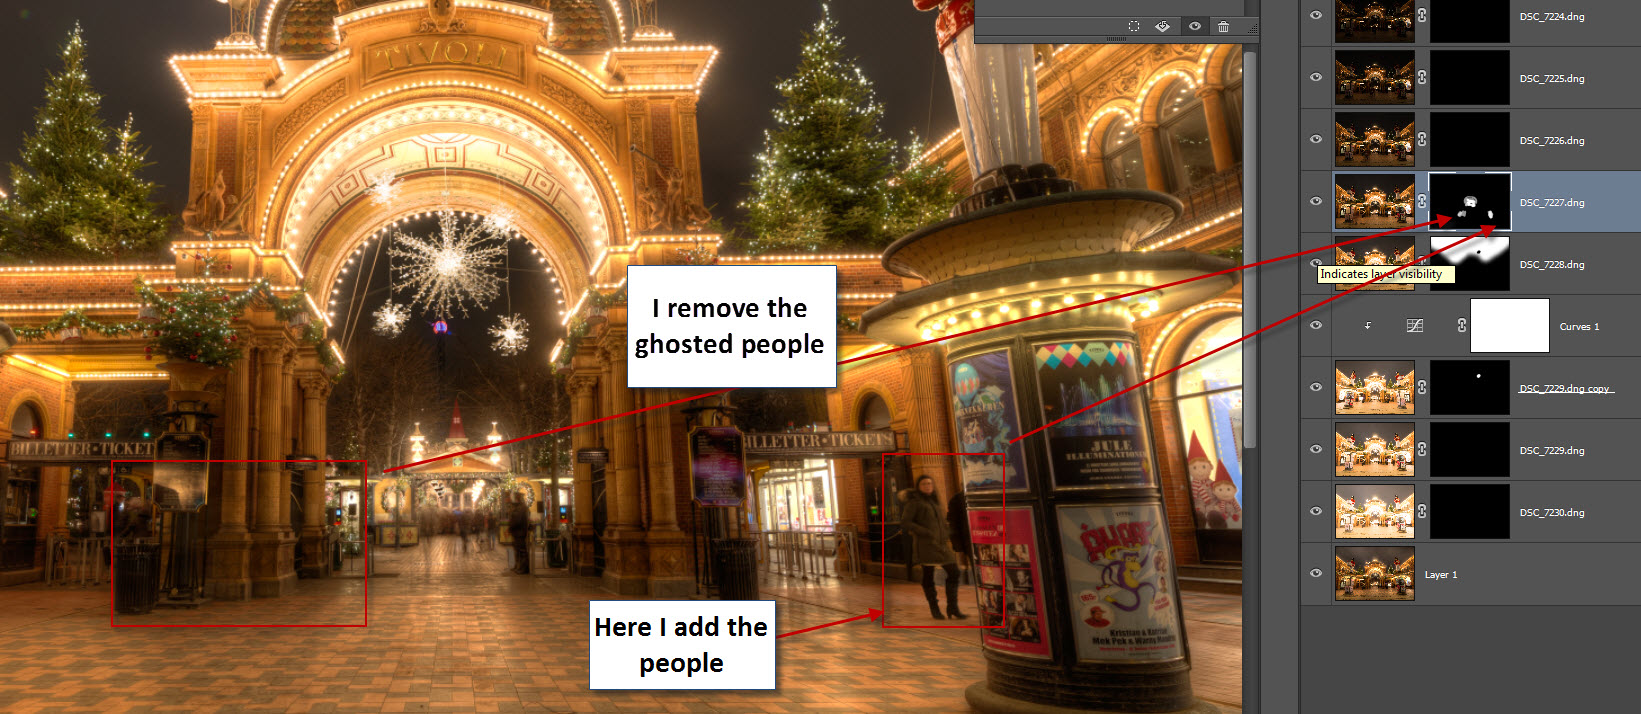
Next step was to remove ghosted people. Once more I search the layers for good replacements. I found them on the fourth layer, just as the stars. I painted white on the layer mask, and the ghosted people disappeared.
And as one last thing I searched for a better exposure for the guards and the people far inside Tivoli. I could live with what was there, but if there was anything better, I would prefer to use that. And I found it on the 6th exposure, however it was very bright, so I had to put an curved adjustment layer on that too, so make a good blend. Just the same as with the mirrored torch.
Now I was happy with the general image. As it turned out, I did not use all of my exposures when blending my layers, but I did use them all for my tone mapped image. What was left now, was the correction of the perspective and the distorted drum.
If I had just used normal perspective correction, I would got a drummer distorted even worse. While the buildings would have been straight, the drummer would have ruined the image. So this is one the places, where you as a photographer have to make a compromise. I normal correcting of perspective, would have given this result:
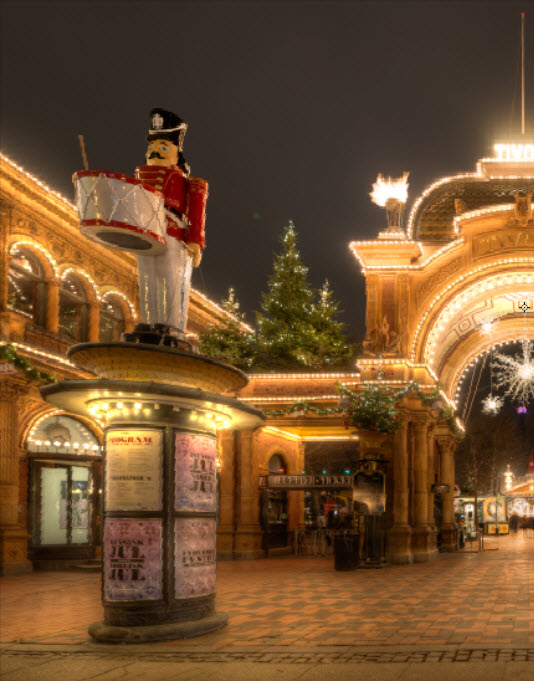
I chose to use a tool that I have bought. It’s called DxO ViewPoint. It can do some advanced correct perspective and distortion magic. My goal was to fix the drummer, rather than the buildings. This gave me a fish-eye looking image, but that is actually quite cool, so I used this.

Final touches
After that I did some further retouching on this image to get to the final image. This mainly consisted in adjusting the color balance and raising the shadows. The buildings are a bit too dark. I did this is both using Topaz Adjust and Adobe Lightroom.