A milestone is been reached – more than 100.000 photos in my library


Warning: Undefined array key "multiauthor" in /var/www/caughtinpixels.com/public_html/wp-content/plugins/post-layout/plugin.php on line 114

Warning: Undefined array key "mobile" in /var/www/caughtinpixels.com/public_html/wp-content/plugins/post-layout/plugin.php on line 352

These trees are just maginificient. Perfectly round and framing the beautiful Church of Eglise Saint Charles. Photo by Jacob Surland, www.caughtinpixels.com

These trees are just magnificent. Perfectly round and framing the beautiful Church of Eglise Saint Charles in Monaco. 

It’s really a milestone, 100,000 photos. 11 years has passed since I bought my first pocket Canon IXUS 400 camera, which I loved and still has. It was 4 megapixels and did take some really good photos.

I always had the love for photography, but I never really did dive into it, until 2 years ago, when I started to buy more serious equipment and using software to improve my photos. And what a journey these last two years has been. The first few shots I made, even surprised me. Is this really possible? I thought. But it really is.

But how to get to this point I am now? Well, the most important step is to be serious about what you do. And you have to realize and accept that there is some real work in it. There is no silver bullet and a no button that says “Press here to get your awesome photo”. It is true that many filters and tools exist, which will do 50%-80%.

But you know what? It’s not the first 80% that counts; it’s the last 20%. And the last 20% takes 80% or more of the time.

You can’t really be sloppy, when you shoot or when you post process. But that doesn’t mean that you have to fix every pixel in the photo. There are some basic rules that you have to follow, to make a photo work. Some of these rules are here:

  • Do not have burned out sky (white splashed in the sky) in your photos. Use ND graduation filters or HDR techniques to make sure, that you cover all light. I have tutorials on HDR on this blog right here.
  • Do prioritize to take photos during the golden and blue hour, or in city lights. Photos in the middle of the day are just so much harder to make great. I even stopped to take photography serious in the middle of the day, unless cloudy.
  • Be precise with your composition. If you are shooting something symmetric, then it MUST be symmetric. If something must be centered, it must be centered – not almost in center. The same thing applies to more complex compositions.
  • Do make sure the horizon is level, and if it is not, make sure it is obvious it shouldn’t be.
  • Do not have “halos” in your photos. If it looks like that your horizon is lightening up the sky, it doesn’t look good, and it is obvious you didn’t put effort into the last 20% or simply, that you have to work more with the photo.
  • Try to avoid too much digital noise in your final photos. If you are doing HDR photos you are likely to get that. Use noise reduction software, to keep the noise under control.
  • Do not overdo the post-processing. It must work, within the style you are doing.
  • Clean up cigarette buds, garbage and other stuff from your photo. A cleaner photo simply works better.

In a photo like this train from Zurich Central Station in Switzerland:

I love riding with the trains in Switzerland. Not only because it is a very beautiful country, but also because they are more high tech, than trains in Denmark. They have a GPS unit connected to a Google Maps screen, so that you can see where you are. I love that! This train on Zurich Central Station is just about to leave. This time I didn't go by train. Photo by: Jacob Surland, www.caughtinpixels.com

I had to spend a few hours removing bugs, but the it is worth the reward, and the photo wouldn’t have worked, if I hadn’t taken my time.

Switzerland train before and after

This I (of course) have learned bit by bit, and Rome wasn’t built in one day. But each of these small steps, I improve for every photo that I make. I make a lot of mistakes, some I fix, and some I think, next time I will fix it.

What is the Dynamic Range of Sony A7R?


Warning: Undefined array key "multiauthor" in /var/www/caughtinpixels.com/public_html/wp-content/plugins/post-layout/plugin.php on line 114

Warning: Undefined array key "mobile" in /var/www/caughtinpixels.com/public_html/wp-content/plugins/post-layout/plugin.php on line 352

Liberty House is a beautiful shopping mall in London. An old one selling a lot of different things, but famous for luxury goods. You can almost see it on the building. Photo by: Jacob Surland, www.caughtinpixels.com

What is the hype about the Sony A7R? For the last few months I have seriously been considering buying the Sony A7R camera. Why? Because I love the size of the camera. I find the D800 rather bulky, and sometimes I bring my Finepix X100 instead. The Finepix X100 is a great camera, but it is terrible slow, not wide enough and it is not great for HDR photography.

But having read many many reviews of the camera, to be sure it really is the right choice. To my amusement, I have come across many Canon users doing flip flops over the Dynamic Range of the camera.

Having had owned both Canon 5D Mark III and Nikon D800, I have learned that there are major differences in the two brands, and in particular when it comes to the Dynamic Range. The Nikons are so much better at Dynamic Range, than the Canons cameras. Apparently this is something that many Canon photographers is not really aware of. Canon 5D Mark III (according to www.dxomark.com) has a dynamic range of 11.7 EVS, while the Nikon D800 has got 14.4 EVS. That is 23% more dynamic range coverage. That is a lot! I

have covered this in detail in my comparison review of Canon 5D Mark III, Nikon D600 and Nikon D800.

The switch from Canon to Nikon really is tough. Not only because it is really expensive to switch, because you have bought a lot of lenses. But Canon and Nikon also are rivals and it’s a religious thing, to be either a Canon or a Nikon guy. You do not go to the enemy!

But Sony has hit a sweet spot. They have crammed a similar sensor to that of the Nikon D800E into a very small body, and the camera delivers the quality. And attaching an adapter to the camera, you can use both Nikon and Canon lenses. Nikon only manual focus though.

Of course both Canon and Nikon photographers loves this little camera. But, the Canon photographers really goes “Wooohooohaahaaaay!” and gets a good surprise, when they realize what 14.4 EVS in Dynamic range truly means. The Nikon guys, they are used to this.

Dynamic range explained

What is the Dynamic Range? Well, it is how much light the sensor inside the camera can capture. What is too bright to capture for the sensor, will just be white. And what is too dark will just be black.

The better a sensor is, the more light it can capture. You measure the dynamic range in “exposure value steps”. One step is equivalent of doubling the shutter speed or cutting it in half.

Holy Atrium – Shoot straight into the air


Warning: Undefined array key "multiauthor" in /var/www/caughtinpixels.com/public_html/wp-content/plugins/post-layout/plugin.php on line 114

Warning: Undefined array key "mobile" in /var/www/caughtinpixels.com/public_html/wp-content/plugins/post-layout/plugin.php on line 352

Look up and enjoy the view, of the attrium at the Hotel Hampton by Hilton in Swinoujscie in Poland. You will get a holy view, if standing in the right possition. Swinoujscie was  a pleasant surprise by the way! Photo by: Jacob Surland, www.caughtinpixels.com
Look up and enjoy the view, of the atrium at the Hotel Hampton by Hilton in Swinoujscie in Poland, and you will get a holy view, if standing in the right position. Swinoujscie was a pleasant surprise by the way – a real beach vacation kind of place. Apparently they have the best beach on the Baltic Sea.

About the photo

It is a single shot. I could have shot a bracketed set for HDR, but the atrium itself, is not that interesting. But the way, the light comes in and forms a cross is interesting. And by having a much contrast, almost silhouetted the cross makes its appearance.

One of the most popular booths at Art Monaco 2014


Warning: Undefined array key "multiauthor" in /var/www/caughtinpixels.com/public_html/wp-content/plugins/post-layout/plugin.php on line 114

Warning: Undefined array key "mobile" in /var/www/caughtinpixels.com/public_html/wp-content/plugins/post-layout/plugin.php on line 352

Near Venice Corner in the medieval town Bruge, Belgium, you find this beautiful view. Along with Amsterdam it's called the Venice of the north and it really is. Photo by Jacob Surland, www.caughtinpixels.com


Maybe it really wasn’t a big surprise, but still it feels great, that Mona Youssef Art Gallery had one of the most popular booths at Art Monaco 2014. You could feel the spirit and the kindness among all of the members of our team. Many had spouses with them, and it all added to the feeling of one big family, with Mona Youssef in the center.

Not only was the spirit good, so was the art works presented by the 30 different artists. It really was no surprise, because we all had that feeling, when we were in Monaco. So many people in the booth. But of cause it is nice to know that Art Monaco noticed the same and tweeted about it https://twitter.com/ArtMonaco/status/459377802031009792.

About this photo

This is one of my Realism Digital Art photos from Bruge in Belgium. It’s a slightly different composition than the earlier published image. In this version, the famous bell tower of Bruge is more prominent. The tower plays an important role in the movie “In Bruges”.

Return from Art Monaco 2014


Warning: Undefined array key "multiauthor" in /var/www/caughtinpixels.com/public_html/wp-content/plugins/post-layout/plugin.php on line 114

Warning: Undefined array key "mobile" in /var/www/caughtinpixels.com/public_html/wp-content/plugins/post-layout/plugin.php on line 352

One of the major sites in lies in the heart of Copenhagen. It's called Nyhavn and means New Harbor. This is just before sunrise, before the neon lights are shut off. Photo by: Jacob Surland, www.caughtinpixels.com

I have just returned from the Art Monaco 2014, the fifth Art Monaco to be held. It is one of the most prestigious art fairs on the French Riviera. I was invited by Mona Youssef Art Gallery and was a part of a great team, with great and beautiful artists. It was so great to be a part of a team, because you can help each other in many different ways. Not only the practical stuff, that is at an event of these dimensions, but also sharing knowledge and experience.

Artists doing different kind of arts, with different perspectives and aspects, still have common ground. Digital artists, share the media and printing, even if some paint digitally, and others, like myself, are photographers. And landscape painters, share compositions and thoughts of how make a landscape image. It really was a very great experience, from which I learned a lot and gained a lot of great new friends, I surely hope I will meet again.

I presented two artworks from my Realism Digital Art collection. The first was the “The Old Houses in New Port” (above) and then the “Tower Bridge and London Bus” (below). And they were received extremely well – better than I had hoped for.

Jacob Surland at Art Monaco

And it was a wonderful experience to see the amazement in peoples eyes, as they were scrutinizing the details of the photos, to make sure, it wasn’t paintings. Both are signed and numbered artworks.

This is an HDR photo of London Tower Bridge combined with a long exposure of a  exposure of a double decker London bus passing by. Photo by Jacob Surland. See more at www.caughtinpixels.com

Statue in Bruge


Warning: Undefined array key "multiauthor" in /var/www/caughtinpixels.com/public_html/wp-content/plugins/post-layout/plugin.php on line 114

Warning: Undefined array key "mobile" in /var/www/caughtinpixels.com/public_html/wp-content/plugins/post-layout/plugin.php on line 352

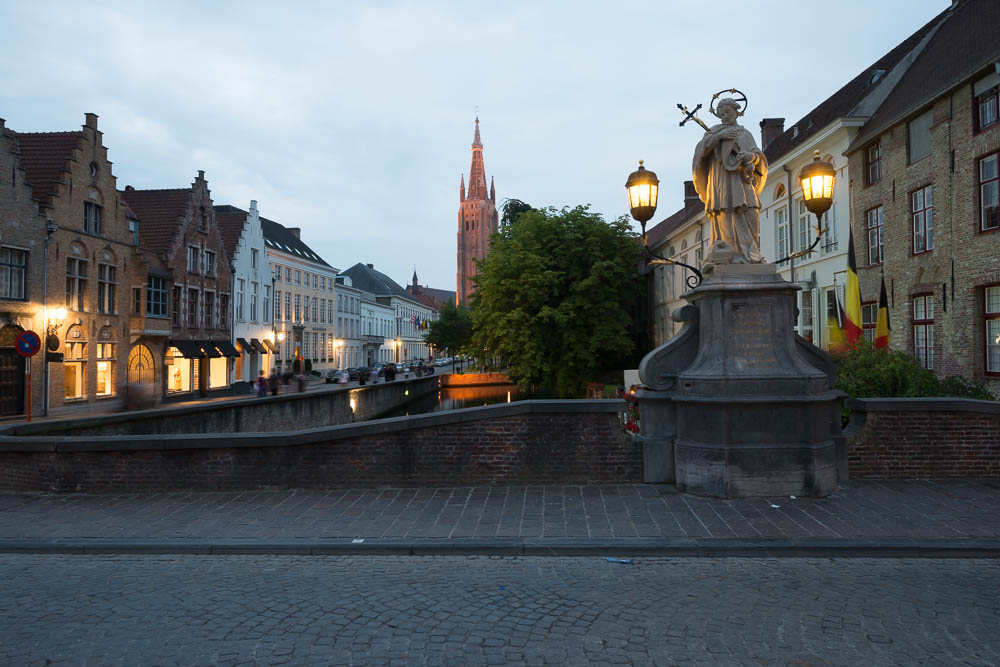
A Venice of the North, they call Bruge in Belgium, and not without reason. They have many canals and old houses. The Medieval center of the city is a truly wonderful place. This photo is from one the bridges crossing one of the canals. Photo by Jacob Surland, www.caughtinpixels.comThe town of Bruges in Belgium is a Venice of the North, and the Capital of Chocolate. This place is a place you definitely want to visit, if you ever get the chance! In the background you see the tower of the Church of our Lady. It is the second highest brick construction in the world and it rises a 122.3 meters from the ground. It is only second to Sct. Martins Church in Landshut, Germany.

Timing is crucial to achieve results like this photo above. Just when the city lights have been turned on, which they did 5 minutes before this photo was shot, you get the most wonderful mixture of natural light and electrical light. And you can achieve these very warm and inviting photos.

This photo belongs to my my Realism Digital Art series and I use both a single and a double tone mapped image, and I blend it with the seven original photos. I use Photomatix Pro to achieve this (you might want to read my free HDR tutorial).

This is a process that I love to do, painting all of these layers together into a final photo. You can really add mood and enhance lights and details to the extend you like.

This is the before photo:

2013-07-23-Sommerferie D600 2013-110


How does lens diffraction come in to the picture?


Warning: Undefined array key "multiauthor" in /var/www/caughtinpixels.com/public_html/wp-content/plugins/post-layout/plugin.php on line 114

Warning: Undefined array key "mobile" in /var/www/caughtinpixels.com/public_html/wp-content/plugins/post-layout/plugin.php on line 352

On The Sunny Side in Nyhavn is one among many restaurants and cafes in Nyhavn, Copenhagen, Denmark. Even on a winter's day, you find Nyhavn beautiful and full of warm light. Photo by: Jacob Surland, www.caughtinpixels.com

In my last post “How to get sharp Landscapes and what is the hyper focal point?” I received a question on lens diffraction. A term I wasn’t overly familiar with and had to research, but I have tried to gather an answer.

The question addresses the sharpness at f/22. Apparently some one has said, that you can get only 4 megapixels at f/22. My first reaction to this, was that, that couldn’t be true, and I decided to figure this out.

Let’s have an example, luckily I had one perfect test on the shelf. A photo from Lake Matheson in New Zealand. I took the exact same scene at f/8 and at f/22.

Let’s compare:

Lens Diffraction

Click to enlarge

It is clear that something has happened from f/8.0 to f/22. The photo on the right is much less sharp. And this is the lens diffraction that comes into play, but is this something that can be saved?

In Lightroom I tried to increase the Clarity and the Sharpness, and I was actually able to bring back the sharpness into the f/22 version of the photo.

Lens Diffraction with sharpen

Click to enlarge.

As you can see in the last example, sharpness is about the same and absolutely usable.

I took this photo using a Nikon D800 with 36 mega pixels. So the postulate that, at f/22 you only get 4 mega pixels isn’t true. The postulate is probably given within a specific context, that I do not know of. However, some details are lost and there may be cases, where it is not possible to get the sharpness, that you really want.

Why is the lens less sharp at f/22?

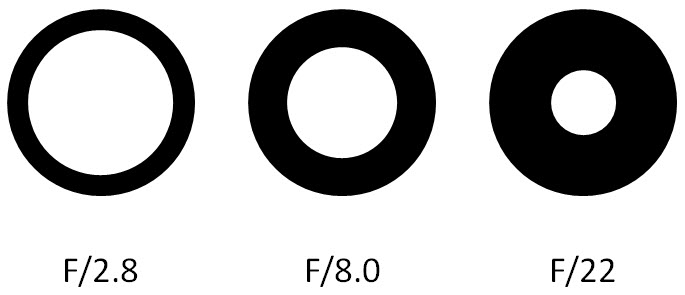
That is because of the lens diffraction, but what is lens Diffraction? When the light passes through the lens, the light is registered on the sensor. The smaller f-stop, the smaller a hole the light passes through. You can say that less light particles comes through the whole.

Lens Diffraction f-stops

The smaller the hole, the more diffraction of the light happens, and the more difficult it becomes to register the precise information. And when the lens is stopped down, it will reach a level, where the sensor can’t register more detailed information, simply because of the laws of physics. This makes sense to me.

On a 36 megapixel full size sensor, the physics dictate, that diffraction will be noticeable at f/22. This we can do nothing about. But if the lens is good enough, the problem is not worse, than it in many cases can be saved using sharpening software.

But there is another aspect in the other end of the f-stops. When the lens is wide open, it lets in a lot of light from a wider angle, and this allows the light to spread out. A photo shot at f/1.4 will be less sharp too, but for completely different reasons. And that is why a lens has an optimal sharpness in the mid range, like f/7.1 to f/16 or may be even more narrow, like f/8 to f/11. The exact numbers you will have to test for your self, using the lenses that you have.

About the photo above

It’s another one from Nyhavn (New Harbor), one of my favorite places in Copenhagen. I really love this restaurant “On the Sunny Side”. I have taken many photos of it, this is the first published one, though. And it comes in my collection of Realism Digital Art.

How to get sharp Landscapes and what is the hyper focal point?


Warning: Undefined array key "multiauthor" in /var/www/caughtinpixels.com/public_html/wp-content/plugins/post-layout/plugin.php on line 114

Warning: Undefined array key "mobile" in /var/www/caughtinpixels.com/public_html/wp-content/plugins/post-layout/plugin.php on line 352

The crop was almost ready for harvesting. I was at the same location, Salvad Park, a few months earlier, but then everything was green. It didn't make any sense to take photos of it, because all would be green. In the distance you can see Roskilde Fiord. Photo by: Jacob Surland, www.caughtinpixels.com

Do you know the feeling? You think you nailed the composition, and the light was just perfect, and the clouds were gorgeous. You’re convinced you have just got a great shot. You hurry home to unload the memory card, but when you see the photo on the computer screen, your excitement drops to a point way below zero. The foreground is unfocused and there is no way, that you can save it.

I still get into that situation from time, in fact it happened to me yesterday. And it really was sloppiness, that was the cause. I didn’t pay enough attention to the little voice in my head, saying “The f-stop is probably not right”. I should have listened to it!

Afterwards I sat down and analyzed what I did wrong, and how to avoid it in a later scenario and I have written an article on the topic. Read about how to get tack sharp photos using the hyperfocal point in this new article.

Finding you own style – Realism Digital Art


Warning: Undefined array key "multiauthor" in /var/www/caughtinpixels.com/public_html/wp-content/plugins/post-layout/plugin.php on line 114

Warning: Undefined array key "mobile" in /var/www/caughtinpixels.com/public_html/wp-content/plugins/post-layout/plugin.php on line 352

The Liberty in London is a fascinating beautiful shopping mall. It's not as famous as Harrods, but from the outside, it's much more charming, if you ask me. Photo by: Jacob Surland, www.caughtinpixels.com

Finding your own style is something that takes a little time. Most of my photos are HDR photos, but making HDR photos is like making an oil painting. It is only a technique. Even what is considered an HDR is only vaguely defined.

Some think it is a must, to have shot more than one shot, to cover the Dynamic range, while others don’t and I belong the to the latter group. I believe that what people recognizes as HDR photos, are tone mapped photos. The tone mapping gives the “HDR effect”. But still, tone mapping can give any range of photos.

A large portion of my photos belongs to a special art style, which I call Realism Digital Art inspired by the traditional Realism Art. It would not be precise enough, just to say that I do HDR photos. It would be like saying that I do oil paintings.

It has taken some time to realize what my style is. I love doing a lot of different styles of photography, but the Realism Digital Art, is what I keep going back to.

Realism Digital Art definition

Realism Digital Art is an art form, based in photography, but with images looking almost like very detailed Realism paintings. The amount of details photography offers, invite the viewer’s eye to wander around, and discover small details and get astonished about the fine details. Even though the work was developed from a photograph yet, captivates the viewers and make them wonder, because it has elements of a painting.

In Realism Digital Art the light and colors play an important role and often they shape the image. Colors and light are essential parts in the composition of the image.

In contrast to photo journalism and naturalism, Realism Digital Art is not trying to portrait reality, but instead strives to present the scene in the most beautiful way, given the circumstances under which the photo was taken.

If removing objects, like lamp posts, signs, rubbish etc. improves the beauty of the image, that is acceptable, even encouraged. Introducing elements, like stars or a sky from another photo, is acceptable too, however not encouraged. In general, Realism Digital Art is not striving to composite photos, but if an element from another photo can fill an empty space in the image, that is acceptable.

Realism Digital Art a photographic way to strive to get to similar results, as the Realism Art does.

The photo above of the Liberty in London, is a fine example fitting this definition, but it is also an HDR. It seams that very often, HDR is a good platform or technique for making Realism Digital Art.


Is it a sin to crop a photo?


Warning: Undefined array key "multiauthor" in /var/www/caughtinpixels.com/public_html/wp-content/plugins/post-layout/plugin.php on line 114

Warning: Undefined array key "mobile" in /var/www/caughtinpixels.com/public_html/wp-content/plugins/post-layout/plugin.php on line 352

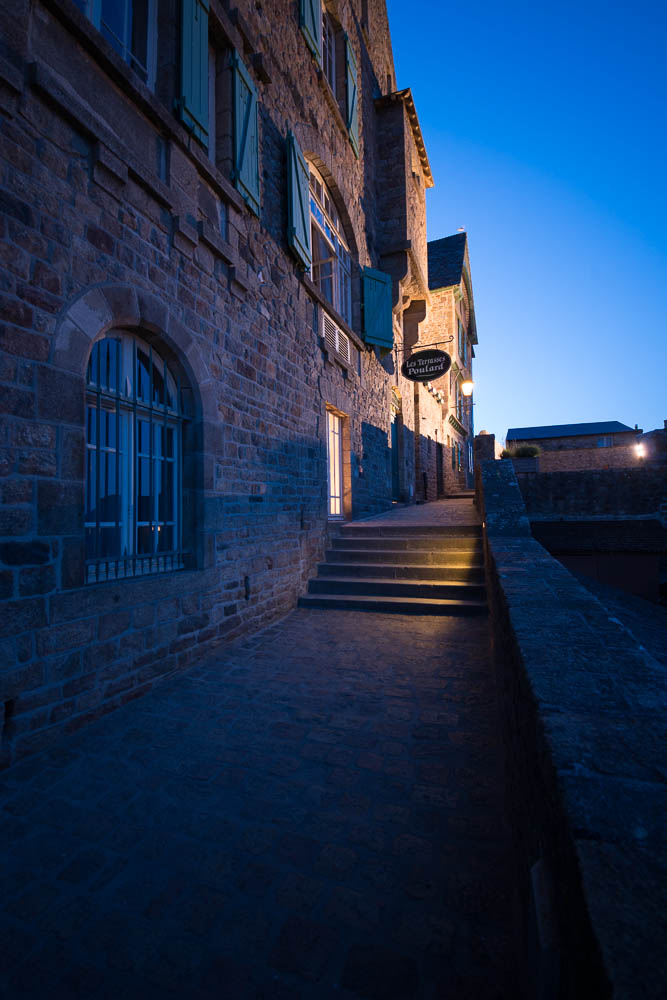
On a summer night in Mont Saint Michel you can find the quiet peaceful harmony. In the daytime tourists buzz around the medieval town. Photo by: Jacob Surland, www.caughtinpixels.com
Nikon D800, Sigma 12-24mm, 17mm, ISO 400, f/5.6, 0,5 sec (0-exposure)

This photo is from the famous Mont Saint Michel in France. It has a long, and in periods very violent history. According to legend, the Arch Angel Michael appeared to the bishop of the nearby town of Avranches. He was named St Aubert. The Arch Angel instructed the St. Aubert to build an oratory on the rock, just off the shores of Normandy. However, the bishop did not act on the instructions, and the Arch Angel got angry and burned a hole in the bishop’s skull.

The skull is on display in Saint-Gervais Basilica in Avranches. It is generally considered more likely, that the hole in the skull stems from trephination, an old medical treatment, that required drilling a hole in the skull, to treat certain diseases in the head. Whether it actually is St. Auberts skull is also unknown.

But St Aubert got the message, and had built an oratory in 709.

Is it a sin to crop a photo?

Many photographers consider it a bad practice to crop a photo. You should get it right in the camera! They say. But is that really the truth? And what’s the big deal?

Todaythe entry level DSLRs are up to 24 Megapixels. And I don’t think that you can even buy a new digital camera with much less than 12-16 megapixels.

I have an A1 poster in my living room, printed from a 10 megapixel camera. A1 is 23.39 × 33.11 inches. That’s a pretty big poster. If I go really close, I just MIGHT be able to tell the pixels. On a 3 feet distance, no way, that I can tell the pixels, even if I really tried.

For anything, that I am ever going to print, I think that 10 megapixels would probably be sufficient.

These days I carry cameras of 24 megapixels and 36 megapixels (Nikon D600 and D800). I could print photos from these cameras in enormous sizes, and even if you got up really close, you wouldn’t be able to tell the pixels. But do I really need this? There is a ‘masters of the universe’ power in having a 36 megapixel photo, but I don’t really get to use all these wonderful pixels, or do I?

I love to shoot with my wide-angle lenses. My darling, is my Nikkor 14-24mm, but often I do find 24mm to be just a little bit too wide. I do have a 16-35mm; I could attach that on my Nikon D600 and then switch camera, whenever I wanted just a little bit more than 24mm. But let’s do a little calculation.

I got more megapixels (36 all together) on my Nikon D800, while I “only” got 24 megapixels on my Nikon D600. If I crop a 24mm on a 36 megapixel camera, to 24 megapixels, then 24mm translates into 36 mm. In other words, I effectively can convert my 24 mm to a longer lens, by cropping.

If I could live with 10 megapixel, I would effectively convert my 24mm into a 86mm. That is quite a change!

On the other hand, I can’t convert into anything wider. What’s outside the border of 14mm I can’t capture. I often end up at 14mm, and I wouldn’t miss it for anything and I do not want to switch lenses all the time. In other words, I have to crop on the long end, if I can’t get exactly the length that I need.

I respect people who believe, that the photo should be right in the camera, but personally, I believe that as long, as you can get anything larger than 10 megapixels, you really are home safe. And if it is an improvement to the photo, do it!

Only if you in advance know, for a fact, that you want to print larger than A1, you need to be aware of the megapixels.

Can you use cropping constructively?

Another approach is to go just a little wider, than what you think is enough. I do this a lot, and I did it when I shot this photo. The thing is, if you go too tight and miss something, when you shoot, there is no way that you can ever get the rest. You would have to go back and reshoot.

If you, on the other hand, went just a little wider than you think is good enough, you can always crop it when you get back home.

This is the original of the photo:

Mont Saint Michel empty street - Original

As you can see, this is a wider cut of the image. The stairs are pretty much in the center of the photo. This is not too good, but I can change the composition by cropping, and push the stairs off-center. This way the stairs will be in one of the golden intersections (using the rule the Golden Ratio).

Mont Saint Michel empty street - crop


But that is not the only thing, that I can fix. I can make three of the leading lines start in the corners; this is a strong improvement on the composition too.

This I could probably have seen at location, but I worked really fast, and I really wanted many different shots from Mont Saint Michel, during the blue hour. By going just a little wider, I could postpone the decision to later, when I had more time and had time to shoot more photos.

In this case I still got a 24 megapixel photo out of the situation. That’s not bad! The Canon 5D Mark III is only 22 megapixels.