How to make a classic WWI plane enter a war scene


Warning: Undefined array key "multiauthor" in /var/www/caughtinpixels.com/public_html/wp-content/plugins/post-layout/plugin.php on line 114

Warning: Undefined array key "mobile" in /var/www/caughtinpixels.com/public_html/wp-content/plugins/post-layout/plugin.php on line 352

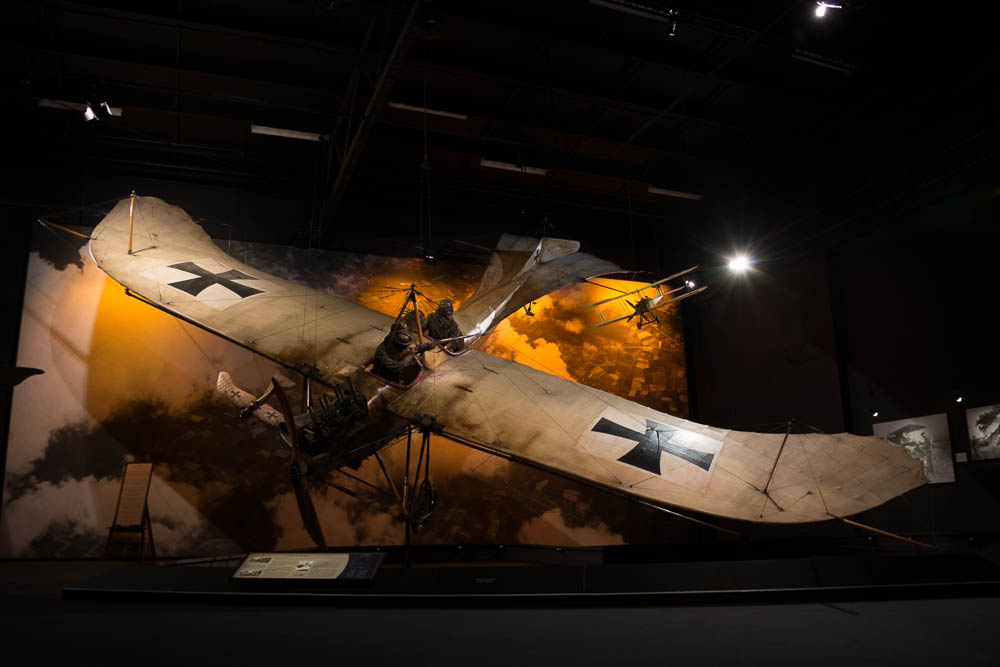
Sir Peter Jackson (Director of Lord of the RIngs) has his private collectoin of World War 1 aeroplanes stored at the Omaka Aviation Heritage Centre Blenheim. This is one of the first aeroplanes used in war, but you can also find the red baron among a lot of other great planes. What really is impressive, is the way each scene is built up. It's really amazingly detailed and very natural looking. If in the neighbourhood of Blenheim in New Zealand, don't miss out on the Aviation Centre. Photo by: Jacob Surland, www.caughtinpixels.com

This beautiful aeroplane  ‘Etrich Taube’ is one of the few left in the world. It’s the German’s first mass produced war plane and it dates back to before the Great Word (World War I). I saw this in Blenheim on the South Island of New Zealand.

Sir Peter Jackson (Director of Lord of the RIngs) has his private collectoin of World War I aero planes stored at the Omaka Aviation Heritage Centre Blenheim. This is one of the first aeroplanes used in war, but you can also find the red baron among a lot of other great planes. What really is impressive, is the way each scene is built up. It’s really amazingly detailed and very natural looking. If in the neighbourhood of Blenheim in New Zealand, don’t miss out on the Aviation Centre.

About the making of this photo

This photo is an 5 shot HDR. The plane hangs inside a hangar, and while some of the background is cool, the rest is looking like a hangar. As always, when making my photos, I run into trouble with something and have to find a solution to it. Let’s look at the original:

Before photo of Etrich Taube

As you can see, the scenery is quite nice, with two extra planes, and a war scene behind, however, the background isn’t large enough to cover the entire hangar.

I used a few tricks to make the plane look like in a real war scene. The first thing I did was to tone map my HDR photos, to get the look and feel of the aeroplane. This photo I then put into Photoshop and did a motion blur, in the direction of the plane seems to fly. And this I merged in all around the plane.

Etrich Taube explained


Having added the motion blur, around the plane, certainly helped removing most of the hangar, but the structure is still visible.

Etrich Taube explained blurred

The trick now is to make the rest of the hangar go away. And to do this, I start clone stamping some of the ground, at perhaps 25% opacity. The goal is to get all square lines out of the image or at least not noticeable. This proved difficult with only the ground available for clone stamping.

The original background contained some clouds and I decided to try to to a cloud texture on the photo, and then mix that in, in exactly the same way as I did with the blur. And now I had the material to start removing the hangar.

The important steps, was to remove what gave away, the fact, that the plane hangs inside a building.


How to plan photo trips?


Warning: Undefined array key "multiauthor" in /var/www/caughtinpixels.com/public_html/wp-content/plugins/post-layout/plugin.php on line 114

Warning: Undefined array key "mobile" in /var/www/caughtinpixels.com/public_html/wp-content/plugins/post-layout/plugin.php on line 352

Churches in Denmark are usually small white churches, but once in while you come by a red one. This one is in Gershoej on Zealand. Photo by: Jacob Surland, www.caughtinpixels.com

One of things I really find myself spending a lot of time doing, is planning where to take photos. Location, location, location. This particular HDR photo I shot some 30 km from my home. And even though I had planned, what I wanted, I ended up with something completely different.

The crop had just been harvested, and hay lay in the fields, either as huge rolls or as long piles of hay. I wanted to shoot some photos of that and I got up real early. Way before sunrise. But I realized, when I stood in the field, that hay really doesn’t do well before sunrise, and the fields I had picked, really wasn’t that interesting for photography. They were Just too flat I think.

I started driving north, more or less along Roskilde fiord, hoping for some better fields. I stopped a few times and tried a few shots, but not really happy with what I got.

And then when I got to Gershøj, I remembered a little harbor and an old Inn. I drove down there a couple of really drunk guys hung around, but they seemed peaceful enough. The harbor and inn was not as picturesque as I remembered them. I did shoot a little, but not really happy, and the sunrise was almost there. I made a quick decision, not to hang around and wait for the sunrise, ran to the car made it for one last chance to get something I liked.

And lucky I was. I had got up on the road, turned right, and then I saw this gorgeous little red church, and the sun just rising above the horizon. I threw in the car and got out.

I drove home happy! Had I not been stubborn, I would not have got anything that morning.

Lessons learned: Even though you have something particular in your mind, it’s not necessarily that you will bring home. And keep your eyes open! You might just, come across something quite wonderful!

Which is best? Canon vs Nikon? Or Sony?


Warning: Undefined array key "multiauthor" in /var/www/caughtinpixels.com/public_html/wp-content/plugins/post-layout/plugin.php on line 114

Warning: Undefined array key "mobile" in /var/www/caughtinpixels.com/public_html/wp-content/plugins/post-layout/plugin.php on line 352

On a winters eve I took out both my Nikon and my Canon cameras and took a lot of pictures with both cameras. Both I got fantastic photos from, but they were still quite different. Basically because the cameras chose different white ballances. The Canon tend to be more warm and purple-ish in this particular scenery. It was the last real photo shoot I did with both cameras and on basis of that, I started out on a camera camparison review you can read here: http://goo.gl/eEJt0N. Photo by Jacob Surland, www.caughtinpixels.comNikon D800, Nikkor 14-24mm, HDR of 5 shots.

Updated 2015-07-13: Since I initially wrote this post, I have bought the Sony A7R and later I have bought the Sony A6000 as well. I have adjusted text slightly.

Which brand to choose? It’s one of the difficult questions. Is Canon better than Nikon? And how about Sony? How good are they? Before I got into photography for real, my impression was, that Canon and Nikon were about the same. Sony was somewhat behind and the rest of the brands even further away from the market leaders.

But having owned all three brands Canon, Nikon and latest Sony, I must admit that there are some quite big differences, both in performance and usage. I have written a very well-received review, based on my long time using both Canon 5D Mark III and Nikon D800 and D600 all together intensively. Having owned both brands for a longer period, does give you a different platform, to write a review from, than if you borrowed a camera for a few days.

You can read the entire review here.

How about Sony? The Sony A7R has got the same sensor as the Nikon D800 and they perform almost equally as well.

After a long time considering it, I first bought the Sony A7R and more recently I also bought the Sony A6000. But, did I do the right thing? I still have my Nikon cameras and I still use them – a lot! The huge advantage is that despite the smaller size the Sony A7R delivers the same image quality as the Nikon D800. I can carry a standard 28-70 lens as well as a 10-18mm lens, and it weighs the same as the body of the D800.

The huge disadvantage of the Sony is, a rather small lens lineup for the Sony, but it is improving. New lenses are coming in a slow but steady stream, and some are good, and some are very good. However, it is not too much of a problem, with the weak lens lineup, because Sony has done a clever job with the Sony E-mount/FE-mount. You can buy adapters to virtually any camera brand. In other words, I can use my Nikon lenses on the Sony A7R. I lose my auto-focus and EXIF information, it’s annoying but not a big problem. The manual focus, using focus peaking, on the Sony A7R works extremely well. I have bought the Metabones adapter. There are cheaper options and one more expensive Novoflex.

In my opinion, Sony is in the lead when it comes to innovative, high-end cameras. The Nikon D800/D810 and Sony A7r sensors are the most awesome sensors made so far, for landscape photography. The Dynamic range is still unrivaled, and the amount of mega pixels is incredible. But Sony has managed to pack it into a very small body, without comprising quality. Nikon and Canon could learn a lot from this. If they don’t pull themselves together in this area, they will lose big time to Sony in the long run.

A lot of other cameras like the Fujifilm X100 or X100s are incredible too, but 12 or 16 megapixels, just doesn’t cut it for me. I would like to have the higher megapixels, to have the option to print really really big or to crop a photo.

My observations on the three brands are:

Nikon

  • Highest Dynamic Range available currently. Even entry level cameras have higher Dynamic Range than Canon 5D Mark III.
  • In entry level cameras, the low light performance is decent.
  • Very engineer like. It’s difficult to find your way in the menus.
  • The 3×00 series does not have Auto Exposure Bracketing (making it more difficult to make HDR’s)
  • Good lenses
  • Has got the best wide angle zoom lens available across all brands, the Nikon 14-24mm.

Canon

  • Has got the worst dynamic range through out the entire range of cameras.
  • Has got the worst low light performance, on entry level, but high end is up to speed.
  • More user friendly than Nikon.
  • Auto Exposure Bracketing is available on all models I have heard of.
  • Good lenses

Sony E-mount cameras

  • Mirror less and much smaller and lighter classic DSLRs
  • Exists from entry level to semi-pro
  • Entry level cameras have got the best low light performance
  • Using an adapter, virtually any lens can be used on the E-mount.
  • Has got similar performance in the Dynamic Range as the Nikons
  • Lacks the option to have Auto Exposure Bracketing on timer. It may seem like a small thing, but if you shoot HDR photos, it is pretty annoying.
  • The lens line up is not very impressive. Especially if you are looking into the full frame lenses, but this is compensated by the ability to use adapters for other brands. I use my Nikon lenses on the Sony Alpha 7R.

What is the real difference between high-end cameras, mid-range and low-end DSLR cameras?

What you pay the big bucks for is low light performance, low-end cameras simply have got worse low light performance. I have had entry level DSLRs, experience with mid-range DLSR cameras and owned several high-end DSLR cameras. They all take great photos if used right. Even the cheapest entry-level DSLR with a decent lens, can do awesome photos. This is a shot with my old Canon 400D using the kit lens:

The Beauty of Noravank

The ability to take (hand held) shot’s indoor in poor lighting conditions, that is what you pay for, when you buy a more expensive camera. Then you also pay for a number of features, which are nice to have, but not strictly necessary for everybody.

This photo is shot at ISO 12800 using the Nikon D800:
High Iso image

My old Canon 400D could go to ISO 1600, and the quality was much too poor to use for anything. I could never have taken the shot above, using that camera. And the same goes for any entry-level or mid-range DSLR or mirror less camera. This IS what you pay for, when you buy the high-end professional or semi professional cameras.

The technology is working for us and the sensors are getting better and better at low light photography. But in a situation like this, I couldn’t have gone higher than ISO 12800 to get this image. I used the Nikon 24-70 at f/2.8 (as open/fast as it goes) at 1/100 sec shutter speed.

A faster lens, of course could have helped a bit. But the essence is, that you pay to get a camera that can do this. The really expensive pro cameras like the Nikon D3s, or the Nikon DF and probably also the new D4s are extreme in this discipline. That’s because the sports and press photographers, they need to be able to take a photo in any condition.

As you climb the ladder and buy more expensive cameras, you get more features. Auto Exposure bracketing is not available on the Nikon D3x00 series, but available in the Nikon D5x00 series. Canon 7D offers an 8 shots pr second.

Features also gets easier access; instead of rumbling around in menus you get buttons. You also get faster cameras (more shots pr second). And in some cases more megapixels. Some are better at videos than others and some better at low light photography than others.

The real jump comes, when you move from cropped sensors to full frame sensors (I have an article on full frame and cropped sensors here, if you don’t know what the difference is).

A larger sensor is much better at capturing light. It is quite obvious that the larger each little sensor cell is, the better it is. And a larger sensor (given same pixel count), obvious has larger cells to capture the light.

So unless you jump to the full frame cameras, my opinion is, that you don’t get a low light camera, not yet at least. A lot of research happens in this area, and the technology is improving, with each generation of the cameras.

The D800 is just … JUST good enough. The 5D Mark III is better and apparently the new Nikon DF is even better again. But they are all within the same ballpark. And the cropped sensors are playing in a different ballpark.

So if your budget isn’t cut for a full frame camera, get a cropped sensor DSLR and invest what you can in a decent lens. The lens is more important.

 

Preparation for Art Monaco 2014


Warning: Undefined array key "multiauthor" in /var/www/caughtinpixels.com/public_html/wp-content/plugins/post-layout/plugin.php on line 114

Warning: Undefined array key "mobile" in /var/www/caughtinpixels.com/public_html/wp-content/plugins/post-layout/plugin.php on line 352

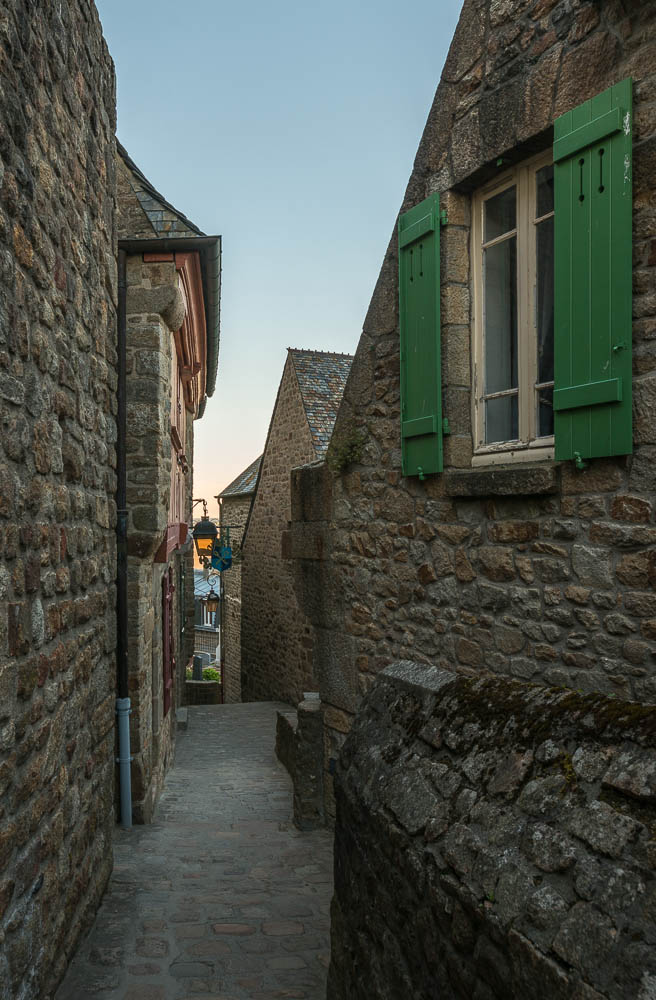
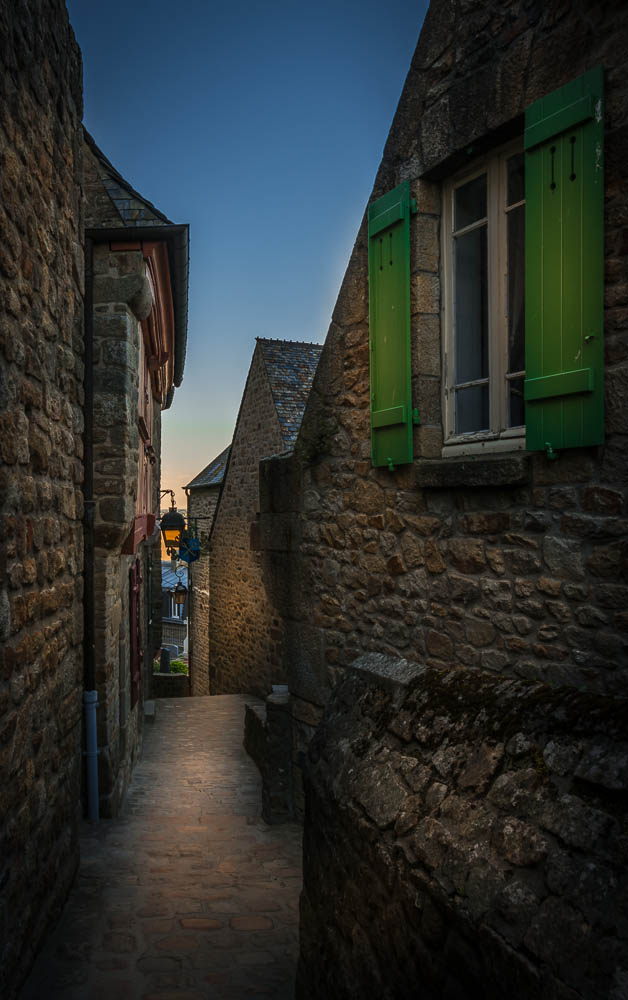
Saint Mont Michel in France is one of the biggest tourist attractions in France with more than 1.2 million visitors a year. Disneyland Paris has got 14,5 million. And Disneyland is probably 5-10 times larger than Mont Saint Michel. That kind of put's it into perspective how many people come to visit Mont Saint Michel. However, if you venture of the mainstreet after you have had your traditional ommelet for dinner, you can find empty streets and alleys like this one. Photo by: Jacob Surland, www.caughtinpixels.com

I am going to Art Monaco 2014 to exhibit two of my photos. Art Monaco receives about 10.000 visitors from all over the world, in just 4 days. That’s an incredible lot of people in a very short time. This is going to be very exciting.

Art Monaca 2014

It is the International Fine Art Realist Painter  and gallerist Mona Youssef, who has invited me, and I am very proud and I am looking very much forward to work with her. Mona does realistic landscape paintings, while I do a lot photos that looks like paintings. Have a look at some of paintings, they are absolutely beautiful. You can find them on her web-site www.mona-gallery.com.

Booking my hotel in Monaco, proved to be more difficult, than first anticipated. The first couple I wanted to look at, had no vacancy at all, but I managed to find one, a bit further away, than I had hoped – but at least within walking distance! The prices in Monaco, really can really go over the top!

While I do like the prints I have made so far, I would like to go a notch higher in quality, if possible at all. I have been searching and searching, and asking people where to get the best quality. It really is the framing, I am only 98% satisfied with. In a couple of weeks I am going to a showroom, to see various print types.

About this photo

I shot this photo in Saint Mont Michel in France. Saint Mont Michel is one of the biggest tourist attractions in France with more than 1.2 million visitors a year. Disneyland Paris has got 14,5 million. And Disneyland is probably 5-10 times larger than Mont Saint Michel. That put’s it into perspective, how many people come to visit Mont Saint Michel.

However, if you venture of the main street after you have had your traditional omelet (in the old days travelers had an omelet, when they arrived to Mont Saint Michel) for dinner, you can find empty streets and alleys like this one.

The making of this photo

This photo is one the photos I have pushed furthest away from the original photo. This is the original:

France - Deserted Alley in Mont Saint MichelAs you can see, quite a different image. What I did, was to add a lot of artificial light sources. Things that are not present in the photo at all, and then I added some warmth to the photo as well. I also made it darker, to simulate night time.

France - Deserted Alley in Mont Saint Michel-2

But what really pushed the image home, towards the final look, is putting it through Photomatix Pro.  Photomatix does wonderful stuff to artificial light sources, this I have shown in detail in this post. It’s the same method I have applied here. The result has to be fixed, because it goes over the top, but that is the same you have to do with everything you put through Photomatix Pro – it is only 2/3 of the final photo.

If you too want to experiment with Photomatix, either for doing HDR photos or more painterly like photos, you can try it for free, but you can also buy it with a 15% discount, by using “caughtinpixels” coupon code. You find Photomatix Pro here.

Red Dress in Bruge


Warning: Undefined array key "multiauthor" in /var/www/caughtinpixels.com/public_html/wp-content/plugins/post-layout/plugin.php on line 114

Warning: Undefined array key "mobile" in /var/www/caughtinpixels.com/public_html/wp-content/plugins/post-layout/plugin.php on line 352

Bruge in Belgium is a beautiful medieval city, also called the Chocolate Capital. The inner city is full of old houses. On the square a young couple took a photo, at the same time as I did. Photo by: Jacob Surland, www.caughtinpixels.com

This is a 7 shot HDR from Bruge in Belgium. I shot it on a very very hot summer evening last year. There was little of a drizzle earlier, but the rain stopped. Many people were out and this couple kept hanging around. In the end I decided to include them in the photo, and the fact that the girl has a red dress adds to the photo I think.

They are placed very much to the side of the photo, which is unorthodox, but for some reason it still works. The rules of composition can be broken.

Other people also kept walking by. The advantage of 7 shots in HDR, is that often you can remove some people by mixing the photos in Photoshop, using layers. I ended up with three people on the right.

Split toning doing the magic … again


Warning: Undefined array key "multiauthor" in /var/www/caughtinpixels.com/public_html/wp-content/plugins/post-layout/plugin.php on line 114

Warning: Undefined array key "mobile" in /var/www/caughtinpixels.com/public_html/wp-content/plugins/post-layout/plugin.php on line 352

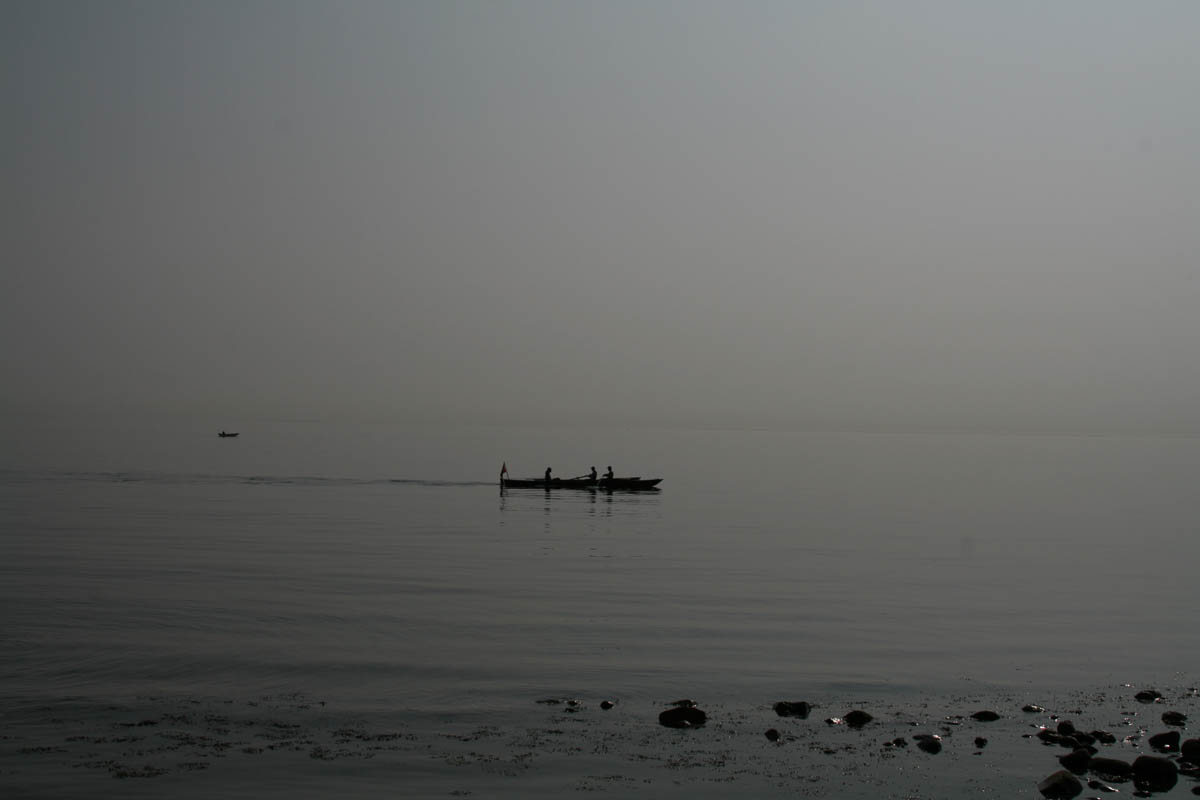
On an early spring day in the mist, I encountered a boat full of rowers, moving almost silently through the water. Only small splashes of water as the oars go in and out of the water. Photo by: Jacob Surland, www.caughtinpixels.com

Canon 400D, Sigma 30mm f/1.4, ISO 100, 30mm, f/10, 1/1600 sec

Once more I have been digging around in my old photos, and found this one from Røsnæs in Denmark. A rowning boat coming by in the mist, and a motorboat slightly further out. Once again it’s the split toning in Lightroom that does the magic.

From this original JPEG photo (still hadn’t switched to RAW):

Denmark - Rowing in the midst

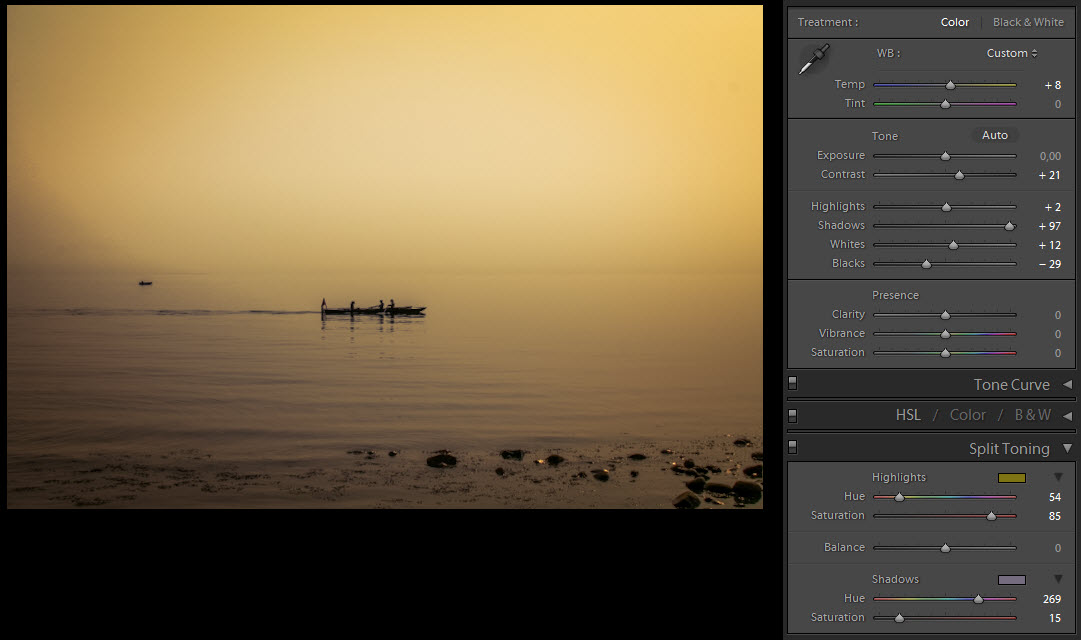
I could get to this result:

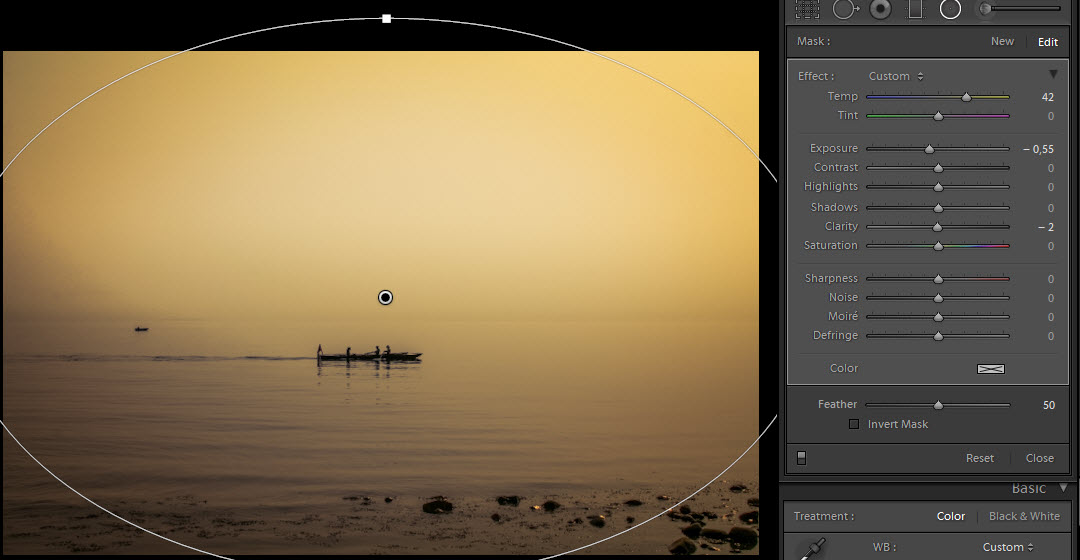
Denmark - Rowing in the mist settings

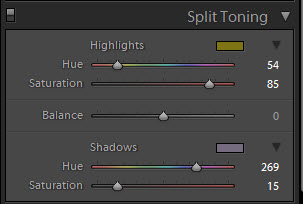
I added (using split toning) a lot of yellow to the highlights and then a little bit of purple to the shadows. I tuned the colors a little bit more, later in Photoshop. But this was my starting point and I could see, that I was on to something.

I also added a radial filter, to punch the yellow even more, in the center and I also brightened the center up, like the sun was out there. In fact the Sun was a little to the right of the scene, and not within the frame. But hey – who’s counting?

Denmark - Rowing in the mist radial


This is not the final photo, but it’s 80% of the photo. I took it into Photoshop and did some noise reduction and removed some JPEG artifacts (grainy spots).

Finally I cropped the stones out. I do like the stones, but I liked it better without the stones in the foreground. They are slightly too dominating and breaks the peace.


Run Forrest RUN! And I ran…


Warning: Undefined array key "multiauthor" in /var/www/caughtinpixels.com/public_html/wp-content/plugins/post-layout/plugin.php on line 114

Warning: Undefined array key "mobile" in /var/www/caughtinpixels.com/public_html/wp-content/plugins/post-layout/plugin.php on line 352

Near Ceillac you can walk up and see Lac Miroir. It's placed in a high valley and the view is just fantastic up there. This is a small stream and the mountain range relects in the still water. Photo by Jacob Surland, www.caughtinpixels.com

Nikon D800, Nikkor 16-35mm, ISO 50, 30mm, F/22, 1/5 sec

On Duncan McArthurs autumn workshop in the French alps, we went to the valley of Lac Miroir near Ceillac. It was quite a steep walk to get the the valley located approx 2500 meters above the sea level. The view up there was just amazing. We sat on a hill in the middle of the valley, with a view to Lac Miroir it self and had lunch. A mountain range surrounded us, all the way around.

On our way back, Duncan said we had to hurry up to get photos of the stream, while the sun was still up. And I started going real fast with my camera. Took one maybe two shots, then I moved in a fast pace down the stream. And when I was a bit further down than this photo was taken, Anne, a French Lady from the group, came running with her camera and tripod, to get a shot too, while the sun was out. We were committed to take photos! Thanks Anne for the nice post card, by the way!

This photo is an HDR – not the most obvious HDR I have made, nevertheless an HDR. The HDR process was the standard HDR process you find in my HDR tutorial.

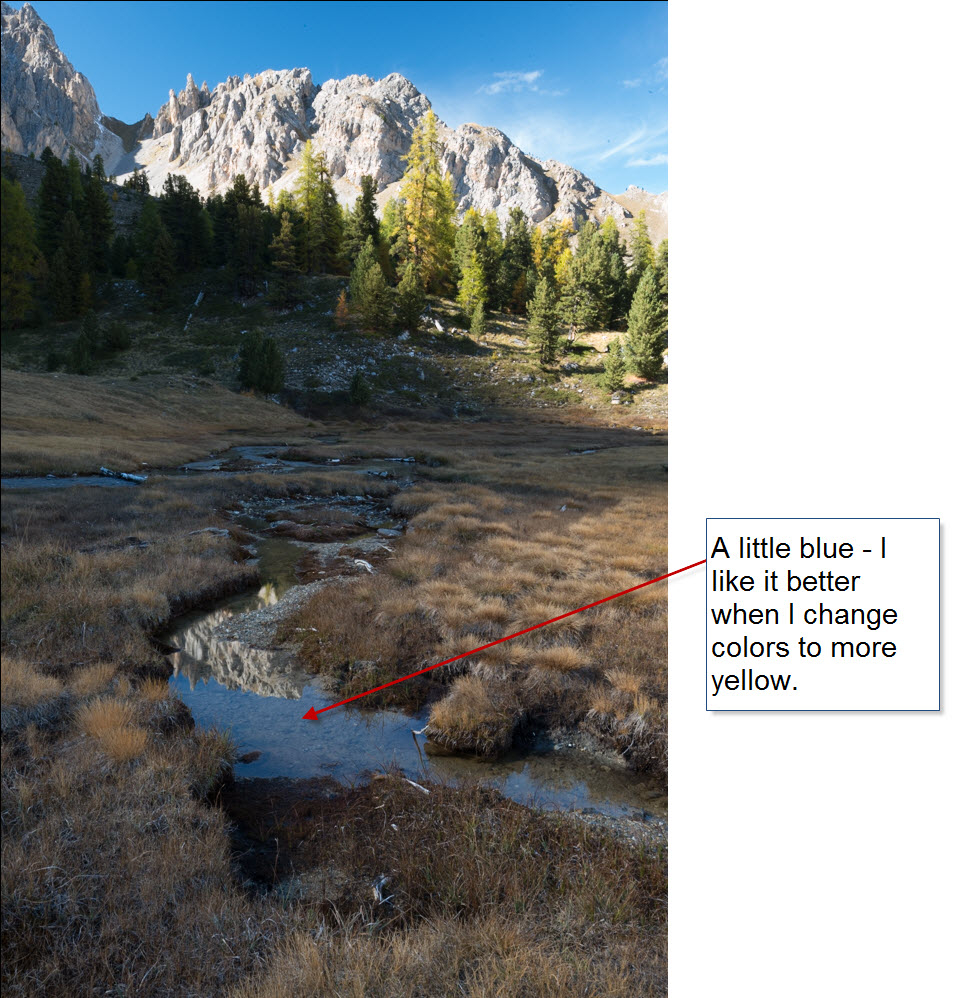
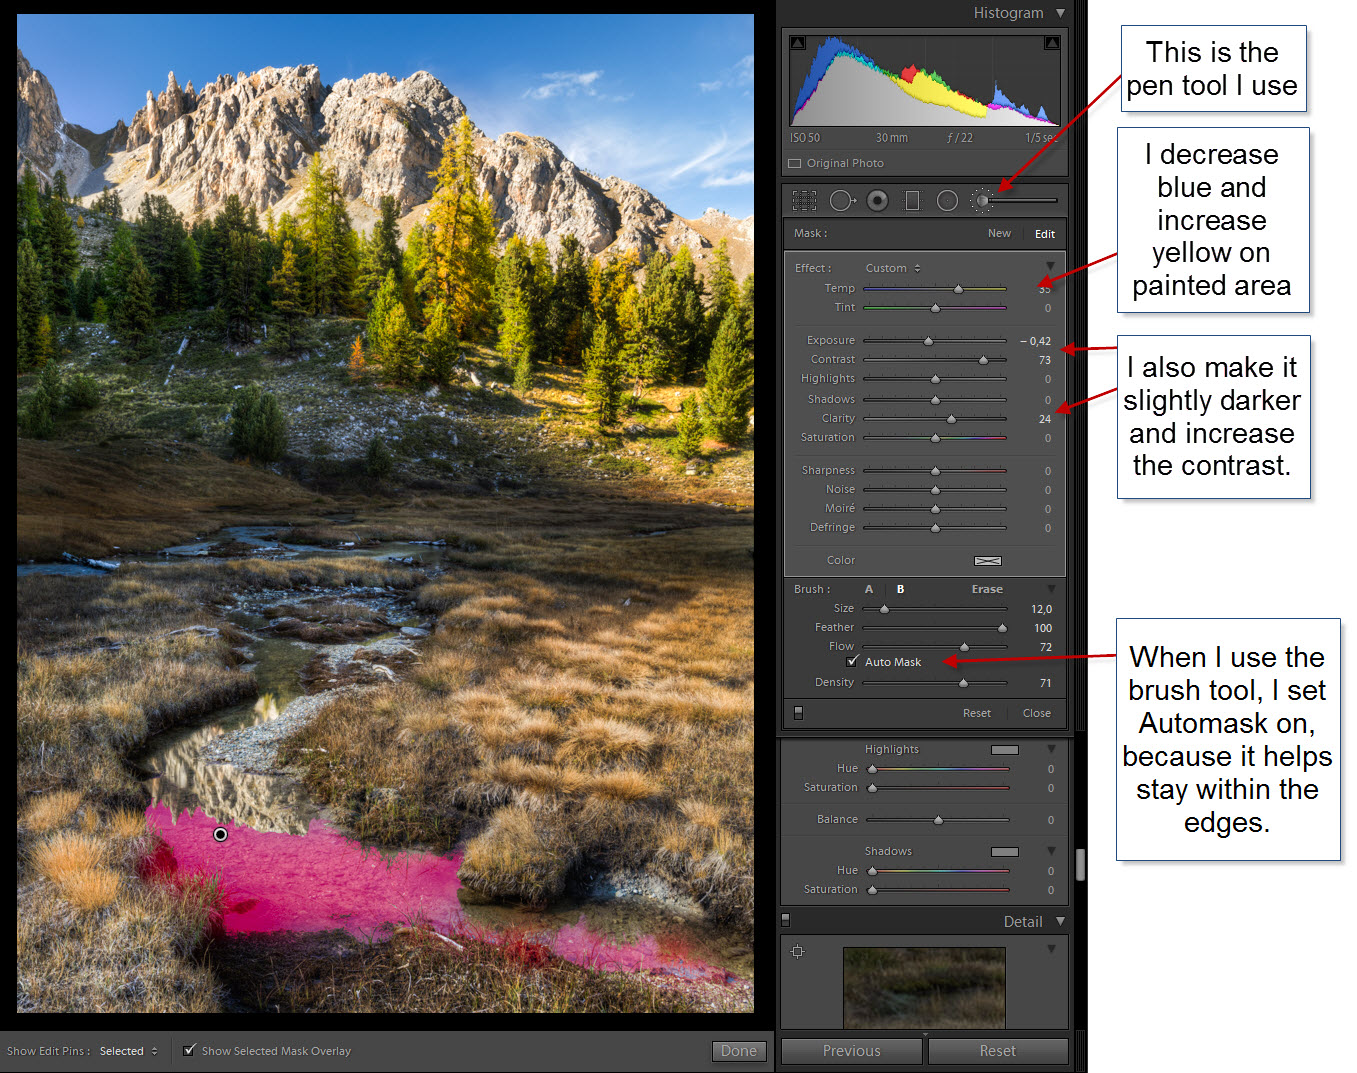
I had a patch of stream that had was a little too blue to my taste. I fixed that in Lightroom, using the pen tool. I then changed the temperature towards the warmer yellow. This removed the blue and added yellow instead.

Lac Mirror Original


And then I added some Contrast and added some Clarity, to make the water more transparent.
Lac Mirror Original changes


Zenith at Cutty Sark – The making of…


Warning: Undefined array key "multiauthor" in /var/www/caughtinpixels.com/public_html/wp-content/plugins/post-layout/plugin.php on line 114

Warning: Undefined array key "mobile" in /var/www/caughtinpixels.com/public_html/wp-content/plugins/post-layout/plugin.php on line 352

The old Sail Ship Cutty Sark, is placed in a dock in Greenwich Village, London. The old ship sailed with tea and was build in 1869. A few years a ago a fire destroyed some of it, but not more, than it could be repeared. I happened to pass the ship at 12 o'clock and the Sun stood just at the top of the masts. Photo by: Jacob Surland, www.caughtinpixels.com

The old Sail Ship Cutty Sark, is placed in a dock in Greenwich Village, London. The old ship sailed with tea and was build in 1869. A few years a ago a fire destroyed some of it, but not more, than it could be repeared. I happened to pass the ship at 12 o’clock and the Sun stood just at the top of the masts.

The making of this photo

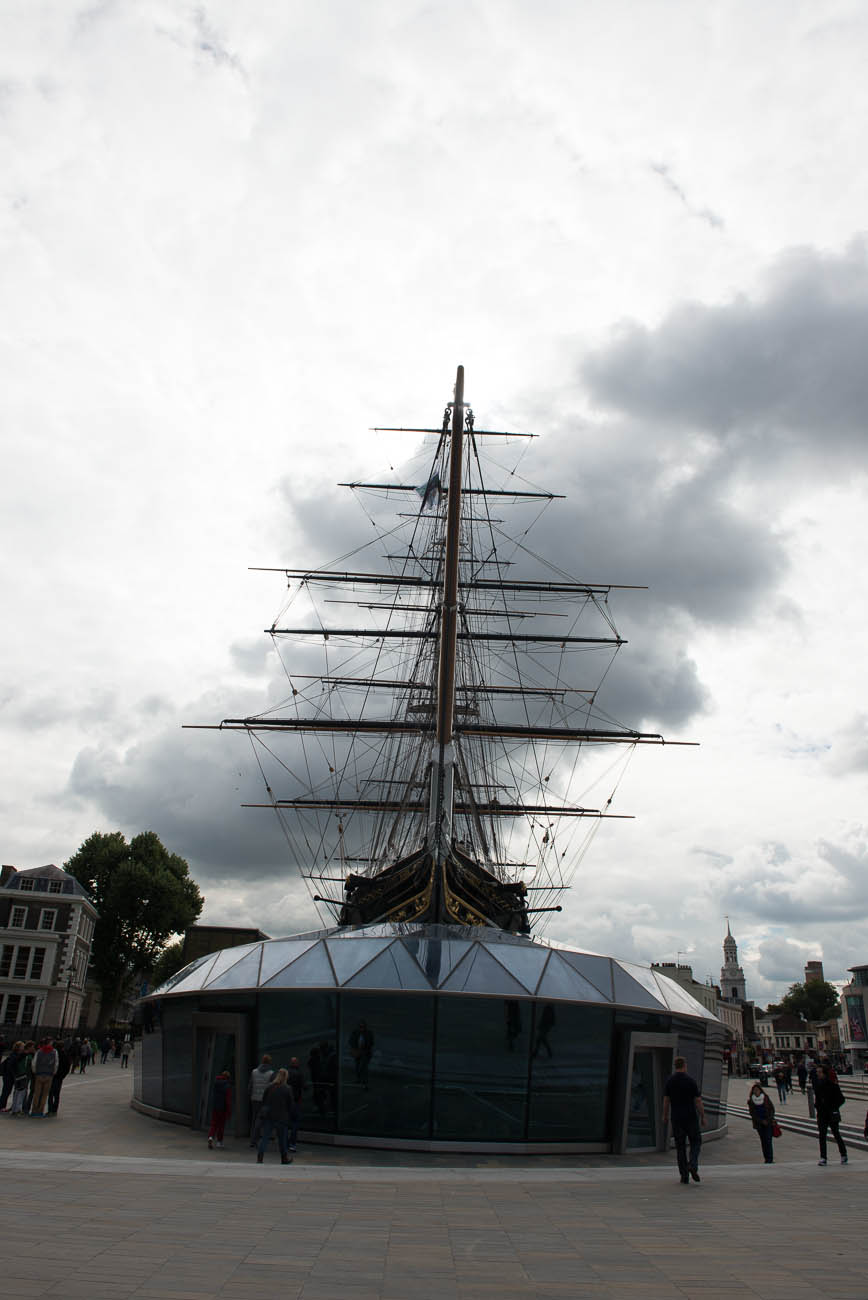
I shot 7 hand held shots (-4 to +2), at ISO 200. It is very bright, and the shutter speeds range from 1/8000 to 1/160. This is the 0-exposure:

Zenith Cutty Sark - beforeAs you no doubt can see, it is quite different, from my final photo. What I did was to make a split toned image in Adobe Lightroom. I have some presets that I have made, some of which uses split toning of the colors. This can sometimes be a great way, to punch some interesting coloring into a mid-day photo.

I often use my Lightroom presets, to get an idea, in particular with a shot like this. The problem with this shot, is that it’s taken in the middle of the day, and the light really isn’t great. I got a composition that I liked, with the sun right on top of the mast. Clearly Cutty Sark is placed North South, otherwise the symmetry wouldn’t have worked.

Anyway, one of my presets give this yellow coloring to the highlights and some purple to darker tones.

Zenith Cutty Sark Split ToningThis gives the overall look and feel of the photo. And this makes an otherwise a little bit boring daylight photo, more interesting. I then synchronized the processing to 3 of the other exposures photos:

Zenith Cutty Sark exposuresI did a little individual processing on the lower part of the photo. I wanted to mix these four photos in Photo, into a final photo.

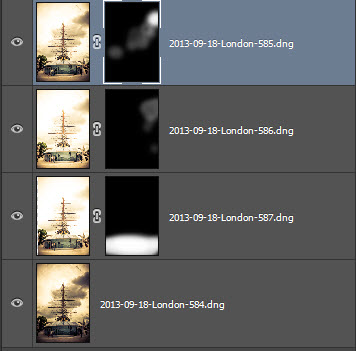
I then used the Lightroom feature to open the four photos as layers Photoshop:

Cutty Sark blue open in photoshop


And then I blended the layers to my liking.

Cutty Sark blue layers in photoshop

I used the four images to get the right mixture on the sky. The brighter one for the people on the ground. When I was happy with the result, I re-imported the 16-bit TIFF file into Lightroom and did the last things there.

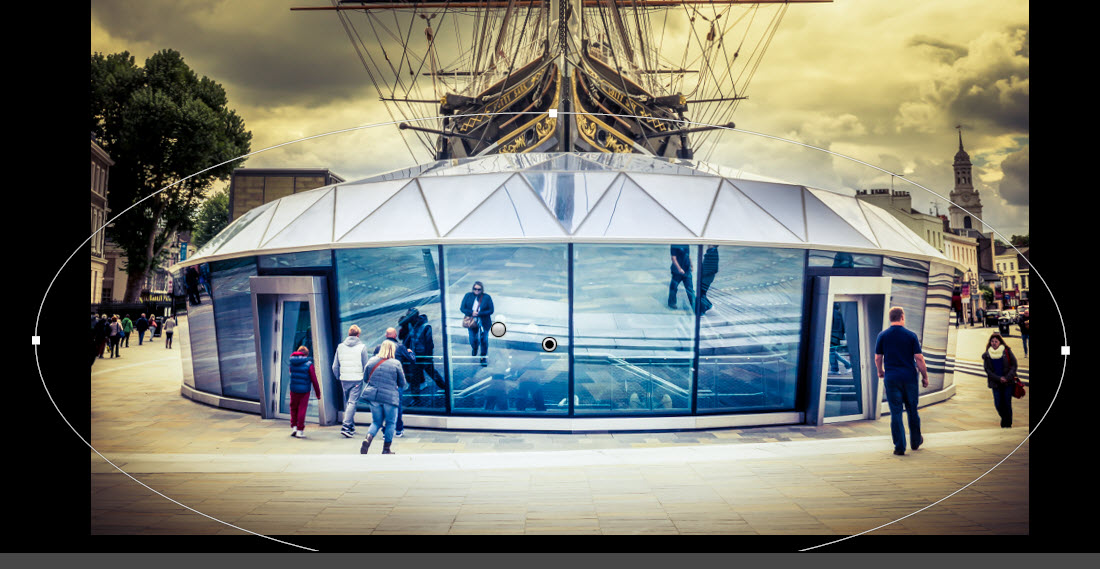
The glass building in front of Cutty Sark I wanted to pop a bit more. Blue and yellow goes really well together, so I wanted to pop the blue color. To do that, I added an elliptic gradient (remember to inverse it!). I increased the exposure, to make it bright, and started playing with the color toning of that.

Cutty Sark blue mapping 2

And the values I used:

Cutty Sark blue mapping

I did several things. I lowered the temperature to -35. This moves the area away from Yellow towards blue. Then I increased the exposure slightly, but also the shadows. But I also added some color, a blue/purple color. What I do when I use this color map, is to drag the pointer slowly around, and use a “better worse” strategy.

For sharpness I used both the Clarity and the Sharpness.

The photo was now roughly done. I thought it was maybe a tiny bit too orange, and made a little adjustment in the Hue section in Lightroom. I pushed the Yellow a bit towards Green, and that took the top of the orange.

Cutty Sark Hue changing


And now I only needed to do the final touches:

  • Reduce noise
  • Remove sensor spots and paper on the ground.

And that was it.

I have a lot of other photos, that I have described “The making of…”. You can find them here.


This is 12mm on Full Frame – Personal review of Sigma 12-24mm f/4.5-5.6 EX DG ASP HSM II


Warning: Undefined array key "multiauthor" in /var/www/caughtinpixels.com/public_html/wp-content/plugins/post-layout/plugin.php on line 114

Warning: Undefined array key "mobile" in /var/www/caughtinpixels.com/public_html/wp-content/plugins/post-layout/plugin.php on line 352

Mont Saint Michel in France is an island half a mile of the coast of Normandy. It's an old monastery, which is an architectural master piece, that is surrounded by a small village. The village has got a small chapel as well. And this is the small chapel. Photo by: Jacob Surland, www.caughtinpixels.com

Nikon D800, Sigma 12-24mm, ISO 400, f/8.0, 0.8 sec (0-exposure)

This photo is from the small church in Mont Saint Michel, France, just outside the huge monastery.

In my review of Canon 5D Mark III, Nikon D800 and Nikon D600/D610 (you might want to read it here), I described my considerations on ultra wide angled lenses, and how it eventually made me switch from Canon to Nikon. A switch that first was more or less cost free, because I focused on fewer lenses, but as I have bought the lenses again, has become a very expensive switch.

For reasons I can’t explain clearly, I missed the fact, that Sigma does an extremely ultra wide angled 12-24mm zoom lens, for full frame cameras. I think the reason I missed it, might be that both Nikon and Canon does a 12-24mm for cropped sensors, and I just put the Sigma lens in the same basket, and that was a mistake!

Had I noticed this Sigma lens much earlier, I would probably never have changed from Canon to Nikon, because it is the ultra wide angle that I wanted. I do not regret the move from Canon to Nikon today, after having come to know and love the Nikons.

Why is it that you want to have an extremely wide angled lens? For me, it is to be able to include everything in a tight spot, like this very small church on Mont Saint Michel in France.

This is shot at 12mm on a Full frame camera. Even at 14mm I wouldn’t have been able to capture both arches, and include the alter in the near one, at the same time. I would have had to make a compromise on the composition and lose something.

Continue reading

Long exposure HDR


Warning: Undefined array key "multiauthor" in /var/www/caughtinpixels.com/public_html/wp-content/plugins/post-layout/plugin.php on line 114

Warning: Undefined array key "mobile" in /var/www/caughtinpixels.com/public_html/wp-content/plugins/post-layout/plugin.php on line 352

The Opera House of Copenhagen caught just before sunrise. It's a long exposure. Photo by: Jacob Surland, www.caughtinpixels.com

This photo is taken 35 minutes later than the last ones I published from Nyhavn, Copenhagen. This is the Opera House of Copenhagen, Denmark, and I have been down there a few mornings to try to get a good shot, but the sunrise has always turned into … a grey one. But this time I was rewarded with a grand ‘almost’ sunrise. I never actually saw the sun, it went behind the clouds before it got up. I saw the sunshine on the buildings behind me, but I never saw the sun. But I did get a wonderful display of colors!

I do like Long Exposure photography. It really fascinates me, what the long exposure does to both water and clouds. And on a morning like this, when the water wasn’t particular smooth, and the Opera house didn’t make a good reflection in the water, a long exposure is a perfect solution. I took out my 10 stop B+W screw on filter and placed that on my 16-35mm lens. A lens I have purchased for this sole purpose, to be able to attach filters on it.

What I did was to first shoot the 7 HDR shots, and then I screwed the filter on the lens, and did a 58 seconds exposure (using a cable release). My plan was to use the water, and maybe the clouds from the long exposure, and mix it with the HDR shot. As it turned out, I must have moved the camera ever so slightly when I put on the filter, because the images doesn’t fit on top of each other. That is a risk.

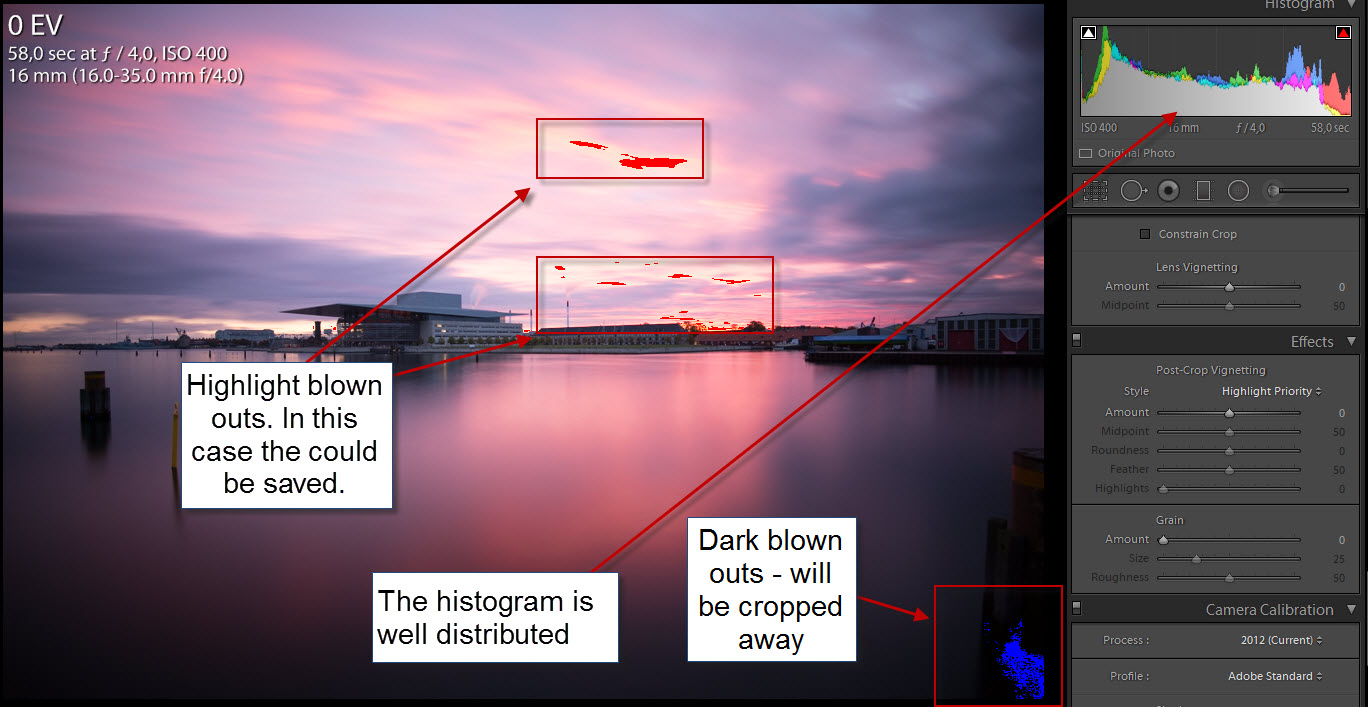
Then I thought of something I learned from another photographer ‘Photography is always a compromise‘! I looked at the long exposure. It really was an almost perfectly exposed photo. Only a few blown outs in the darks and lights, and some of it even in the corner, which I knew I would crop away anyway:

Opera house copenhagen histogram

Continue reading