Miniature review of the Fujipix X100


Warning: Undefined array key "multiauthor" in /var/www/caughtinpixels.com/public_html/wp-content/plugins/post-layout/plugin.php on line 114

Warning: Undefined array key "mobile" in /var/www/caughtinpixels.com/public_html/wp-content/plugins/post-layout/plugin.php on line 352

Viking ships on a rowBeen a while since I posted a photo of Viking ships. A thousand years ago, Roskilde was the home of the vikings, and the king of Denmark. The second king of Denmark Harald Bluetooth  (the modern technology is named after that guy!) rests in our Cathedral. We also have the worlds largest replica of a viking ship called the Sea Stalion. These are some of the smaller viking ships, and you can get to sail with them, as a tourist attraction.

ISO 800, 23mm, f/4.0, 1/140 sec

It has been a while since I posted a photo of Viking ships. A thousand years ago, Roskilde was the home of the vikings and the king of Denmark. The second king of Denmark Harald Bluetooth (the modern technology is actually named after that guy!) rests in our Cathedral. That kind of puts Roskilde on the map, so to speak. We also have the worlds largest replica of a viking ship called the Sea Stalion. These are some of the smaller viking ships, and you can get to sail with them, as a tourist attraction.

I shot this photo with my Fuji FinepixX100, a camera that I both love and hate and use far too little, and should have got rid of. The camera can take absolutely fantastic photos, but also has it’s flaws.

The camera looks awesome – like an old Leica or similar. I bought the brown leather cage for it as well, which only emphasizes the looks of an antique camera. And when ever I carry it around, it is always commented “Oh – that’s an old camera” – but it is not.

Basic facts:

  • 12 Mega pixels using an APS-C sensor. APS-C is awesome, compared to user smallish cameras. 12 Mega pixels is just a little to little.
  • Dynamic range 12.4 EVS (See dxomark for the lab test)
  • Maximum auto bracketing (aeb) is -1, 0, +1. As a photographer of HDR, this is just not good enough
  • Built-in Neutral Density filter ND 3. This is cool! I have used it far too little.
  • The lens is fixed at 23mm – equivalent of 35mm. A good all round size, but due to the small mega pixel cropping options are not that great. If I have the “wrong lens” attached, I will crop an image. 12 Megapixel just leaves less to crop from.
  • Weight Approx 0.5 kg. It’s not a light weight small camera.
  • Pretty awesome low light performance.

I have had the camera with me on a few vacations, but I tend to get annoyed with it. As you can see on the image of this post and this image the camera can produce absolutely awesome photos. But it has problems getting the focus spot on. I tend to get maybe 10% or 20% of my photos not tack sharp. But when it hits the focus point, the photos are awesome sharp. And the saturation I just love.

The camera is slow – it takes a long time to start up. And because of the mirrorless technology, it also focuses slowly.

The lens is fixed and not possible to switch – however, the lens is totally awesome. f/2.0 and produces fantastic images. The limit comes with the fairly low mega pixel count. If it had been a higher mega pixel count, I would have shot more shots and just cropped them.

It has a panorama feature, which works quite well. If you do it hand held, you of course have to have a fairly steady hand, otherwise you get skewed merges between images.

About low light performance. The camera is known for it’s low light performance, and that is in all fairness. However, it still get’s it ass kicked, by high level DSLRs. There is an upper limit for the everything, including Low light performance of the X100.

I love the camera because of the looks, the high image quality and the fairly compact format.

I hate the camera because, it is not good for HDR, because it only does -1, 0, +1 in automatic exposure bracketing mode. I also hate it because it fails on getting the focus spot on, in far too many photos, just as well as it is a slow camera, both in starting up and focusing.

For the casual shooter, that want’s something that that is siginificant better than the average snapshot camera, this camera really kicks in. But for the serious photographer, the camera comes in almost good enough. No doubt the image quality is totally awesome, but it’s flaws are considerate, and for that reason I use it far too little.

How to restore photos of poor quality


Warning: Undefined array key "multiauthor" in /var/www/caughtinpixels.com/public_html/wp-content/plugins/post-layout/plugin.php on line 114

Warning: Undefined array key "mobile" in /var/www/caughtinpixels.com/public_html/wp-content/plugins/post-layout/plugin.php on line 352

Recently I have been looking through some of my older photos. The last 7 years I have been travelling more than I ever have been doing, and during all of that time I have had a growing interest in photography, without ever really getting to the point, where I thought of myself as an amateur photographer. But during this time I have shot some photos, that I have found to be better than “just snapshots”, but unfortunately not shot with the kind of cameras I carry around these days.

My post-processing skills have improved enormously and I amaze even myself what it is possible to do with an image. Recently I decided, it would be fun to see, what I could recover or restore from before I got great cameras.

I have found that I can restore some of my old photos. The main overall problem is that I have shot most in JPEG (do not shoot in JPEG!! Shoot in RAW) and therefore have too little information in my images. But the problems I can in general summarize to this:

  1. Too little information because I shot in JPEG.
  2. Too much digital noise in the photos. This has to be removed, without removing too many details. This requires some decent Noise Reduction software. I mainly use Noiseware.
  3. The mood has to be improved in the photo to create that ‘this is a great photo’ feeling.

The Basilica Cistern of Istanbul

The Basilica Cistern of Istanbul is an amazing place. More than 1500 years ago, while Istanbul was a part of the Roman Empire, a giant cistern was build. A cistern to contain water for drinking. The construction is enormous 138m by 64m and the ceiling is carried by pillars, some reused from even older buildings.

Basilica Cistern, IstanbulThe Basilica Cistern is a 1500 year huge underground water container, used to store water that was transported to Istanbul by large roman aqua ducts. The cistern is 138m by 64m room - that is larger than a soccer field. An amazing fact is, that it was lost for 500 years. It was then rediscovered, because some people took water

 Canon 400D, Sigma 30m f/1.4 at ISO 200, 30mm, f/2.5 and 1 sec.

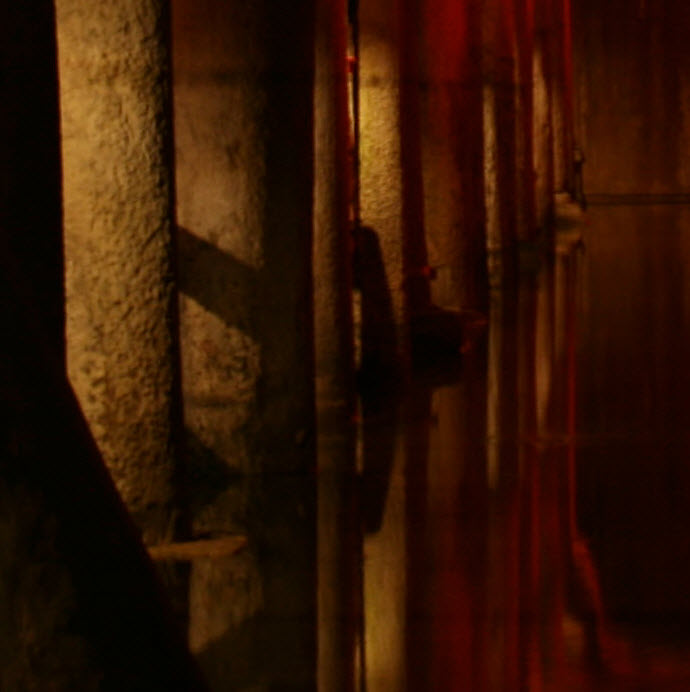
I didn’t have a tripod so I had to use the rail on the pathways running in and out of the between the pillars. This is the only one I managed to get fairly sharp, but if you look at the original in a 100% crop, you can see that it is far from tack sharp. Taking sharp photos in light conditions in poor light conditions is difficult, because the camera can focus.

Basilica Cistern - before - 100% crop

100% crop of original JPEG shot.

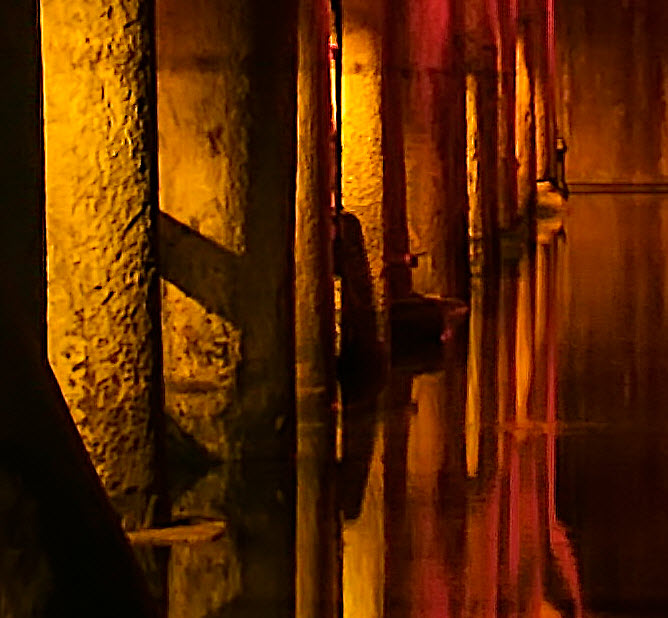
And this is a 100% crop of the final image.

Basilica Cistern - 100% crop

While the photo will never be comparable to one shot with a really expensive high end camera, it has improved impressively and has become a great photo worth publishing. This is original JPEG photo:

Cistern Basilica Original Photo

So what did I do to this image? I have done several things.

  1. First I created the overall mood and feeling. I did that in Adobe Lightroom. This is a JPEG and I only shot the one shot. There is no way I can make an HDR out of this image. This means that, what ever is shadows will remain shadows. There is virtually no information in the shadows.
  2. I cropped the image to Portrait format instead of Landscape format. This works better as a composition, but also leaves me with a much smaller photo of 5.1 megapixels.
  3. I did noise reduction, first a little in Lightroom, but when the noise is complicated and fairly strong I have to use another tool. Otherwise I can’t get rid of the noise without losing too many details. I have various dedicated noise reduction software, but I mostly use Noiseware from Imagenomic, which does a great job of reducing noise without losing too many details. And what I especially like about it, is that there is a built-in sharpener too, that works quite efficiently. That I used on this image too, because it lacked the sharpness.

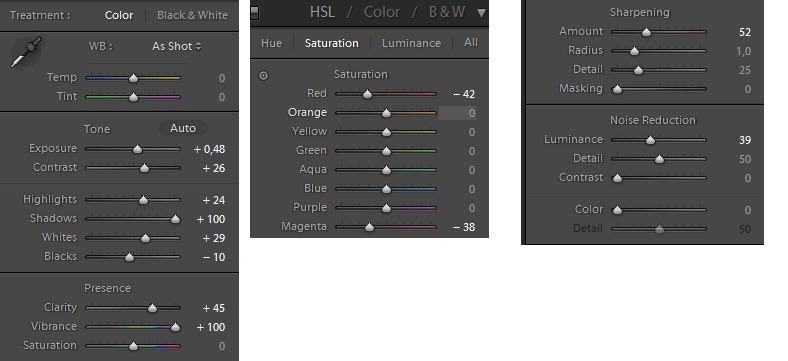
These are my settings in Lightroom to create the overall look and feel:

Basilica Cistern Lightroom settings

Let’s do a walk through of the settings:

Exposure +0.48: The original shot is a bit too dark. I increased the exposure 0.48 exposure step. That makes noise evident in everywhere in the photo.

Contrast +26: Almost every photo I make I increase the photo. It makes them pop a bit more.

Highlights +24:  Usually I let the highlights go in minus, but in this case I wanted more power in the light areas and this explains the stronger light on the pilars on the left side.

Shadows +100: Make the dark areas more bright. Remember this is a JPEG and there is very very little information in the dark areas. So noise reduction is mandatory afterwards.

Whites +29: This increases the point of how bright the image is by stretching the brightness. If you press ALT while you move the slider to the right, you can see when you start to get blown out white areas.

Blacks -10: It is good to have some black in your photo to make it work. If everything is gray’ish, the photo will be dull and flat. This also goes for HDR photos – there has to black to create depth in the photo. I have increased the dark areas, compensating for having set the ‘Shadows’ to +100.

Clarity +45: Clarity is potent slider. What it exactly does I can’t explain, but it adds some kind of contrast and it does at it says, it makes things more clear. In this case the photo is a bit unsharp and soft and by using the Clarity slider quite a bit I can ‘un-soften’ the photo, which is needed. Careful with the Clarity, it can very easily be overdone.

Vibrance +100: Wow – I think that is the only time I have ever used +100. Vibrance works a bit like Saturation, except that it only works on some colors. Skin colors (red and pinks colors) are less affected. This photo almost only has red colors and therefore Vibrance only has a little effect in the orange on the pillars.

Saturation 0: The photo has plenty of colors, no need to add them.

HSL (Hue, Saturation and Luminosity)

It is a complete section of it’s own. The more I use Lightroom the more I use these sliders to finetune the colors of an image. In this case I found the the Red was too intense, and I lowered the saturation of the red.

Red -42: I reduced the reds quite a bit.

Magenta -38: It has got absolutely no effect on this image. There is no magenta in it, I just dropped it somewhere. I always check magenta, because chromatic aberrations often come in magenta colors. This is one way to remove purple chromatic aberrations.

Sharpening

The photo is a bit unsharp and does require sharpness. I add some sharpness here, but I also add some in Noiseware later.

Noise reduction

I add some noise reduction. If you are not sure, what noise is, it’s grain in your photo that is generated digitally by you sensor in you camera. The more expensive your camera is, the better it handles noise. This is shot with an entry level DSLR – an old one too, which makes it very prone to adding noise to the images. This is the noise in my image (click it up to see the full size):

Basilica Cistern - noise

Crop the Image

Some go against cropping and argue, that it is better to get the photo right in the camera. I disagree. If a photo gets better by cropping, do so. The only problem I see in cropping is that you get a smaller image, and if you want to print it, that might be a problem. This photo is shot as a 10 mega pixels, but I’m left with only 5.1 mega pixels. This is better than an unusable photo, right?

Reducing the noise in a photo in a third party tool

When you shoot photos in poor light conditions your camera will most probably generate digital noise. There are many tools that you can use to remove digital noise. I have used several. There are Noise reduction in Lightroom, but it is not the most optimized tool that I know. It takes away too many details, but I find that Noiseware from Imagenomi really does a great job of reducing noise and keeping the details. But it also does a quite efficient sharpening. A side-effect in reducing the noise, is that you get a softer photo and therefore need to add sharpening – and having it built into one application I find very convenient.

Gullfoss in Iceland


Warning: Undefined array key "multiauthor" in /var/www/caughtinpixels.com/public_html/wp-content/plugins/post-layout/plugin.php on line 114

Warning: Undefined array key "mobile" in /var/www/caughtinpixels.com/public_html/wp-content/plugins/post-layout/plugin.php on line 352

Gullfoss in IcelandTravelling in Iceland brings you around to see the some of the most amazing wonders that Earth has to offer. If you are staying in the capital Reykjavik, you can go on a trip by car or arranged, that covers the Golden Circle, which brings you to Geysir, Gullfoss and Thingvellir. The Great Geysir rarely erupts now a days, but Strokkur which is right next to The Great Geysir, will erupt every few minuts. It will go as high as 35 m. In the photo you see the great waterfall Gullfoss (the Golden Falls). It's an amazingly big water fall that falls in two large falls as you can see and it looks like the water just plunges into Earth. The last stop of the Golden Circle (or first depending on which way you drive) is the old historical and cultural center Thingvellir. This vikings used to use the area for it's parliamentary discussions. However, Thingvellir is also interesting from a geological point of view, because it is lies at crest of the mid-atlantic ridge. There's a great cliff ridge that marks the edge.

Travelling in Iceland brings you around to see the some of the most amazing wonders that Earth has to offer.

If you are staying in the capital Reykjavik, you can go on a one day trip by car or get an arranged tour that covers the Golden Circle, which brings you to Geysir, Gullfoss and Thingvellir.

The Great Geysir rarely erupts now a days, but Strokkur which is right next to The Great Geysir, will erupt every few minuts. It will go as high as 35 m.

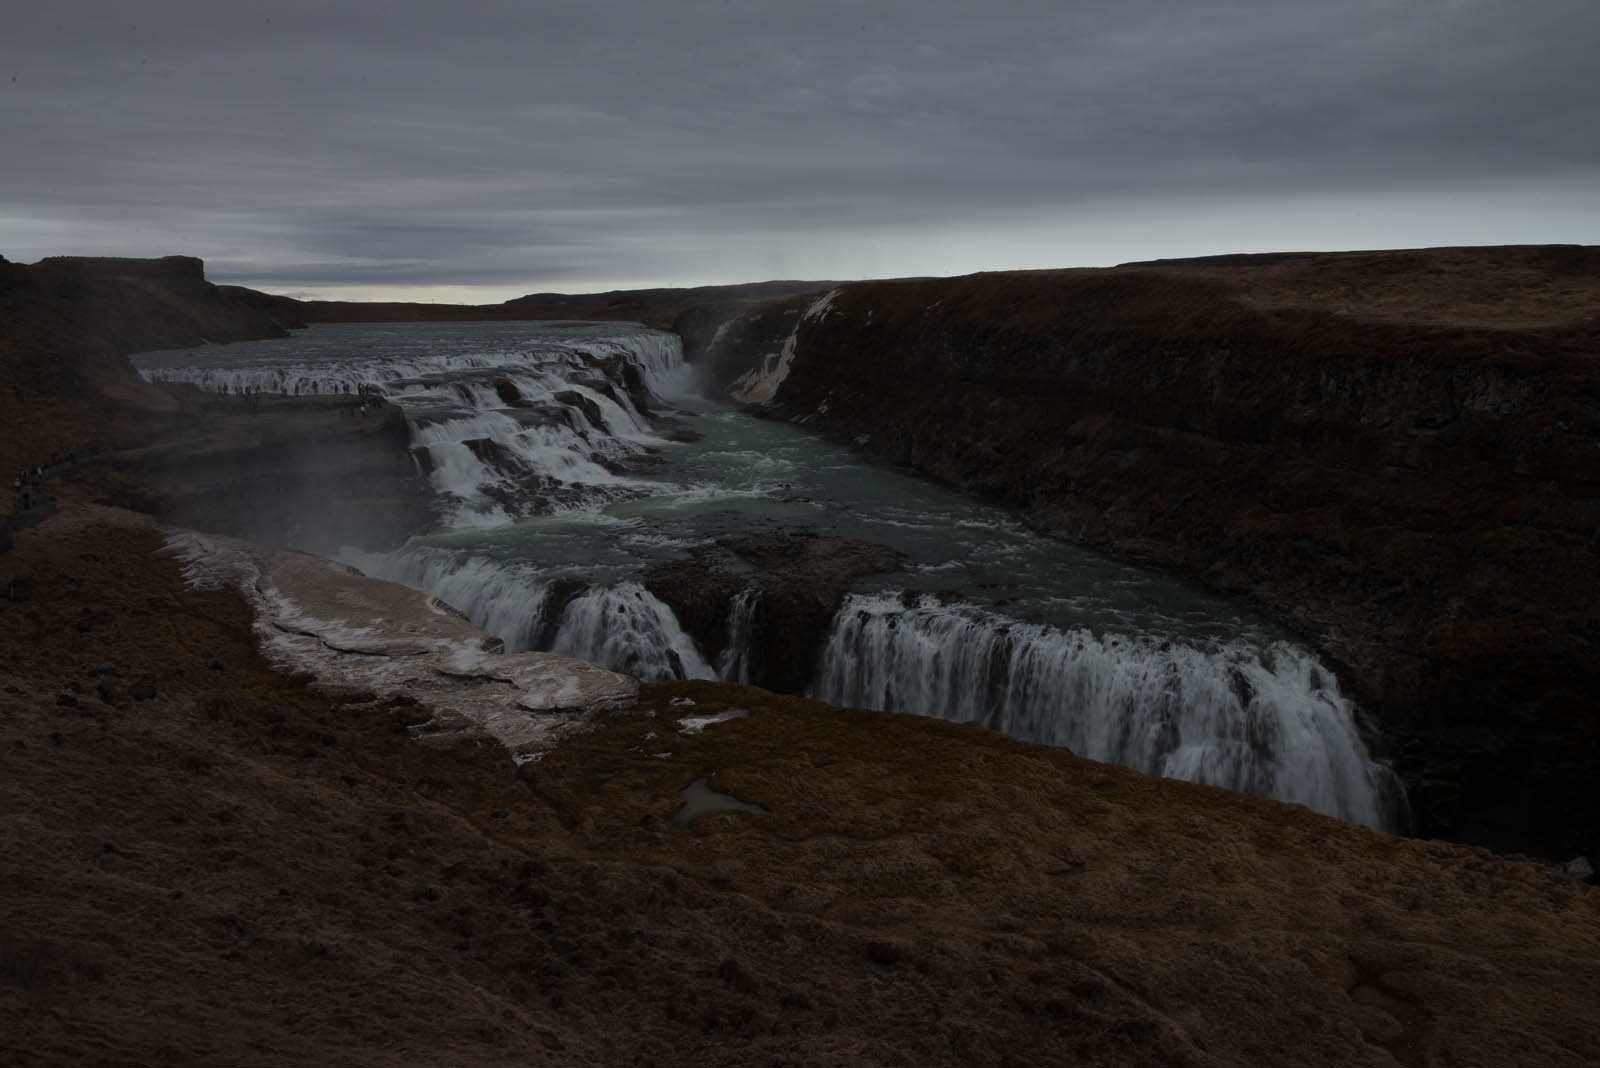
In the photo you see the great waterfall Gullfoss (the Golden Falls). It’s an amazingly big water fall that falls in two large falls as you can see and it looks like the water just plunges into Earth.

The last stop of the Golden Circle (or first depending on which way you drive) is the old historical and cultural center Thingvellir. The vikings used to use the area for it’s parliamentary discussions. However, Thingvellir is also interesting from a geological point of view, because it is lies at crest of the mid-atlantic ridge. There’s a great cliff ridge that marks the edge.

How did I shoot and post-process this photo?

I shot this photo in rainy conditions using my Nikon D600 with my Nikkor 24-70mm lens. Because it was raining I had to wipe the lens all of the time. To wipe the lens you should use a fiber cloth, to avoid getting any scratches.

What I really wanted when I took the photo, was not to freeze the waterfall, so that I could count every drop, I wanted this silky long exposure waterfall. I started using my Lee Big Stopper filter, which is a 10 stop ND filter (Neutral Density filter), but I thought it was too much and switched to a Lee 2-stop ND filter instead. But what is an ND filter (Neutral Density filter) anyway? A 2 stop ND filter will block the light just so much that I have to double my exposure time twice, which means if the shutter speed was going to be 1/400 sec it would be 2*2*1/400, which is 1/100 of a second. It’s like putting a pair of sunglasses on your lens.

In broad daylight a 2 stop ND filter is not quite enough, so I also made the lens as slow as possible, by stopping it down to f/22. Which is the lowest value my lens will go to, and then I shot at ISO 100.

I shot this photo as a 3 shot exposure bracketed shot (AEB), which gives me three photos. One exposure which is 2 steps too dark, one normal and one 2 exposure steps too bright. Like this:

Gullfoss minus 2

 Minus -2 exposure: EXIF: ISO 100, 28mm, f/22, 1/15 sec

Gullfoss 0

0-exposure: EXIF: ISO 100, 28mm, f/22, 1/4 sec

Gullfoss plus 2

  +2 Exposure: EXIF: ISO 100, 28mm, f/22, 1.0 sec

As you can see in the darkest -2 exposure, the water is somewhat frozen, and that was not what I wanted. But from the middle exposure the water looks like silke long hair falling over the edge, just like I wanted it. And the same goes for the +2 exposure.

So what I did in the post processing, was to do an image using Photomatix Pro. I did a fused/natural image and then I did a version in Adobe Light room. The version from Lightroom only had to make the water fall look great, because I was going to use the image from Photomatix for the rest.

The two images I loaded into Photoshop as layers and placed the Photomatix image on top, and by adding a layer mask (here you can see how to do that), I punched a hole through my top layer to get the water fall from the layer underneath. This way I was able to have my Photomatix and my Lightroom version form the final image as a blended image.

Why didn’t I just use the waterfall from the Photomatix version? Well, I do like the looks a waterfall that has the silky look. I had taken my time to use an ND filter to get longer exposure times to get that exact effect and Photomatix just ruins that, because it blends three images that are “ghosted” (not identical) in the water fall. At other times, when I take photos of the sea, with waves, I might like the water to be ghosted, because it adds and effect.

And why did I use HDR in the first place? Well in this case it is strictly not necessary, because there is not a lot of dynamic light, but you can also use Photomatix, to get an “effect” or mood into your photo. This I do a lot and I did it in this. But no, it wasn’t necessary.

Disneyland Paris – The Space Mountain


Warning: Undefined array key "multiauthor" in /var/www/caughtinpixels.com/public_html/wp-content/plugins/post-layout/plugin.php on line 114

Warning: Undefined array key "mobile" in /var/www/caughtinpixels.com/public_html/wp-content/plugins/post-layout/plugin.php on line 352

Disneyland Paris - The Space MountainThis is one of the very first HDR shots I shot. It is shot hand held with my old Canon 400D and the old 18-55mm kit lens. I think this photo is a proof that it doesn't take professional gear to make great photos. I shot three exposure bracketed shots (-2, 0 and +2) and merged them in Photomatix Pro.

This is one of my very first HDR shots I shot. It is shot hand held with my old Canon 400D and the old 18-55mm kit lens. I think this photo is a proof that it doesn’t take professional gear to make great photos. I shot three exposure bracketed shots (-2, 0 and +2). I shot it in june 2012, before I really knew anything about HDR or post processing.

What’s most interesting about the post-processing is the mirroring of the lower part of the image. There was a large container like construction I couldn’t avoid having in the photo. I tried another angle, but that didn’t work, so in the end I shot with the construction included.

I have did the tone mapping and really liked the result, but I didn’t like the construction, so the photo has been lying around for some time, and then recently I picked up the photo again, and tried to remove the construction.

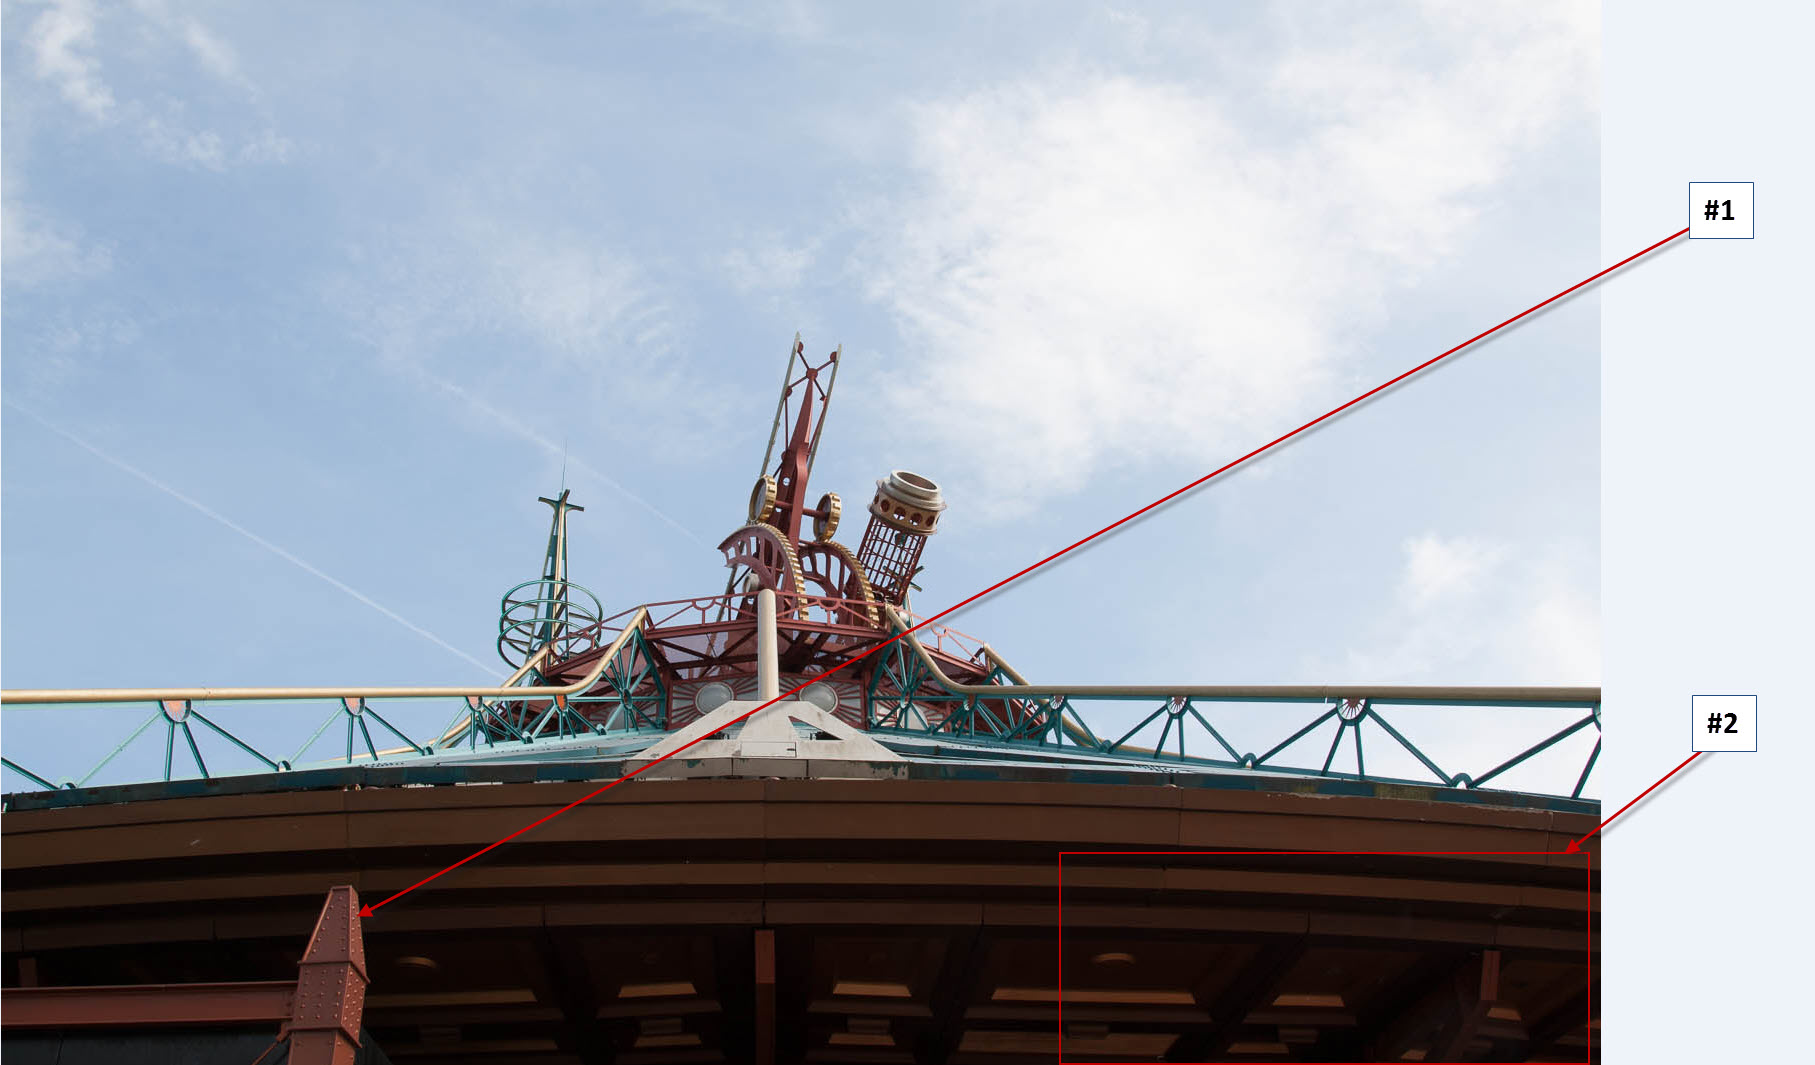
This is the original:

Space Mountain - before

#1 This the top of the ugly construction and it ruins the photo.

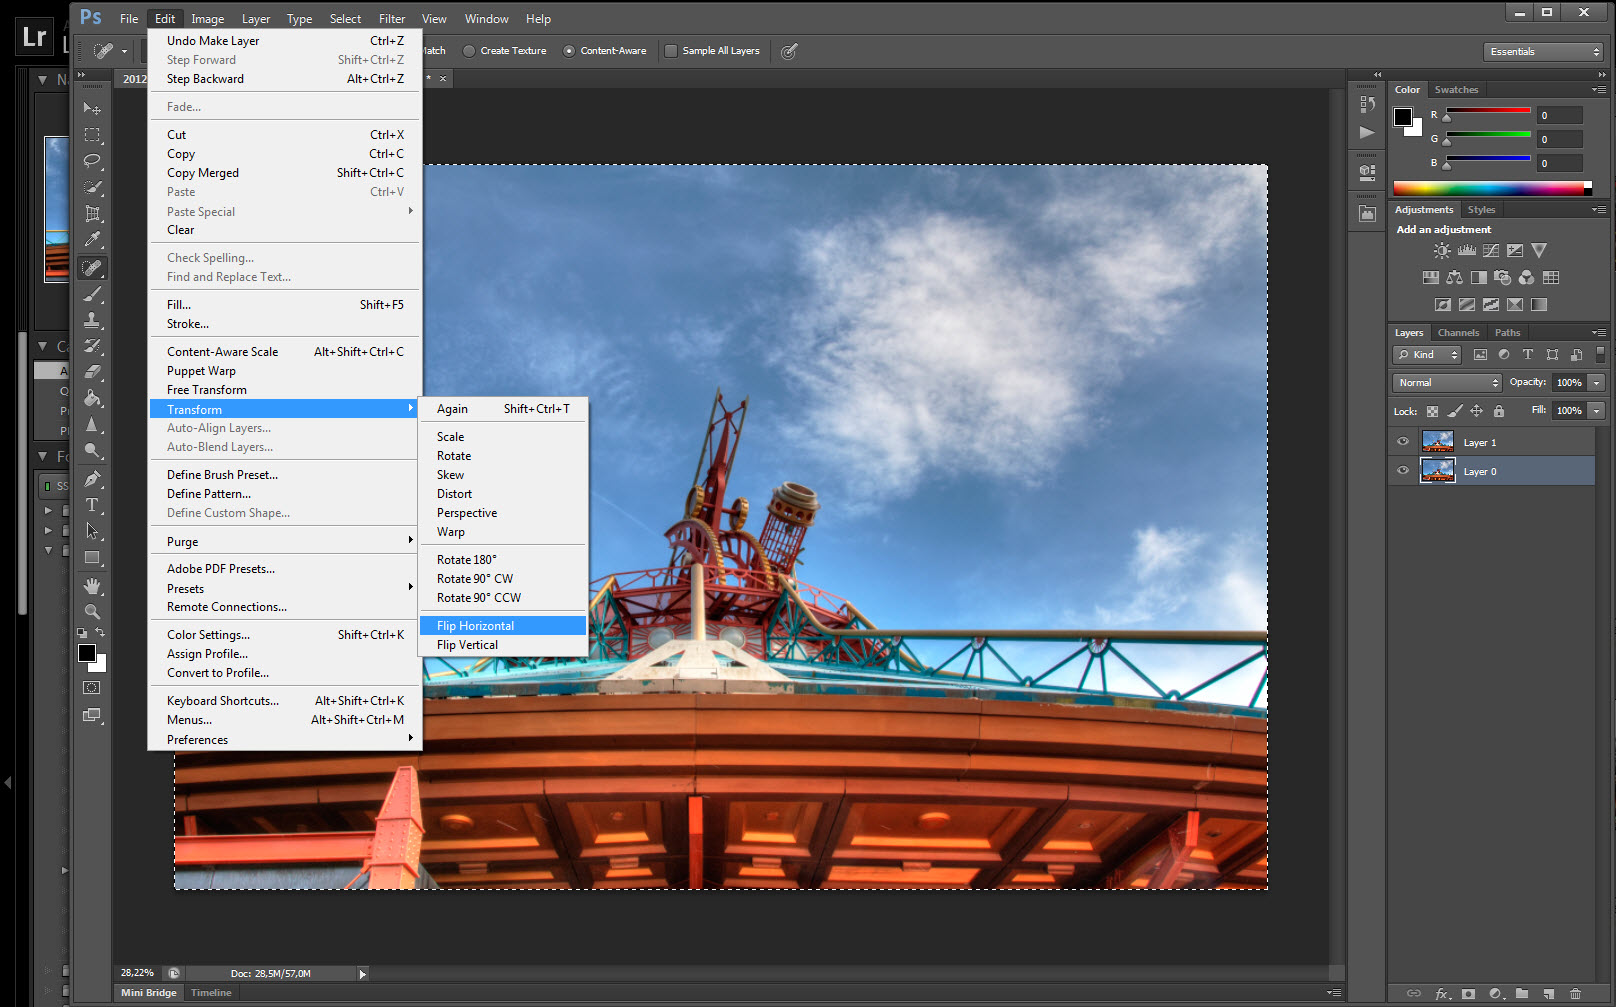
#2 This part of the image I mirrored and merged into the right hand side. The photo is close to 100% symmetric, but I had to do a little shuffling around the pixels to get it to look well enough to deceive the eye. There are probably many ways to do this, but the way I did it, was to load the image into Photoshop, and then duplicate the layer (CTRL+J) and then select the lower layer and press CTRL+A to select all of the layer. And then I flipped the layer like this:

Space Mountain - step 1 flip

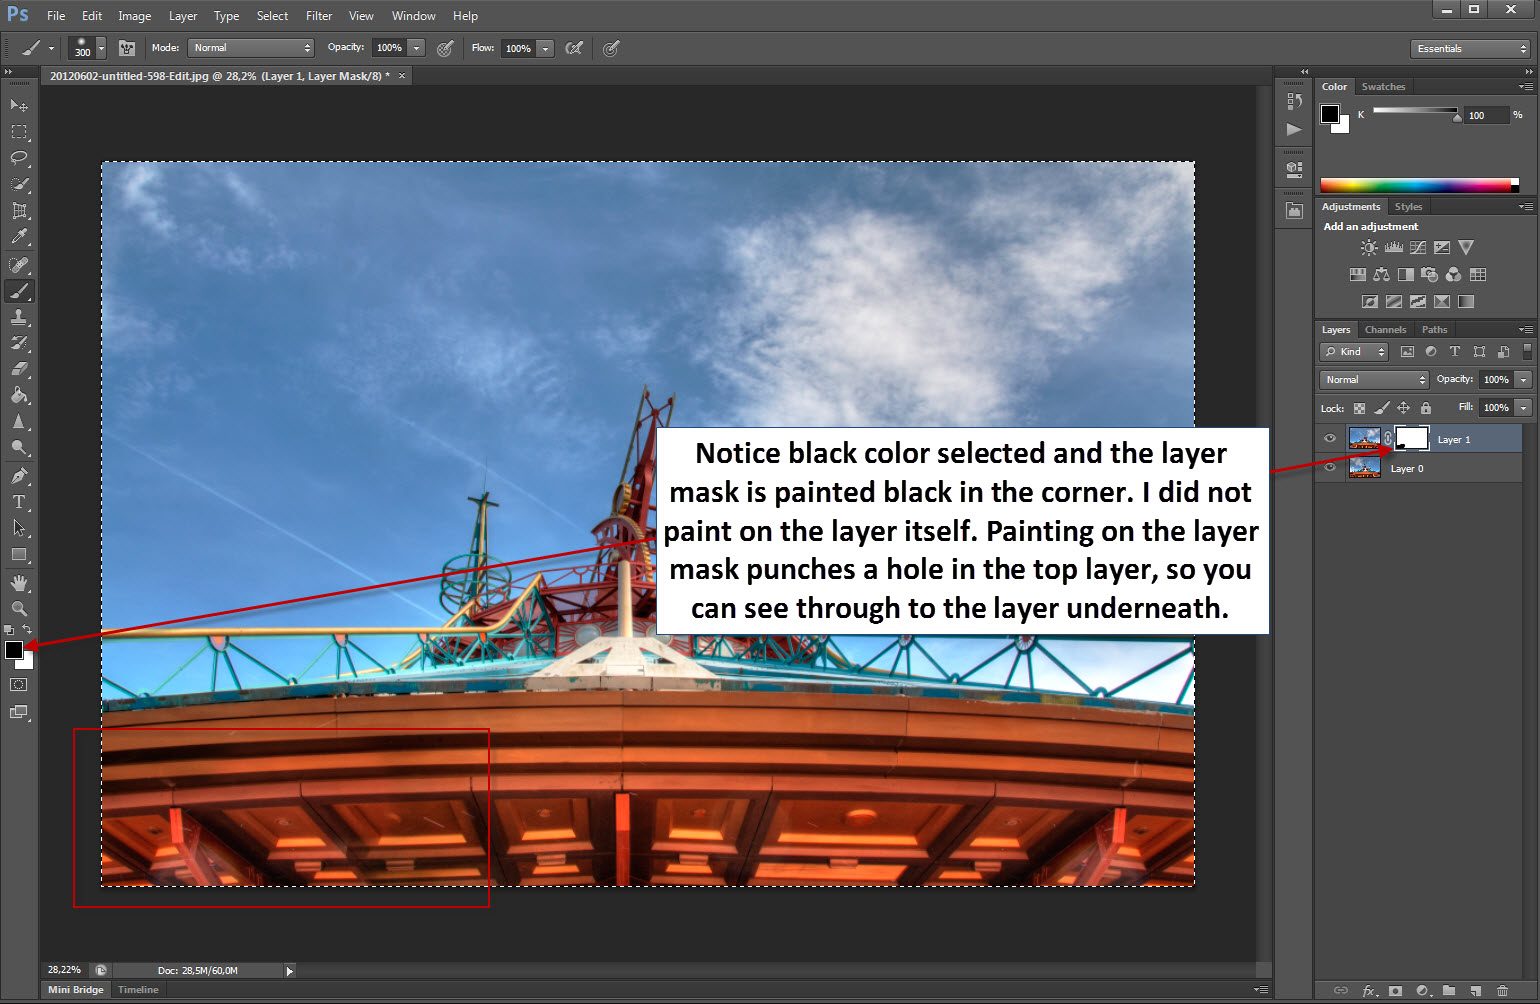
And then I used a Layer Mask to paint through. What a Layer mask does, is punch a hole through the layer it is attached to, but only where you paint black on the layer mask. This is the procedure to add a layer mask and paint through to the layer underneath:

Space Mountain - step 2 paint through

And notice how the layer mask is painted black in one corner, making the layer below visible:

Space Mountain - step 3 paint through

Blue Hour Water – using a ND filter


Warning: Undefined array key "multiauthor" in /var/www/caughtinpixels.com/public_html/wp-content/plugins/post-layout/plugin.php on line 114

Warning: Undefined array key "mobile" in /var/www/caughtinpixels.com/public_html/wp-content/plugins/post-layout/plugin.php on line 352

Blue Hour Water - using a ND filterThis could look like ice, but it isn't, it is a long exposure of water on a fairly windy day. It's in a narrow bay, the waves don't get big, but they had a little white foam on top. I took this photo using a tripod and because it was very windy, I dug the leggs into the sand on the beach. Otherwise the camera wasn't steady enough for a long exposure.But how to get a long exposure of 20 seconds around sunset? I did three things:1) First of all I turned the ISO down to 100. If I had shot it at ISO 200, the exposure time would have been cut in half to 10 seconds, and at ISO 400 only 5 seconds. So to maximize the exposure time I set it to the lowest ISO I could, which was ISO 100. 2) Then I also set the f-stop low (remember that low f-stops are high values) - I had it at f/16. Had I shot it at f/4, which is the highest f-stop the lens will go to, I would also have cut the shutter speed in half a few times. That's why you call a lens that has a very high f-stop like f/2.8 or maybe even f/1.4 a fast lens, because it gives shorter shutter times.3) The last and equally important step was that I attached a Neutral Density Filter (ND filter) to the lens. A ND-filter is like a pair of sunglasses that blocks the light. ND-filters comes in different flavors that are more or less dark. In this case I attached a ND density filter that stopped down the light two full Exposure Value Steps. Or in plain english it doubled the shutter speed twice, which brought the shutter speed from 5 seconds to 20 seconds.And that is how I made the water look this way. It came as surprise to myself, that it looked like ice, I had anticipated a smokey look on the water. But I guess it comes from the fact, that it is shot in the blue hour, which adds a blue color to the water. By Jacob Surland, www.caughtinpixels.com.
This could look like ice, but it isn’t, it is a long exposure of water on a fairly windy day. It’s in a narrow bay, the waves don’t get big, but they had a little white foam on top. I took this photo using a tripod and because it was very windy, I dug the legs into the sand on the beach, to keep the camera wasn’t steady enough for a long exposure.

But how to get a long exposure of 20 seconds around sunset? I did three things:

  1. First of all I turned the ISO down to 100. If I had shot it at ISO 200, the exposure time would have been cut in half to 10 seconds, and at ISO 400 only 5 seconds. So to maximize the exposure time I set it to the lowest ISO I could, which was ISO 100.
  2. Then I also set the f-stop low (remember that low f-stops are high values) – I had it at f/16. Had I shot it at f/4, which is the highest f-stop the lens will go to, I would also have cut the shutter speed in half a few times. That’s why you call a lens that has a very high f-stop like f/2.8 or maybe even f/1.4 a fast lens, because it gives shorter shutter times.
  3. The last and equally important step was that I attached a Neutral Density Filter (ND filter) to the lens. A ND-filter is like a pair of sunglasses that blocks the light. ND-filters comes in different flavors that are more or less dark. In this case I attached a ND density filter that stopped down the light two full Exposure Value Steps. Or in plain english it doubled the shutter speed twice, which brought the shutter speed from 5 seconds to 20 seconds.

And that is how I made the water look this way. It came as surprise to myself, that it looked like ice, I had anticipated a smokey look on the water. But I guess it comes from the fact, that it is shot in the blue hour, which adds a blue color to the water.

About the processing

I shot this photo as an HDR, but in the end I only used a single shot, because it ended up being perfectly exposed. I tried putting it through Photomatix, but it didn’t anything of interest. So in the end I just straightened it up using a crop tool and I added at bit of post-crop vignetting in Lightroom.

So the photo is pretty much straight out of camera.

Travelling in Iceland


Warning: Undefined array key "multiauthor" in /var/www/caughtinpixels.com/public_html/wp-content/plugins/post-layout/plugin.php on line 114

Warning: Undefined array key "mobile" in /var/www/caughtinpixels.com/public_html/wp-content/plugins/post-layout/plugin.php on line 352

Sunrise on the way to Keflavik

Sunrise on the way to Keflavik.

I have really been wanting to go to Iceland for a long time. Having seen the beauty of Iceland captured by other photographers it has drawn my attention. But you can’t be everywhere at once, so I’m seeing the world in small pieces, bit by bit. But a window opened for three full days in Reykjavik and me and my family went off to see a small bit of Iceland.

Ideally if you want to go to Iceland I would say you should have time enough to drive all of the way around on Iceland and give yourself time enough to see and experience Iceland. Like New Zealand Iceland has a lot action and adventure options, that really should be tried. I have spend one month in New Zealand in November 2012, driving around and one month is not nearly enough to get all of the way around New Zealand and see try all the great fun stuff they have. Iceland is much smaller and I would like to go for two maybe even three weeks at some point in time to experience Iceland.

But an extended weekend in Reykjavik is really a great option. If you stay in Reykjavik you are within driving distance of several of the main attractions in Iceland, like Thingvellier, The Blue Lagoon, Whale Watching, Gullfoss waterfall and Geysir. So if you rent a car you can get to see a lot of the interesting things. The Icelandic horses are everywhere, so you can’t miss those either. So in three days you get to see a lot of the essence of Iceland.

Iceland was hit severely during the start of the financial crisis and that has changed a lot up there. Eating out is really cheap, compared to Denmark, and they really do make great food up there.


Free wall papers available


Warning: Undefined array key "multiauthor" in /var/www/caughtinpixels.com/public_html/wp-content/plugins/post-layout/plugin.php on line 114

Warning: Undefined array key "mobile" in /var/www/caughtinpixels.com/public_html/wp-content/plugins/post-layout/plugin.php on line 352

This is something I have wanted to do for some time. I find that music can be used to emphasize the feelings of seeing photos. I have been working on this project for a couple of weeks now, but feel that it is ready now. You can download 27 totally awesome free wall papers in high resolution, giving you great looking images even on full hd and 2560 px monitors. You may use them on your computer as wall papers, but also on your website or blog, as long as you give credits to Jacob Surland and link back to www.caughtinpixels.com. If you want to use them commercially, you will have to contact me. You can see the photos here, in a beautiful video with the song Age of Heroes by Olive Musique:

The music is: Age of Heroes by Olive Musique.

You can download the wall papers here.

Have a nice Sunday!

Breaking the Ice


Warning: Undefined array key "multiauthor" in /var/www/caughtinpixels.com/public_html/wp-content/plugins/post-layout/plugin.php on line 114

Warning: Undefined array key "mobile" in /var/www/caughtinpixels.com/public_html/wp-content/plugins/post-layout/plugin.php on line 352

This winter lasted a long time, but now spring has finally arrived. During the winter time I have had many opportunities to photograph ice in the fiords around Roskilde. This particular day I ventured out on the ice with a tripod and two cameras. It’s a very shallow part of the fiord and should I have gone through the ice I would have been in to the knees, no more than that. The ice does funny things around the rocks. It looks like small frozen vulcanos. There are many rocks in this area, and I  shot a few of them.

About the post-processing

I have had some problems trying to get the ice look good. Ice is basically grey’ish, maybe with a blue tint, but is not that colorful. However, when the colors of the sky reflect in the ice, you can get a little color out of it. My project has been to get some intensity out of of the ice, while still believing that it is ice. Ice is blue and the mind accepts it to be blue.

The photo is a 5 shot HDR (High Dynamic Range) photo, but to make the final photo I have used two different images I made in Lightroom from the 0-exposure and one I made in Photomatix Pro.

This is the original 0 exposure photo:

Breaking the Ice - Original

As you can see a flat and dull photo and certainly not reflecting the reality. But you can also see that almost everything is visible. There are no completely blown out areas of white, neither is there any pitch black areas. This means that there is not a lot of dynamic light in this scenery and no real need for HDR software like Photomatix, but Photomatix not only assembles several exposures into one High Dynamic Range image, it also does some post-processing of the image. The post-processing can also be applied to single photos and give really great results. In this case I had 5 different exposures, and I used them all, simply to get a better quality of image in the shadows, but I could have used just this single photo.

#1 The sky is dull. I started playing around with the sky in Lightroom and exported two different versions of the 0-exposure, and I anticipated that I would use one of those two skies in the final image. I made a beautiful one and then I did a more dramatic one. I made the two in Lightroom, because Photomatix often makes a grey’ish sky, and that does not look good. This is something I have learned over the past couple of months and come to realize, that Lightroom is pretty for making gorgeous skies. In this case, however, I was tricked – Photomatix did the best sky.

#2 The area with the golden colors reflecting in the sky has to come more alive. I did that by amp’ing up the saturation and by adding a little softness to area.

#3 Clean up. I do it every time and it makes a difference! It really does. Try and compare. In this case I used the Lasso select tool in Photoshop CS6 and then pressed SHIFT+F5 for a content aware fill. In some situations it does amazing work. And then I used the Healing Brush remove a larger number of stones and ice peckles both close the Rock and further out in the distance. This does take some time, but it is worth the effort!

This is the first of my images exported from Lightroom. You can see three horizontal lines. That is a Gradient filter. The effect starts from the lower line and reaches the maximum effect at the top line.

Breaking the Ice - The Sky

In the right hand side, you can see the settings for the Gradient in the top section. In this case I ded a fine tuning of my global changes. The global changes you find in the section below (the middle one you can see). In the middle section you can see how I simulate HDR in Lightroom. This is done by lowering the Highlights to -100 and raising the Shadows to +98 (or 100). This gives a flat HDR looking photo, but by adding some contrast and clarity things starts looking really good. I amp’ed up the saturation too, to get a great looking sky. The Black and Whites I also adjusted a little bit to add a little more punch the image.

The second image I generated from Lightroom is a more dramatic one. As you maybe can see, some of the ice from this image, is in final image. The sky from this image I didn’t use.

2013-01-25-Frozen water-190

And below is my image from Photomatix Pro. I found a really nice processing in the “Exposure Fusion” and “Method: Fusion/Natural”. I have some presets that I use and then I adjust them a bit, when I find something that I like.

Breaking the Ice - Fused

In this case the sky turned out really nice and I ended up using this sky. I also blended the Ice with the second image, giving a more blue color to the ice.

These three images I loaded into Photoshop as layers, along with the five original shots, giving me all together 8 layers. I then started mixing the final image, by using layered masks (see my tutorial on blending layers in Adobe Photoshop here). As it turned out, I never used anything from the original shots in the final image, but only from the three images displayed here.

The Court of Law


Warning: Undefined array key "multiauthor" in /var/www/caughtinpixels.com/public_html/wp-content/plugins/post-layout/plugin.php on line 114

Warning: Undefined array key "mobile" in /var/www/caughtinpixels.com/public_html/wp-content/plugins/post-layout/plugin.php on line 352


One day after work I went out to shoot some photos. I was thinking of shooting the Opera House in Copenhagen. But on my way I passed the Eastern High Court of Denmark and saw the shadows from the gate, and I shot those instead of the Opera House.

Shooting the photo

My idea was to use the shadows as lead in lines and I really liked the color of the sky along with colors of the building. Preferable I would have liked to have door a little further to the left in the image, but a car was there and I couldn’t really get it to work. I tried several different compositions until suddenly the gates opened and I gave up doing more shots. I tried a couple of shots with the open gates, but it didn’t work.

The photo I took close to the ground on a small Manfrotto table tripod with an extension. With the extension fully extended it gets a little unsteady, but it is usable. I always have that one with me, if I don’t have one my full size tripods with me. Careful when you use such a small tripod in such a busy area, people are prone to kick your camera like a football, because they don’t see it.

The idea of going close to the ground, is to make the lines appear stronger, and the have less dead space from the road.

About the processing

This is the original shot, here you can see the tip of the car and a bit more of the road. That is too much of the street, but I could go into the street, because it was quite busy. The street it also way too yellow, and there is a nasty lens flare.

The Court of Law - before

This is my primary post-processing to the photo done in Adobe Lightroom 4. I use Lightroom a lot and find that I can do so many things with it. Most of the post-processing I did to the photo is done in Lightroom, only the perspective crop and the the clean up in the photo is done in Photoshop. It looks like, that Lightroom 5 will allow me to get that done within Lightroom too.

The Court of Law - before - LR Settings

I originally intended the photo to be an HDR, but it appeared not to contain a whole lot of Dynamic light, so I only did a standard post-processing to the photo, using the 0 EV version of the photo.

Lets run through the settings.

Exposure: I lowered it ever so slightly with -0.36 EV step to get the image just a little darker and more moody.

Contrast: This I raised to make shadows on the street appear more prominent.

Highlights: The slider affects the bright areas in the photo and either makes them lighter or darker. This I lowered to amp down the strong light from the lamp.

Shadows: Works like highlights, only it works on the shadows. I also lowered this to get the shadows on the street to become stronger. It is not that often I lower the shadows, but in this case I did it intentionally.

Clarity: This I raised to get more grittiness in the street and more texture in the building. It is a very potent slider and you should handle it with care.

Tone curve section: Here I adjusted two parts of the highlight area, I raised the Highlights a little again and but lowered the lights. How does these work compared to Highlights in the section above? The tone curve allows you to do more detailed adjustments, and they are applied on top of the settings. I often end up using both the slides both in the top section and in the Tone Curve section. Tone curve can add a more controlled contrast to the image. I use the slides, even though I could drag the curve around. I find that I can work the sliders in a more controlled way, than moving around the curve with my mouse..

HSL section:  This section I really use a lot too tweak colors in the photo. In this case I removed all yellow saturation and lowered the orange. There is yellow in orange, but Lightroom is clever enough only to remove the yellow. So I got rid of my yellow street, but kept my orange building. In a later final touch step I removed all saturation in the street, to get it completely grey.

The Court of Law - PS

In Photoshop CS6 I did:

#1 Remove nasty flare. I did that with a combination of content aware fill and clone stamping until it looked nice.

#2 I then did my usual clean up. Some might argue, that the stuff really was there, and therefore it should also be there in the photo. I find that the images a better and stronger image by taking my time to remove the rubble and signs on the wall and gates. I’m not making a portrait of reality, but I am making a photo.

#3 I cropped the photo in a way to avoid the large square in the lower right hand corner, but keeping the sewer cover in the left corner. And then I straighten the image a bit, using perspective crop. I did that to get rid of the building on the left, with loosing my sewer cover.

Lightroom 5 beta is available – and Jack the Ripper


Warning: Undefined array key "multiauthor" in /var/www/caughtinpixels.com/public_html/wp-content/plugins/post-layout/plugin.php on line 114

Warning: Undefined array key "mobile" in /var/www/caughtinpixels.com/public_html/wp-content/plugins/post-layout/plugin.php on line 352

I just had a quick look at the upcoming Lightroom 5 and some of the new features listed and I’m already very excited! I work a lot with Lightroom 4 and I’m amazed at what I can achieve with it, but there are some tasks, that always requires that I start up Photoshop. One thing I do not like about starting Photoshop up, is that Lightroom then generates a TIFF file, and TIFF files take up space on my hard drive. And even though hard drives are fairly cheap, it is becoming a problem to make back ups, carrying them around etc.

One thing I really love about Lightroom is, that everything I do to a photo in Lightroom is applied on top of my RAW file. If I make multiple virtual copies, to which I can make other adjustments, so that I have got several different photos, based on the same RAW file, but most important I still only have one photo on my hard drive. A great bonus from this feature is, that I can always dial back and press Reset.

But there are some features missing in Lightroom, which really pushes me into Photoshop. I use a wide angled lens a lot. 80% of my photos are shot at a wide angle lens, and quite often I have to shift the camera upwards or downwards, and when I do that, perspective gets distorted. That is a side effect from using a wide angled lens and some times it can be used as a feature, at other times it ruins the photo, if not straighten up. In Photoshop I use the “Perspective crop” tool to solve these problems. It does a decent job, but sometimes it squashes the the photo too much, like making the Empire State Building look like a small fat 20 story skyscraper.

In Lightroom 5 there is going to be a new Upright feature, aimed specifically at this task. This I’m really looking forward to. It can both save me from having a TIFF file around, and maybe even doing a better job than Perspective crop in Photoshop?

Another thing that pushes me into Photoshop, is when I want to do content aware removal of things. I can only remove round things in Lightroom 4, with the clone stamp, which is fine for removing sensor dust spots, but not satisfactory, when I clean up my photos by removing lamp posts and other stuff from my photos, to make a more clean photo. But in Lightroom 5, there will be an advanced Healing Brush.

Then there are some new features:

  • The Radial ND filter, can be a cool thing too. The Gradual Neutral Density filter I already use a a lot to make adjustments to a sky, by lowering the exposure on a very bright sky, increasing the contrast etc. to get the details and texture more clear. This gives a more balanced photo. The new Radial ND filter I guess can be used for some fun stuff on round objects, like the sun, faces etc. You can probably achieve similar things with the existing brush tool.
  • Smart reviews. I don’t think this feature will be usable for me, with my current workflow. The idea is if you are using your laptop is your primary machine to handle your photos, then you got a problem, when you are on the road. You can’t bring all of your photos along, because they take up way too many gigabytes to fit on your small laptop hard drive. What this new feature allows you to do, is to work “off-line” of your primary storage (like a NAS), on low resolution versions of your photos. You can do meta tagging and adjustments. I figure adjustments are post-processing. Though this is quite cool for some, I do have a much more powerful desktop computer, to do my primary post-processing on. For some this might be cool.
  • Photo book creation – I think not. I stick to www.pixum.com to make my family albums. They offer excellent quality and excellent flexibility. But of cause I will look at it, when Lightroom 5 is a available.

Adobe Lightroom 5 will also include a number of minor features and enhancements. More information is available here.

To create todays photo I have used the clone healing brush and the perspective crop in Photoshop.  It is a 7 shot HDR photo, and I used Photomatix pro, to create both a single tone mapped image and a double tone mapped image, which I mixed with the original ones.

The original photo is not a bad one, but neither perfect.

Jack the ripper is around - before v2

#1: I removed the branches. When I straighten the church, some disappeared, but I ended up removing them completely. When I took the shot, made sure, that they were included and did not cover the church. I used the brush healing tool in Photoshop.

#2 The sky I worked with, to emphasize the light in the mist. That is an important part of the mood. I increased the contrast and saturation a bit.

#3 The church I straighten to a certain level. I can’t straighten it completely, because it makes a small fat church, which is not the reality. The compromise is somewhere in between completely straightened and this. Ideally I would have gone further away, but that was not possible.

#4 The acid color of the light from these lamp posts I didn’t like, so I worked with the colors, and mixed that into my final photo. I did that, by making a new layer in Photoshop, opened the Hue/Saturation dialog (CTRL+U) and dialed back some of the yellow and green. I then mixed the lamps into my image.

#5 These lamps are blown out, but because I shot it in HDR I can achieve the moody great look from the lamps, in stead of just a white blob. There is not a lot of dynamic light in this photo otherwise, but the lamps I save.

#6 I then used more healing brush to remove the snow. I used a clone stamp after wards to get a better result on the cobble stones.

#7 The cobble stones is the double tone mapped image. What I get from the double tone mapped image, is the lovely reflections from the lamps and the many details and textures in the cobble stones.

This is one of the photos, where you might ask “Why HDR it?” – well I got more details within the windows of the church and on the lamps. I also got more shots, so that I could remove people and the car coming around the corner. And then it added some of the magic, mysterious Jack the Ripper mood.