Warning: Undefined array key "multiauthor" in /var/www/caughtinpixels.com/public_html/wp-content/plugins/post-layout/plugin.php on line 114
Warning: Undefined array key "mobile" in /var/www/caughtinpixels.com/public_html/wp-content/plugins/post-layout/plugin.php on line 352
Update: I have updated this article to reflect the Nikon D610. The D610 is a minor update of the Nikon D600 and only really has got three changes, two has to do with the shutter. It now does 6 fps instead of 5,5 and it has a Quiet mode (which I loved on the Canon 5D Mark III too). And last a change on the white balance, to fix an issue.
Since I originally wrote this article have sold my Canon 5D Mark III and now only have the two Nikons.
Update 2014-01-03: I have added the Nikon DF in the review comparison. I have given the Nikon DF a lot of thought, and I have ended up NOT buying it. In the conclusion of this review, I will bring in my thoughts on the Nikon DF.
Check prices at B&H:
- Nikon D800 Digital SLR Camera (Body Only)
- Nikon D610 DSLR Camera (Body Only)
- Nikon Df DSLR Camera (Black)
- Canon EOS 5D Mark III DSLR Camera (Body Only)
or at Amazon

For some unplanned reason I have ended up as the owner of Nikon D600, D800 and Canon 5D Mark III and have been using all three camera’s intensively for several months. On a daily basis I carry around both my Nikon D800 and my Canon 5D Mark III – and why is it that I do that? Because they are different cameras. They are good in different situations. They both take excellent photos. I will give a review based on my hands-on experience, in a non formal way. The formal lab tests exist in heaps already.
I will start by explaining why I ended up owning both high-end Canon and Nikon cameras, because that is an expensive lot. I always was a Canon guy, while many of my friends and my dad was Nikon guys. I became a Canon guy by random and not religion. I got a new girlfriend (my wife today) and she had a 70-300mm lens for Canon, so when I should buy my first DSLR, the choice was Canon. The lens however was so poor that I never used it for anything. When I started out doing more serious photography in 2012, I got myself the Canon 5D Mark III.
And for a couple of months I was quite happy with my camera. Good low light performance and a couple of good lenses. But, being a landscape and cityscape photographer, the wide angled lenses are very important to me. After a trip to Amsterdam in september 2012, where I shot around 2000 shots, my mind changed. I have the Canon 17-40mm and I had brought it with me to Amsterdam. My problem was not as much the camera, as it was the lens. The Canon 17-40mm is not terrible sharp in the corners, but worse, it is not wide enough. I realized that, when I stood in a church and shot this image:

I couldn’t include all of the pulpit and all of the roof at the same time. I didn’t have any room behind me, so this was the best I could do and I wasn’t happy about it.
I started looking for other extreme wide angled lenses and read a ton of reviews, only to find out, that Canon only had a few options. Canon has a 16-35mm, which cost twice as much and was reviewed much the same as the 17-40mm. And then there is the 14mm prime that cost three times as much as the 17-40mm, and is characterized as the worst price/quality/performance ratio lens ever. And another couple of options is a cheap Samyang 14mm, with great reviews, except for one major drawback, because it has got a complex distortion, changing a horizon into mustage shaped line. And the Carl Zeiss 15mm, which is very expensive, but very good. In my search I discovered that Nikon did make a 14-24mm that not only had a really good zoom range but also had received extremely good reviews. This lens was the only real reason why I made the shift to Nikon. I’ll get into the details later.
I was going on a 6 week vacation to vist Australia, New Zealand and Singapore. For that I needed two cameras and to avoid carrying too many lenses and doing too many lens changes, I decided to get a D600 with an 28-300 as my second camera for the trip and I left the Canon 5D Mark III at home.
Comparison parameters
My primary focus of photography is landscapes and architecture/cityscapes. I do a lot of HDR photography and my review is biased as such. I will review the cameras from these perspectives.
- Ease of use. The usability of the camera if you like.
- Shooting HDR photos.
- Low light performance.
- Using the Live View mode.
- Image quality.
- Dynamic Range.
- Lens line-up.
Ease of use
I must admit, that I would love to make combination of Nikon and Canon features and button layout. In many ways I find the Canon easier and faster to use, and for some reason more modern than Nikon, but Nikon has some advantages too. But I must admit, that everytime I pick my Canon 5D Mark III, it feels just like coming home.
Custom settings
What I really like about the Nikon D600 and the Canon 5D Mark III is the easy accessible custom presets, that are easily access by turning a dial to U1 or U2 (Nikon D600) or C1, C2 or C3 (Canon 5D Mark III). These presets are onfigurations of the camera, that I can make and store in a preset bank. I use mine for HDR photography and have different configurations for each configuration. One for handheld (higher f-stop, and higher ISO) and one for HDR shots on tripod. Canon 5D mark III has got three preset banks, which allows me to have a handheld setting, a 5 shot tripod setting and a 7 shot tripod setting. This I really love.
The D800 has got some custom presets, divided into two different banks and they are hidden in a menu. They are not easily accessed and I don’t use them at all, it’s faster to setup the camera manually.
One thing I need when shooting on a tripod, is to turn on the Timer. On both Nikon cameras this is a dial and cannot be included in a preset, which when switching between hand held and tripod preset, I sometimes forget, to switch the Timer dial accordingly.
On my D800 I need to do all of my HDR settings manually, and it is really a pain and I more than once ended up forgetting to switch on something or switch something off when I’m done. This is definately not why I use the D800 as my primary camera, this is something I have learned to live with.
On all three cameras I have learned to find my way around, and I find that many things are equally fast to adjust, but just (very) different. However, Canon also has the option of doing the settings on the screen too, like a menu, with (changing programs, f-stops, shutter-speed etc). This is very user friendly.
HDR photography
I like to take High Dynamic Range photos. In the old days only Pro Nikon cameras could take more than 3 auto exposure bracketed (AEB) shots automatically, but that changed with Canon 5D Mark III. The 5D Mark III does up to 7 backeted shots, however the Nikon D800 does up to 9, but the baby brother Nikon D600/D610 still only does 3 bracketed shots. Canon really did a good job, when they designed how the exposure bracketing should work.
First I will need to define what I call the Total Dynamic Range of the camera.

If you take a set of 5 HDR shots, with 1 EV (exposure value) step between each photo, ranging from –2 to +2, then you effectively extend your camera’s Dynamic Range by 4 EV steps (or EVS). Let’s look at the differences in the Total Dynamic Range:
| Canon 5D Mark III | 7 AEB shots with a variable EV step ranging from 1/3 to 3 EV steps. Native dynamic range is 11.7 EVS. Total Dynamic Range coverage is going from –9 to +9, that gives 18 + 11.7 = 29.7 EVS. |
| Nikon D800 | 9 AEB shots Variable EV step ranging from 1/3 to 1 EV step. Native dynamic range is 14.4 EVS. Total Dynamic Range coverage is going from –4 to +4, that gives 8 + 14,4 EV = 22,4 EVS. |
| Nikon D600/D610 | 3 AEB shots Variable EV step ranging from 1/3 to 3 EV steps. Native dynamic range is 14.2 EVS. Total Dynamic Range coverage is going from –3 to +3, that gives 6 + 14.2 EV = 20.2 EVS. |
I have used DXOMark test values to get the native dynamic range for each camera.
It looks like the Canon 5D Mark III is a clear winner in this discipline, and in some ways it is. Because of the flexibility of the Canon 5D Mark III you can reach a higher total dynamic range coverage, than you can with the Nikon D800 and D600/D610.
I do like the flexibility the Canon camera has, not only because I can increase the total covered dynamic range, without adding more photos. The D800 is limited to 1 EVS between each shot. A result of that is the only way to increase the covered dynamic range, is to increase the number of photos. To get the maximum covered dynamic range with Nikon D800, I have to shoot 9 exposures, each taking approx. 75 Mb, which is 675 Mb per set of HDR photos. That is an awful lot of memory card! Had the Nikon D800 had the same flexibility to change the AEB to go by 2 or even 3 EV steps pr shot, it would have been a clear winner. Or if the D600 had not been feature locked to a maximum of 3 AEB shots, that could have been in the game too.
Another aspect is the native Dynamic Range of the camera. The two Nikons are really impressive and are the best DXOMark has ever measured. A “standard HDR photo” is 3 or 5 exposures ranging from –2 to +2. With Canon 5D Mark III that is a total covered dynamic range of 15.7 EVS (11.7 + 2 + 2). The Nikon D800 is 14.4 EVS in one single exposure, which is only 1.3 EVS less than the Canon HDR photo. The Nikon D600 is only 0.2 EVS short of the Nikon D800.

In the future the High Dynamic Range will be covered in one single exposure. When you pass the line of 16 EVS in one shot you will only need to use AEB in more extreme situtations.
Just to show how much dynamic range the Nikon D800 covers with 14.4 EVS covers, let’s have a look at the image below. I shot this photo with my Nikon D800 as a single exposure. The building was almost completely dark, only lit by the couple of street lamps you can see. I actually shut off the camera because I thought it was too dark. This photo had been impossible to shoot with my Canon 5D Mark III in one single exposure, because it would have lost all of the details on the building in either complete black spots or very noise areas.

Conclusion on HDR
In terms of flexibility and total covered dynamic range the Canon 5D Mark III comes out as a clear winner. In extreme dynamic range situations, like a really dark church with bright sun shine coming through smaller windows, the Canon has an edge.
However, both of the Nikons has an impressive native dynamic range, which makes it possible to capture scenes, that the Canon 5D Mark III would have to use AEB shots to capture. The Nikons can cover more than 18 EVS, within a –2 to +2 scenary, which is plenty for most High Dynamic Range situations.
While both Nikon D800 and the Canon 5D Mark III has got more flexibility in how many AEB shots they can shoot, the D600/D610, can only capture two or three shots. The D600/D610 does support up to +3/-3 EVS steps, which 1 more EV step than most consumer DLSR’s supports. This is a feature lock put on the D600/D610 by Nikon, probably to prevent the Nikon D600/D610 to take market shares from the D800. But even with the 20.2 EVS coverage (using –3 and +3) of the D600/D610, it’s is really impressive.
I prefer the flexibility of the Canon 5D Mark III and can cover more extreme situations with the 5D Mark III, but the D800 is more than capable in as good as any situation. The D800 has a huge advantage in the native dynamic range. It allows me use a single shot in many situations, where the Canon 5D Mark III would need to use AEB. This helps photographing moving objects.
The most annoying thing with the D800 is the maximum limit of 1 EV step pr bracketed shot and that combined with the fact, that the D800 RAW files are enormously 75 Mb each. A 9 shot HDR set will then be 675 Mb on your memory card.
The only thing that talks the D600/D610 down is really the feature lock on maximum of 3 bracketed shots, but to compensate for that, I have bought a Promoto Control, which is a really neat control for HDR photography and time lapse photography. The Promoto Control allows me to take any number of bracketed photos that I would like.
Shooting in low light conditions
All three cameras perform very well in low light conditions, though I always take the Canon 5D Mark III, if I know I’m heading into low light situation, like an indoor event or something like that. I do not like to use a flash; I prefer to use the natural light available. This puts some extra strain on the camera. One of my absolutely main reasons for acquirering the 5D Mark III, was because of its low light performance. And it really does a great job here – the best I have ever tried.
There are many ways of getting more scientific conclusions, and if I you are really interested in it, I suggest that you look around for good source. But take my word for it, the Canon 5D Mark III comes out as a clear winner compared to Nikon D800 and D600/D610. Of the two Nikons, the D600/D610 is ever so slightly better than the D800.
At ISO 1600 Canon 5D Mark III has got a lead, which only increases at ISO 3200, 6400 and 12800. I would actually use ISO 12800 for family photos, in small prints. At ISO 12800 I don’t really want to use the photos of the Nikons.
To me there are two kinds of low light situations. One is an event where I take pictures of people in a low light condition, while the other one is shooting landscapes outdoors at night, dusk or dawn. The first situation requires a fairly fast shutter speed, because it is handheld, which means increasing both the f-stop and the ISO, while in the latter situation, I will have the camera on a tripod and I can keep both the f-stop and the ISO much lower. In the first situation I would use the 5D Mark III ten times out of ten times, while all three cameras can handle the latter situation effortless.
Conclusion on low light performance
The Canon 5D Mark III does perform much better at very high ISO ranging from ISO 3200 and higher. But even at ISO 1600 the Canon has got a clear lead. You can hide a lot in the 36 megapixels of the D800, but pixel to pixel it can’t compete with the 5D Mark III.
Using the Live View mode
On the back of all three cameras there is a great Live View screen. For any normal hand held shooting, I never use Live View. It uses the elektronics to focus, just like the snap shot cameras and it is much too slow to get the shot. Fast focus is only achieved by shooting while looking through the View Finder, and that goes for any DSLR camera.
However, I do like to use the Live View mode when I have the camera on a tripod as I do when I take my landscape and cityscape photos. When I shoot my landscapes, I rarely use auto focus. I prefer to use the Live View mode, both to compose the photo and to focus manually. This works impressively well with Canon 5D Mark III. Even in fairly dark situations I am able to adjust the focus manually. The Nikon D800 and D600/D610 is a different story all together.
When I got my Nikon D800 I was really disappointed with the Live View mode. There are two major problems with the D800 Live View. First of all the D800’s Live View has a poor low light performance. Even in reasonably bright situations, like in a room with normal daylight outside, the Live View is very noisy. When the D800 is almost giving up, the Canon 5D Mark III is not even struggling yet.
But that is not the worst part about the D800s Live View. The worst part is, that it does some interlacing of the image on the screen, making focusing impossible in some situations. Even if the light is really good, you may still have serious problems focusing because of the interlacing. You simply can’t see if it is sharp. The interlacing is most probably a side effect of the high pixel count the D800 has. An ingeneered solution to get performance out of the Live View, while handling the 36 megapixels. Typically you see this problem if you try to focus on a smaller pattern, like bricks, fences, windows etc, which I happen to have included in my photos quite often, when means that I have had to adapt other ways of focusing.
The Live View Mode on the D600/D610 is better than on the D800. It does not have the interlacing problem, and the light performance is slightly better, but the Canon 5D mark III is still running in circles around the Nikon D600/D610 in this area.
I use my Nikons for landscape photography and to get around my problems with the poor Live View I have learned by heart, where my Nikkor 14-24mm f/2.8 must be focused to get a tack sharp photo. This is possible because it is a wide angled lens, and when you use a wide angled lens you can get pretty much everything sharp.
Conclusion on Live View mode
The Canon 5D Mark III is a clear winner in this discipline and the Nikon D800 is a clear looser. The D600/D610 is somewhere in between, it has a little better low light performance compared to the D800, but is still way behind compared to the 5D Mark III, however, most important, it doesn’t suffer the interlacing problem if its big brother the D800.
No matter how good the Live View is on the 5D Mark III in lowlight conditions, there are limits to what’s it capable of, and it will grow first noisy, then black too.
Image quality
The image quality of all three cameras is excellent and it should be. There is no reason to be disappointed in any of the three cameras. But they do have their differences.
The mega pixels
The Canon 5D Mark III and Nikon D600/D610 have similar pixel count, 22 and 24 megapixels, respectively, while the D800 has got the mind boggling 36 megapixels. All three cameras capture a lot of details and has got plenty of pixels to spare, if you need to do some cropping. I have, in a couple of situations, really loved the 36 mega pixels, because it allows a more aggressive cropping.
While the 5D Mark III and D600/D610 generate raw files with a size of about 25 Mb, the Nikon D800 is a monster. Raw files takes up about 75 Mb (update: after having writting this article I learned that there is a loss less compressed NEF, which makes RAW files around 40 Mb). You fill up your memory cards too fast. A 64 Gb memory card can hold less than 800 photos at 75Mb and around 1200 at 40Mb. I shoot HDR photos and I take series of 5, 7 or 9 photos and this is really a pain. Later, when I import the D800 images into Lightroom I convert them to DNG files, which compresses the files to about 30 Mb, which is much better. But even the import takes painfully long time.
The large images also have a foot print in the time I spend working with the photos, first the unloading, is more time consuming, and the post-processing my photos is also slower. Eventhough I have a pretty potent computer with 16 Gb of RAM I still find it slow to work with the D800 images in Lightroom. This is a natural price to pay, because data processing takes longer, the more data you have. Larger images contains more data than smaller images.
The colors
The colors are different on the cameras. The two Nikons are much the same, while the Canon is born with a different color profile. The Canon I find slightly more saturated, which comes becomes more clear in some situations than others. This is not something that I feel is an advantage or disadvantage for any of the cameras, just differences. I work a lot with the colors in the post processing and I haven’t had any problems that I couldn’t solve with either of the cameras.
The last real photo shoot I did with both Nikon and Canon, I did on a winters eve close to my home. At the time my Nikon D600 was in for repair, to get fixed the dust / oil on sensor issue. This is what I got:
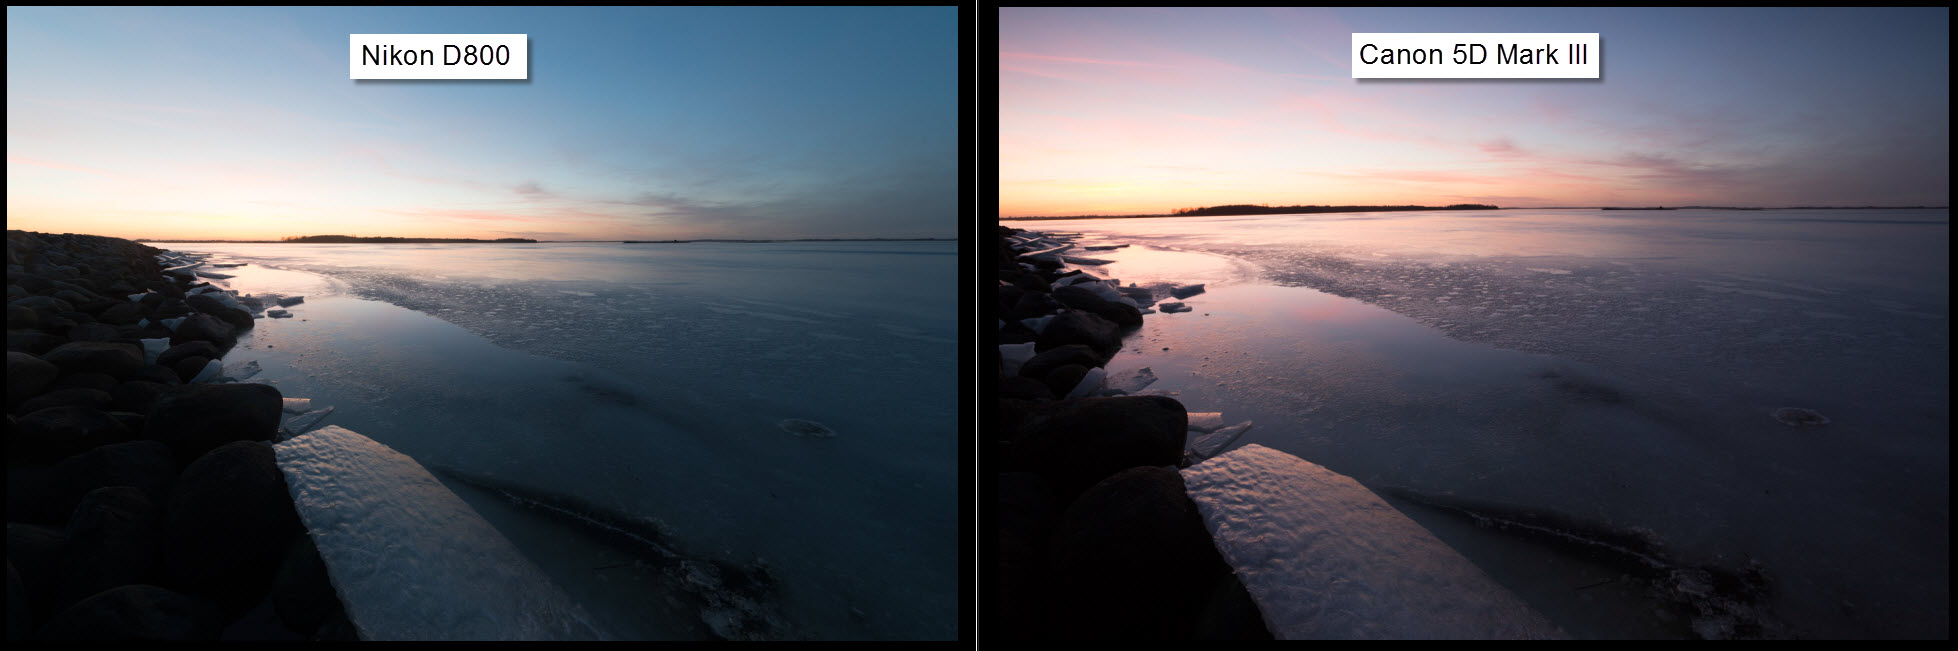
I of course can change the white balance on one of them and get more or less the same colors. I work a lot with the colors, but the initial white balance often tends to be my starting point, and in this case it does give very different results.
This is my final HDR from the Canon 5D Mark III (and I know it is not the same composition as above, it is shot only 3 minutes earlier, and the coloring is the same. I try not to post process same composition twice) :

And this is the finaI HDR from the Nikon D800:

Very different photos, also because I processed them with different things in my mind, but notice the overall temperature and coloring. The Nikon one just is more blue, and the Canon more purple. I boosted the saturation quite a bit in the Nikon version, but that doesn’t change the temperature.
Now I have only the Nikons and my results are quite biased by the default white balance, even though I work a lot with the colors.
Which is better? The Canon or the Nikon? They are extremely good both of them, just different. What did reality look like? Like something in between the two I would say.
The Dynamic Range
I was very happy with my 5D Mark III when I got it. I was amazed at what details I could find in the dark shadows. It was not perfect, there was some red and green color noise, but with some noise reduction I could retrieve great things from the shadows. This is mostly relevant you shoot single exposures, but I shoot a lot of HDR consisting of 5 shots or more and then dynamic range of each photo is less relevant. However…
When I got the Nikon D800 I knew it was 2,7 stops better in dynamic range, than the 5D Mark III. I hadn’t realized how much this was. The D800 – and the D600, because they perform almost equally well – are outstanding in dynamic range, as you can read in the section about HDR photography above in this review.
This is an example of three closely resembling photos, shot with a few seconds between them.

Canon 5D Mark III

Nikon D600

Nikon D800
I then increased the exposure 4 stops (4 EV steps) artificially in Lightroom and have a look at the shadows at a 100%.

Canon 5D Mark III: A 100% crop from from the shadows. (unfortunately slightly unfocused)

Nikon D600: A 100% crop from from the shadows.

Nikon D800: A 100% crop from from the shadows. (unfortunately slightly unfocused)
This is what what Dynamic Range is about. Even though I failed to get two of the shots tack sharp, I think it is easy to see, that the Canon 5D Mark III is a lot more noisy in the shadows, if the shadows are raised 4 EVS as I did here. The area is almost completely black in the original images, but the Nikons actually manages quite well and delivers very usable details, a little noise but definitely usable! The Canon 5D Mark III on the other hand really falls apart in the shadows, and I would not try to recover that information. Shadows should remain shadows on the Canon 5D Mark III. If you want to have more information from the shadows you should shoot at two or more exposures.
When you shoot photos with both the D600/D610 and D800 you can shoot an under exposed photo and then you can raise the exposure in Lightroom or Photoshop and still get a usable result. This I have purposedly used, while shooting single exposures. I then set the exposure compensation to –0.7 EVS or –1 EVS. This I do if I anticipate a risk of blown out areas and I prefer to have completely black areas compared to completely white areas.
Conclusion on Dynamic Range
There is no doubt about it, in dynamic range, both the Nikons come out as clear winners, the D800 only an inch ahead of the D600/D610, but well ahead of the 5D Mark III.
Lens lineup
I was quite happy with my Canon 5D Mark III, but as I wrote in the introduction to this article, there was a turning point. It had started, because I sometimes got annoyed with the image quality of my Canon 17-40mm lens. It is soft in the corners and has got a lot of chromatic aberrations. The latter can be removed, softness can’t. But there was a third problem – it was not wide enough and as I wrote in the introduction to this review, I realized that in a church in Amsterdam, where I couldn’t get all of the pulpit included in a photo and I wasn’t happy about it.
I had picked that particular lens, because from reviews I could see that, there was no significant difference in the quality of the images between the Canon 17-40mm and the twice as expensive Canon 16-35mm. I also liked the fact, that the 17-40mm was lighter. It didn’t matter, that the 16-35mm is a faster lens that goes up to f/2.8 where the 17-40mm only does f/4.0. I had no intension of using it with a faster f-stop than f/4.0.
What good was an excellent full frame camera body, if I didn’t have the lens that I wanted? So I started my research.
After having read a ton of reviews on the Canon lenses I figured, none of the wide angled lenses was really what I wanted:
- The Canon 8-15mm fisheye. It takes completely round pictures at the lower end and in the upper end still classic fisheye and I didn’t want a fisheye.
- The Canon 14mm prime is very expensive and has received the worst price/image quality ratio and then it is less flexible, being a prime and not a zoom.
- Canon 16-35mm. Twice the price of the 17-40mm, only 1mm wider, which I doubted was enough and much the same image quality as the Canon 17-40mm. This seemed too much the same, just more expensive.
I then looked for other brands and found:
- Samyang 14mm f/2.8, also a prime with excellent sharpness and very cheap. But it has got a complex distortion. A straight horizontal line looks like a mustage, which is harder to fix than a curve. I decided that I didn’t want this kind of distortion, even though it might be fixable.
- Carl Zeiss 15mm f/2.8. At the time a new and not yet available lens, for other than a few reviewers. The lens is very expensive, but also excellent in every way, as far as I could see, but it was a prime and not a zoom.
- Nikkor 14-24mm f/2.8. This seemed like the perfect lens for my needs. It goes really wide and has out standing reviews and image qualities. It’s expensive, but still cheaper than the Carl Zeiss and Canon 14mm. There was only one problem, it was a Nikon lens.
I ended up pre-ordering a Carl Zeiss 15mm, even though it was a prime. It seemed like the only option.
I had a long vacation coming up, where we had to go to Sydney for a few days, then stay in New Zealand for a month and then a couple of days in Singapore. I would hate to go with the wrong equipment. It was very likely that I wouldn’t get my Carl Zeiss before going, so I continued searching for other options.
While waiting for the Carl Zeiss I fell more and more in love with the Nikkor 14-24mm. I also found out, that Nikon had a Nikkor 28-300mm, while not being a superb lens, it was reasonably priced and had a good all purpose usage for travelling. A tourist lens. Canon has got a 28-300mm lens too, but the price tag is just more than I want to spend on a lens, beside the fact that it is huge and heavy.
I did some calculation, and figured out that if I sold all of my Canon equipment, bought the Nikon D800, Nikkor 14-24mm and the Nikkor 28-300mm I would still have money in my pocket. In the end I chose to buy the Nikon D800 and the two lenses. During my investigations I observed a few things, that are important to me:
- There are several lenses that exists in both line ups, like 16-35mm, 24-70mm, 70-200mm, 70-300mm, 28-300mm, but they may be of different quality and with different specifications and very different pricetags.
- For Canon full frame cameras there is no superb extreme zoom wide angled lens, like the Nikkor 14-24mm f/2.8.
- Canon high-end lenses are more expensive than Nikons. Nikons are expensive too, but I have the feeling of getting the good stuff cheaper than at Canons.
- It seems that everything new from Canon is really really expensive. The new 24-70mm f/2.8 has almost doubled the price.
- Canon has got an excellent 24-105mm all purpose lens, that doesn’t exist in Nikons lineup. Nikon has a 24-120mm, the newest one is reviewed ok’ish, but not excellent. So the only real option is the 24-70mm or 28-300mm, which are two very different lenses in quality and zoom range… and price.
- Canon has a cheap 70-200mm f/4 that is really sharp and light. Nikons has got something similar, though not as as cheap.
- Canons full frame cameras are more expensive than Nikons.
The decision of switching from Canon to Nikon
I can take great photos with Canon, some of my best I have shot with my 5D Mark III, but what really pushed me towards Nikon was the lenses and to some extend the pricing. It seems that every new thing from Canon is much more expensive, so I thought I’d rather get off the train, before it was too late. Canon lacks some of that good stuff in the wide angled lenses department, that Nikon has got. And I must say, despite the weight and clumsiness of my Nikkor 14-24mm f/2.8 I love this lens. It has an out standing sharpness all over and gives incredible photos and I love that I’m able to go as wide as 14mm.
I do miss the flexibility from the Canon 5D Mark III, both in Auto Exposure Bracketing and in the easy accessible custom presets, but the native dynamic range and the lenses of Nikon is making up for that.
The Nikon D600
I wanted a second backup camera for my long vacation in New Zealand. While I searched for options, Nikon announced the D600, which seemed like the obvious choice to me. It hit the shelves a couple of weeks before my journey and I got one of the first copies.
I really love many things about the D600. It’s almost as fast as the 5D Mark III in terms of shots pr second, and has got many qualities (update: And the D610 is equally fast). There are really only two negative things to say about the D600. The first one is the fact that it is feature locked to a maximum of 3 Auto Exposure Bracketed shots. The second one is the dust on the D600 sensor issue. I got the camera with dust on the sensor and immediately handed it in for cleaning, and they gave it a quick blow and handed it back to me, but before I knew it, I had got spots again. I handed it in again, and this time they did a proper cleaning. I got it back two days before take off. But on the second day in New Zealand the upper left hand corner had a lot of dust spots again. But just a few weeks ago Nikon finally acknowledged that there is a dust problem with Nikon D600 and I handed in my camera again. And they fixed it, and now I am a very happy D600 owner. Update: I still get far more spots on my sensor than I ever got on my Canon. But this also goes for the Nikon D800. Both generate much more spots on the sensor.
Conlusion and verdict
All three (well four now) cameras are amazing and can produce amazing photos, but there of cause exists differences.
Canon 5D Mark III
Pros
- Total Covered Dynamic Range at 29.7 is amazing.
- Lots of flexibility in Auto Exposure Bracketing mode.
- Fast accessible Custom Presets for complicated camera configurations.
- Excellent low light performance.
- Fast camera with 6 fps.
- Fantastic Live View Mode.
- Quiet shutter mode.
Cons
- Not a very impressive native Dynamic Range. Only 11.7 EVS. (www.dxomark.com). Which more often requires brackted shots, making photographing moving objects difficult.
- Weaker lens line-up in the extreme wide angle department.
- Prices on newly released Canon equipment is too expensive to my taste.
- No built in Flash.
Nikon D800
Pros
- Total Covered Dynamic Range at 22.4 is enough almost any situation.
- Some flexibility in Auto Exposure Bracketíng mode.
- The best native dynamic range in the world.
- Excellent extreme wide angle lens line-up.
- 36 Megapixels gets a lot of details.
Cons
- Custom presets are hidden in a menu and not usable for practical use. Faster to just switch the buttons.
- RAW files are huge, they take up 75 mb and are slow to work with.
- It is a slow camera with only 3 fps.
- Really bad Live View mode, with interlacing making manual focus in Live View mode impossible in some situations.
Nikon D600/D610
Pros
- Second best native dynamic range in the world, only second to the D800.
- Almost as fast as the Canon with 5.5 fps (and the D610 6 fps)
- D610: Quiet shutter mode.
Cons
- Custom presets are hidden in a menu and not usable for practical use. Faster to just switch the buttons.
- Total Covered Dynamic Range is only 20.2 EVS, which is not much better than many other cameras.
- Bad Live View mode, though better than the D800.
- Not much flexibility in Auto Exposure Bracketing mode.
Nikon DF
I don’t have a Nikon DF, though I did consider to get one, but in the end I have chosen not to buy one. Why is that?
The Nikon DF certainly is a different camera, not technically, but in usage. It does not offer Video, but that’s no big deal for me. If I shoot a video I use my iPhone, I rarely the cameras.
What the camera really is all about is the essence of old school photography. You can use a number of old Nikon lenses, that you can’t on a D800. But I (just as well as most people out there) don’t own any of these and probably never will. If you are dying to use some of the lenses, this of course can be the reason to get a Nikon DF.
The sensor is the same as in the D4. It’s “only” 16 megapixels, which is in the low end of what I prefer. I do love the 24 megapixel of the D600/D610 and love even more the 36 megapixels of the D800. I wouldn’t hesitate to crop a photo from the D800 quite a lot. If you got the wrong lens attached, then it is an option, to say “what the heck, and do the cropping later”. From 16 Megapixels, you don’t have much to crop from. This is reason enough for me, not to buy the camera.
What the Nikon DF does better than any of the other three is Low Light photography, and that should be the ONLY reason for me to buy a Nikon DF. But I have been experimenting with the Nikon D800 on low light photography recently, and I find that it really does meet my requirements.
If you shoot a lot of Low light photography, the Nikon DF, might just be the camera that you need.
And the price tag. It’s just too expensive. If you don’t own the old lenses and don’t have a really high demand of a low light performance, you get much more camera for your money, buying a Nikon D610, in my opinion.
Pros
- Low light performance.
- Almost as fast as the Canon with 5.5 fps
- More quiet than the other Nikons
- Looks vintage
Cons
- Only 16 Megapixels
- Less Dynamic Range (13.1 EVS)
- Fairly expensive compared to what you get
- No video, if you are into that kind of thing
- No built in flash
Verdict
All cameras produce fantastic photos, and differ a little in usage, but for a landscape photographer Nikon has got a better extreme wide angle lens line-up, compared to Canon, and that really tips the verdict, for me. What Canon 5D Mark III might lack in native dynamic range, is covered in a very flexible Auto Exposure Bracketing mode.
After having had all three cameras for some months now, my decision is clear. Nikon D800 is the best DSLR of the three for landscape photography. The D600 now with a solved dust on sensor issue, is another excellent landscape camera. The D600 also gives 5.5 fps, which almost is the same as 5D Mark III’s 6 fps.
Now that I have had good and long time with all three cameras I am sure, that have made the right decision to switch to Nikon. The only things I will be missing are the ease of use with the Custom Presets and the low light performance. The Nikons are good at low light too, but the 5D Mark III just is better.
And at the time of writing this review I have actually sold my Canon lenses and the Canon 5D Mark III body is leaving the building in two weeks.
Check prices at B&H:
- Nikon D800 Digital SLR Camera (Body Only)
- Nikon D610 DSLR Camera (Body Only)
- Nikon Df DSLR Camera (Black)
- Canon EOS 5D Mark III DSLR Camera (Body Only)
or at Amazon