Shoe Boat


Warning: Undefined array key "multiauthor" in /var/www/caughtinpixels.com/public_html/wp-content/plugins/post-layout/plugin.php on line 114

Warning: Undefined array key "mobile" in /var/www/caughtinpixels.com/public_html/wp-content/plugins/post-layout/plugin.php on line 352

Shoe Boat

I guess it’s no surprise that Amsterdam has all these lovely canals. You find house boats, construction boats and just small boats for cruising around in the canals. The yellow shoe shaped boat is one of the more spectacular ones I found.

About the processing

It’s a 5 shot HDR, that I processed with Photomatix. Nothing unusual there. Then I blended layers in Photoshop, to remove a little ghosting in the trees, not much there though. The photo still didn’t really pop the way that I had hoped. I had managed to get a not very pretty handle of bicycle in the lower part of the photo. In the end I decided on this cinematic format, cutting away the handle. The other thing I did like, was the hanging bowl of flowers, so I decided not to emphasize that too much.  I focused on the small Shoe shaped boat and the sun rays in the far end. Those I processed to be emphasized. The boat was a bit dark, I made it more light and the sun rays I emphasized using burn and dodge tools.

New York Grand Central in Golden Light


Warning: Undefined array key "multiauthor" in /var/www/caughtinpixels.com/public_html/wp-content/plugins/post-layout/plugin.php on line 114

Warning: Undefined array key "mobile" in /var/www/caughtinpixels.com/public_html/wp-content/plugins/post-layout/plugin.php on line 352

New York Grand Central In Golden Light

Grand Central in New York – a must for photographers coming to New York. I didn’t have much time in New York, but I’m glad that I got the opportunity to see the Grand Central. It’s totally awesome.

About the processing

It’s a 9 shot HDR ranging from -5 to +3 with 1 EV step between each shot. My problem was, that the window in the middle has very strong sunlight coming in. So strong, that it spills over the walls and really ruins the photo. Even though I manage to capture all of the darkest and brigtest parts. In the processing in Photomatix, it turned out to be a gray and very ugly wall around the window in the middle, ruined by the sunlight. Even if the window it self is perfect. Finally I got the idea to use a ‘sunlight’ filter in one of my Photoshop plugins, to turn white grayish light golden and also reflect the golden color on the floor. That worked!

Late Summer Sunset


Warning: Undefined array key "multiauthor" in /var/www/caughtinpixels.com/public_html/wp-content/plugins/post-layout/plugin.php on line 114

Warning: Undefined array key "mobile" in /var/www/caughtinpixels.com/public_html/wp-content/plugins/post-layout/plugin.php on line 352

Late Summer Sunset

The late summer in Denmark is beautiful. This is after a great barbeque at my Brother in Law. They just bought a farm on a small island.

It’s a 3 shot handheld HDR. Instead of using shutter speed to bracket my three shots, I used the ISO. The brightest one was ISO 6400, which made it a bit hard to work with, due to the noise. I wouldn’t recommend doing ISO bracketing, when the ISO goes that high. I had to do it, because it was hand held and it was too dark to shoot the photo otherwise.

Tip: Crop dead areas away


Warning: Undefined array key "multiauthor" in /var/www/caughtinpixels.com/public_html/wp-content/plugins/post-layout/plugin.php on line 114

Warning: Undefined array key "mobile" in /var/www/caughtinpixels.com/public_html/wp-content/plugins/post-layout/plugin.php on line 352

Misty Orange Sunrise

Sunrises and sunsets keeps amazing me. You still can be surprised and see new wonderful variations. This photo is hardly processed. In Lightroom I have increased the contrast a bit, lowered the clarity a little and then raised the vibrance slightly. Not a lot compared to what I do to some of my other photos.

Tip: Crop dead areas away photo
In the beginning I didn’t want to cut away pixels. The more pixels, the better. I’m still struggling with this, but I have learned that some photos really get a much stronger composition by cropping them.

This particular photo doesn’t have much of an interesting foregrund and the sky continues upwards as orange. It becomes dead areas with nothing interesting. By cutting that away, I cut away dead zones and is left with the good stuff and that makes a stronger composition.

When, what and where to take photos?


Warning: Undefined array key "multiauthor" in /var/www/caughtinpixels.com/public_html/wp-content/plugins/post-layout/plugin.php on line 114

Warning: Undefined array key "mobile" in /var/www/caughtinpixels.com/public_html/wp-content/plugins/post-layout/plugin.php on line 352

I have a normal job and work at regular business hours and I do not work as a photographer. I work in an IT consultancy company called Pentia. I also have a family. So when do I get time to take photos? Well, when the opportunity is there – I’m prepared so to speak. This is what my bag looks like at any given time:
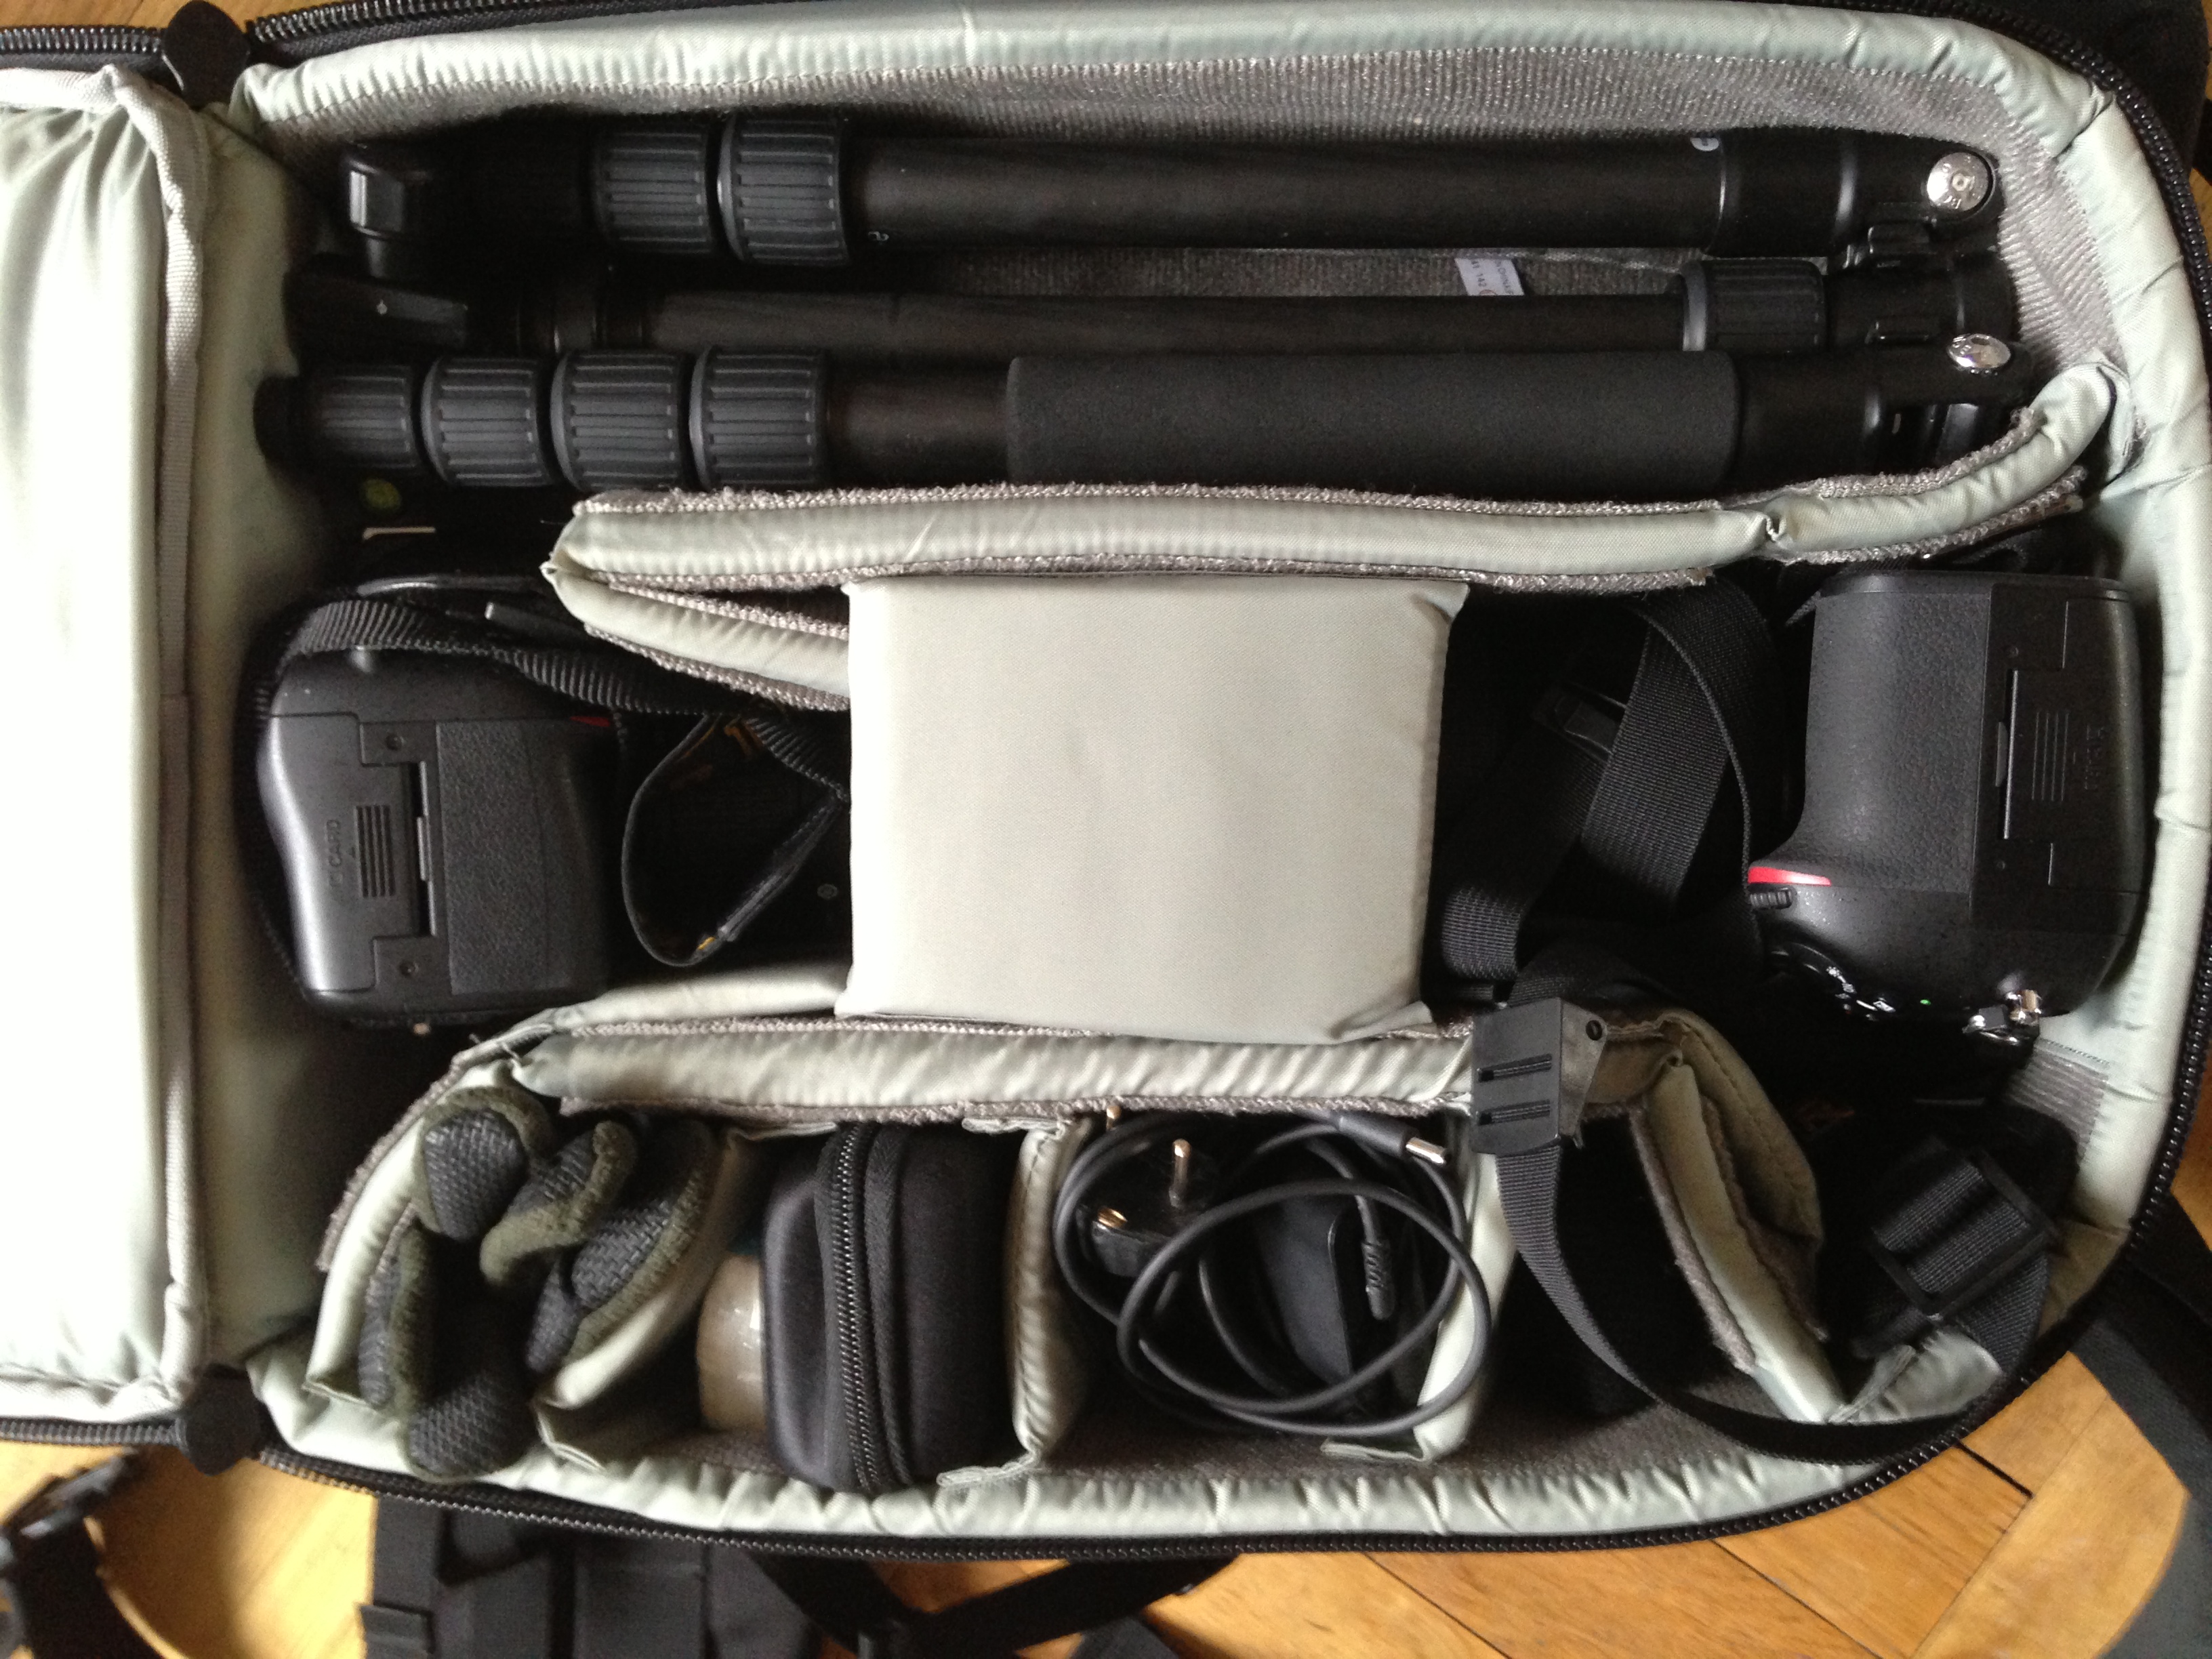
What's in my photo bag

And I always carry my bag around. Sometimes I take out the D600, to get a lighter bag. What you find in here is:

  • Nikon D600, with a standard Zoom lens (24-70mm)
  • Nikon D800, with a wide angle Zoom lens (16-35 or 14-24)
  • Sometimes I also have a 28-300mm along.
  • Promote control (for taking HDR photos)
  • Mouse – for my laptop.
  • Fishing glowes, that can have individual fingers uncovered
  • Full size tripod.
  • Polarizer
  • Extra memory card
  • Extra battery
  • Cloth to wipe things clean
  • Sometimes I take out the tripod and carry that in my hand to allow room for my Lee filters set.

By carrying this bag always – and I mean always, I’m always prepared. What I have come to learn over the last 3 or 4 months, is that, if the light is not good, don’t take the shot. It’s a waste of time. The only reason to take a shot is to practice composition.

Going to work and leaving work during the winter time, matches sunrise and sunset, which allows many photo opportunities. And I do spend 15-20 minutes if the light is right, to walk that extra mile, to get something.

I’m also getting better at stopping the car, and taking the shots, when I see something pretty, while I’m driving.

This is the way I can make it work for me, as an amateur photographer, with a fulltime job and a family. I do get to travel a little bit, as a part of my job, and we travel some privatly, and I do bring my camera, but it is far from every time, that I get photo opportunities.

Sometimes I go for a specific location at sunrise or sunset to shoot. Every time I do that, I get awesome photos. That is really what it takes. Be there or be square… It’s a lesson that I’m still learning and is still trying to make fit into my life, but it is not easy.

My spare time I use for processing the photos. I have far too little time to do this and only a few of my photos reach the public. I try to post at least one successful photo from each of my “shoots”. But from a scene I might have somewhere between 5 and 30 photos, that I could process and get great looking photos, but I only process one or two. First of all I would like to share photos with a variety, second I keep some in store, for a time, when I might not have as much to take photos, and still want to process photos.

Some of the photos I bring home, might lack something in the composition, some may be more difficult to process. I usually process those I instantly like the most, and save the rest for later. Some shoots may have been in a different light, that what I have tried before, and I have to figure out how to get great photos in the processing.

When I have been on a vacation and shot a fairly large amount of photos I spend a long time sorting and processing. The problem with travelling is, that far too often you come across wonderful things and places, but at the wrong time of the day, with hard light. If you can get a good photo out of it, you have to spend a long time trying to save the photo in Lightroom and/or in Photoshop.

Tip: Pseudo HDR


Warning: Undefined array key "multiauthor" in /var/www/caughtinpixels.com/public_html/wp-content/plugins/post-layout/plugin.php on line 114

Warning: Undefined array key "mobile" in /var/www/caughtinpixels.com/public_html/wp-content/plugins/post-layout/plugin.php on line 352

Pantheon Reflecting the Sun Setting

Pantheon Reflecting the Sun Setting

Pantheon is one of the most beautiful buildings I have seen and I was even rewarded with the most beautiful sunset.

The photo is an old one, shot with my ancient Canon 400D. How to salvage an old photo? I took this photo as a single RAW on my old Canon 400D using a Sigma 10-20mm lens. I didn’t have a tripod, but the light was so gorgeous I just had to shoot the scene. What I did was to stand as still as I could and just fire away 20 shots hoping one would be sharp enough. The ISO I had turned up to 400, which is the highest acceptable ISO on that camera, and I the raised the f-stop to the highest value the lens allowed (lowest number). That gave me a shutter speed of 1/13 seconds, which requires a very steady hand. But I managed.

Tip: Try making Pseudo HDR photos from single exposure RAWs
In the processing had to major issues. I had to get a better balance between light and shadows and to increase the sharpness. To get better balance between the shadows and the light areas, I made a Pseudo HDR photo. To do that I made in Lightroom two artificial exposures by making virtual copies. One I made a -2 and the other I made +2. These to exposures I gave some strong noise reduction, and then I exported all three to Photomatix and tone mapped them. The result was awesome. Not as good as if I had shot three proper bracketed shots, but good enough.

The sharpness I achieved by duplicating the layer in Photoshop and then applying a fairly strong Unsharp Mask (really a bad name for a sharpening rool). That did some really good things to the roof of the Pantheon. I blended in the good parts of the sharpened image – the rest I didn’t use.

The Frozen Setting Sun


Warning: Undefined array key "multiauthor" in /var/www/caughtinpixels.com/public_html/wp-content/plugins/post-layout/plugin.php on line 114

Warning: Undefined array key "mobile" in /var/www/caughtinpixels.com/public_html/wp-content/plugins/post-layout/plugin.php on line 352

The Frozen Setting Sun

The sun right into the camera? 9 exposures with 1 EV step between each. I was just on a small business trip to New York. I managed to get time to go to B&H and get myself a Promote control. For some reason I can’t buy that in Denmark. The Promote control should be a tool in every HDR photographers backpack.

The Promote control allows (through a cabel) to take as many HDR photos you like. I can then take 9 HDR photos automatically with my Nikon D600 (which is normally limited to 3 shots), just as I can with my Nikon D800. But I can also increase the EV step between each shot. The D800 is locked to 1 EV step, which means that if I really wan’t to cover some dynamic range, with the Sun within the frame and dark shadows too, I have to switch to manual. Another nasty side effect of taken 9 bracketed shots with the D800 is the 675 Mb impact on the memory card (ouch!).

With the Promote control I can take what ever number of photos I like with whatever EV step. Now that is cool, and I can’t wait to get it in use for real.

For this shot I didn’t have the Promote Control yet and took all 9 shots of 75 Mb each.

About the processing
I used Photomatix to tone map the image. Afterwards I have spend quite some time in Photoshop blending layers. The sky kept coming out dull and gray from Photomatix, so I had to mix in another sky from one of the original photos, but it was still too flat. So I made a duplicate layer and started playing around with the Red, Green and Blue channels individually in the Hue/Saturation dialog (CTRL + U) untill I got what I wanted. However, that ruined the lower part of the image completely, but that was not problem, I just mixed in the sky with the rest of the image.

Finally I spend quite a lot of time cleaning up small peckles on the ice and the bridge.

Peaceful Sunrise At Milford Sound


Warning: Undefined array key "multiauthor" in /var/www/caughtinpixels.com/public_html/wp-content/plugins/post-layout/plugin.php on line 114

Warning: Undefined array key "mobile" in /var/www/caughtinpixels.com/public_html/wp-content/plugins/post-layout/plugin.php on line 352

Peaceful Sunrise At Milford Sound

One of the most beautiful and dramatic fiords lies on the the west coast of New Zealands South Island. The sun rises and shines on Mitre Peak, which rises an amazing almost 1700 m straight out of the water, which I was told was the record. The weather changes a lot in Milford Sound and seeing it without a cloud is a rare experience. It rains up to 11 meters (!) per year here, which is makes this place one of the places on Earth where it rains most.

About the processing
This is 7 shot HDR photo merged together using Photomatix. I have worked a lot with the image. Created a new layer, fine tuned an area, and then blended that area into the main photo, then made another duplicated layer to optimize another area. I have used Topaz Adjust and Nik Color Efex filters with delicacy.

Cleaning up the photo
I have done a lot of cleaning up in the photo. There was a lot of dirt, leaves, insects etc in the water. This I have removed using the clone tool in Photoshop. It took some time, but it’s important to achieve the calm mood of the photo and the strong clear reflection.

Stars above swedish cottage


Warning: Undefined array key "multiauthor" in /var/www/caughtinpixels.com/public_html/wp-content/plugins/post-layout/plugin.php on line 114

Warning: Undefined array key "mobile" in /var/www/caughtinpixels.com/public_html/wp-content/plugins/post-layout/plugin.php on line 352

Stars above swedish cottageIn the autumn we went to Karlskrona in Sweden with some of our friends. At night the clouds cleared and with no moon I took a few shots at the sky.

What did I learn?
I learned that when it is so dark, you can’t really focus. You have set the lens to manual focus mode, and then learn by heart where the focus ring must be positioned.

About the processing
The photo consists of 9 HDR photos, but the sky comes from only one shot. The reason for that, is that the stars actually move surprisingly fast. An exposure of more than 15 seconds, will show stars moving. It’s really fascinating.

Christiansborg – house of the goverment


Warning: Undefined array key "multiauthor" in /var/www/caughtinpixels.com/public_html/wp-content/plugins/post-layout/plugin.php on line 114

Warning: Undefined array key "mobile" in /var/www/caughtinpixels.com/public_html/wp-content/plugins/post-layout/plugin.php on line 352

Christiansborg - house of the goverment

The previous photo ‘The Royal Stables’ I posted, I shot over at the right hand side of this image. The photos are shot within a few minutes, but as you can see, they are very different in nature.

About the processing
This photo is a single exposure, processed in Lightroom 4. What I have basically done, is to raise the Shadows to 100 and then lower the Highlights to -100. This move made the ‘mood’ of the photo. The next steps I did was fine tuning (using curves), raised clarity a little.

The last steps I did was cleaning up in the photo, like removing the shadow from the tripod, removing a nasty green color cast from a lamp.

As you can see, the mood is very different from ‘The Royal Stables’ and I like both, they are just different.

About the composition
My idea with composition was both to have a lead in line, using the edge of the bassing, and the second was using the lamp as a kind lamp like the tower on the the building. The lamp seems very large and has much the same shape as the tower.