The Weekend Post: The Three Most Important Tips for Photographers

The old main building of the University of Copenhagen.

This post is The Weekend Post – sign up on the website, to get it on email. Last week I showed how to get two great and yet somewhat different photos, out of one photo. If you missed it, you can find it here.

This week I will dive into three things, that I find very important to improve if you want to improve as a photographer. I will put this into three solid tips, that will improve your photography. It’s not the usual tips, but it’s three things that make a big a difference.

We all know the phrases ‘Composition is everything’, ‘Timing is everything’ and ‘ Light is everything’, and somehow they seem both to work together, and yet still, if they are not contradictory, at they are least not the same thing. So which is right? Well, sort of all three at the same time.

If you have a poor composition, your photo will, no matter what you do to it in the post-processing, not be very successful. I once read that a bad composition is a turd, and no matter what you do in the post-processing, it will still be a turd. I tend to agree, and yet I have some reservations. I believe it’s a balance of several things, the composition being one of them. A weaker  composition, can to some extent be compensated by great light, timing and post-processing, and you will still end up with a successful photo.

Tip #1 Learn to post-process and learn it fast

If you can make everything peak, you will have a stunning photo. If you can get the perfect composition, in the perfect light, with the perfect timing, you will have a perfect photo … IF you know how to process the photo perfectly too. If you do not know how to post-process the ‘perfect photo’, it will never be a winner.

One of the reasons, why I got into photography, and the very essence of “Caught in Pixels” is the realization, that an SOOC (Straight Out Of Camera) photo usually is not interesting. It is the post-processing, that brings a photo to life. No matter how good your composition, light and timing is, if the photo has a poor processing, everything falls apart. The post-processing is the glue that ties everything together. And the better post-processing, the stronger is the glue.

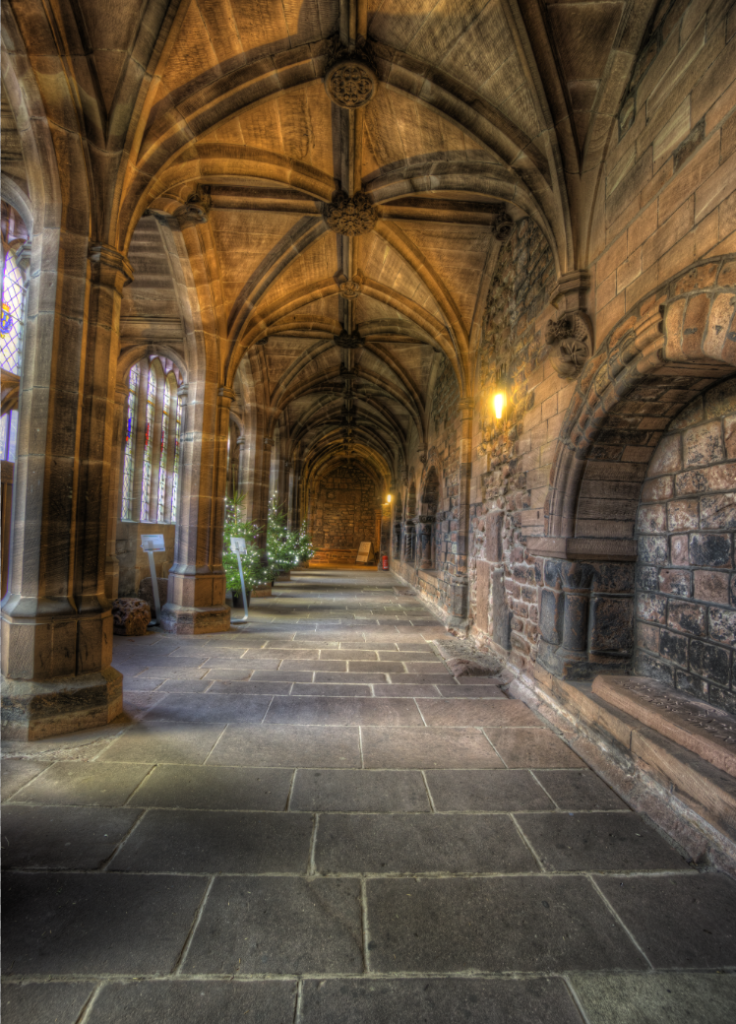
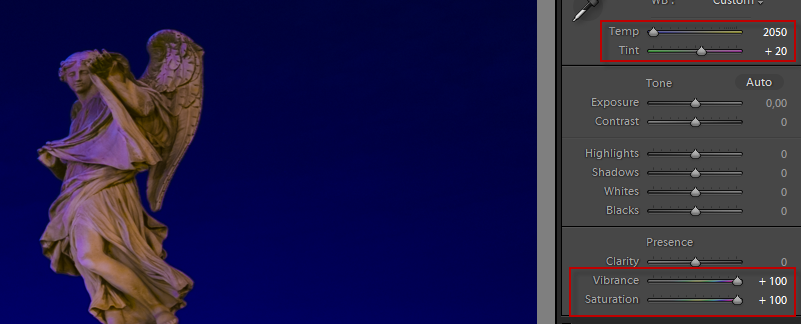
Far too many people, think that extreme processing makes a good photography, but it doesn’t. If you want to have success with your photography, you need to have control of post-processing and have it on a (tight) leash. Have a look at this photo, in a badly processed version, and afterwards in a good processing.

Bad processing 2

An example of a poorly processed photo. This is a 30 second processing process. It almost hurt my eyes to look at this, and they keep floating around searching for focus points.

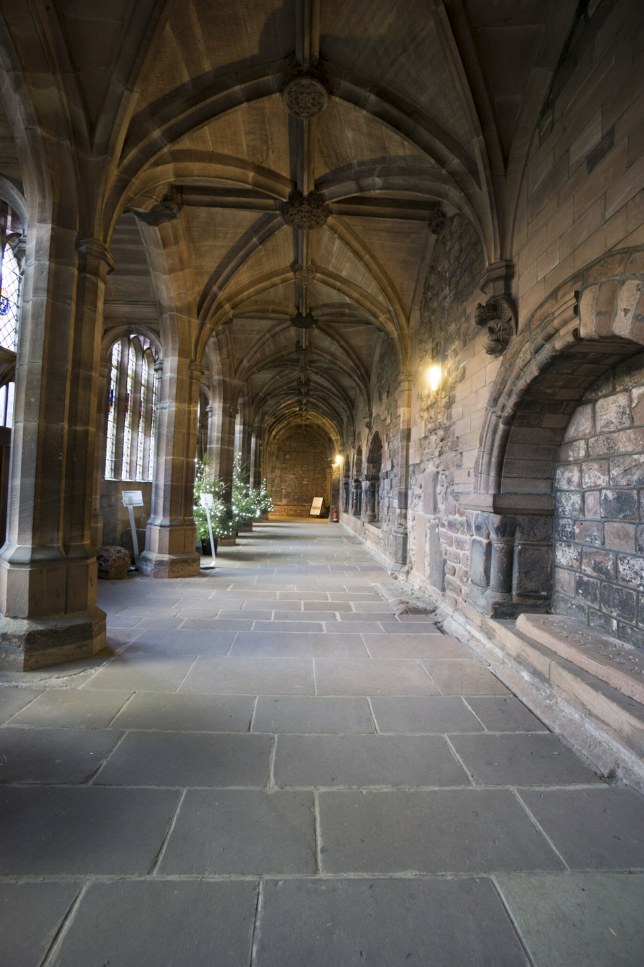
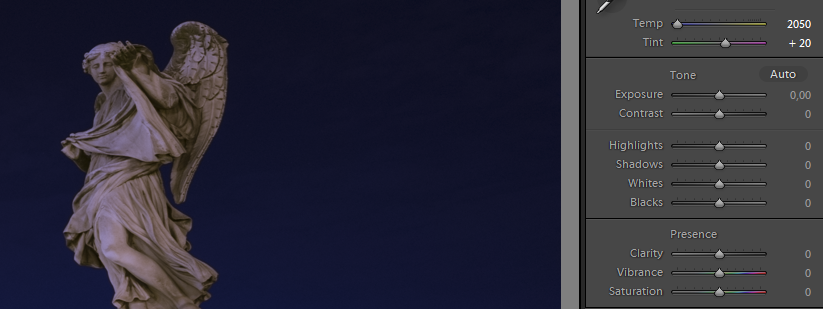
And now the exactly same photo, just processed competently.

The same photo processed in a good way. This is a 2-3 hour processing process. This one is much more peaceful, and the eyes wander straight to the pulpit.

In the first version of the photo, is a classically badly processed HDR. And it is that kind of processing, that has given HDR photos a bad reputation. It is too much of everything, and the depth is completely gone, because everything seems equally important. If everything is enhanced, nothing is enhanced.

You might be able to see, that a strong photo and composition is behind the bad processing, but a poor processing takes the away the quality of the photo. In the first version, the first thing that comes into my mind, is ‘too much, too much of everything’. In the second version, there is a much stronger balance in the photo, and this is the difference.

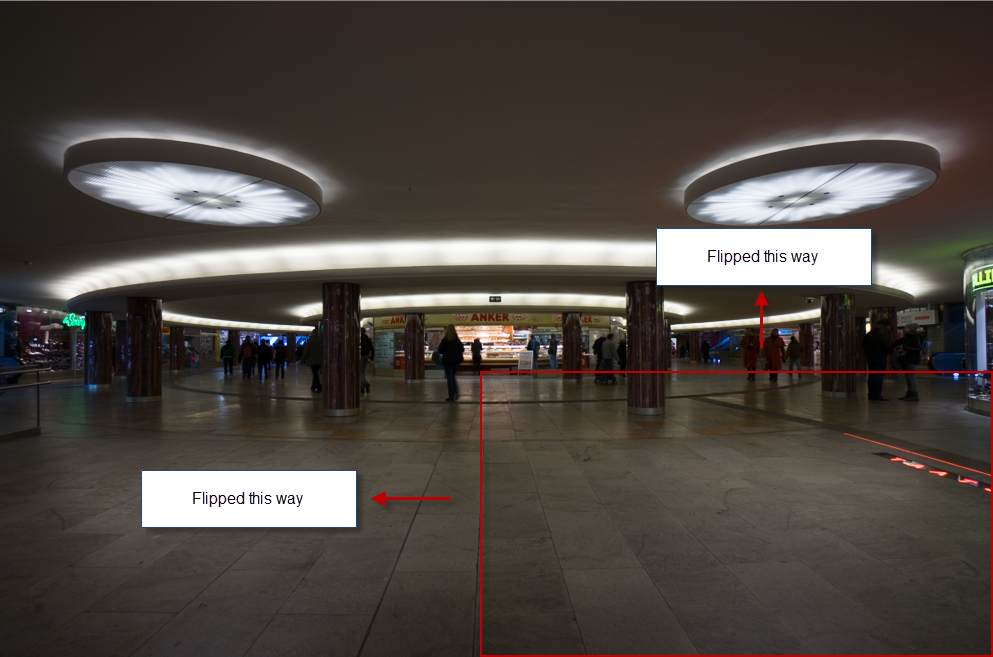
I have often received the comment “Normally I don’t like HDR photos, but I like this one you have made'”. Of course, this makes me happy, but it also makes me think. I have received that kind of comment, where I think I have knocked myself out in HDR, and gone quite extreme, like in this one from Copenhagen Central station:

A heavyly processed HDR photo, with the award “I dont’ like HDR, but I like this one”.

Why that comment is given to the photo of Central station in Copenhagen, does make me wonder. HDR apparently divides people into two groups, those who like it, and those who hate it. And yet, some of the people, who are dedicated haters of HDR, still likes photos like mine. Even if I have done an extreme HDR processing. Why? I think it is because I have kept a foot in the real world, and I don’t have a lot of classical processing mistakes.

There hundreds of ways I could have processed it, and another person could have processed the photo in yet another hundred ways, and anyway would have made it to a successful photo. The way I did it, I just made it mine. I keep depth in the photo, by controlling highlights and shadows. I play with them, and enhance some, and flatten others, but I don’t enhance everything, and that is an important part.

If I had released the photo from Copenhagen central station, in a crazy psychedelic HDR processing, like the one from the cathedral above, this would never have received any appraisal from an HDR hater. It would have been categorized as ‘a typically HDR’. HDR is not a synonym for bad post-processing, but unfortunately, there are tons of badly processed HDR photos out there.

A large part of my game is HDR, but it is generally applicable. You need to learn to do proper post-processing, to make quality photos.

It requires more than pressing a button or perhaps even investing 30 seconds on processing images, to create something, that is pleasing to more people, even people who are declared ‘haters of HDR photography’. That is because the quality of the HDR photos increases, by doing proper post-processing.

Learn post-processing and learn it fast. It’s one of the most important factors. Do not rely on ‘press a button’ processing. In these Instagram and Snapseed days, everyone can do that. Don’t be everyone else. Be yourself!

Learn to post-processing, and learn it fast. Be yourself… No, you will not make nearly as many photos in the same time, but wouldn’t you rather make high-quality photos? I know I would.

Quality is everything!

I believe that is the truth. It is a much more complex matter, than ‘light is everything’ or ‘composition is everything’. It is about the quality of the photo, and light and composition are factors in this equation, but they can not stand alone. Quality is to an extent a subjective matter, but there are also many objective elements. One of them being, bad processing doesn’t fly.

Tip #2 Learn to listen to that little voice inside your head

What you have to do, when making a photo is to strive to get as high a quality as possible. This begins, when you grab your camera, to go out shooting, and goes through many different steps, until you finally stop post-processing, because it is finished.

As time passes by, and your overall skills improve, something else happens. A small voice in the back of your head appears. It says, ‘is that good enough?‘. It happens when you are post-processing your photos, but also when you are shooting photos. No matter where you hear it, you should pay attention to it.

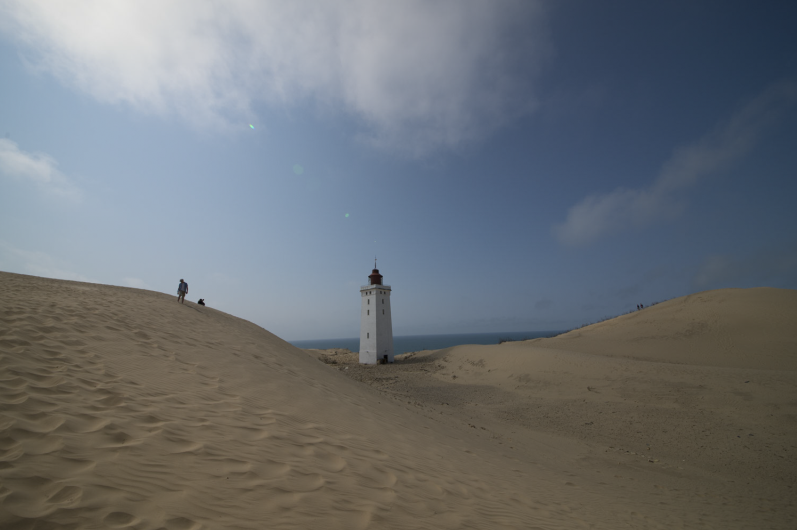
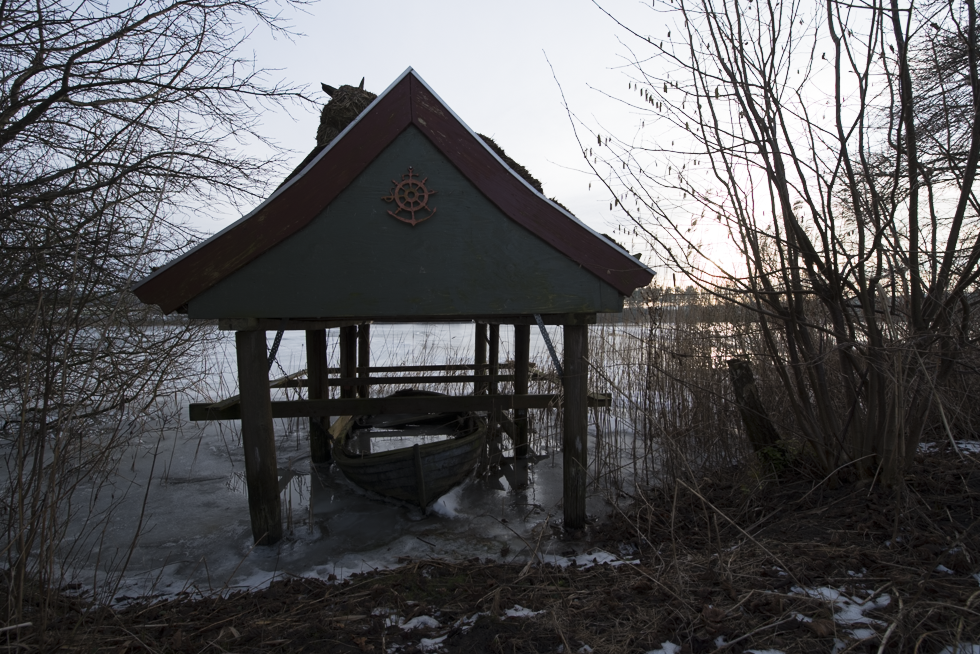
The first time I was seriously aware of that little voice was when I did this shot. First I did the one on the left, and the little voice said ‘You are almost there, you are on the right track, just move the camera a bit‘. I heard that little voice, and three shots later, I had the composition working my way.

Listen to that little voice

Moving the camera a bit to the left, and a bit down, as my little voice suggested to me, makes the difference between a nice shot and a killer shot. It was the last but one shot, I shot that morning, because the Sun came out too strong only a few minutes later and had I not listened to the voice, I would not have gotten this photo.

The same goes when you post-process you photos. Learn to listen to that voice saying ‘ahh, is that contrast just over the top?‘ or ‘something is missing in that area!‘ It takes some practice to be able to hear this little voice, but it is usually right. It is about finding a balance, that works well with a photo, no matter if you are aiming at something natural looking or you are aiming, at something more surreal. It has to be balanced nicely.

A classic mistake made by novice photographers, diving into post-processing, is to be too drastic in the post-processing. Too much HDR effect, too much Contrast, too much Clarity or too much saturation. We have all been novices, and have made all the same mistakes. And it is by listening to that little voice, in the back of our heads, that we improve.

There is nothing wrong, by going a little bit crazy, and wild. You just need to balance it in the photo. The sunrise photo, has a crazy wild processing too, but it is only applied locally. And it is a very strong element in the equation, that gives the image a high quality.

In most cases, global adjustments (saturation, contrast etc) to a photo is not enough, to make a photo reach its full potential. I am tempted to say that the whole difference, between a successfully processed photo and a less successfully processed photo, is the ability of the photographer to apply changes locally, accordingly to what is necessary.

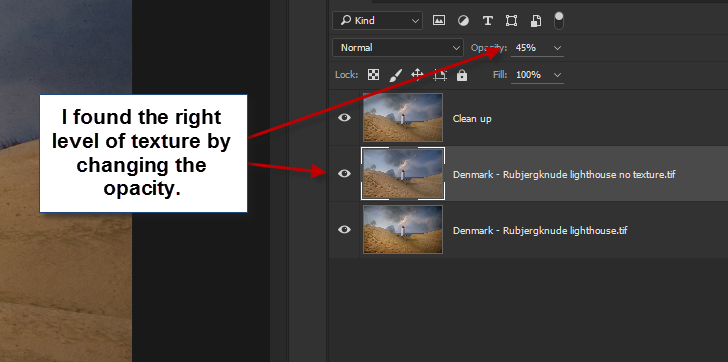
This might be a little bit abstract, but in the photo above, I did a lot of standard processing, but what knocks this photo into being something special, is the heavy enhancement of the jetty.

Local processing

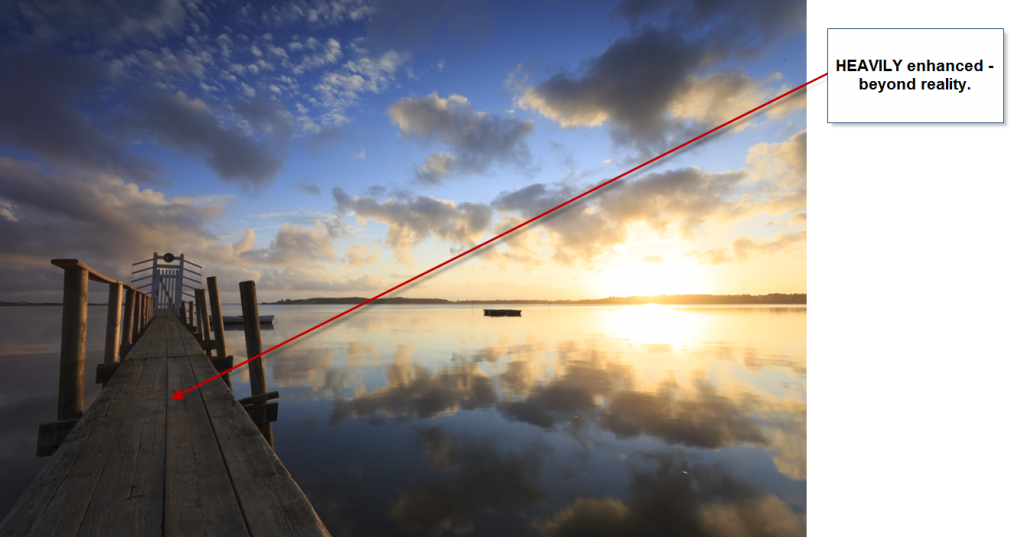
The jetty is heavily processed. The exposure has been increased, and a 100% clarity pen and some detail enhancement from a Topaz Adjust filter have been applied to the jetty. Had I applied those effects globally to my photo, it would have been ruined the balance, due to over processing, but applied to just the jetty is amazing. And it is the little voice in the back of my head that suggests that, and I listen to it.

The little voice in the back of your head will eventually begin to say ‘that does not look too interesting, can we either enhance or hide it?‘ or ‘this is the important element, it needs to be popped!‘. What is important is that you, listen to that little voice, when it speaks. The little voice is your intuition, and the intuition is MUCH stronger than the rest of your conscious brain.

Learn to listen to that little voice saying ‘ahh is that composition or processing good enough?’ Usually, that little voice is right, it’s you sub-conscience, and it is much more powerful than the rest of your brain. Learn to listen to it, and act on it, to improve your photography. You learn from making mistakes, but only if you notice you make them!

Learn from your mistakes. Your little voice points out your mistakes, listen to it! And learn from it.

Tip #3 Learn to separate the good photos from the bad photos

I have more than 100.000 photos in my library. Even if some are series of 3, 5, 7 or 9 HDR photos, it is still a lot of different photos. I don’t have time enough, to process all of them, not yet anyway, but not all are worth processing either. If I was to try to process them all, I would not have enough time at all.

Since I don’t have the time, to process all photos, I should only focus on the ones resulting in quality photos. Not all can be killer shots, but certainly above my personal minimum level of quality.

One of the pitfalls I regularly fall into is that I try to process a photo, that is clearly never going to turn out any good. This is something, I have seen other photographers do too. For some reason these photos attract us, I know I am attracted to them because I see them as problems that need to be solved and I love to solve problems. But some problems are just unsolvable or extremely time-consuming to solve, and I end up wasting valuable time, with mediocre results.

A photo might not be worth processing for many different reasons. It could be the clouds that are boring, the wrong time of the day, or even wrong time of the year or simply, that the composition has failed. Some of these things are fixable, and some are not.

Train yourself in identifying the photos worth processing. I use a star system in Lightroom.  When I imporort new photos, into my catalog I rate them 3 stars.

0 stars: Not in the evaluation process

1 star: I will not look at this photo again.

2 stars: Maybe on a rainy day, but probably never.

3 stars: Unevaluated.

4 stars: Has potential

5 stars: Ready to process.

Often I have a lot of different, and yet similar compositions, and picking the strongest ones, takes a bit practice, but it is worth spending that time. You learn a lot from evaluating your own photos.

Sometimes, when you have evaluated your photos, you can see, that if you had moved the camera, or it had been shot at a different time of the day or year, it would have been a better photo. And sometimes, you have the option to actually go back and reshoot. Put the photos in a folder for reshooting, not to forget.

Don’t work too long on ‘not good enough’ photos, you just waste valuable time. If you have the option, go back and reshoot, and that way you will learn from your mistakes. Or move on to other photos, just being able to stop yourself, is learning too.

There is a lot of satisfaction, as well as a lot of learned lessons, gained from going back and reshooting a location, and doing everything right. The right timing and the right composition, and going back home to do the right processing.

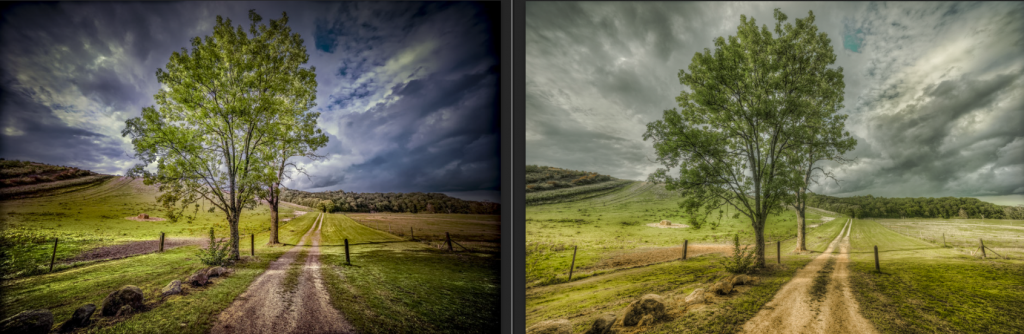
This last example shows an example of, how I deliberately went back to shoot a specific scene. When I was there in May and everything was green and just too green. Grass, fields, trees, everything was just green and then more green. Instead, I returned not long before the harvest, when the fields had turned yellow and I reshot. The Sun was in a different location at sunset, and I had to move into the field, to get the Sun behind the trees in the far background. This allowed me to use the tracks in the field as leading lines.


Going back and reshoot

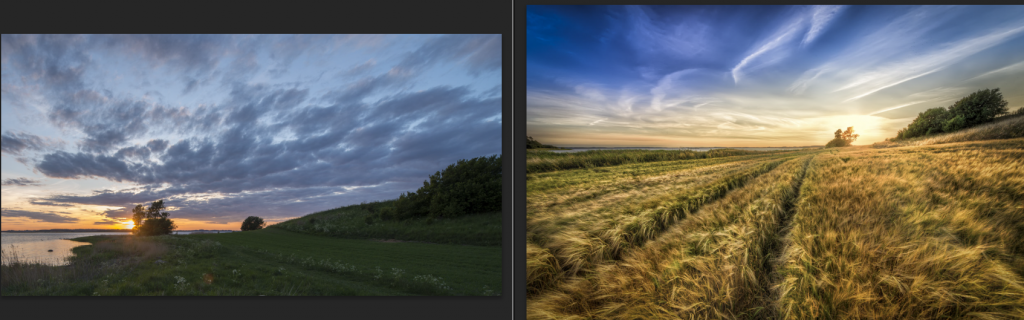
The photo on the right couldn’t have been shot in May, even if the sunset was nice in May, and it was nice. This I could do, because this is pretty close to where I live, and I can just go there.

If you are travelling, you might not have the option to go back, and yet you still might have. I often travel to cities, and as it turns out, you often pass the different locations more than once. Often during the day as well as night. What I have begun to do, is to shoot daytime photos, and review them, and then go back and reshoot early in the morning or in the evening. This way, I get some ‘practising’ time.

Doing this, saves me time later, because the sorting processes will be easier, simply because I have less photos, trying to find the best composition.

Summary

These three tips require something of you, but photography does! You can not improve your photography, if you do not put some kind of work into it. There is no silver bullet, only sweat. Some of the things, might come easier to some of you, while others have to work harder. But eventually, if you work hard enough, you can succeed.

These three tips, will make you a better photographer, and remember a photographer is not only, about being in the field. It is also about bringing a photo to life in the post-processing. And because, it is only you, who does things the exact same way, as you do, you will get your own style, in time.

–Jacob Surland

The Weekend Post: How to create two images from one image

The Dungeon

“The Dungeon” created from the cloister at Chester Cathedral.

This post is the first in my new series of posts, which is called ‘The Weekend Post’. It is a post, that contains something good about post-processing or photography in general. It is more, than just “Hey, this is my latest photo”. If you don’t want to miss this series of posts, sign up on the website, and get it directly to your mailbox. If you have any particular topic, you want to cover, do not hesitate to ask me.

I am no good at painting and drawing, but I always liked to do it. For years, I haven’t painted or drawn anything, but my photography, or rather my post-processing, stimulates the same part of my brain (and heart for that matter). I always strive to get something out of my images, something that wasn’t there, when I shot it. Something that I create during the post-process. I see my RAW files as my oil and canvas, and I work from there.

Some photos have a lot of potentials, others don’t. The photos I get a kick out of processing, are the ones, that come out quite different, than what they looked like, and still look good. You can knock yourself over on the wrong side of the road if you just go crazy. I try not go crazy, but I do experiment a lot. My aim is to add some etherealness, something otherworldly, something surreal and perhaps even painterly to my photos in my photos. That is what gives me a kick.

Not two photos are alike, and they deserve individual post-processing. I am not in the ‘click on a button’ processing business because it is the post-processing that I love most. It is the post-processing that sparkles my creativity, it is the post-processing that resembles painting the most. And I did love to paint.

I have a chest full of tricks, tools, ideas and methods that I apply to my photos. I use the problem-solving part of my brain for creating images. I see all photos as problems, that needs to be solved, because, I am pretty good at solving problems.

Let’s walk through the photo from this post. What I started out with, was this photo:
The Dungeon Unprocessed

The unprocessed 0-exposure. Not a very interesting light, and yet it had potential.

The shot is a 3-shot HDR photo shot with my Sony A6000 in Chester Cathedral. The Cathedral is HUGE and in connection to the Cathedral itself, there is built a cloister like you find in monasteries, around a garth. However, that cloister had Christmas trees, and other objects, that I didn’t want in my photo. However, there wasn’t any way I could exclude them from my photo. I shot it anyway, even if I felt lacked something for the scene. But, better safe than sorry.

A few months later, I came past the photo in Lightroom and thought I would give it try in the post-processing. I often to do that, with photos that I am not sure if they will work out. Sometimes, I get an idea and get something great out of it, and when if I succeed, these are often the photos I love the most.

Some photos are bound to be successful, because the light is gorgeous or the composition so striking, and and light good enough. But a photo like this one from Chester Cathedral, was not a given success.

What I did, was that I started out on my HDR processing workflow. I mostly use Photomatix Pro for creating my more artistic HDR photos. The new HDR feature in Lightroom I also use, but only for less artistic HDR photos.

I liked the mood that Photomatix generated, even if for some of the disturbing objects:

The Dungeon Photomatix

This is what I like about Photomatix. It manages to extract a lot of mood and warmth. You can’t use it straight out of Photomatix Pro, but there is a good start.

At this time, the problem-solving part of my brain kicks in, solving the problem ‘How to create harmony?’ And it didn’t take long, before it came up with the idea to mirror the image. It was the straight line in the roof, that brought the idea into play, combined with one other fact. The Chester Cathedral is only almost symmetrical in every way. NOTHING in Chester Cathedral is symmetric, even when you expect it would be. So my mind had been thinking about symmetry, in connection to the photos I shot there.

My initial intuition, was to remove the window part and the Christmas trees, and that gave me The Dungeon. I instantly fell in love with that, and wanted to finish that. But I got the idea to, try out the opposite and to my surprise that worked out as well. And in the end, I ended up having two different photos, made from one photo.

The mirrored cloister in Chester Cathedral

The mirrored cloister in Chester Cathedral.

This post is a first post in the series “The Weekly Post”. It will be published every Friday. If you want to be sure not to miss it, follow my website, and you will get the post on a mail every time it is posted.

Have a nice weekend.

–Jacob Surland

About composition – Sometimes centering works

Rubjergknude light house

Rubjerg Knude Fyr in Denmark.

I have approximately 20 different compositions from this day. It was a bright summer day just after midday. The light was pretty hard, but just a little bit of summer haze defused the light a tiny bit. But not enough to make great light. Of the 20 compositions, this one, is the one that works best, and it works really well, even if I broke the rule “do not center your primary object”. I did that, and it yet it still works, but why is that?

I have been thinking about the ‘why’. Let me start by showing you the original unprocessed shot:

Rubjerg knude hard light original

Unprocessed shot of Rubjerg Knude Fyr.

The unprocessed photo is flat, and the light is pretty hard. The sky is uninteresting, and yet you can see the potential. There some leading lines and a couple of other important details.

The tower is shot at close to an exact 45-degree angle. Dead on angles usually work well. as for the dead center. This is no different than shooting a building straight from the front, like this shot:

Pantheon in Rome at night

The Pantheon in Rome shot dead on from the front. A strong composition.

Symmetry is pleasing to the eye, a square building, like the lighthouse, gives symmetry when shot at a 45-degree angle. This is the first important factor. When you work with symmetry, it often works well, to have the object the center, in particular if you can support it with leading lines.

The leading lines in the shot from Pantheon are easy to spot. Man made lines, and they all (if extended) point to the door. This draws the eyes of the viewer to the center of the image, to the door, and the door itself is also a focus point because it is so bright.

But how about the leading lines in the lighthouse photo? There are plenty! Let’s have a look:

Rubjerg knude hard light leading lines

Leading lines. Some are more subtle than others.

As you can see, there are many leading lines. Some are more subtle than others. The one going from the left-hand lower corner is very subtle, but there are lines going through the sand dune. And the curved orange line going through the sand is very powerful, and probably the most important one. And then you have the sand dune horizon that also work as leading lines from left and right.

During the post-processing, I also enhanced some lines, and I created some new ones. The sky I had, in the original photo, didn’t work well. I replaced that, with another sky, shot just before sunset. A sky that had the soft light, that we like so much. I made a mask, and dumped the new sky. The sky was shot at higher resolution, and it allowed me to move the sky around until I found the strongest position for it.

The new sky also adds some leading lines. There is the brighter cloud wiggling like an s-curve from the right to the center of the image, and you also have it coming down from the top. And from the left, you have clear blue sky moving in. Everything pointing to the lighthouse.

There is one more thing the new sky added, and that is a repeated shape. The cloud where it says #1 repeats the shape (more or less) of the lighthouse, this is also a well working a compositional trick.

The dark and bright lines coming in, from the right-hand corner I enhanced by using some simple dodge and burn (making things brighter and darker in local areas). This enhanced existing lines.

A centered composition can be a strong composition

So, what at a first glance looks like a simple composition, turns out to be quite complex. All of these lines makes it a very powerful composition, and if you compare it to the photo of Pantheon, it is a very similar composition. All lines point to the center of the image, where you find the brightest part (the bright door and the bright lighthouse).

The straight on composition used on the Pantheon photo, is a strong composition, even if it seems simple. The interesting composition, are the ones, that order things in a pleasing way, no matter how complex that may be. And usually in a way, that you don’t normally see with your human eye.

The head-on shot of some building or whatever, is unusual for the human eye. How often to you stand at the exact center and watch a building or similar? Hardly ever! And that is why it is unusual to the human eye and is a strong composition, and it is pleasing because it is symmetric.

The hard part is to know when to use the centered composition, and especially when NOT to use it. One of the important factors is, can you get a perfect symmetry? Then it’s probably ok. If it is supported by leading lines, then go ahead for sure!

The processing details

As for the rest of the processing. The photo still had a bit of hard light to it, and I began to add some textures. I find that textures can be used to add that missing element, that softness in the colors, take off the edge of the hard light.

When I was done, I could see, that the texture was too much, and I had second thoughts on the textures. I made a new copy of the image, without the texture part. That’s one of the great things about working with layers in Photoshop. You can just hide some. Now I had these two images:

Now I had these two images:

Rubjerg knude hard light mixing

 Too strong textures and no texture version.

I found that neither worked to my satisfaction. One had too strong textures, but the other one missed something.

In the end, I decided to do a compromise. I loaded both images as layers into Photoshop and changed the global opacity for the top layer, which happened to be the one without textures. And moved the slider back and forth, until I had the right amount of textures, to my taste, and that was at 45% opacity.

Rubjerg knude texture mixing

And my final step, was to do a clean up in the photo. Removing irregularities, stones, rubble etc. that did no good thing to the image.

–Jacob Surland

Mixing HDR and Textures

Trees by the road to the woods

Trees by the road to the woods.

Every Thursday my son plays keyboard at a school of music, and I get to spend an hour waiting while he plays. When the weather is suitable, I drive and shoot some photos. This picture is from one of those drives. It’s right next to a horse farm.

This photo is an HDR photo. In the beginning, I tried to get something more funky HDR like out of it. I tried to push it, but I didn’t get something that I liked.

Other versions of Road trees

In the end, I opted for a more neutral processing and then used some textures to get a sort of vintage look. Sometimes, the look comes easy, at other times, I have to try a long time, to get something that I like.

–Jacob Surland

Small boat house by Bastrup Lake

Small Boat House

Boat House at Bastrup Lake.

I went chasing the sunset one day a couple of years ago. I went to this place, called Bastrup Castle Ruin. It’s right next to Bastrup lake and it’s not that far away, and yet I have never seen it. It’s not always you get around, to go to see what’s close to home.

Bastrup Castle Ruin used to be one of the strongest fortifications in northern Europe around 1100. It had an impressive 6m thick walls. However, there s not much left of it, and I went searching for something else along Bastrup Lake, and I came across this little boat house, with an old boat inside.

I wasn’t too lucky with the light, though. The sunset didn’t really work my way, and I never did finish processing any of them. I tried a few times doing this boat house, which I liked. Not until I tried this ‘Orange’ look, things started working my way.

This is the before photo:

Bastrup lake boat house

As you can see something quite different. Because I am shooting right into a pretty strong Sun, I have shot from -5 to +3, that is 9 shot’s, and merged them in Lightroom, using the new’ish HDR merge. I only normally only use this one, if I do not want to make any tone mapping. I often want to do tone mapping, because it opens up for a lot of creative processing. In this case, however, the orange look is created within Lightroom.

The Orange Look presets will be available in my upcoming Lightroom presets.

–Jacob Surland

Using LAB color to bring out the magic

Fire in the Sky

This photo really came to life, when I used the color space Lab Color as a tool.

Teaser: Last in this post, you can see the before version of this image of the Eiffel Tower.

Recently I have been working a lot on understanding colors and color spaces. It has been coming to me, from two different angles. It’s funny how things sometimes converge from different places and situations into the same realization, at the same time.

I have been working on understanding why some of my prints went haywire color wise, even at a professional printing house. It turned out, it had to do with color spaces or more correctly the gamut of a color space. A gamut is the range of colors a color space can produce. Gamut is a strange word, but I will try to exemplify in a simple way. I will discuss this in more detail in a later post.

At the same time, as I was working on getting my prints looking right, on another track in my life, in my eternal search for new cool processing ways, I came across the Lab color space as a processing technique. It was introduced to me, by Robin Griggs Woods, and I was completely blown by it.

What is a color space anyway?

Before getting deeper into the Lab Color color space, let’s talk a bit about the color spaces in general. Color spaces are quite complicated, and I will try to make an easier-to-digest description.

Continue reading

National Natural History Museum in Paris

Muséum national d'Histoire naturelle in Paris is worth a visit, alone because of the building. I had some expectations but I was still completely blown away when I got there. So incredibly beautiful and dynamic lighting for a fantastic room. I only had 1,5 hours before it closed, and I didn't even get time to see the exhibition.--Jacob Surlandwww.caughtinpixels.comArt sale as limited prints. Photo by Jacob Surland, Licensed Creative Commons non-commercial v4.0. No Derivative Work. Protected by Pixsy.com.

The colors of the roof and walls keep changing colors, to simulate day, night and the weather.

I knew that the ‘Muséum national d’Histoire Naturelle’  would be something special, but I was still blown completely away with the beauty of this enormous old room.

I arrived in the midst of a tropical thunderstorm. The roof changes colors, along with the one wall, to simulate the weather. It can show lightning, day and night, and a rainbow … at least that was what I saw, during my 1,5 hours I had there until it closed. I didn’t even get much time to look at the exhibition, but that looked really awesome too. This place I would require a day, to do it full justice I think.

I could just squeeze in visiting the Museum between I hung up my artwork at Carousel du Louvre, and the VIP grand opening later in the evening.

About the processing of this photo

This photo is shot with a Sony A7R using my metabones Nikon adapter attached with my 16mm Nikon Fisheye lens. The fisheye is obvious. I used a fisheye in this location, to got something out of the ordinary classic shot from this museum, and I think I managed to get that. At least, I have never seen anything like this before.

It is an HDR shot bracketed -2, 0 and +2.  The Sony A7R is somewhat limited regarding shooting bracketed HDR photos. I need at least 1 stop between each shot, and prefer 2 stops. When choosing this option, the A7R can only shoot 3 bracketed photos. If I shoot less than 1 stop between each stop, it can shoot 5 shot, a ridiculous limitation.

I shot it at an f/stop somewhere in the middle. One of the drawbacks from using the Metabones adapter for Nikon is, that no EXIF information is transferred from the lens. But I know I had the f-stop somewhere in the middle, my guess is f/8-f/11. And then I had the camera at ISO 100 and the longest shutter speed was 5 seconds. This allows me to blur most of the people fairly much away.

I used my standard processing workflow for this image. I processed it in Photomatix (you might want to see my tutorial here), and afterwards i took the three originals along with the output from Photomatix into Photoshop and blended it to this final result. These are my three original unprocessed photos:

Paris - Natural History Museum

One of the important things, when you shoot a photo symmetric like this one, is that symmetry is as exact as possible. I could spend a long time while shooting, to get it exactly right in the camera, by shooting, checking and re-shooting. I work in a different way. I need to be ‘close enough’ to the final framing, but I do not mind, doing a final more exact crop at home on the computer. This way I get more time, to do more shots, instead of working one composition into death. This might be a different way, than others work, but I like it that way. Of course I sometimes get stuck, if I can’t get a “good enough” result quickly. I hate getting home with something, that I cannot use.

I am far from puritan about ‘getting it right in the camera house’. I see no point in doing that, it would only require more time, at each location, giving me less to time, to do more compositions.

In Photoshop I first got an “overall” good blend of the tonemapped output from Photomatix, and the three original images. Then I added some effect, by using Topaz Adjust. Afterwards i used two of the original shots ones more to fix or improve very specific areas.

Paris - Natural History Museum - Photoshop layers

How do I determine what ‘needs to be fixed’ in an image? What I get out of Photomatix is next to NEVER a final image. This I know, and I just have to look for the ‘problems’ with the image from Photomatix. There is always something, that doesn’t look too good. Something that is too extreme, a nasty halo or a to hard contrast. How do I spot that? I look closely at the image, both in a smaller thumbnail seized image, and in a closer to 1:1 version. But in the end it comes down to a mix of taste and experience/practice. The more images you have processed, the better you get at doing this. In the beginning, this was pretty much a lot of guessing work and less qualified work. Most of this early work, I have withdrawn from my public stream. The more images you process, the better you get at it, and some of the ‘problems’ gets so obvious to fix, that you hardly think about it.

In this particular image, I first got the ‘basic’ image, by blending the Photomatix version, with the three originals. Then I made some effect using, Topaz Adjust, and afterwards I fine tuned the image, by picking some very specific areas from the original images, to fix some problems.

–Jacob Surland

Working with the White Balance in City Night Photography

Castel Sant'Angelo or in English Castle of the Holy Angel, was the Mausoleum of Hadrian, Emporer of Rome in the second century. It sits by the river of Tiber. It leaves one with a massive impression, not because it's particularly beautiful, because it isn't, but yet, it fascinates. It used to be the tallest building in Rome.--Jacob Surlandwww.caughtinpixels.comArt sale as limited prints. Photo by Jacob Surland, Licensed Creative Commons non-commercial v4.0. No Derivative Work. Protected by Pixsy.com.

Castle of the Holy Angel seen from Ponte Sant’ Angelo.

Castel Sant’Angelo or in English Castle of the Holy Angel, was the  Mausoleum of Hadrian, Emporer of Rome in the second century. It sits by the river of Tiber. It leaves one with a massive impression, not because it’s particularly beautiful, because it isn’t, but yet, it fascinates. It used to be the tallest building in Rome.

Shooting photos in Rome at night, is great fun, but also a big problem when you start post processing the photos. The city lights are VERY yellow, even when you are on location and looking at it. When we walked around and shot photos along the River of Tiber, I just knew that colors would be a problem. This is not the first time I have encountered such yellow city lights. I also experienced it Rothenburg ob der Tauber in Germany. They use some kind of LED lamps, with a very yellow glow.

The problem with yellow lamps is that you don’t really get a lot of colors reflected back. Think back to the old days with a dark room. The red light bulb made a white piece of paper seem complete red, even if you knew it was white. The same thing happens with a yellow lamp. The light almost only has yellow colors in it, and the only colors they really reflect is yellow. It’s a strange concept the first time you run into it. A surface can only return, the colors that the light source contains.

Once I heard a question ‘what color is the Moon really?’ and the answer got very complex, exactly because of the colors the light contains, and that different colors have different wavelengths.

In my world, the color of light is less complex than wavelengths, it’s just a couple of sliders in Adobe Lightroom.

Castle of the holy angel before

On the left you see the fixed white balance, and on the right you see the out of camera white balance.

Usually, the color of city lights is somewhere between 2200 kelvin and 3300. Modern LED lamps tend to be in the lower end of the span, but there is only way to find out, and that is by adjusting the temperature.

Castle of the holy angel before white balance

This usually brings you to the right temperature, but with the city lights of Rome, I found that I hit the bottom, which is 2000 degrees Kelvin, before I am happy. And I am only JUST happy and not really happy. No flexibility at all.

Castle of the holy angel before white balance adjusted

This is much better, but there is still a purple and yellow hue to the statue. To adjust this, I can use the Tint slider, but before doing that, I will show you a little trick. The trick will make it quite easy to find the best possible white balance much easier.

Tip: Before adjusting the temperature and tint slider, I dial up the Vibrance and the Saturation to 100. I am not going to leave them in this place, but it makes it easier to spot color casts because they are exaggerated.

Castle of the holy angel before white balance trick


I adjust the Temperature and the Tint to find a compromise. My aim is to balance the amount of blue and yellow and purple or green. This IS a compromise, but when the balance is found, I have found the best possible white balance. I will have to make local adjustments to make changes to it.

Typically this is a real problem if there are mixed light source, it could be electrical and natural light or just different sorts of electrical light.

This is what I ended up with, after using the trick:

Castle of the holy angel before white balance trick adjusted

While this has got a little more purple, it also has less yellow. It turned out, that some of the yellow really was too much green. The compromis is to accept a bit more purple in the image over all, but purple can be removed, using the HSL panel, in Lightroom, if need be (so can yellow for that matter).

When I dial the Saturation and Vibrance back to 0 I get this acceptable result:

Castle of the holy angel before white balance trick adjusted desaturated

And the full image looks like this:
Castle of the holy angel before white balance trick adjusted desaturated full image

I still had to work with the colors, but in general I have am rid of the super duper yellow image, and have something in the natural world. There is a purple hue, but that can fairly easy be removed using either Photoshop or Lightroom.

From here I did my Photomatix and Photoshop blend images show.

These are a couple of other examples of city night shots, that had a real strong yellow orange glow to them before I started processing them:

During the day, The Bean in Chicago is crowded with people, enjoying the wild reflections. It is insanely fascinating, such a large curved mirror, and I shot a ton of photos during both day and night of The Bean.Read about the making of this photo here: http://goo.gl/EC0lGF--Jacob SurlandPhoto by: Jacob Surland. Buy limited prints on www.caughtinpixels.com Licensed creative commons non-commercial v4.0. No derivative Work. Protected by Pixsy.com.

Cold evening at the Bean in Chicago.

Rothenburg ob der Tauber is one the most idyllic German medieval towns I have visited. Fot that reason I have been there three times. This split road is particularly lovely I think. Photo by: Jacob Surland, www.caughtinpixels.com

Rothenburg split road. Not as vibrant as it could have been, if not for the strong yellow city light.

This trick on white balance I have showed you here is the easiest and fastest way I have found so far to do a pretty accurate white balance.

–Jacob Surland

Photoration X – get a kick out of post-processing

As unreal as it might seem, this is a photo from an underground station in Vienna. And to be honest, I have forgotten which. I usually can reconstruct the details in my mind, of where a photo was shot, but this one, I have simply forgot.

I got a kick out of making this photo. The photos I like the most, is the ones I get a kick out of.

As unreal as it might seem, this is a photo from an underground station in Vienna. And to be honest, I have forgotten which. I usually can reconstruct the details in my mind, of where a photo was shot, but this one, I have simply forgotten this exact location.

About this the making of this photo

This photo I processed in a different way, compared to most of the photos I make. Actually you only see a quarter of the photo, because I mirror it, twice! Let’s have a look at the original:

Photoration X - original

You can probably easy recognize the lower right hand corner. What’s interesting about this corner is both the light in the floor, and the fact, that almost no people are there.

Why does this work as powerful as it does? There are some lines in the flor, and one of the lines of tiles is even slightly brighter than the others, forming an X when mirrored, first vertically and the horizontally.

The scene is not quite interesting enough, even if the lamps and the circular form of this underground station in Vienna are interesting subjects. I shot this hand held, using my Sony A7R, while I was on the move. I managed to get the perspective right, but it would have required more time and a tripod, to get a really good shot out of this. I tried to proces this in my usual ways, but couldn’t get something really interesting out of it.

Instead I did what I do best. I switched on my problemsolving brain. When put into problemsolving mode, my brain works in mysterious creative ways, with lots of ressources, and this idea of mirroring popped up into my mind. And from there, things went fairly easy.

Gotta Love Venice

I really love Venice, even if there are heaps of tourists. The city is something out of the ordinary, and its magic just captures me. I got up early enough, to be able to see Piazza San Marco (almost) without any people. Photo by: Jacob Surland, www.caughtinpixels.com Licensed creative commons non-commercial v4.0. No derivative Work. Protected by Pixsy.com.

Palazzo Ducale or Doge’s Palace in Venice is a huge and incredibly beautiful building.

I really love Venice, even if there are heaps of tourists. The city is something out of the ordinary, and its magic just captures me. We got up early enough, to be able to see Piazza San Marco (almost) without any people (and of course to capture it in the right light). I think we got lucky with the weather.

About this photo

This is a 7 shot HDR, ranging from -4 to +2. I shot it using my Nikon D800 and my Nikkor 16-35mm f/4.

Venice Doge's palace

Why did I shoot from -4? They are almost completely black. One of the hard parts in shooting night shots, or blue hour photos like this one, is that street lamps are incredibly bright, compared to the rest of the photo. And often you end up, having completely blown out lamps. Sometimes, blown up lamps, can look great, at other times, lamps with full details can look great.

By shooting, and making sure, that I have all information, I have the artistic freedom, to choose if I want one or the other. A blown out lamp or a lamp with details. In the case of this photo, I went in the middle.

Venice Doge's palace - lamp

You could argue, that from -2 to +2 would have been enough, but if I had wanted to do something different when I got home, I couldn’t have changed my mind. So I made sure, when I shot the shot.