Tracks in the field


Warning: Undefined array key "multiauthor" in /var/www/caughtinpixels.com/public_html/wp-content/plugins/post-layout/plugin.php on line 114

Warning: Undefined array key "mobile" in /var/www/caughtinpixels.com/public_html/wp-content/plugins/post-layout/plugin.php on line 352

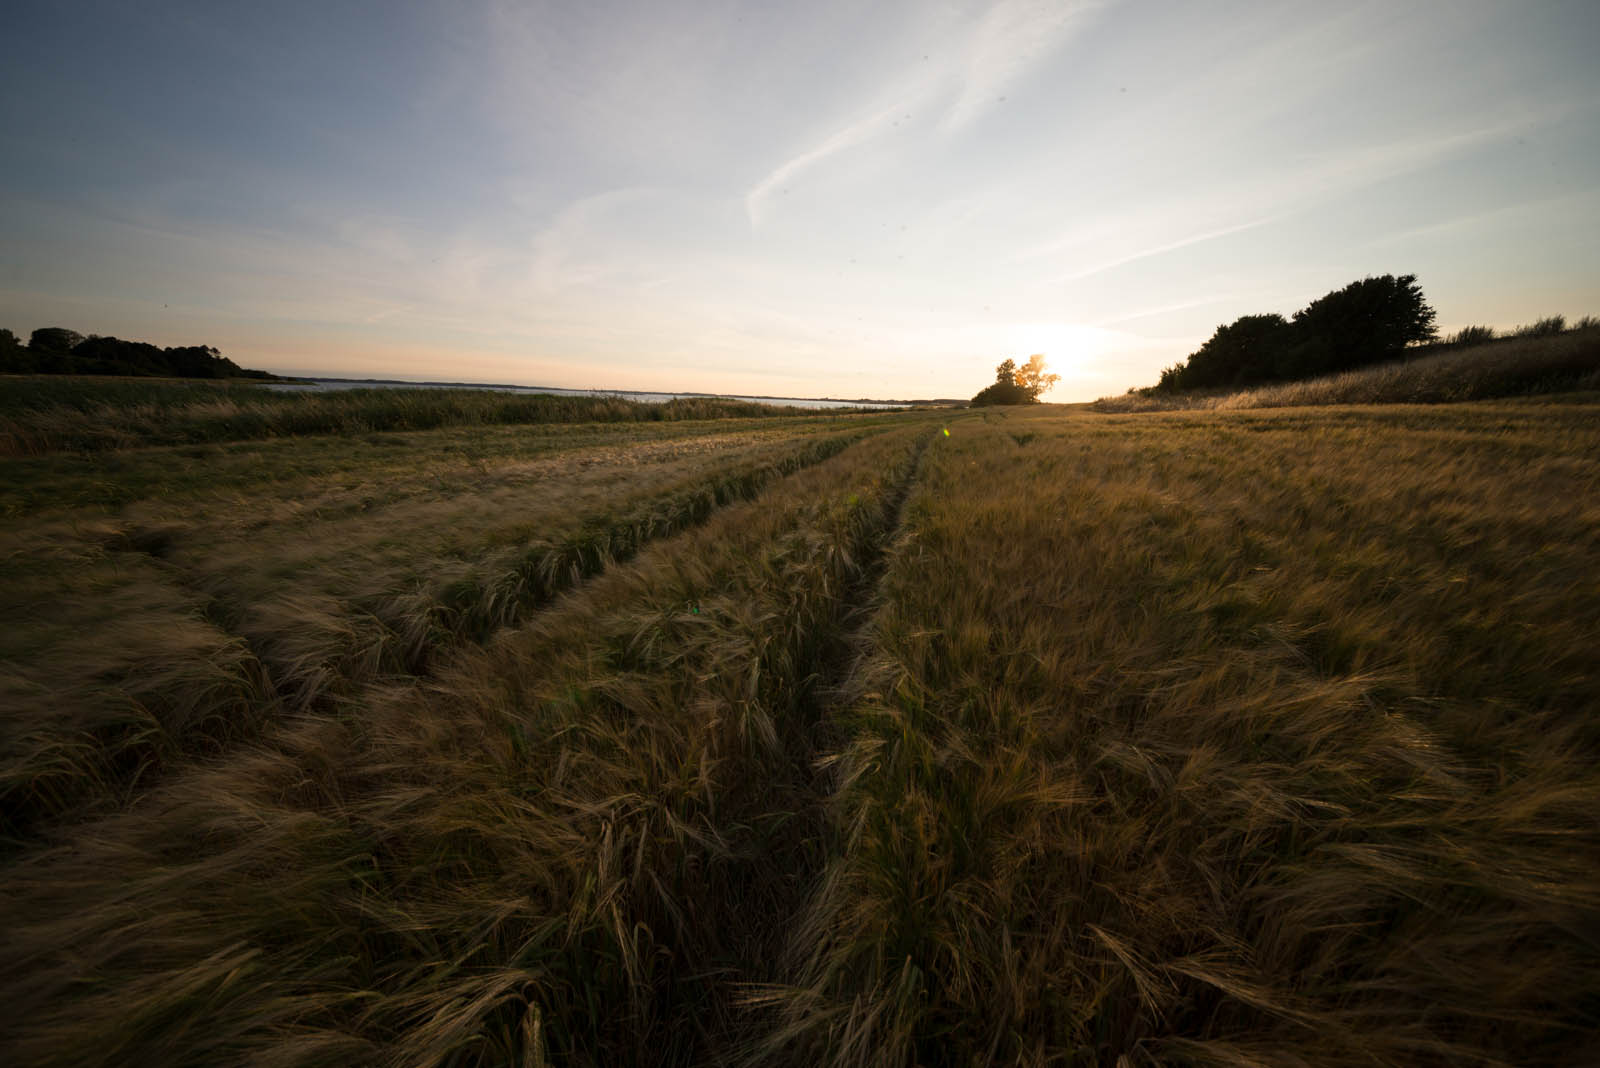
The crop was almost ready for harvesting. I was at the same location, Salvad Park, a few months earlier, but then everything was green. It didn't make any sense to take photos of it, because all would be green. In the distance you can see Roskilde Fiord. Photo by: Jacob Surland, www.caughtinpixels.com
Nikon D600, Sigma 12-24mm, ISO 100, 12mm, f/5.6, 1/320

The crop was almost ready for harvesting when I shot this shot. I was at the exact same location, Salvad Park, a few months earlier, but then everything was green – much too green, but I did like the location, so I made a mental note of it. Actually I did shoot the scene and hoped it would, turn out ok, but of cause it didn’t. Just too green.

This shot is an HDR photo, shot with my Nikon D600 and my newest wide angle lens Sigma 12-24mm, which I love. It’s a shot straight into the sun. Had I used my Nikon D800 I would have tried to avoid the sun to blow out, which is really difficult, because the sun is so bright. But recently I have come to the conclusion, that somehow the eye accepts that the sun is blown out, because you can’t look at the sun with the naked eye anyway. If you look at other photos the sun is often blown out and that is really OK. What I did do, though, was make an exposure compensation of -2/3, and instead of getting -2, 0, 2, I got some awkward exposures -2 2/3, -2/3 and then 1 1/3. But that made more of the sky come out right.

The photo is processed in Photomatix Pro, as well as in Lightroom. It was a bit windy, so I had to use only one exposure for the crop that is closest, otherwise it would be ghosted. This exposure I did in Lightroom and made it mix nicely with the rest of the HDR. I used layered masks in Photoshop to mix the images.

This is the original image:

Tracks in the field - original

First impressions – Review of Photomatix Pro 5 beta 4


Warning: Undefined array key "multiauthor" in /var/www/caughtinpixels.com/public_html/wp-content/plugins/post-layout/plugin.php on line 114

Warning: Undefined array key "mobile" in /var/www/caughtinpixels.com/public_html/wp-content/plugins/post-layout/plugin.php on line 352

The London Tower Bridge is one of the worlds most well known landmarks. Photo by: Jacob Surland, www.caughtinpixels.com
London Tower Bridge – a 5 shot HDR photo processed with Photomatix Pro 5 beta 4 and then mixed with a long exposure image for the fountain and the clouds. The Long exposure I made using my 10 stop ND filter from B+W. I did use a final filter High Key from Topaz Adjust to get the more pseuchedelic look.

Some of you might have noticed that a new version of Photomatix Pro 5 is on its way. The official beta 4 is now available and I have had a quick glance at it. After having played around with for a awhile I am a bit disappointed, but there are a few goodies too.

The wording – that is the usability – has changed in general to the better. By using the right words you can do a lot for the ease of use of a software program. For instance instead of calling a feature ‘Align source image – by correcting vertical and horizontal shifts’ it gets a lot easier to understand from the new wording: ‘Align source images – Taken on tripod’. I’m a great fan of usability and this is great usability in it’s essence. Straight talk for normal human beings to understand, not engineer talk that only a small group of people can understand.

There are a couple of others of these wordings that has changed for the better. The Button “Process” has been changed to “Apply and Finish”.

The algorithm for aligning images should be improved, but that is fairly hard to test. I have never really had any problem with the one from Photomatix 4 – but improvements of course is good.

The deghosting as been changed too and is better. However I never use the deghosting tool. I might give it a try or two, but basically I think you get a better result using by blending one of the source image in using layered masks in Photoshop or GIMP.

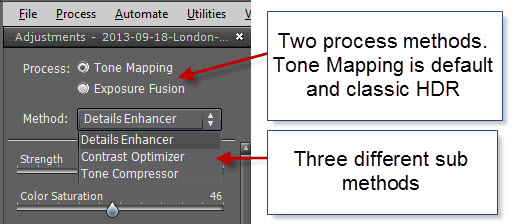
A couple of new processing methods has been added. Tone mapping has got a ‘Contrast optimizer’ method in addition to the Details Enhancer and the Tone Compressor:

Step 04 - Tone mapping methods

The ‘Contrast Optimizer’ is great for natural looking images, but is not worth much for more creative processing. I will probably not use it for much. The fusion also got an ‘Fusion/Real estate’ optimized for images to show both interior and the outside for real estate photographers. That’s not really me either. So I’m stuck with the Fusion/Natural and Tone Mapping/Details Enhancer.

The details enhancer has got a single change. Luminosity has changed to Tone Compression, but it does exactly the same. In fact the Details enhancer does exactly the same as before. I had hoped for more fun and creative options, but got disappointed on that. I have tried to process images with both Photomatix Pro 4 and Photomatix Pro 5 beta 4, with the exact same settings and the images are identical. That really disappointed me. The noise levels are the same. One of the weaker points in Photomatix Pro is the noise it produces. Of course there are other ways of handling the noise, would just have been nice if the algorithm had been better at handling noise.

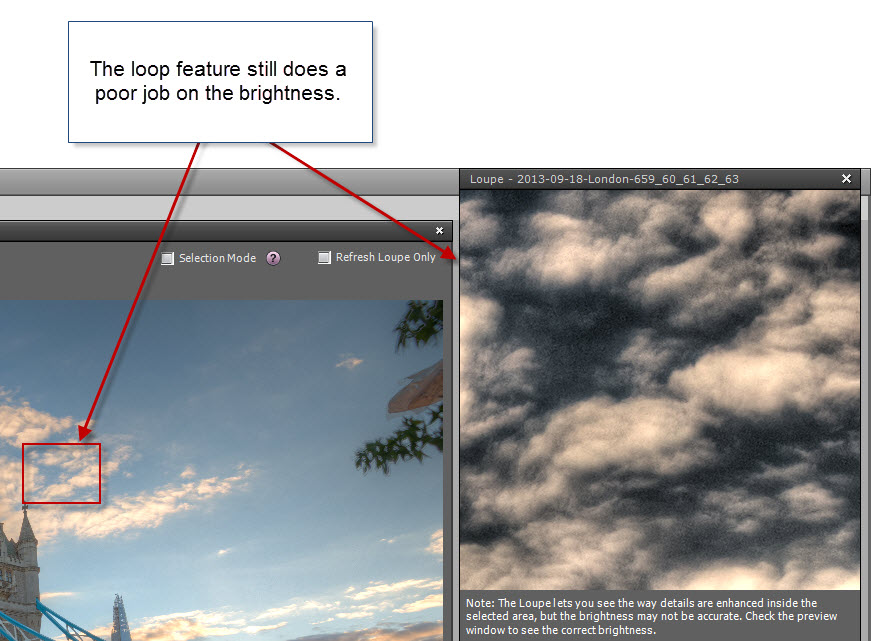
I had also hoped for the loop feature to do a perfect processing, so that you would see the real deal, but that is still very poor.

First impressions - Loop still poor

Conclusion of a preliminary review of Photomatix Pro 5 beta 4

There are number of usability improvements in the software, which really makes it easier to use, and some improvements in some of the more automatic parts of the software, like deghosting and auto aligning.

There are also a couple of new processing algorithms, but they are targeted to a different group than the more creative HDR photographers.

But for the more creative side this version is a more or less 1:1 with the old Photomatix 4.

Good thing that if you bought Photomatix 4.2 or later, you get the Photomatix pro 5 for free.

So I’m a bit disappointed.

Try out the beta of Photomatix Pro 5 here – it will still water mark the images if you haven’t purchased it.

Remember that I have a detailed Free HDR photo tutorial and by by using the coupon code “caughtinpixels” you can get 15% off when you buy Photomatix Pro.


How to get inspired by Presets in Lightroom


Warning: Undefined array key "multiauthor" in /var/www/caughtinpixels.com/public_html/wp-content/plugins/post-layout/plugin.php on line 114

Warning: Undefined array key "mobile" in /var/www/caughtinpixels.com/public_html/wp-content/plugins/post-layout/plugin.php on line 352

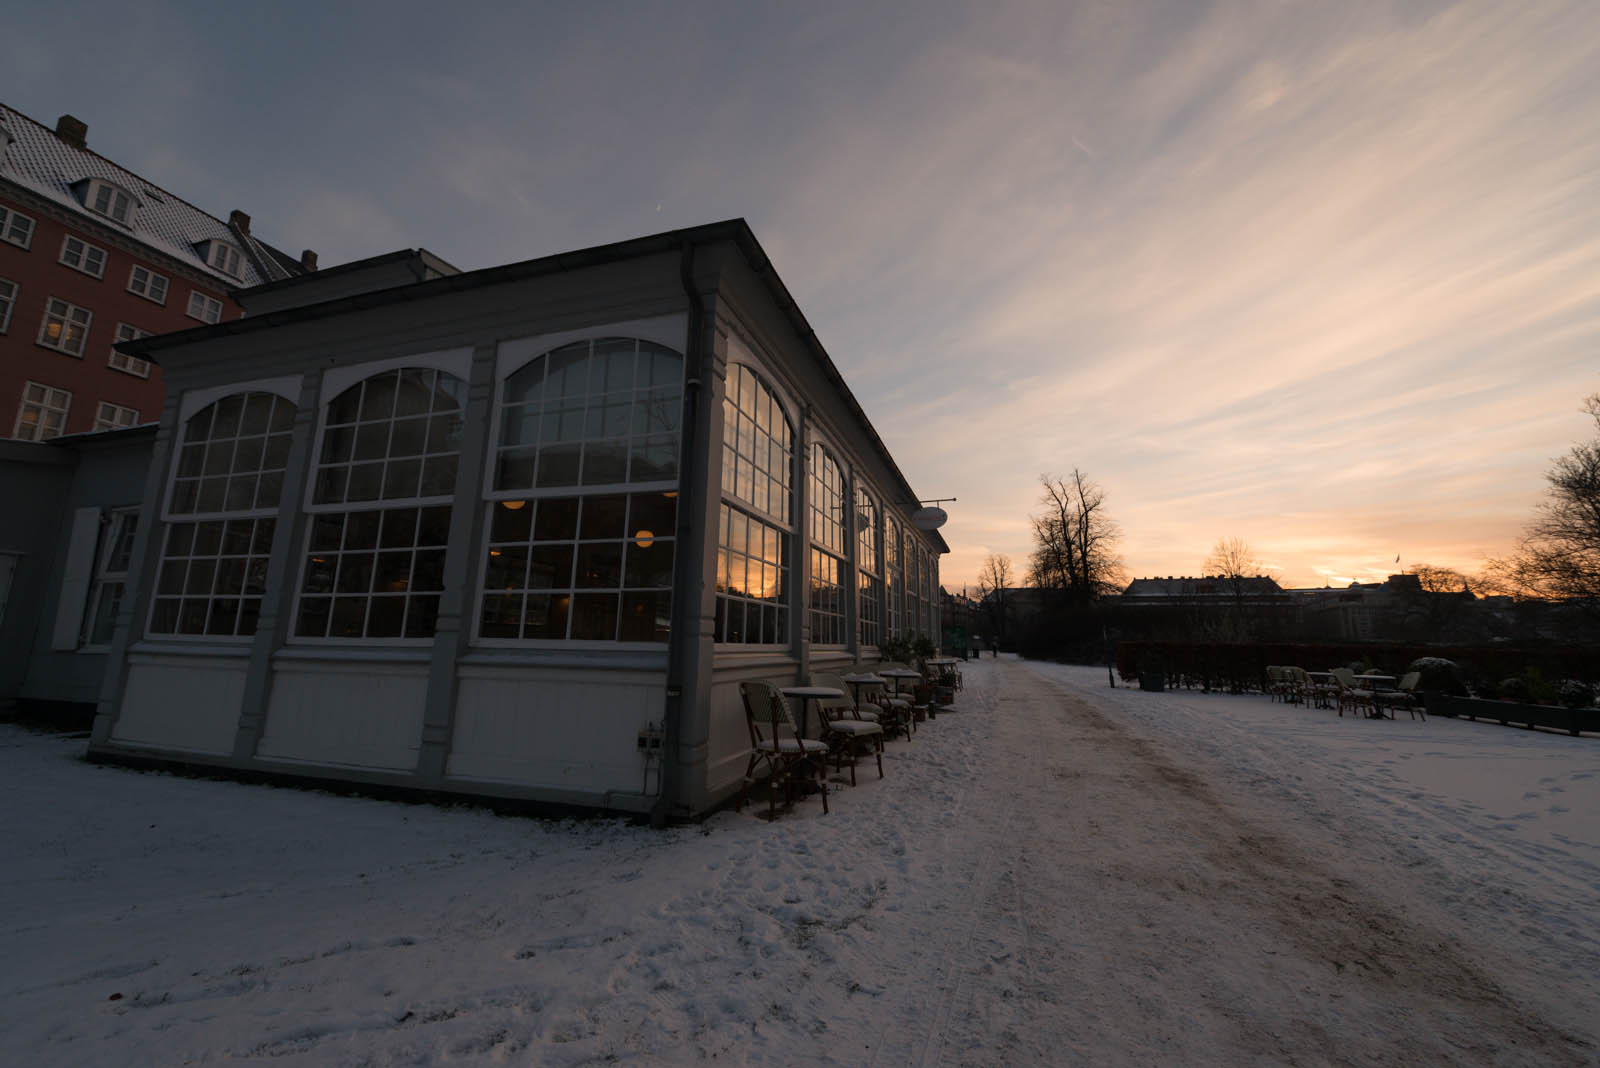
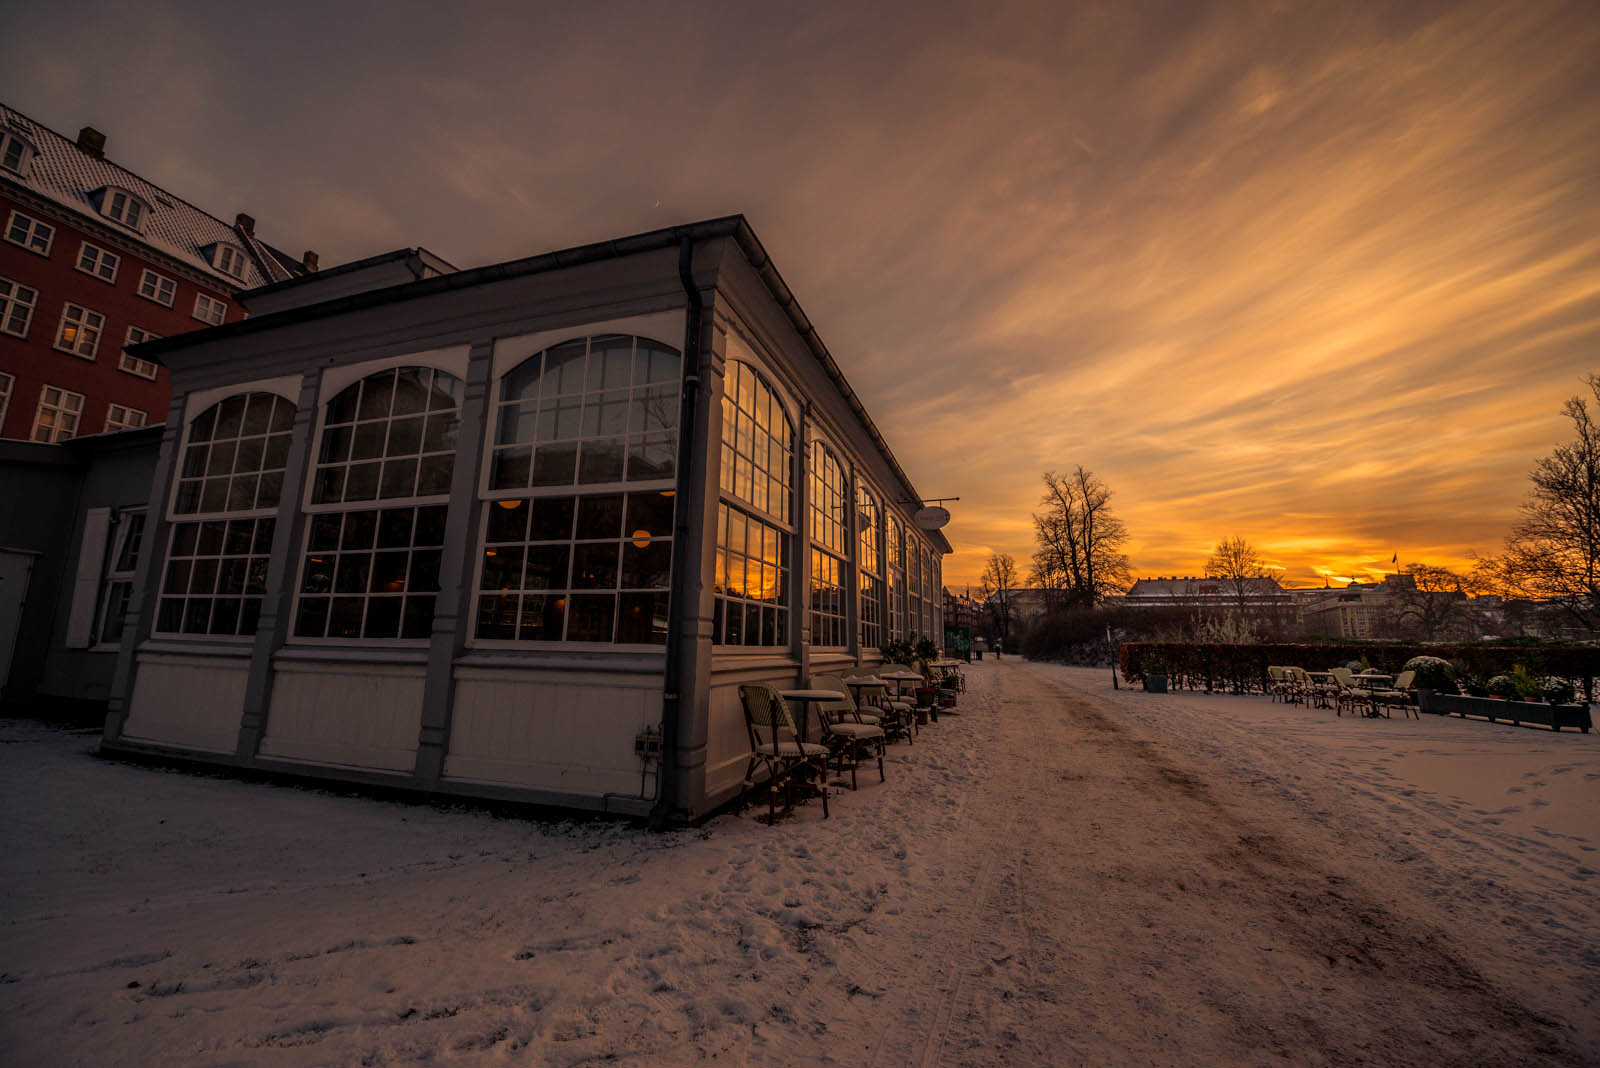
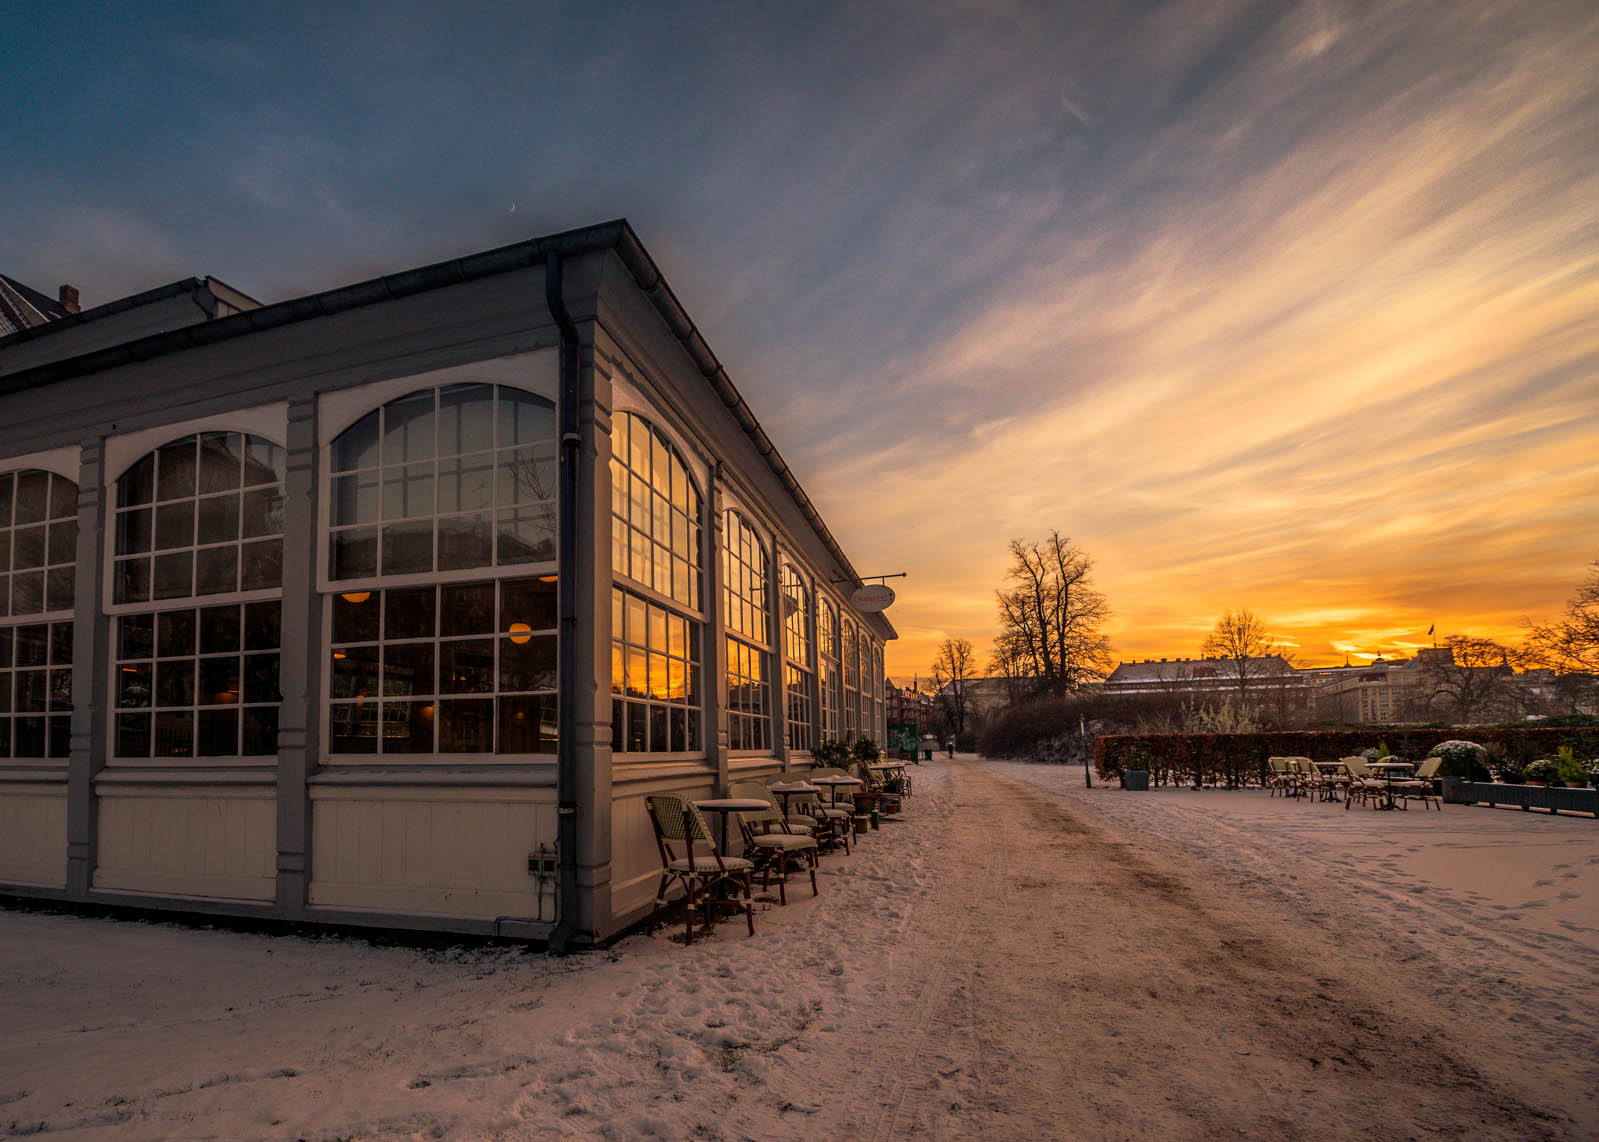
In the center of Copenhagen Denmark lies the old Kings Garden. On summer days the park is crowded with young people sitting around the park enjoying the great weather. The old Orangery, now a restaurant, is placed in fence surrounding the garden. Photo by Jacob Surland, www.caughtinpixels.com

In the center of Copenhagen Denmark lies the old Kings Garden. On summer days the park is crowded with young people sitting around the park enjoying the great weather. The old Orangery, now a restaurant, is placed in the fence surrounding the garden. One day I will go in there!

About the processing

Can you believe that I almost deleted this photo? A few weeks ago I did some clean up. I was running low on disk space and decided to clean out in my photos. “Your first 10,000 photographs are your worst” said Henri Cartier-Bresson and he is right, at least to some extend. When I started out just over a year ago I shot a lot of photos and most was completely useless. Completely! Some I got rid of at once, but others I didn’t get the time to get rid of until a few weeks ago.

This one was from a day with a fairly ok sunset and I was on my way home from work and got my camera out, but I didn’t really feel that I got what I wanted when I took my shots.

I have a two step procedure when I delete photos. I mark them as “rejected” in Lightroom (press X). Then I review them later before deleting. I get ticks in my eyes, when people start talking about deleting stuff. It’s so irreversible. But sometimes it’s just necessary.

When I came to this image I marked it as rejected:

Orangery - Original

but, I accidentally hovered over one of my presets called “HDR Armageddon Sunset” in Lightroom which gave me this look:

Orangery - Armageddon

And I thought – well maybe the sunset isn’t that bad. I added a gradient filter in Lightroom to bring back some of the blue in the sky and pressed the “Upright Auto” button and cropped slightly. That gave this result:

Orangery - Armageddon Adjusted

Now I was 100% sure, that this was something to work with. I exported this photo to my post-processing folder and exported the rest of the 5 hand held exposure bracketed shots (-2, -1, 0, +1 and +2) to Photomatix Pro and did a tone mapped version of the image. I knew I had to get something that matched the sky of my Lightroom version of the image.

As I had suspected before exporting it into Photomatix, the sky didn’t come out very well from Photomatix. This is a common problem. Often the sky turns gray, very noisy or gets nasty halos. The sky very often get’s ruined. Instead I used the sky from the Lightroom export and mixed that with the tone mapped HDR image.

Final touches

I used NIK Color Efex Pro 4 to finish up the sky. There is a filter called Tonal Contrast that is good to get details out of the sky (amongst other things). I blended this gently into the image to the extend that I felt worked well.

I very rarely use a complete version of a filtered image, not matter what filter it is. I use Topaz Adjust and NIK Color Efex frequently, but occasionally I also use OnOne Perfect Suite. But I always duplicate my image before starting the filter and then I use layered masks in Photoshop (or GIMP) to mix in the parts that I like. This really is an advanced kind of Dodge and Burn.

I do the same with Noise reduction software. I don’t apply unnecessary noise reduction to parts of the image that don’t need it. I would just loose details by doing that. So I use layered masks to mix in the parts that needs to be noise reduced, typically areas like the sky.

Conclusion

I didn’t use my preset completely, but I did get inspired and got a successful photo from something that I almost deleted. I use presets a lot this way – to get an idea. Sometimes I finish up the idea in Lightroom and at other times like this, I start up an HDR processing workflow.

Remember that you can get 15% of Photomatix Pro by using my coupon code “caughtinpixels”. You can also read my tutorials on blending layers and using Photomatix here.

The Spaniards Inn – Dick Turpins Pub?


Warning: Undefined array key "multiauthor" in /var/www/caughtinpixels.com/public_html/wp-content/plugins/post-layout/plugin.php on line 114

Warning: Undefined array key "mobile" in /var/www/caughtinpixels.com/public_html/wp-content/plugins/post-layout/plugin.php on line 352

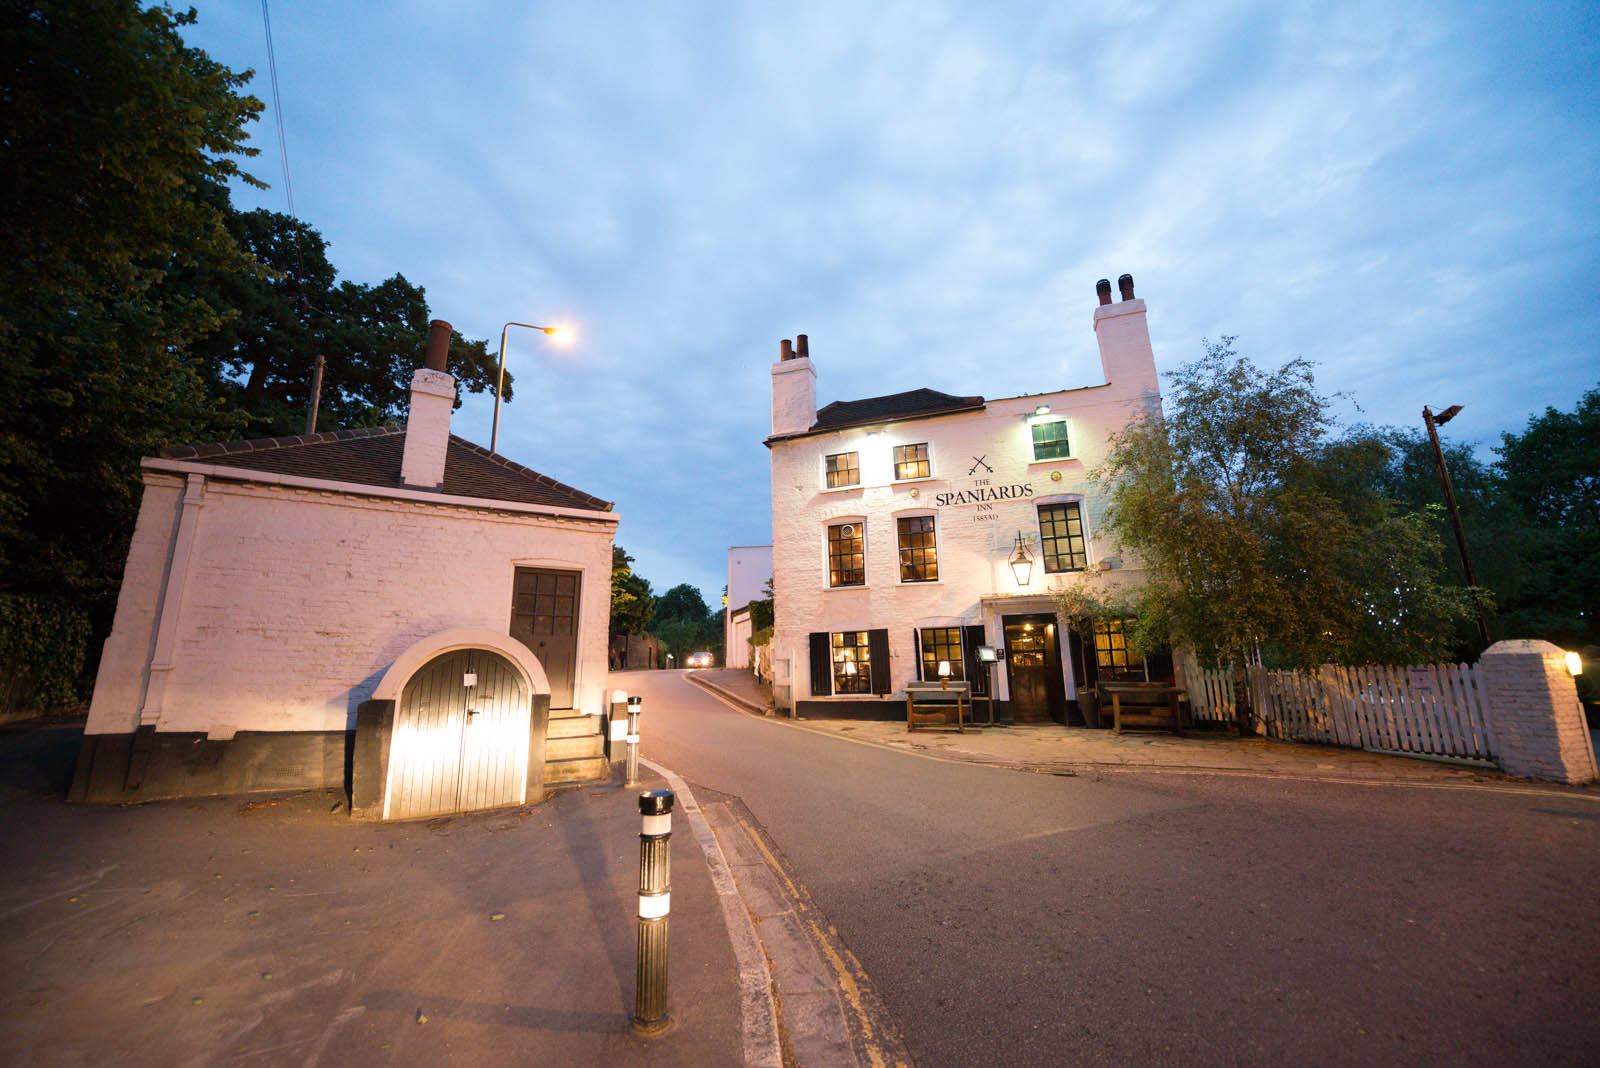
The Spaniards Inn in Hampstead, London, is an old fantastic pub dating back to 1585. Quite possible the oldest pub I have ever been to. Apparently an episode of the legendary Dick Turpin featured the Spaniards inn. No surprise - the interior of the inn is very old too. Photo by: Jacob Surland, www.caughtinpixels.com

Nikon D800, Nikkor 14-24mm, ISO 3200, 14mm, f/2.8 (0-exposure)

The Spaniards Inn in Hampstead, London, is an old fantastic pub dating back to 1585. Quite possible the oldest pub I have ever been to. Apparently an episode of the legendary Dick Turpin tv series featured the Spaniards inn. No surprise, really – the interior of the inn is very old too and would fit perfectly in.

This photo is shot just as we came out of the inn and waited for a cab. The road really is quite busy, but I got 5 shots almost without cars. I shot hand held at ISO 3200. ISO 3200 on the Nikon D800 is something I usually try to avoid, but for some reason this image really survived and there was no more noise than I could clean up, without ruining the photo. I used Noiseware to reduce the noise.

The photo is processed from the +1 exposure in Lightroom and then I made a hand made HDR processing, where I mixed in 3 of the 4 other shots. Overall the Lightroom image was good enough, but the lamps was totally burned out. I used the really dark images and used layer masks to blend in the lamps to my final image.

The double door on the left hand side I had to work a lot with. The headlights of the cab hit the door and really ruined it. I had the option either to crop it out or to restore it. I chose to restore it from the darkest images and then did a little healing brush work to get it good enough.

This is the before photo:

London - Spaniards Inn - original

I tried to do an HDR in Photomatix, but because of the high noise levels I got at ISO 3200 this only got worse in Photomatix and I stuck to do a hand made HDR in stead.


How to make HDR like photos in Lightroom


Warning: Undefined array key "multiauthor" in /var/www/caughtinpixels.com/public_html/wp-content/plugins/post-layout/plugin.php on line 114

Warning: Undefined array key "mobile" in /var/www/caughtinpixels.com/public_html/wp-content/plugins/post-layout/plugin.php on line 352

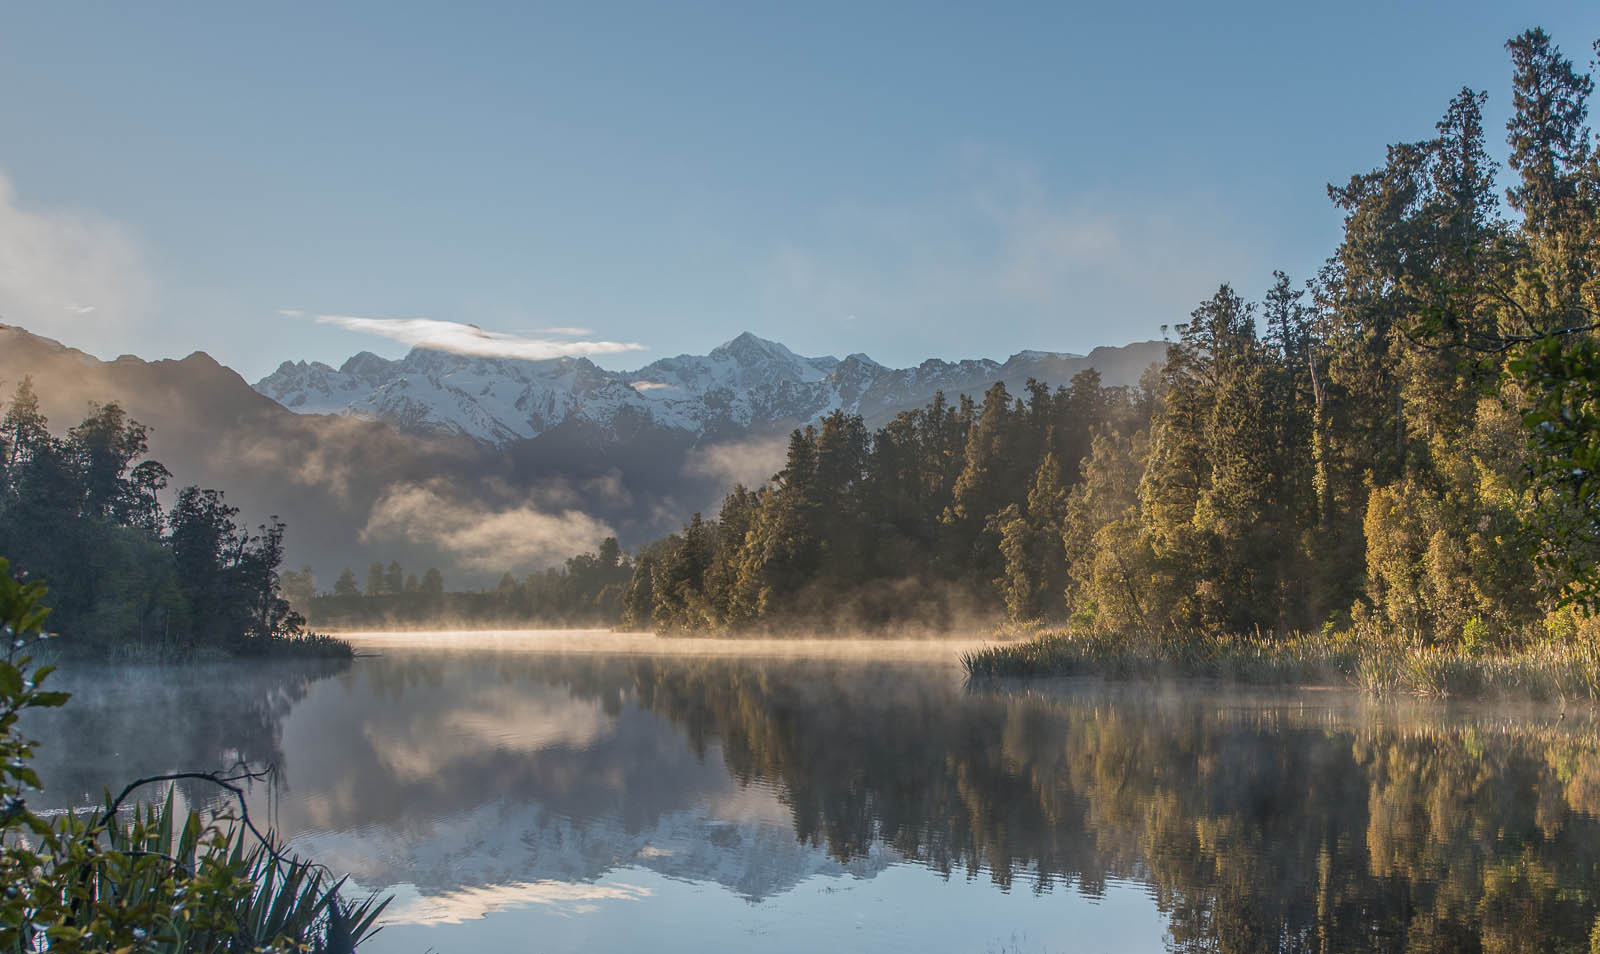
Lake Matheson on the South Island of New Zealand offers an exceptional view of Mount Cook reflecting in the water. And if you get up early, the water is completely still. If you ever go to Fox Glacier and stay for the night, do yourself the favor and get up early to see this. Photo by: Jacob Surland, www.caughtinpixels.com

Nikon D800, Nikkor 14-24mm, ISO 200, 24mm, f/5.6, 1/400 (-2 exposure)

This shot is from Lake Matheson on the south island of New Zealand. It has an exceptional view of Mount Cook reflecting in the lake. My last post was about the photographers plague, where the building you intended to photograph is covered in scaffolding when you get there. This time it was a cloud covering the summit of Mount Cook. Well, it didn’t change the fact that the view and peacefulness at Lake Matheson is absolutely stunning.

This particular photo is handheld. The Lake is surrounded with wood and it’s really only a few places that you can shoot and I had to lean out a bit to get this shot. A tripod was no option, and not really necessary either, as it turned out later.

About the processing of HDR like photos in Lightroom

I had 9 handheld exposure bracketed shots ranging from -4 to +4. What I tend to do when I get home from a photo shoot is to scan the images for what is usable and unusable. For this I use my homemade collection of Lightroom presets and click through a few. This usually gives me an idea of where a photo can go. Sometimes I stay in Lightroom, do some more adjustments and finish up in Lightroom.

In this case one of my presets just made this photo. I tried to do my usual workflow, with Photomatix Pro, but I couldn’t get a result that matched what I got in Lightroom. I even tried out using NIK HDR Pro 2, but that didn’t work out either. After having had the photo lying around for a long time I picked it up again, once more tried the Photomatix, but still couldn’t get anything better than what Lightroom gave me. So instead I finished up the Lightroom version.

As I said I used one of my homemade presets. The presets work really well for inspiration, but I usually do some minor adjustsments, because all photos are different.

This is the original unprocessed photo:

New Zealand - Lake Matheson at Sunrise - original

To do an HDR like photo in Photomatix, you have to have a RAW file. If you just shoot in JPEG you will find that you do not have enough information in the shadows in particular.

If you have shot a RAW file, like I have done here, you then open up the Shadows and lower the Highlights. You do that by setting Shadows to +100 and Highlights to -100. This results in a bit flat photo, but you can already see that the shadows are not almost black and the bright parts are darker giving a better balance.

New Zealand - Lake Matheson at Sunrise - HDR step 1

The next step is to get the the Blacks and Whites adjusted to make the most of the information in the RAW file. You do that by spreading out the Histogram (I will do a post on the histogram later).

These are the settings I ended up with:

New Zealand - Lake Matheson at Sunrise

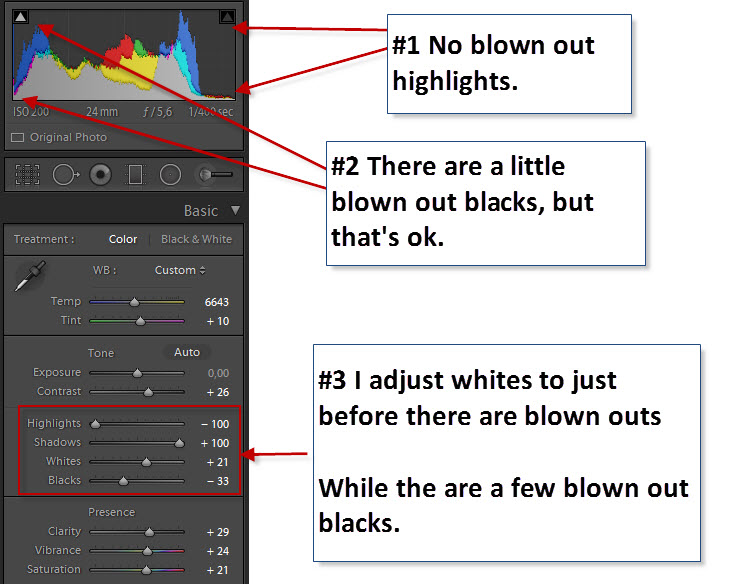
#1: You slide the Whites slider into the possitive area and keep a good eye on the histogram. You will notice it extends to the right. If you keep moving the Whites to the right you will get blown outs, that is completely white pixels. Usually you don’t want that. In the upper right hand corner of the histogram is a small triangle. If this get’s turned on, you will have blown outs. You can click it to see where or you can press ALT key (command key on Mac) while dragging and you will see the exact spots. You maximize the whites, without getting any blown outs. In this case it’s Whites at +21.

#2 Then you do the same for Blacks, except you move it the the left in to the negative area. It’s important to have black in your photo, just not too much. I do this visually and stop when I like the result. Usually I can see that the warning triangle in the left hand corner of the Histogram is turned on. But that’s ok.

#3 This is where the settings are adjusted.

The result of this step gives you something that looks HDR’ish, but made in Lightroom. What you den can do is shift around on the Contrast and Clarity until you get something you like and you can adjust all of the other goodies that Lightroom offers. At the end, just remember to check the Whites has got blown outs while you worked the image.

Lightroom presets available soon

As I said I use Lightroom presets quite a bit. I use them to get a good start or to get inspired. I have made my own collection. I am still working on finishing it up, but when I am done, I will make it available to buy from this website.

If you are want to get notified when it arrives you can sign up to follow this blog in the lower right hand corner.


Scaffolding pest and the blue cock


Warning: Undefined array key "multiauthor" in /var/www/caughtinpixels.com/public_html/wp-content/plugins/post-layout/plugin.php on line 114

Warning: Undefined array key "mobile" in /var/www/caughtinpixels.com/public_html/wp-content/plugins/post-layout/plugin.php on line 352

On Trafalgar Square in London lies the enormous National Gallery. Apparently one of the statues is in for repairing and they replaced it with a huge blue cock. Photo by: Jacob Surland, www.caughtinpixels.com

Do you know the feeling too?
Within the last year, I have started to take photography more seriously. I have started to seek out locations that I like to take photo graphs of. But sometimes I feel that I am suffering some kind of Scaffolding pest or Photographers Plague.

I took a month leave in december 2012 to have a lot of time to work on photographer, both the post-processing as well as time to take photographs. In the one month there were two sunsets that wasn’t overcast. It seems almost impossible. And other things like Mont Saint Michel I travelled far to see, and I ended up seing it on a clear blue sky day, which isn’t good for photography. The four previous days had been totally overcast, which is not any better. And not to make it any better, a large part of was covered in scaffolding and a huge construction site sat in front of the island. Maybe it’s just because I have turned into a photographer I start noticing how many scaffolds and restoration projects are being executed.

I have just returned from a business trip to London and I came past the National Gallery at Trafalgars Square, just as I did last time I was in London. Last time I wasn’t hit by the plague, but this time I was. There is a scaffolding on the building. But notice the blue chicken or cock! Last time there was a big bronze statue of a man on a horse on that pillar, but now a huge blue cock on it… Great with funny solutions!

National Gallery in London


Warning: Undefined array key "multiauthor" in /var/www/caughtinpixels.com/public_html/wp-content/plugins/post-layout/plugin.php on line 114

Warning: Undefined array key "mobile" in /var/www/caughtinpixels.com/public_html/wp-content/plugins/post-layout/plugin.php on line 352

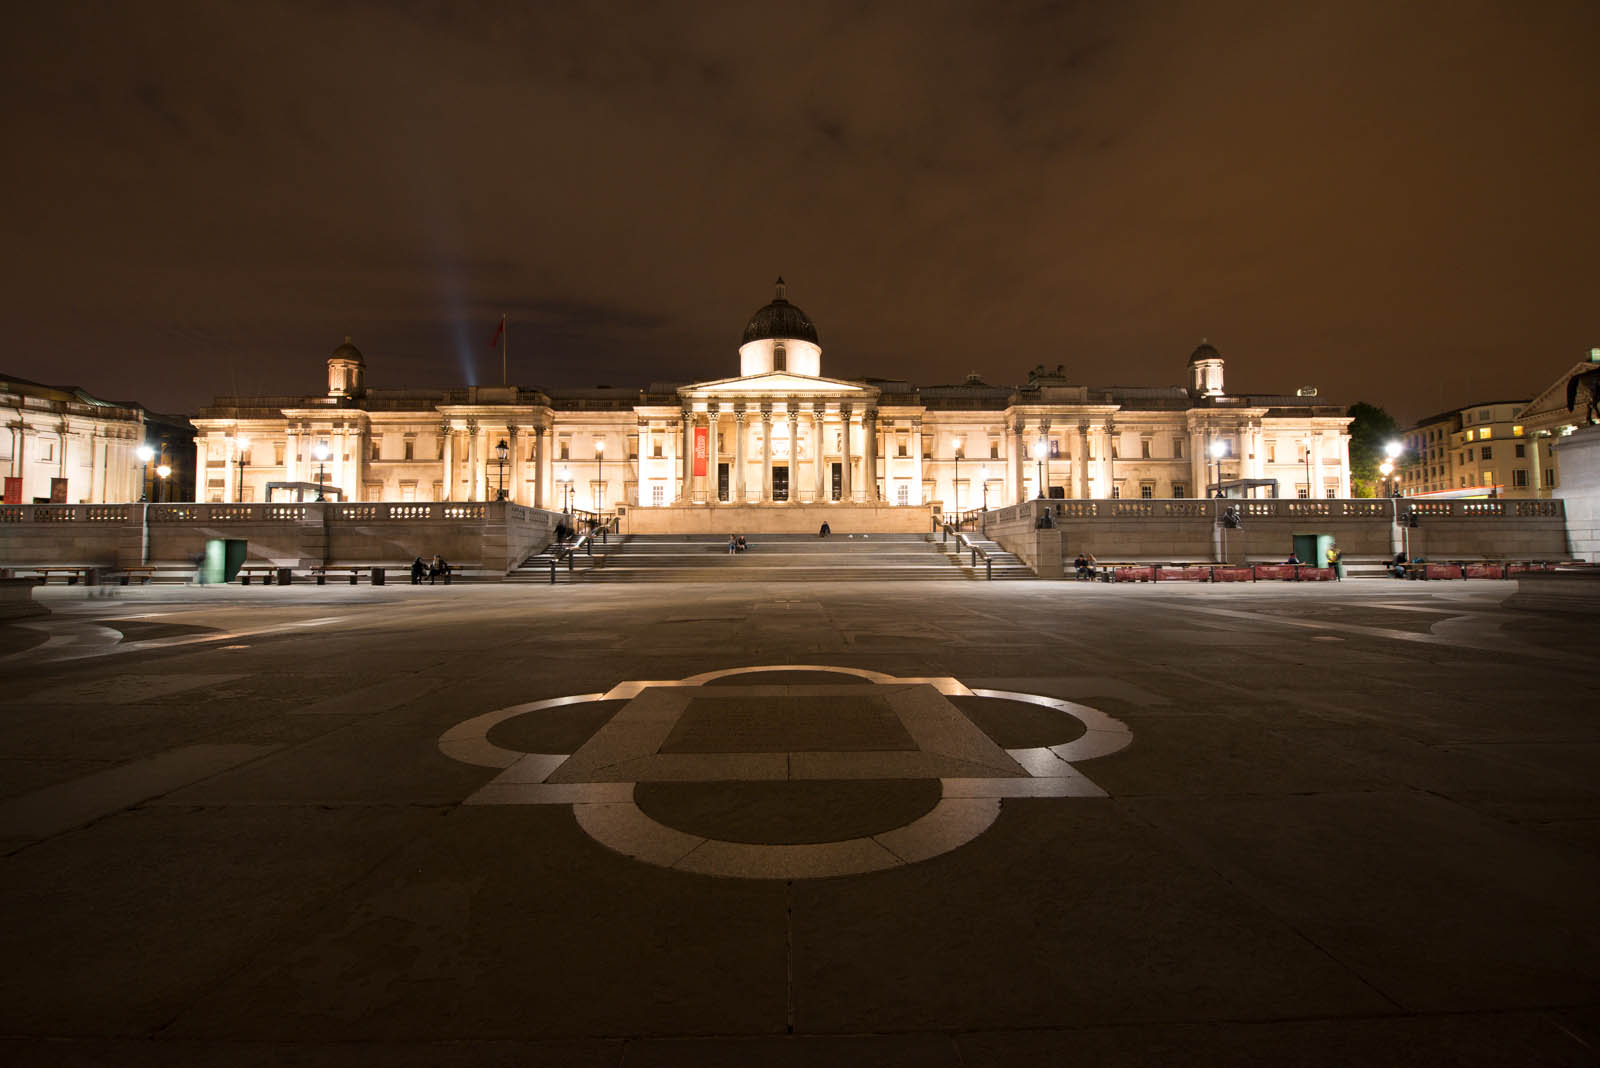
On Trafalgar Square in London lies the enormous National Gallery. An old huge beautiful building. Photo by: Jacob Surland, www.caughtinpixels.com Nikon D800, Nikkor 14-24mm, ISO 800, 15mm, f/6.3, 1.3 sec

This is the National Gallery in London. The square in front of it is Trafalgar Square and Lord Nelson stands on his pillar right behind me.

I’m going back to London next week for some business. I plan on bringing my camera. Maybe I will get up early one day and grab a few shots as the city awakes.

This photo is an HDR photo made from 5 exposures (-2, -1, 0, +1 and +2). I have processed it first in Photomatix to get my tone mapped image. Then I blended in Photoshop, mostly to remove ghosted people. Last but not least, and that is what makes the photo work, I added some artificial light sources on the shape in the lower part of the image and around the buildings (you might want to read about adding artificial light sources here).

This is the original 0-exposure with no adjustments:

Shape in front of The National Gallery - Before

Learning to criticize your own work


Warning: Undefined array key "multiauthor" in /var/www/caughtinpixels.com/public_html/wp-content/plugins/post-layout/plugin.php on line 114

Warning: Undefined array key "mobile" in /var/www/caughtinpixels.com/public_html/wp-content/plugins/post-layout/plugin.php on line 352

It may be small, but it's a wonderfull small church with the most beautiful view possible. I find it hard to imagine a more beautiful view. The Church of the Good Shepard overlooks the odd blue lake of Lake Tekapo in New Zealand. Photo by: Jacob Surland, www.caughtinpixels.com

It may be small, but it’s a wonderfull small church with the most beautiful view possible. I find it hard to imagine a more beautiful view than this small church has. The Church of the Good Shepard overlooks the odd turquoise blue lake of Lake Tekapo in New Zealand.

The photos is a 3 shot HDR photo post-processed in Photomatix Pro and I then blended layers in Photoshop. To extract the details in the clouds, I used Tonal Contrast in NIK Efex Pro. You can learn to make photos like this too, if you read my HDR tutorial here.

Learn to give critique to your own work

One of the things that I found most important is skill to learn to criticize my own work. Not only for the bad things, also for the good things. What works and what doesn’t work. I have a lot more bad than good photos. Someone said that the first 10.000 photos are bad. I still have too many bad photos, but not as many as I used to. I just deleted 4000 photos that was no good at all and never would be. 6 months ago I probably wouldn’t have been able to decide that.

The process of making a great photo requires that

  • You know your camera and can use it right.
  • You can compose a photo
  • You know when to take a photo – the opportune moment.
  • You can process the photo later in the post-processing software.

Each of these disciplines requires skills and training. People are different and some find composing a photo easier than others do, and others find the technical details of the camera super easy, while others don’t. You always have some strengths and weaknesses and your weaknesses you have to work harder to get good at.

A fifth bullet is the

  • You have to learn to criticize your own work.

This is far more difficult than it sounds. Start by looking at photos you see posted around the web on Flickr, Google+ or even Facebook. You will find some you like, but a lot more you don’t like. Why is it that you don’t like them? What’s wrong with them? Is it taste or is just not great photos? Try to figure out what problem you have with the photos – and then avoid doing it yourself.

Personally I like colors a lot and for that reason I rarely make black and white photos and I don’t spend much time looking at them either, though I respect black and white photographers. I really love the richly saturated photos and therefore I make richly saturated photos. Some would probably say over saturated, but that’s really up to me to decide.

Learning to criticize your own work is about learning what you like and what you don’t like and learn to scrutinize your photos for the presence or absence of either one. Sometimes I can process a photo and publish it instantly because I like it so much. Later, perhaps even within the hour of publishing it, I start to see errors or problems in the photo and I regret that I published it. Big mistakes I will have to fix and replace in my Smugmug portfolio, but I can’t do that with the photos I posted in Google+ or Flickr. This will have the errors forever.

There are probably many ways of learning how to give critique to your own photos. I will tell how I do it.

I usually let my photos lie around for some time, before publishing them. Currently I have 35 unpublished and completely ready and meta tagged photos. I then have around 30 more which are some that I think has got the potential and I’m in progress with – either as post-processing or just evaluating. And then I have a back log of 15.000 photos or so that I have taken over the last 12-15 months. Some of those photos are crap, while others have potential. Some have great potential, but I still just haven’t got around to select them.

The 35 ready-to-publish photos I will look at in turn regularly and in some of them I find things I don’t like about them as time passes by. Sometimes I start to dislike a photo, because a photo has a major flaw. Sometimes I can’t pin point the flaw for a while, until I suddenly realize it. It’s about finding what the weakest point of your photo is. And remember:

A photo isn’t stronger that it’s weakest point.

Sometimes it can be very hard to spot what makes a photo weak. Is it something about the technical quality like lack of sharpness, or is it the composition, maybe something about the light or is it the post-processing? If it’s one the three first, it can be very difficult to fix and you will probably have to discard the photo and if at all possible re-shoot it at a later time (I have a Collection in my Lightroom called Re-shoot, for photos I know I will get a second chance to shoot). But sometimes I might find a way to solve the problem. Like I did in this photo:

The problem with this photo (from Sydney Australia) was that I had taken it very quickly and had not made sure to get everything sharp. The wooden pillars wasn’t sharp close to the edges. After a while I got the idea of making this radial blur on the photo and blending it with the sharp part of the photo and then get this moving effect. That works and it saved my photo. But many times I have given up. Like I did on this photo below (it’s one of the photos I have been spending most time on, without any result):

New Zealand - Arthurs Pass

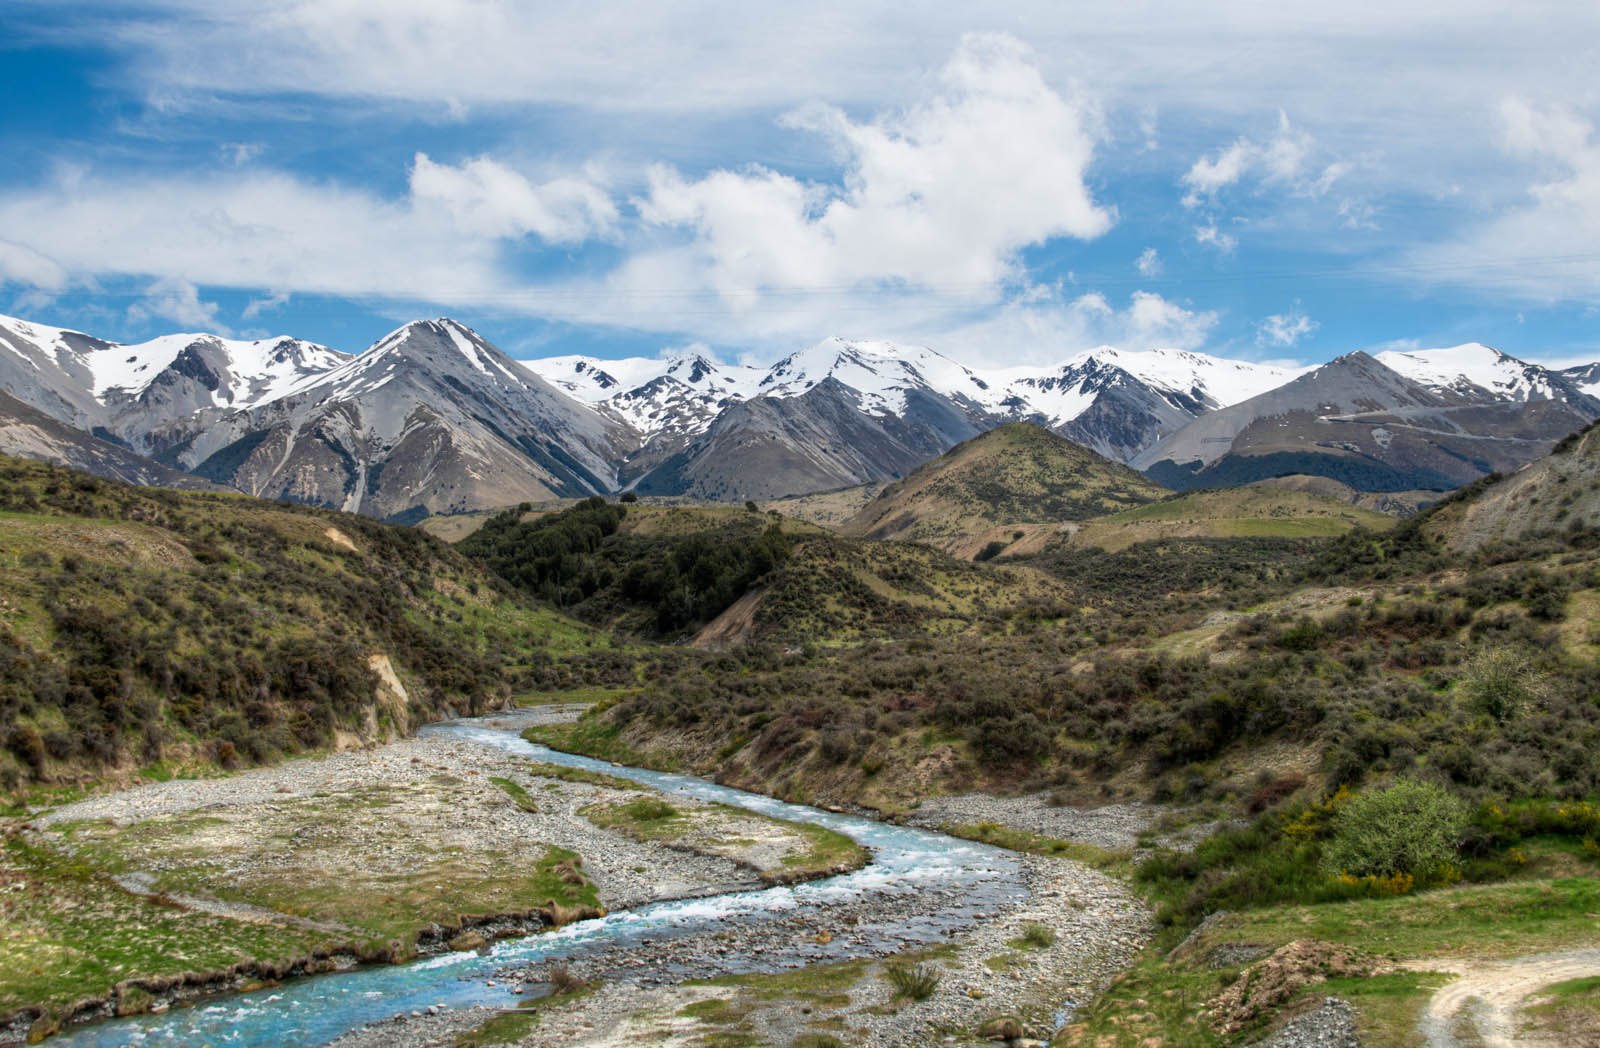
I do like the composition on this one, but for some reason it keeps not ending up where I want it. First of all I have shot it with my 28-300mm Nikon lens, which really has some sharpness issues. So the quality of the photo is not as good as I would like it to be – it’s not sharp enough. Second – the light is not very great. I have tried all sorts of things to compensate for that. I have used a number of more advanced filters, but nothing really works. The conclusion I have made is that while the composition works fine, the light fails and there fore the whole photo fails. I would love to go back and re-shoot, but I’m not sure if that is ever going to happen.

If it’s “only” the post-processing that has problems I will try to process it again. Sometimes it’s because a photo is difficult to process and then I just have to wait (or re-process later) until I have the skills. These photos stay in a ‘work in progress’ collection in my Lightroom.

By letting the photos sit around I slowly but surely figure out what I like and don’t like about my photos. I learn how to criticize my own work and my loop hole for acceptable photos keeps shrinking everyday on different parameters. Sometimes I like a specific photo for one thing, while another part fails and I have a hard time discarding the photo. But I’m getting better at discarding.

A great side effect of this process is, that I get better I get at shooting the photos. One of the most important lessons I have learned is about the light. Light is everything. If the light is not present, forget about taking photos! At least the kind of photos that I like to take. I have learned that it is much better to take 500 photos around sunrise or sunset than at noon, because the light is much better. And the photo above from Arthurs Pass in New Zealand is a great example of this. This makes me relax during the middle of the day and not keenly look for a photo opportunities everywhere.

How to take photos while driving


Warning: Undefined array key "multiauthor" in /var/www/caughtinpixels.com/public_html/wp-content/plugins/post-layout/plugin.php on line 114

Warning: Undefined array key "mobile" in /var/www/caughtinpixels.com/public_html/wp-content/plugins/post-layout/plugin.php on line 352

We drove from Cherbourg in Normandy to Saint Malo in Brittany while the sun was setting. I opened the window and shot this tree. Not two sunsets are alike, and I would love to photograph each single one of them. Photo by: Jacob Surland, www.caughtinpixels.com

Nikon D800, Nikkor 24-70 f/2.8, ISO 100, 27mm, f/5.6, 1/1250 sec

Rule number #1 – Don’t ever drive the car and take pictures at the same time!

The shot above is shot while driving from Cherbourg in Normandy to Saint Malo in Brittany. I got this scene in the neighborhood of Saint Mere Eglise. There was a beautiful sunset, but we would arrive late and couldn’t afford the time to stop to take any photos. But with the right configuration of the camera and some training, you can get good photos and sometimes even great photos out of the window of a driving car.

We’ve been on a few road trip vacations and a thing you just can’t do is to stop every two minutes to take a photograph. It just doesn’t work with the family (and schedule). But don’t get too frustrated! Let your spouse do a lot of the driving and arm yourself with a lens that allows some zooming, but not too much. My preferred lens is a 24-70mm on a full frame camera, which would be something like 18-55mm if you have a cropped sensor camera.

One thing you can’t do while driving 60 mph is to adjust the camera – you have to have some overall working quite good settings.

Then configure your camera to the following settings (look up in your manual if you are unsure how to do it), and then you will be just fine shooting:

Step 1: Fast shutter speed.

If the photos are blurred or shaken, you can’t use them. Shutter speed is the one control you have to set fixed to 1/1250. This is fast enough to freeze a straw of grass even close to the car, while driving 60 mph. Put your camera on S (if you have a Nikon) or Tv (if you have a Canon). This will allow you to set the shutter speed to a fixed speed. Dial until you see 1/1250 in the display.

I started out on 1/1000 sec but I have decreased it one notch to 1/1250 sec.

Step 2: Focal length

You can’t zoom too far in for two reasons. Number 1, you can’t frame anything, because the car is rumbling. Better to take a bit wider photos and then crop them in the post processing. The further you zoom in, the faster the shutter speed will have to be. Of cause you could make an even faster shutter speed, but you would then put more strain on other factors of the camera and you will risk ending up with unusuable photos.

You can’t go too wide either, because you then include the car. Most of my successful shots are between 24mm and 70mm (or 18mm 55mm on a cropped sensor).

Step 3: Auto ISO

You don’t have time to test what ISO you should set the camera to. You only have one chance on each photo. By setting the camera to auto-ISO you let the camera decide what f-stop to use and what ISO to use. It does this quite well – your camera is quite clever.

Step 4: Under expose a little bit

It’s better to slightly under expose a photo than slightly over expose it. Why? Because blown out parts doesn’t look very good to the eye, while black parts are much easier accepted. I have found that if I set my Nikon cameras to an exposure compensation (the +/- button on the camera) to -2/3 of an exposure, I rarely get blown out highlights, if it is broad daylight.

In more difficult lighting situations I shoot exposure bracketed hand held. I know that I will not be able to use them for HDR because they will be different photos, but I can use the best exposure.

In the cause of the photo above I had set the camera to take a -2, -1 and a 0, and with the exposure compensation of -2/3 I got some weird exposures like -2 2/3 and -1 2/3 and -2/3. But never mind the numbers, just shoot away! I got a good exposure at -1 2/3 and that one I used for the photo above.

Step 5: Focusing

You can either set the auto-focus to the center or you can use manual focus. It depends a bit on the focal length you are using and what you are trying to hit. In this particular photo I used manual focus and set it to infinity, because the light was fading and I had trouble getting the camera to focus at all.

Step 6: Learn to read the landscape

You then have to learn to read the landscape passing by. You don’t get a lot of time to react and when you see a great photo it is too late to shoot it. You have to read that the scene is coming and then shoot when it’s there. It’s a difficult situation hitting a target while moving, but while you are trying you will get better and better at it.

What I had in my mind this particular evening was a lone tree, if anything else showed up, I would try that as well. To shoot one of these lonely trees I first of all had to find a hole in the highway fencing. I could see these coming up from time to time. Second I had to have the combination of a hole in the fence and a lone tree. I was lucky and got this shot, which pretty much was what I was after.

Step 7: Get close to the window to avoid reflections

You have to get the camera close to the window to avoid too many reflections in the window and you have to keep the window reasonable clean. Or at least shoot around splashed bugs on the wind screen. The closer you get the camera the less important the dirt is.

Step 8: Don’t drive the car

Let somebody else drive the car. It is way to dangerous and illegal to take photos while driving yourself.

Another example

This is from New Zealand on our way to Lake Tekapo.

On The Road Again

Nikon D600, Nikkor 28-300mm, ISO 100, 35mm, f/3.8, 1/1000 sec


How to use advanced Dodging and Burning to improve your photo


Warning: Undefined array key "multiauthor" in /var/www/caughtinpixels.com/public_html/wp-content/plugins/post-layout/plugin.php on line 114

Warning: Undefined array key "mobile" in /var/www/caughtinpixels.com/public_html/wp-content/plugins/post-layout/plugin.php on line 352

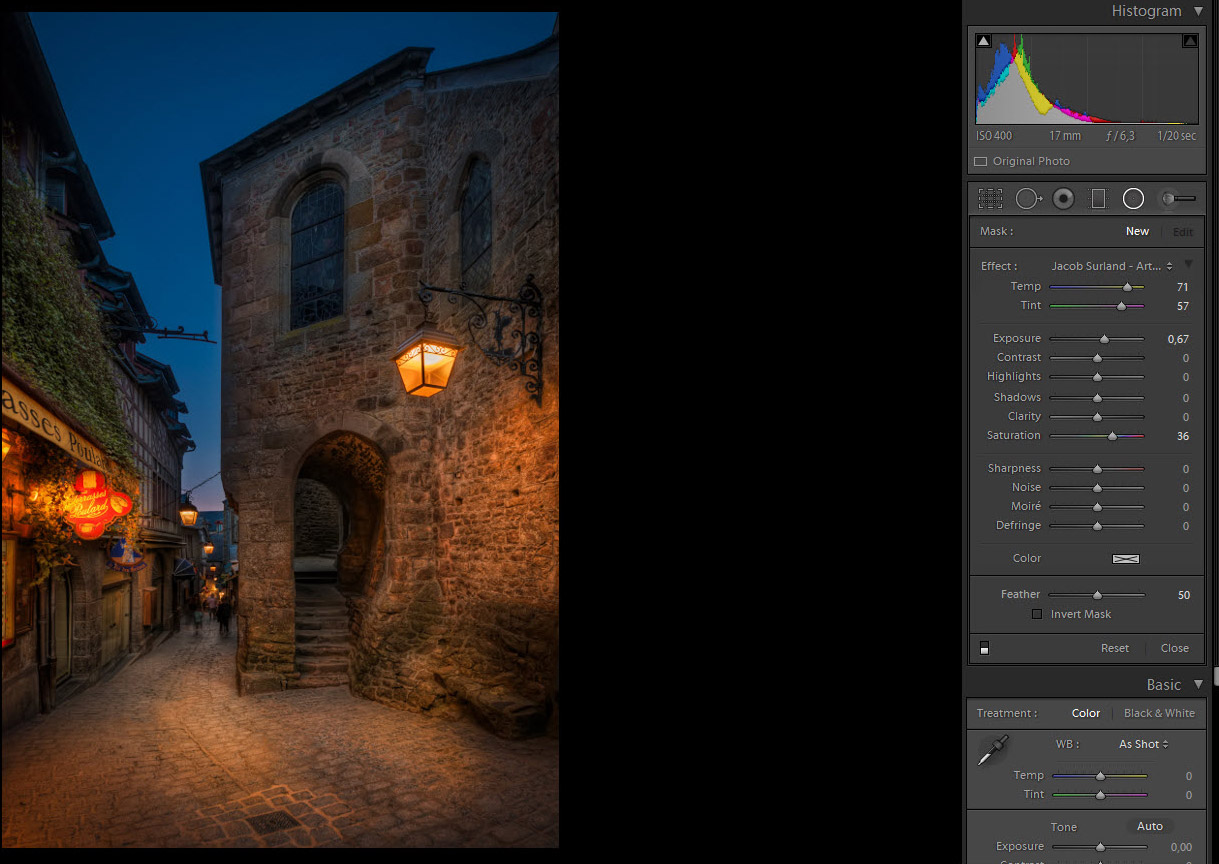
At daytime Mont Saint Michel is crowded with tourists, but later, when the sun is down people leave the place. It's a labyrinth of small streets and alleys criss crossing their way to the entrance of the monastery on the top of the mountain. Small lamps light up and make it very Harry Potter medieval town. Photo by: Jacob Surland, www.caughtinpixels.com

Buy a print

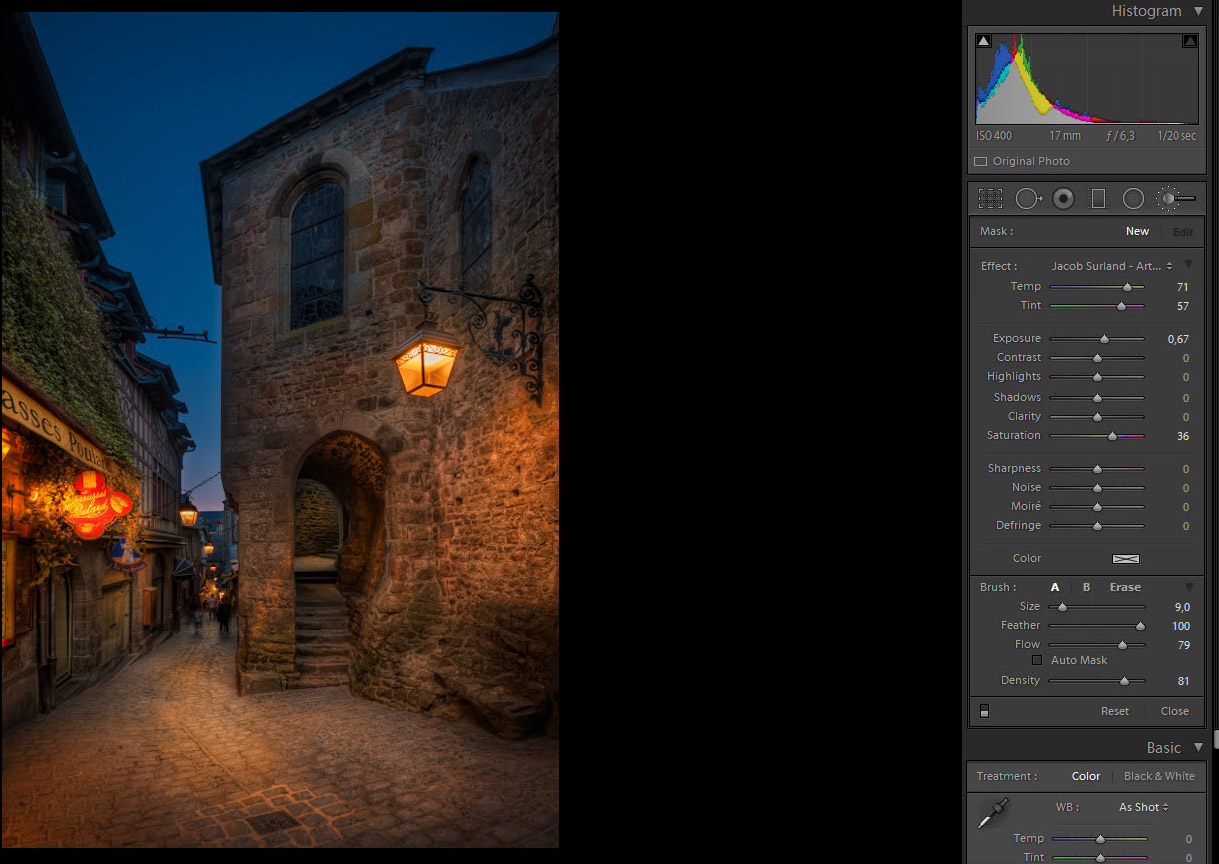
Only recently I realized how powerful a tool and technique dodging and burning really is. I always thought of classic dodging and burning, but modern digital dodging and burning is much much more powerful and I have started to use it in some quite cool ways and I will show you how you can use this to improve the mood of your photo. I have written a tutorial on dodging and burning here.

In the article I have shown two different techniques used in the photo above, try and hover the mouse to see the changes I did with the Brush Adjustment tool::

Mont-Saint-Michel-Light-up-Adjustment-Brush

And then hover to see what I did with the Radial Filter:

Mont-Saint-Michel-Light-up-Radial-Light-Up

Notice how I have lit up the passage up the stairs and the platform at the far end of the passage and added light in the street. This makes the viewer curious and it seems welcoming and I achieved the warm and welcoming image I wanted.

Further examples and readings

Read the detailed tutorial on dodging and burning here.

I have been using Dodging and Burning many times and these are just two examples:

A Moeraki Boulder

Here I burned the shadow of the rock to emphasize it.

and in the next one I dodged the snow, to make it look like the light is shining from the viking ship.

Viking ship lit in the Winter

Do you want to make photos like these too?

All three of these images are made like HDR – which is an advanced photo technique, that you can learn too. If you want to make images like this, I can recommend to read my completely free and very detailed HDR tutorial and that you get your hand on a copy of Photomatix Pro. I can offer you 15% discount by using the coupon code “caughtinpixels”.