Roskilde Cathedral in the Mist


Warning: Undefined array key "multiauthor" in /var/www/caughtinpixels.com/public_html/wp-content/plugins/post-layout/plugin.php on line 114

Warning: Undefined array key "mobile" in /var/www/caughtinpixels.com/public_html/wp-content/plugins/post-layout/plugin.php on line 352

To create this photo I have used the clone healing brush and the perspective crop in Photoshop.  It is a 7 shot HDR photo, and I used Photomatix pro, to create both a single tone mapped image and a double tone mapped image, which I mixed with the original ones.

The original photo is not a bad one, but neither perfect.

Jack the ripper is around - before v2

#1: I removed the branches. When I straighten the church, some disappeared, but I ended up removing them completely. When I took the shot, made sure, that they were included and did not cover the church. I used the brush healing tool in Photoshop.

#2 The sky I worked with, to emphasize the light in the mist. That is an important part of the mood. I increased the contrast and saturation a bit.

#3 The church I straighten to a certain level. I can’t straighten it completely, because it makes a small fat church, which is not the reality. The compromise is somewhere in between completely straightened and this. Ideally I would have gone further away, but that was not possible.

#4 The acid color of the light from these lamp posts I didn’t like, so I worked with the colors, and mixed that into my final photo. I did that, by making a new layer in Photoshop, opened the Hue/Saturation dialog (CTRL+U) and dialed back some of the yellow and green. I then mixed the lamps into my image.

#5 These lamps are blown out, but because I shot it in HDR I can achieve the moody great look from the lamps, in stead of just a white blob. There is not a lot of dynamic light in this photo otherwise, but the lamps I save.

#6 I then used more healing brush to remove the snow. I used a clone stamp after wards to get a better result on the cobble stones.

#7 The cobble stones is the double tone mapped image. What I get from the double tone mapped image, is the lovely reflections from the lamps and the many details and textures in the cobble stones.

This is one of the photos, where you might ask “Why HDR it?” – well, I did get more details within the windows of the church and on the lamps. I also got more shots, so that I could remove people and the car coming around the corner. And then it added some of the magic, mysterious Jack the Ripper mood.

How to get inspired by Presets in Lightroom


Warning: Undefined array key "multiauthor" in /var/www/caughtinpixels.com/public_html/wp-content/plugins/post-layout/plugin.php on line 114

Warning: Undefined array key "mobile" in /var/www/caughtinpixels.com/public_html/wp-content/plugins/post-layout/plugin.php on line 352

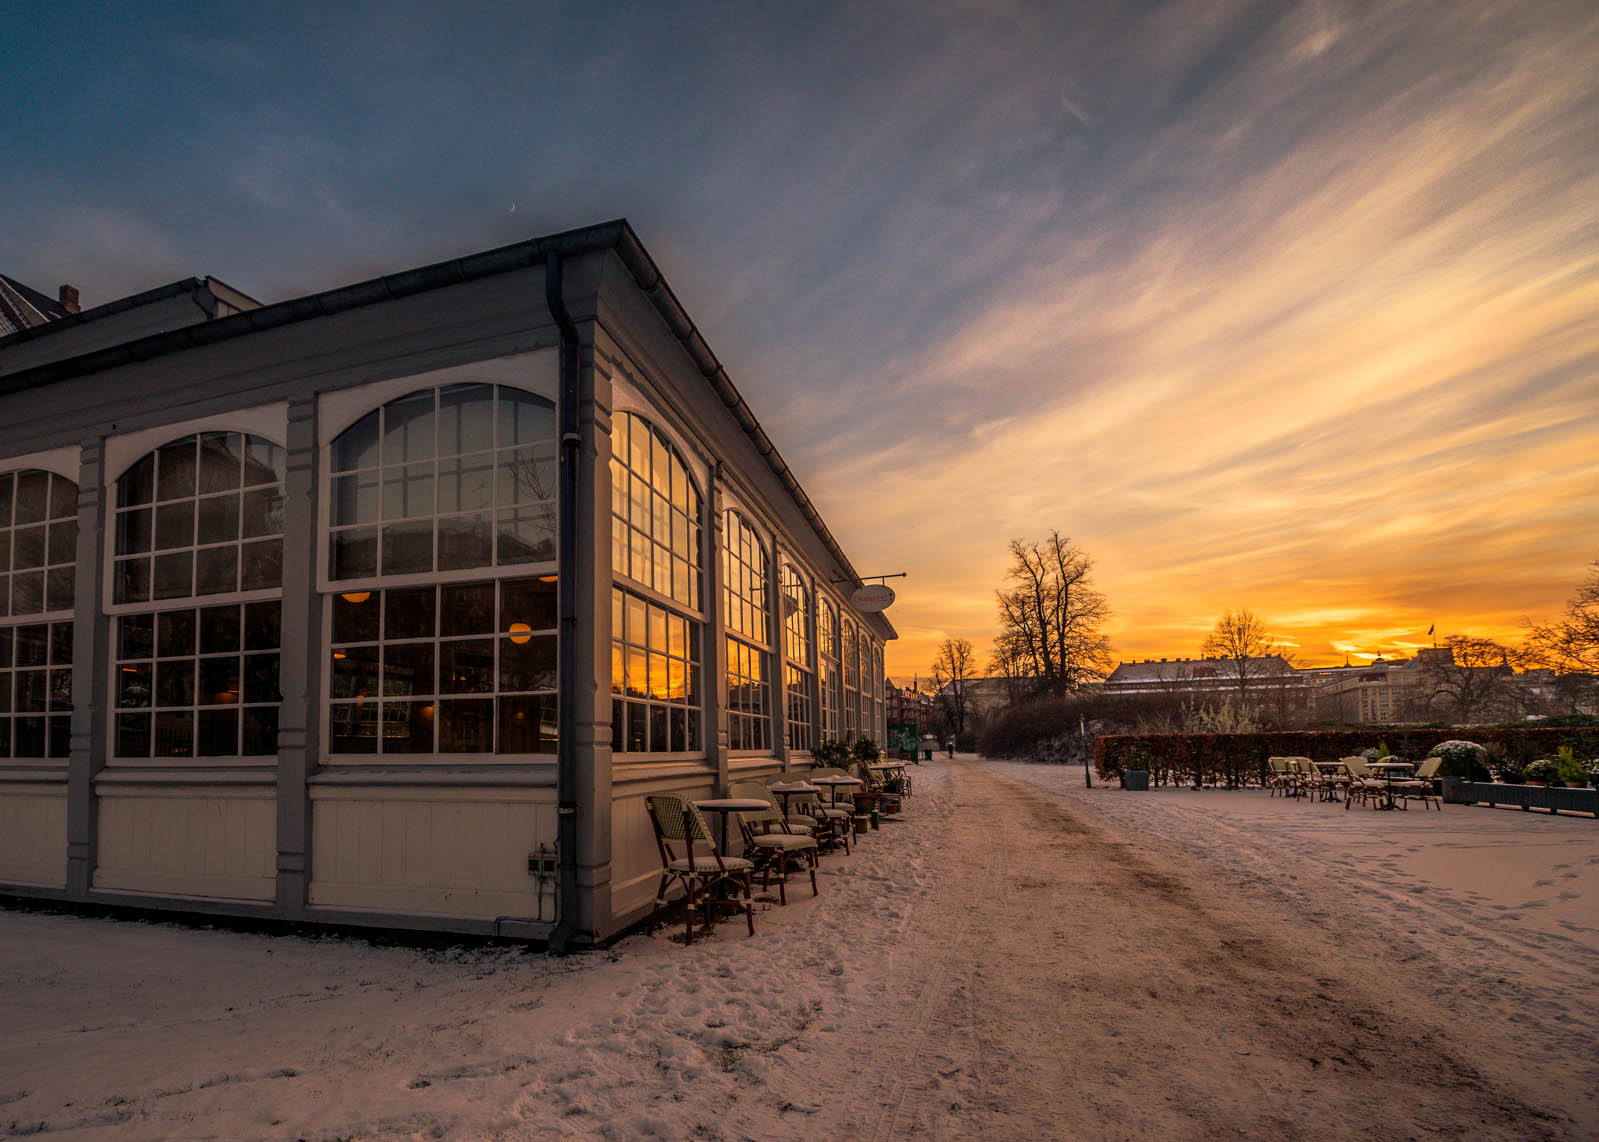
In the center of Copenhagen Denmark lies the old Kings Garden. On summer days the park is crowded with young people sitting around the park enjoying the great weather. The old Orangery, now a restaurant, is placed in fence surrounding the garden. Photo by Jacob Surland, www.caughtinpixels.com

In the center of Copenhagen Denmark lies the old Kings Garden. On summer days the park is crowded with young people sitting around the park enjoying the great weather. The old Orangery, now a restaurant, is placed in the fence surrounding the garden. One day I will go in there!

About the processing

Can you believe that I almost deleted this photo? A few weeks ago I did some clean up. I was running low on disk space and decided to clean out in my photos. “Your first 10,000 photographs are your worst” said Henri Cartier-Bresson and he is right, at least to some extend. When I started out just over a year ago I shot a lot of photos and most was completely useless. Completely! Some I got rid of at once, but others I didn’t get the time to get rid of until a few weeks ago.

This one was from a day with a fairly ok sunset and I was on my way home from work and got my camera out, but I didn’t really feel that I got what I wanted when I took my shots.

I have a two step procedure when I delete photos. I mark them as “rejected” in Lightroom (press X). Then I review them later before deleting. I get ticks in my eyes, when people start talking about deleting stuff. It’s so irreversible. But sometimes it’s just necessary.

When I came to this image I marked it as rejected:

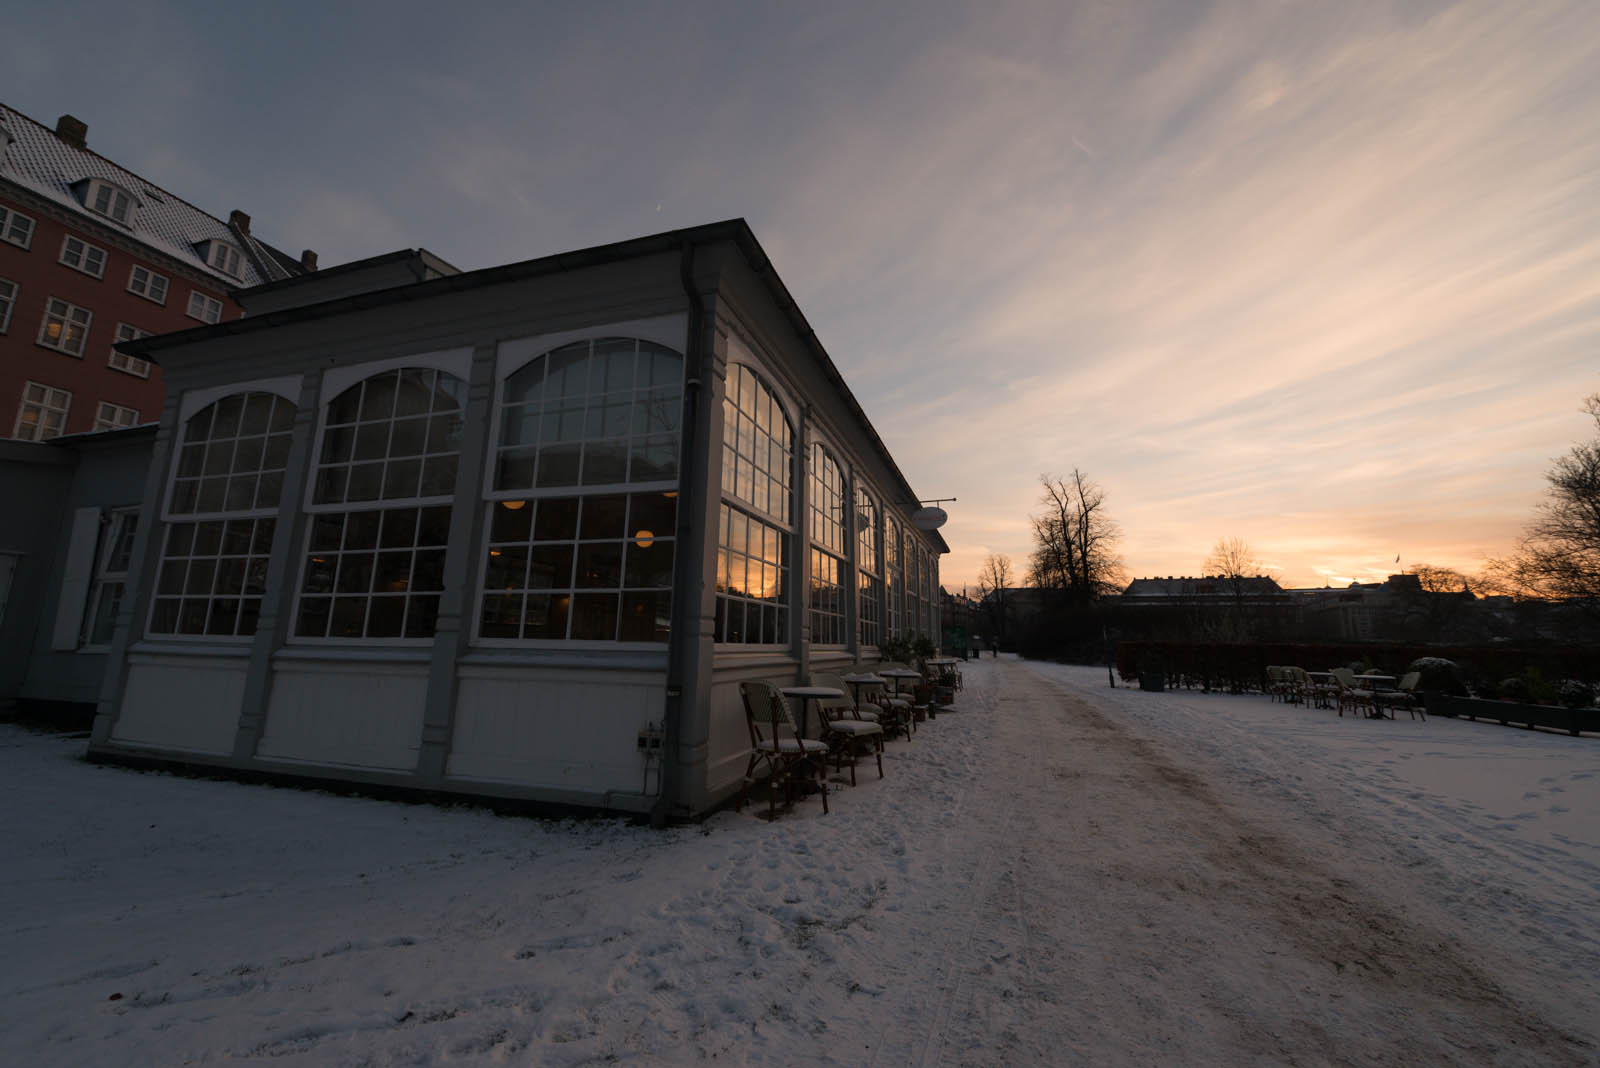
Orangery - Original

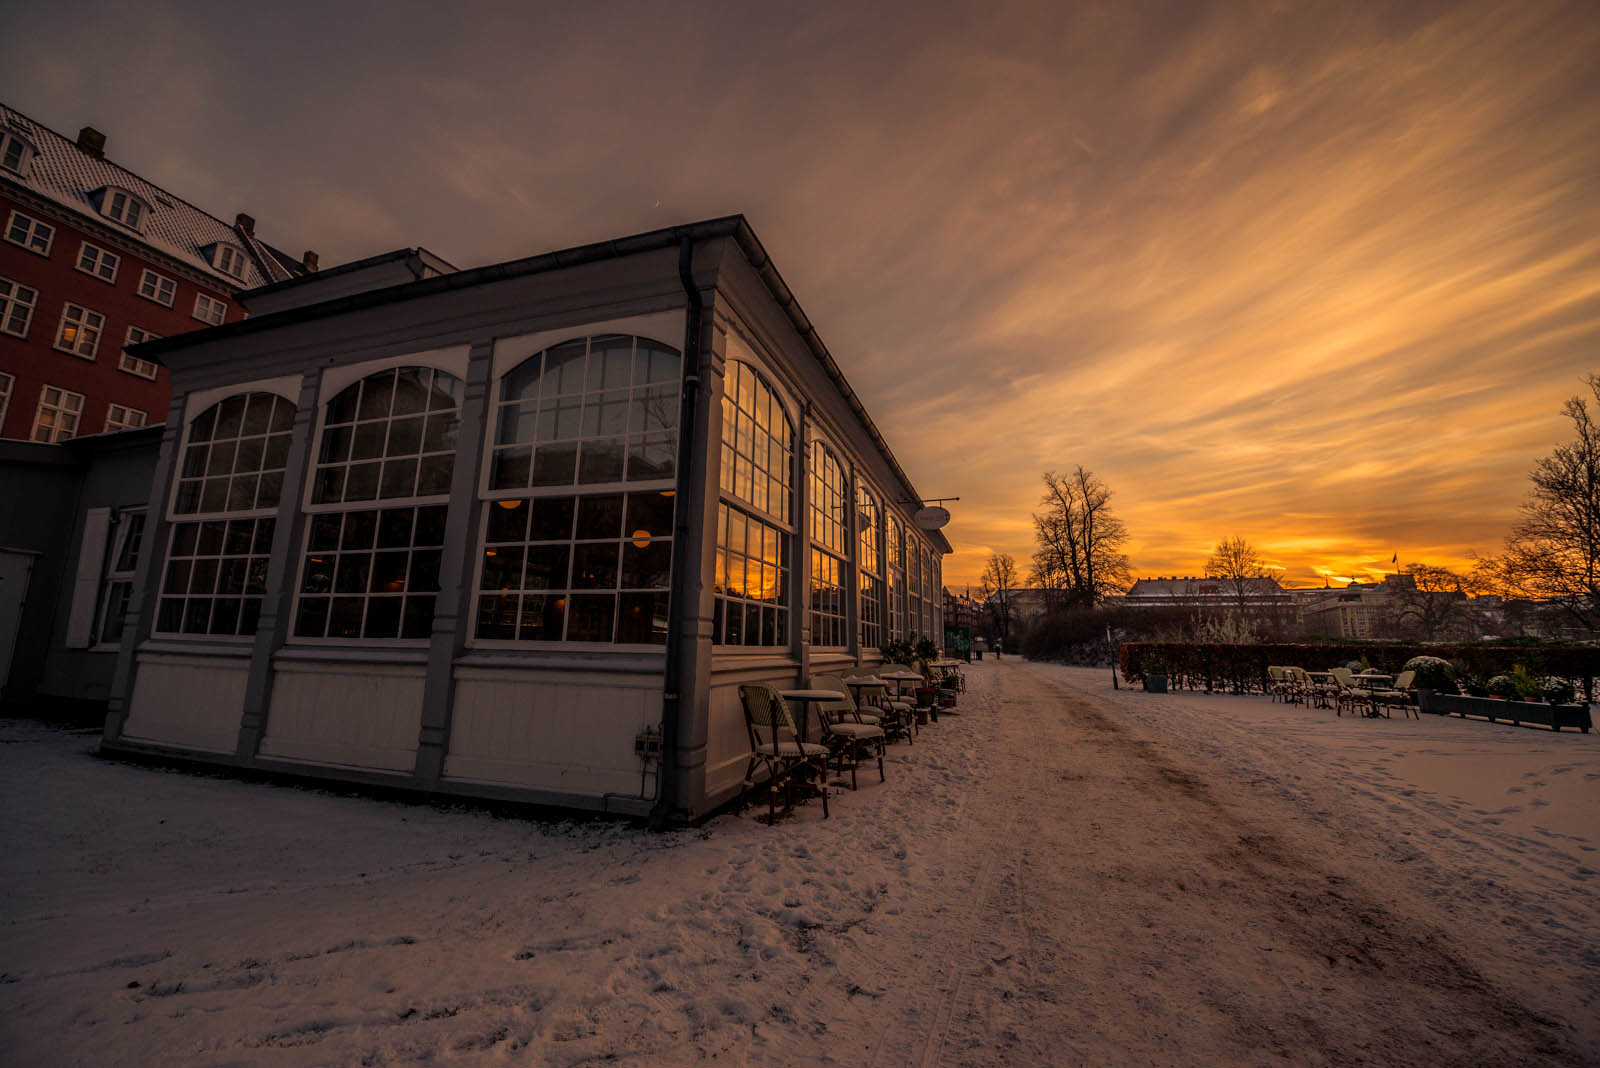
but, I accidentally hovered over one of my presets called “HDR Armageddon Sunset” in Lightroom which gave me this look:

Orangery - Armageddon

And I thought – well maybe the sunset isn’t that bad. I added a gradient filter in Lightroom to bring back some of the blue in the sky and pressed the “Upright Auto” button and cropped slightly. That gave this result:

Orangery - Armageddon Adjusted

Now I was 100% sure, that this was something to work with. I exported this photo to my post-processing folder and exported the rest of the 5 hand held exposure bracketed shots (-2, -1, 0, +1 and +2) to Photomatix Pro and did a tone mapped version of the image. I knew I had to get something that matched the sky of my Lightroom version of the image.

As I had suspected before exporting it into Photomatix, the sky didn’t come out very well from Photomatix. This is a common problem. Often the sky turns gray, very noisy or gets nasty halos. The sky very often get’s ruined. Instead I used the sky from the Lightroom export and mixed that with the tone mapped HDR image.

Final touches

I used NIK Color Efex Pro 4 to finish up the sky. There is a filter called Tonal Contrast that is good to get details out of the sky (amongst other things). I blended this gently into the image to the extend that I felt worked well.

I very rarely use a complete version of a filtered image, not matter what filter it is. I use Topaz Adjust and NIK Color Efex frequently, but occasionally I also use OnOne Perfect Suite. But I always duplicate my image before starting the filter and then I use layered masks in Photoshop (or GIMP) to mix in the parts that I like. This really is an advanced kind of Dodge and Burn.

I do the same with Noise reduction software. I don’t apply unnecessary noise reduction to parts of the image that don’t need it. I would just loose details by doing that. So I use layered masks to mix in the parts that needs to be noise reduced, typically areas like the sky.

Conclusion

I didn’t use my preset completely, but I did get inspired and got a successful photo from something that I almost deleted. I use presets a lot this way – to get an idea. Sometimes I finish up the idea in Lightroom and at other times like this, I start up an HDR processing workflow.

Remember that you can get 15% of Photomatix Pro by using my coupon code “caughtinpixels”. You can also read my tutorials on blending layers and using Photomatix here.

The Spaniards Inn – Dick Turpins Pub?


Warning: Undefined array key "multiauthor" in /var/www/caughtinpixels.com/public_html/wp-content/plugins/post-layout/plugin.php on line 114

Warning: Undefined array key "mobile" in /var/www/caughtinpixels.com/public_html/wp-content/plugins/post-layout/plugin.php on line 352

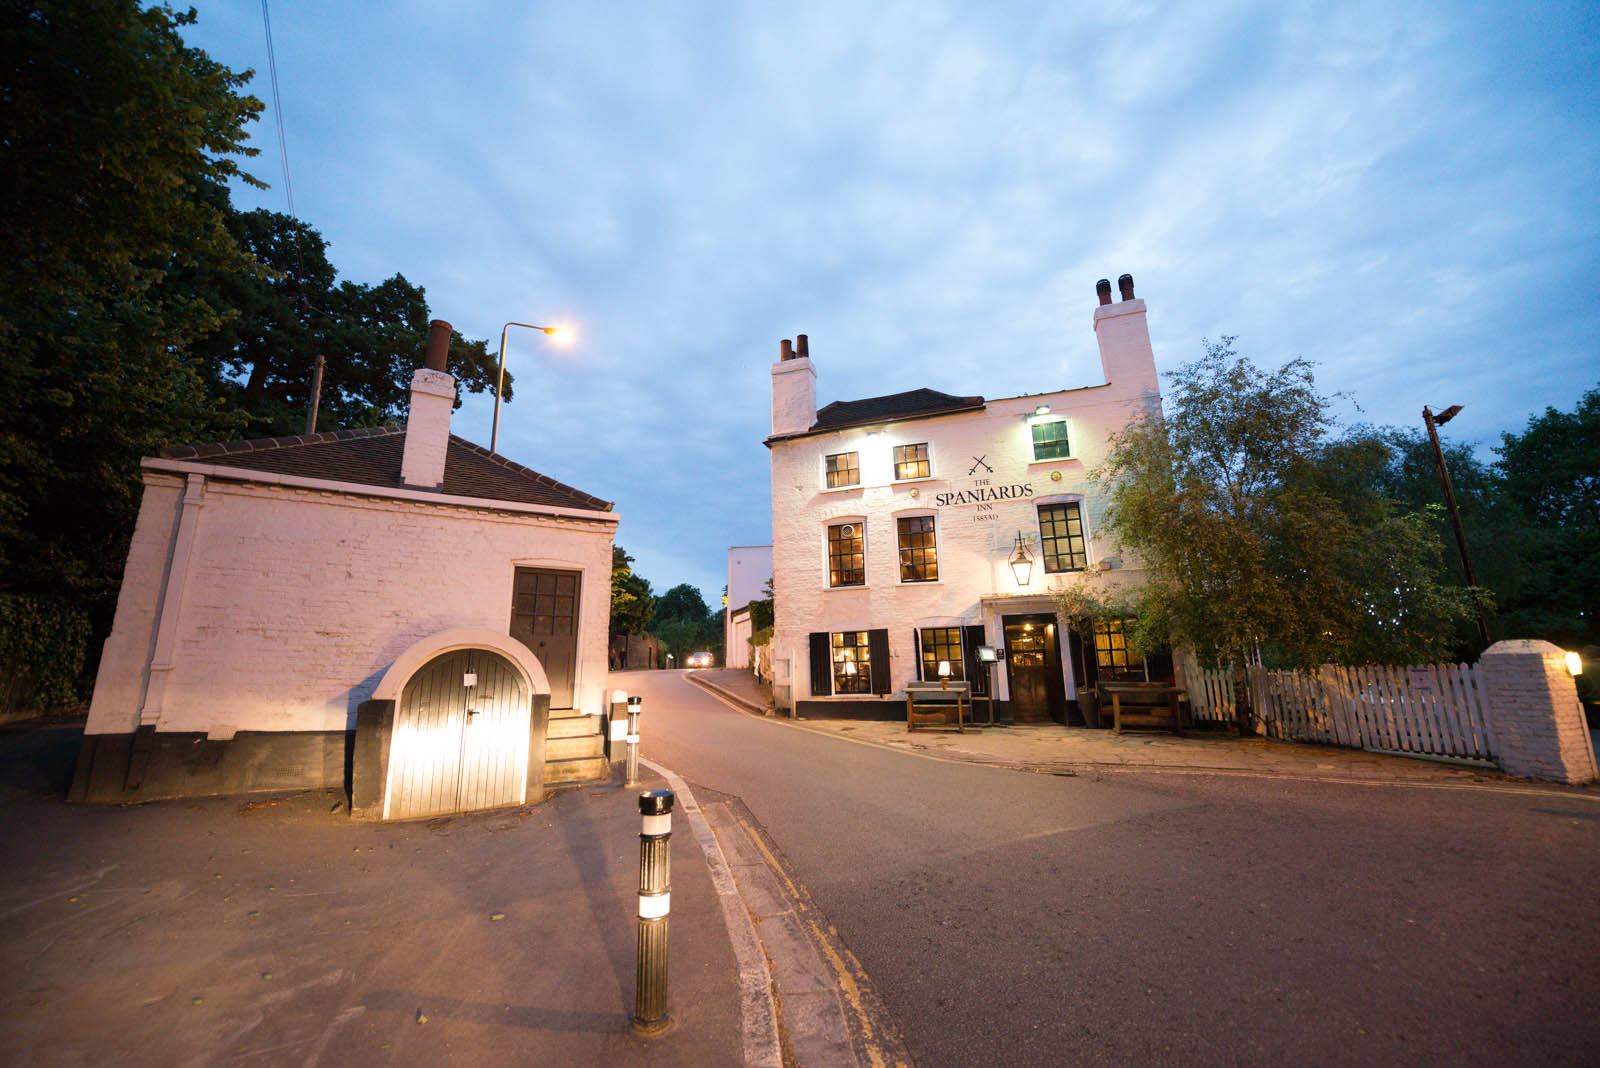
The Spaniards Inn in Hampstead, London, is an old fantastic pub dating back to 1585. Quite possible the oldest pub I have ever been to. Apparently an episode of the legendary Dick Turpin featured the Spaniards inn. No surprise - the interior of the inn is very old too. Photo by: Jacob Surland, www.caughtinpixels.com

Nikon D800, Nikkor 14-24mm, ISO 3200, 14mm, f/2.8 (0-exposure)

The Spaniards Inn in Hampstead, London, is an old fantastic pub dating back to 1585. Quite possible the oldest pub I have ever been to. Apparently an episode of the legendary Dick Turpin tv series featured the Spaniards inn. No surprise, really – the interior of the inn is very old too and would fit perfectly in.

This photo is shot just as we came out of the inn and waited for a cab. The road really is quite busy, but I got 5 shots almost without cars. I shot hand held at ISO 3200. ISO 3200 on the Nikon D800 is something I usually try to avoid, but for some reason this image really survived and there was no more noise than I could clean up, without ruining the photo. I used Noiseware to reduce the noise.

The photo is processed from the +1 exposure in Lightroom and then I made a hand made HDR processing, where I mixed in 3 of the 4 other shots. Overall the Lightroom image was good enough, but the lamps was totally burned out. I used the really dark images and used layer masks to blend in the lamps to my final image.

The double door on the left hand side I had to work a lot with. The headlights of the cab hit the door and really ruined it. I had the option either to crop it out or to restore it. I chose to restore it from the darkest images and then did a little healing brush work to get it good enough.

This is the before photo:

London - Spaniards Inn - original

I tried to do an HDR in Photomatix, but because of the high noise levels I got at ISO 3200 this only got worse in Photomatix and I stuck to do a hand made HDR in stead.


How to make HDR like photos in Lightroom


Warning: Undefined array key "multiauthor" in /var/www/caughtinpixels.com/public_html/wp-content/plugins/post-layout/plugin.php on line 114

Warning: Undefined array key "mobile" in /var/www/caughtinpixels.com/public_html/wp-content/plugins/post-layout/plugin.php on line 352

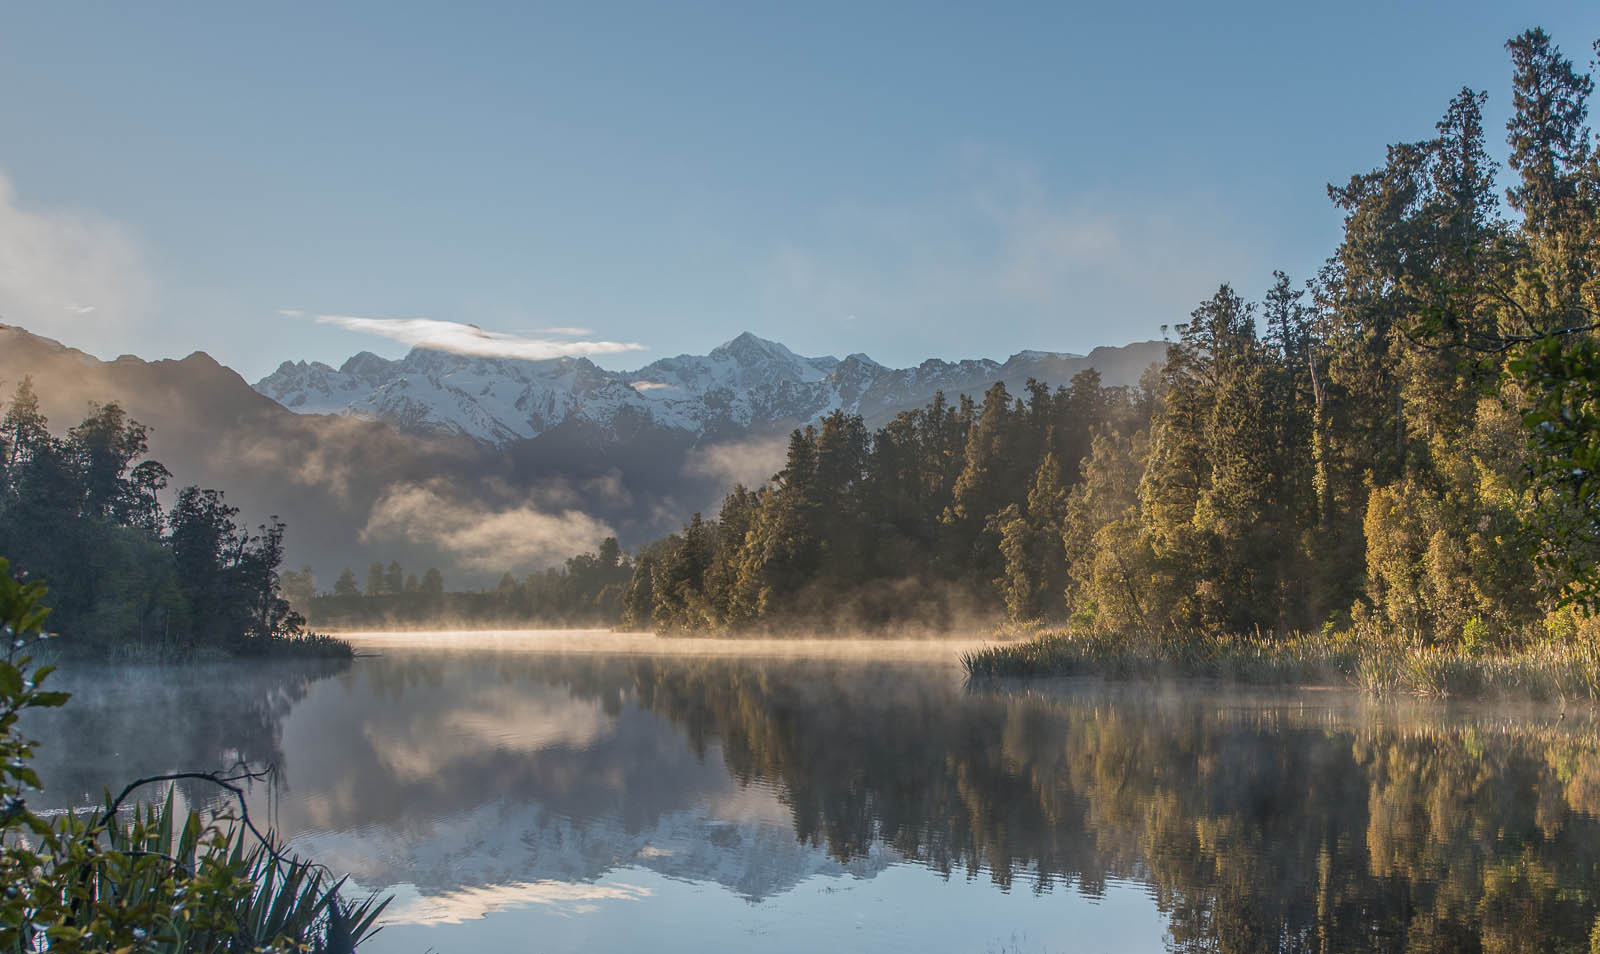
Lake Matheson on the South Island of New Zealand offers an exceptional view of Mount Cook reflecting in the water. And if you get up early, the water is completely still. If you ever go to Fox Glacier and stay for the night, do yourself the favor and get up early to see this. Photo by: Jacob Surland, www.caughtinpixels.com

Nikon D800, Nikkor 14-24mm, ISO 200, 24mm, f/5.6, 1/400 (-2 exposure)

This shot is from Lake Matheson on the south island of New Zealand. It has an exceptional view of Mount Cook reflecting in the lake. My last post was about the photographers plague, where the building you intended to photograph is covered in scaffolding when you get there. This time it was a cloud covering the summit of Mount Cook. Well, it didn’t change the fact that the view and peacefulness at Lake Matheson is absolutely stunning.

This particular photo is handheld. The Lake is surrounded with wood and it’s really only a few places that you can shoot and I had to lean out a bit to get this shot. A tripod was no option, and not really necessary either, as it turned out later.

About the processing of HDR like photos in Lightroom

I had 9 handheld exposure bracketed shots ranging from -4 to +4. What I tend to do when I get home from a photo shoot is to scan the images for what is usable and unusable. For this I use my homemade collection of Lightroom presets and click through a few. This usually gives me an idea of where a photo can go. Sometimes I stay in Lightroom, do some more adjustments and finish up in Lightroom.

In this case one of my presets just made this photo. I tried to do my usual workflow, with Photomatix Pro, but I couldn’t get a result that matched what I got in Lightroom. I even tried out using NIK HDR Pro 2, but that didn’t work out either. After having had the photo lying around for a long time I picked it up again, once more tried the Photomatix, but still couldn’t get anything better than what Lightroom gave me. So instead I finished up the Lightroom version.

As I said I used one of my homemade presets. The presets work really well for inspiration, but I usually do some minor adjustsments, because all photos are different.

This is the original unprocessed photo:

New Zealand - Lake Matheson at Sunrise - original

To do an HDR like photo in Photomatix, you have to have a RAW file. If you just shoot in JPEG you will find that you do not have enough information in the shadows in particular.

If you have shot a RAW file, like I have done here, you then open up the Shadows and lower the Highlights. You do that by setting Shadows to +100 and Highlights to -100. This results in a bit flat photo, but you can already see that the shadows are not almost black and the bright parts are darker giving a better balance.

New Zealand - Lake Matheson at Sunrise - HDR step 1

The next step is to get the the Blacks and Whites adjusted to make the most of the information in the RAW file. You do that by spreading out the Histogram (I will do a post on the histogram later).

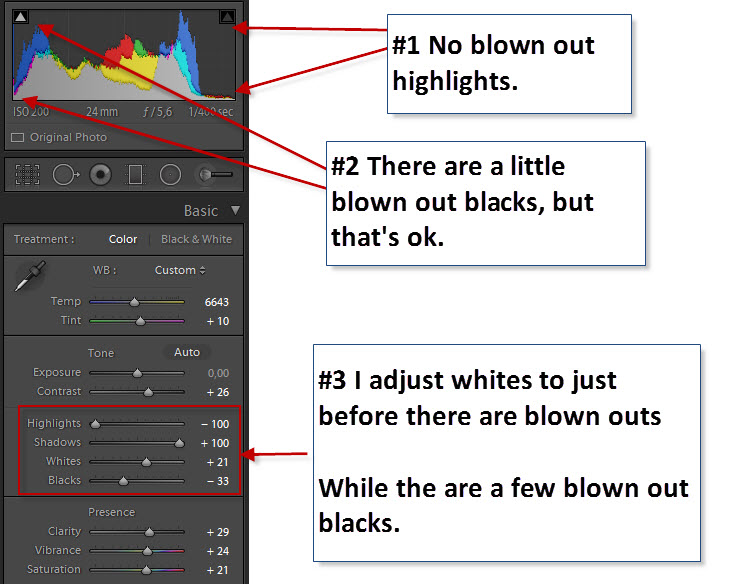
These are the settings I ended up with:

New Zealand - Lake Matheson at Sunrise

#1: You slide the Whites slider into the possitive area and keep a good eye on the histogram. You will notice it extends to the right. If you keep moving the Whites to the right you will get blown outs, that is completely white pixels. Usually you don’t want that. In the upper right hand corner of the histogram is a small triangle. If this get’s turned on, you will have blown outs. You can click it to see where or you can press ALT key (command key on Mac) while dragging and you will see the exact spots. You maximize the whites, without getting any blown outs. In this case it’s Whites at +21.

#2 Then you do the same for Blacks, except you move it the the left in to the negative area. It’s important to have black in your photo, just not too much. I do this visually and stop when I like the result. Usually I can see that the warning triangle in the left hand corner of the Histogram is turned on. But that’s ok.

#3 This is where the settings are adjusted.

The result of this step gives you something that looks HDR’ish, but made in Lightroom. What you den can do is shift around on the Contrast and Clarity until you get something you like and you can adjust all of the other goodies that Lightroom offers. At the end, just remember to check the Whites has got blown outs while you worked the image.

Lightroom presets available soon

As I said I use Lightroom presets quite a bit. I use them to get a good start or to get inspired. I have made my own collection. I am still working on finishing it up, but when I am done, I will make it available to buy from this website.

If you are want to get notified when it arrives you can sign up to follow this blog in the lower right hand corner.


National Gallery in London


Warning: Undefined array key "multiauthor" in /var/www/caughtinpixels.com/public_html/wp-content/plugins/post-layout/plugin.php on line 114

Warning: Undefined array key "mobile" in /var/www/caughtinpixels.com/public_html/wp-content/plugins/post-layout/plugin.php on line 352

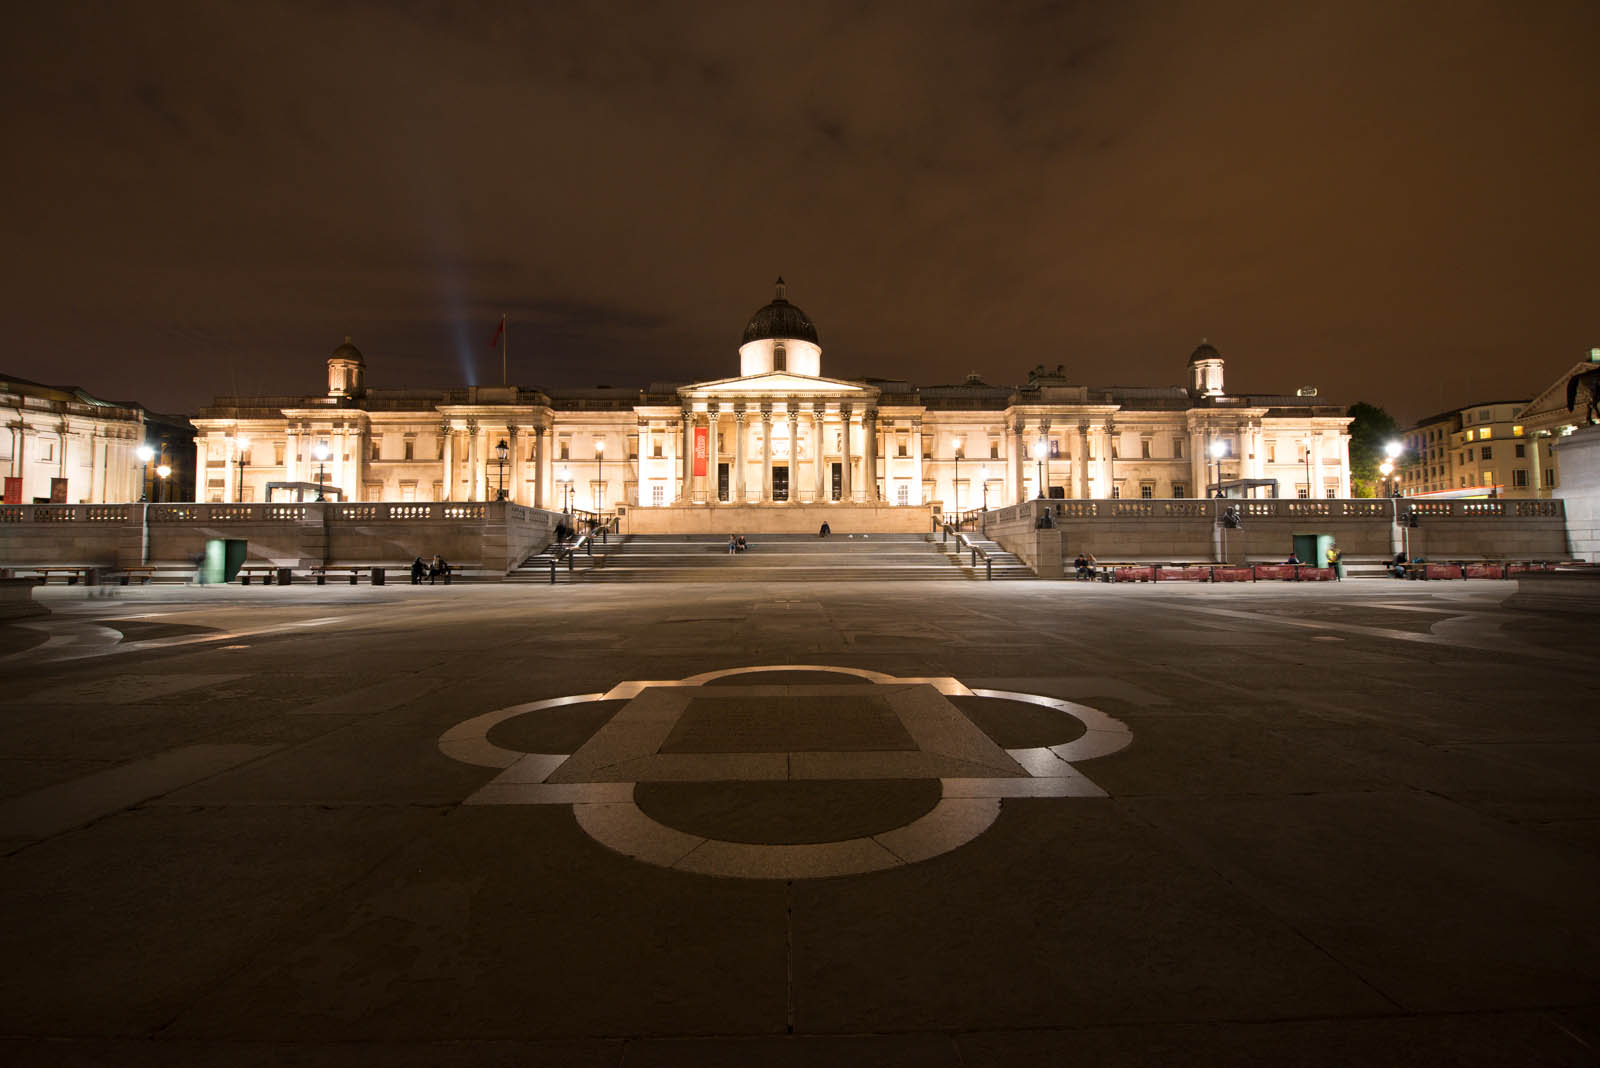
On Trafalgar Square in London lies the enormous National Gallery. An old huge beautiful building. Photo by: Jacob Surland, www.caughtinpixels.com Nikon D800, Nikkor 14-24mm, ISO 800, 15mm, f/6.3, 1.3 sec

This is the National Gallery in London. The square in front of it is Trafalgar Square and Lord Nelson stands on his pillar right behind me.

I’m going back to London next week for some business. I plan on bringing my camera. Maybe I will get up early one day and grab a few shots as the city awakes.

This photo is an HDR photo made from 5 exposures (-2, -1, 0, +1 and +2). I have processed it first in Photomatix to get my tone mapped image. Then I blended in Photoshop, mostly to remove ghosted people. Last but not least, and that is what makes the photo work, I added some artificial light sources on the shape in the lower part of the image and around the buildings (you might want to read about adding artificial light sources here).

This is the original 0-exposure with no adjustments:

Shape in front of The National Gallery - Before

Bruges the Chocolate Capital


Warning: Undefined array key "multiauthor" in /var/www/caughtinpixels.com/public_html/wp-content/plugins/post-layout/plugin.php on line 114

Warning: Undefined array key "mobile" in /var/www/caughtinpixels.com/public_html/wp-content/plugins/post-layout/plugin.php on line 352

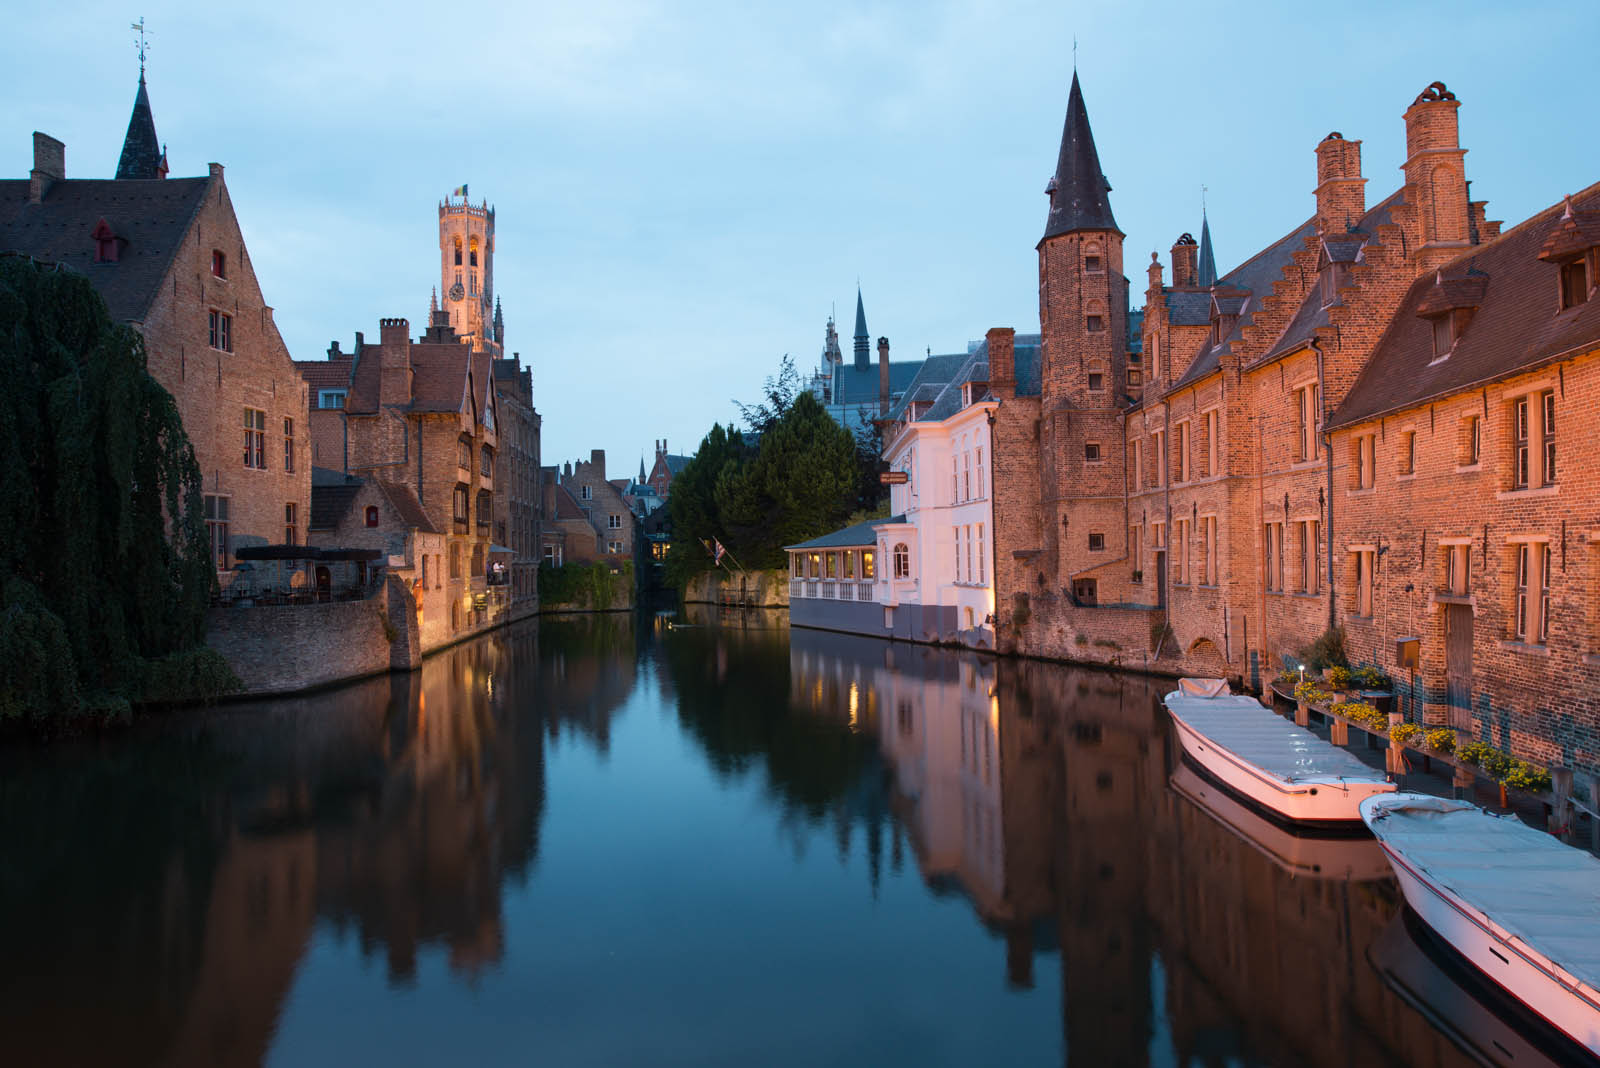
Canal in old Middle ages town.

The White hotel on the right is the one from the move “In Bruges”.

Bruges in Belgium is an amazing town with a center that dates back to the middle ages.Some call it ‘Venice of the North’, but I learned that cities and towns with many canals, like to call themselves Venice of this” and “Venice of that”.

I think both Bruges and Amsterdam both in all fairness can be called a “Venice of the North”. They are both absolutely fantastic. Bruges has a lot of canals, and they wind their way through the medieval center of the city. It is a very beautiful place that I can highly recommend coming visit it for an extended weekend.

I got inspired to go to Bruges from the movie “In Bruges” starring Colin Farrell. In the movie, a couple of hired killers go on vacation to Bruges, and the one character really hates it, while the other one loves it. Personally, I found the movie hilarious, but I know other’s hate it. Some movies divide the World, just like cats and dogs do.

Anyway, the great footage from the old center that made me want to see Bruges, and I made a point out of making a one night stop in Bruges on my way to France.

What I didn’t know about Bruges is that it’s called the Chocolate Capital. I just love chocolate, and we did buy some, which, unfortunately, had to eat at once, due to the extremely hot weather.

This photo is from a particular famous corner, next to “Cafe Little Venice”. I have seen many shots from this corner, and this is my version.

The making of this photo

I shot this photo using my Nikon D800 and Nikkor 14-24mm. I shot it as a 5 shot HDR from -2, -1, 0, +1 and +2. This is the 0-exposure (the normal exposure):
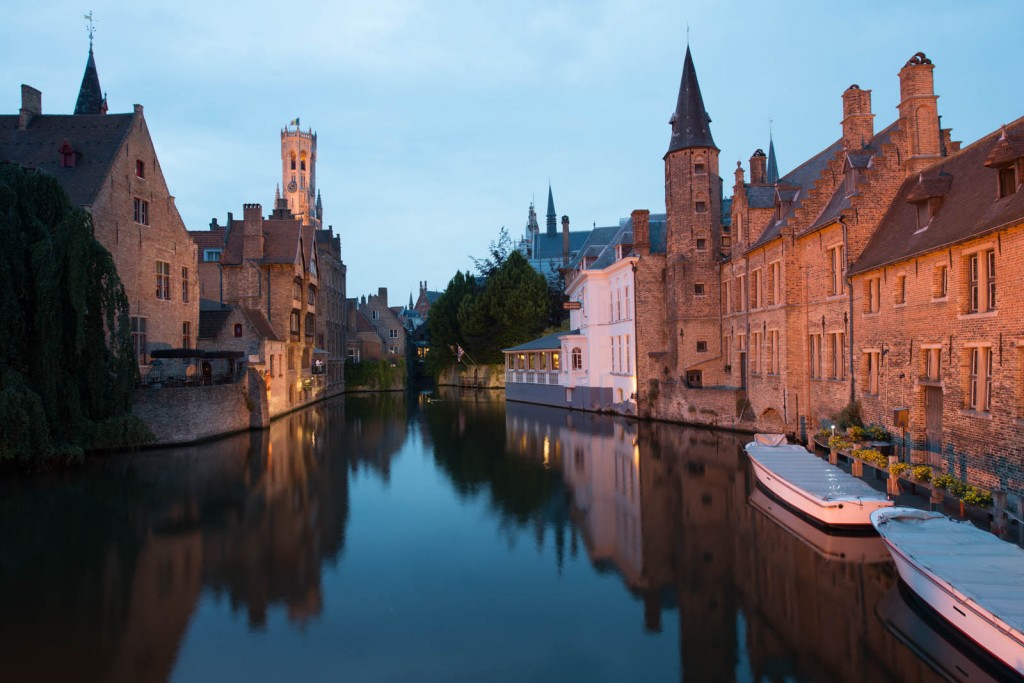
Canal in an old middle age town

 Nikon D800, Nikkor 14-24mm, ISO 200, 22mm, f/11, 2.5 sec.

I should have used a lens not quite as wide, but there was a light drizzle and I did not want to change the lens, instead I cropped the image. That’s one of the wonderful things about having many megapixels. You can crop quite a bit away, and still end up with a 12-megapixel image, like this one.

I know that some people find that cropping images to be a sin and that you should get it right in the camera in the first place. I believe that if a photo get’s better from cropping it, then by all means crop it! And one more thing, I would rather come home with 10-20% too much of a scene, than 10-20% too little.

In this case, I didn’t like the white canal tour boats in the corner. I composed the photo, and included the boats and decided to crop the photo later if I didn’t like the boats.

HDR Processing workflow

My overall workflow, when I process HDR photos is, that I generate a pool of images, based on the original bracketed photos. And these I blend to together into a final image. I usually create a one or two images in some HDR software, usually Photomatix Pro. And these I add to the pool of the original RAW files, these files I load into Photoshop as layers and blend them together.

Photomatix supports presets and I have a few I use for inspiration. Often I use one, and tweak it a little bit until I am happy. I did that in this case.

I processed two versions of this photo in Photomatix Pro. First I made one, a single tone mapped. Saved that, and then I took the output, and put back into Photomatix, and did a double tone mapped image.
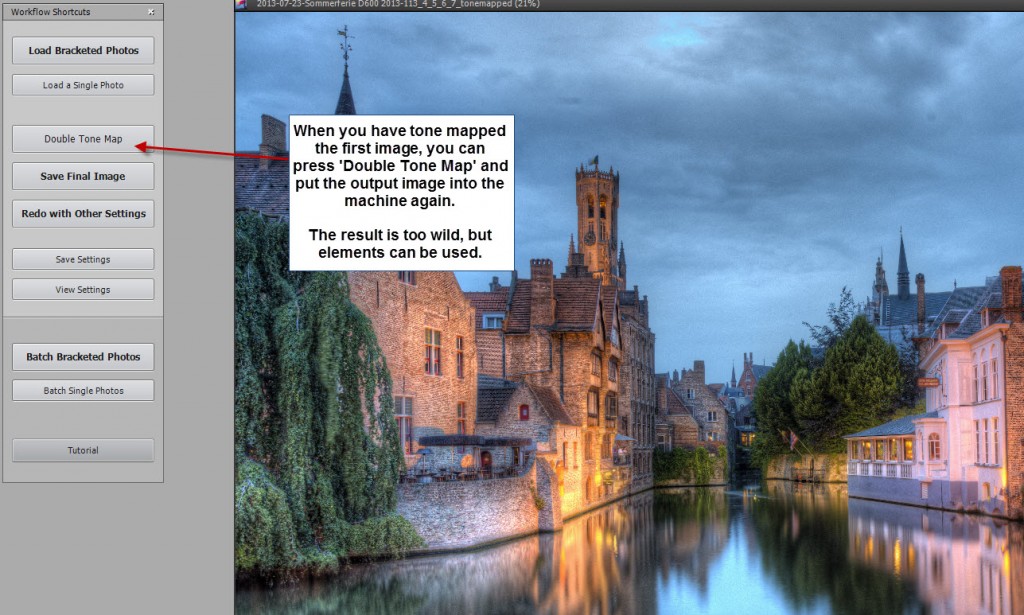
Bruges double tonemap

Use Double Tone Map to push the effects, but use it with care, because the effects easily get’s really out of control.
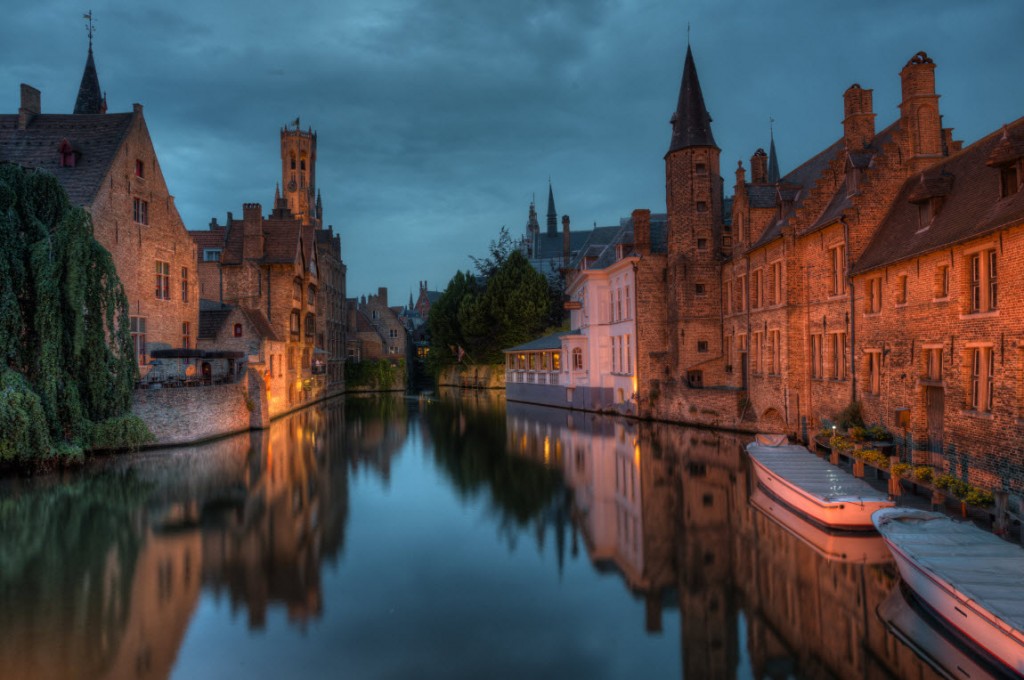
Canal in an old middle age town - single tonemapped

Single Tone mapped image.

The double tone mapped image usually goes completely wild, and you have to control it a bit, to make some of useful. The trick is to turn down saturation to around mid 40’s, and push Tone Compression to the left and Detail contrast to the right. They are highly potent, and you will have to find the right balance. Sometimes I find that the balance isn’t really there, and just skip making a double tone mapped image.
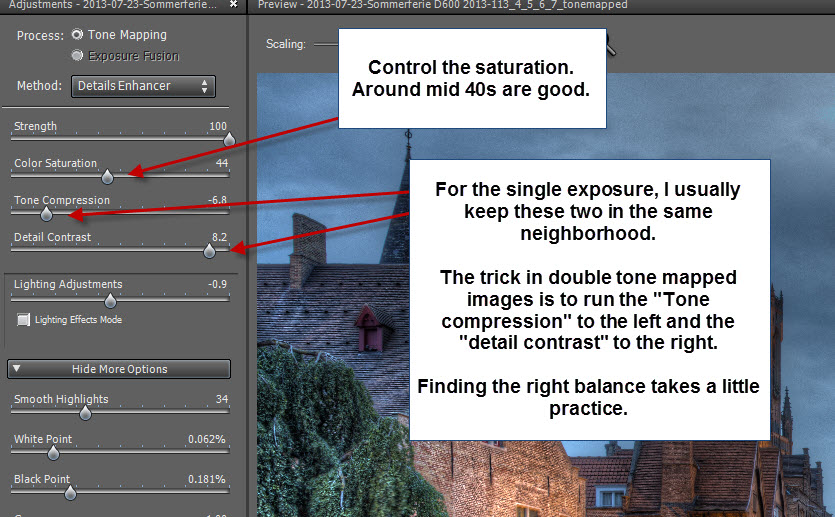
Bruges double tonemap number 2

How to get the best result when making double tone mapped images in Photomatix Pro.

When I start to blend my images in Photoshop (you might find my tutorial on layer blending useful) I order them, so that the one I like the most, is my primary image, and it’s usually my single tone mapped image, but not always.
Canal in an old middle age town - double tonemapped

Double Tone mapped image.

In general, my goal with my post-processing technique is to improve my primary image, and by improve I mean:

  • Remove ugly bits.
  • Add cool effects
  • Make it work as a complete and balanced image.

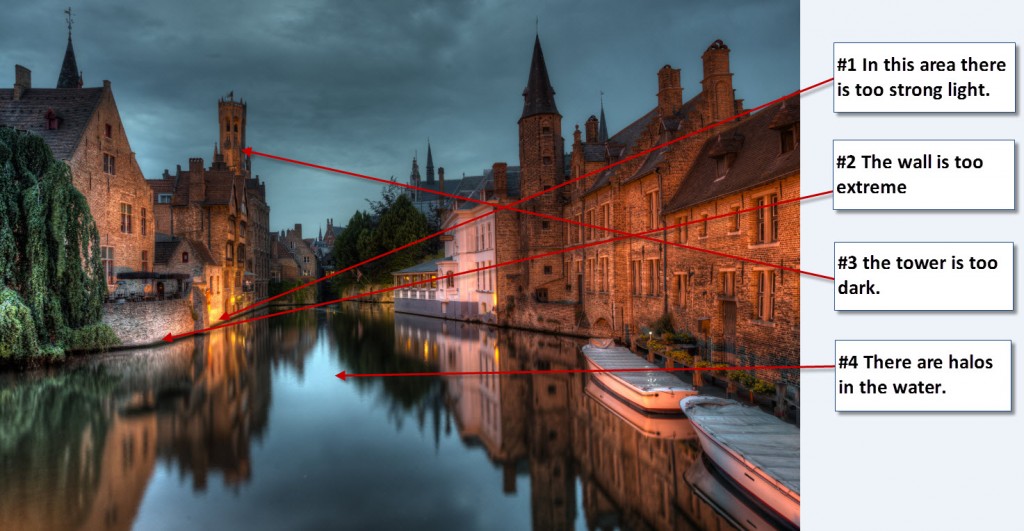
Now that I have my (primary) tone mapped image, I look at the issues I face:

#1 The lamps are way too bright. I dial them back a bit by blending in a darker version of the lamp, from one of the other images.

#2 The wall for some reason has gone almost white (blown highlights). This I also change by using a darker version and masked it in 25-50%.

#3 I really wanted the tower to be brighter, so I found a brighter version in one over the over-exposed image and blended that in.

#4 The water is bad – really bad. It has got a nasty halo. You can see that the water is almost black in the lower middle while it’s very bright along the edge of the reflections. This is called a halo and must be removed. I do that by mixing in the water from the 0 exposure.

A side effect from using the double tone mapped image is that light sources and other bright areas tend to get very bright or even blow out. A part of making the double tone mapped images is to find the balance between getting enough effect, without getting too much trouble repairing the blown out highlights and the halos.

To fix all of the above-mentioned problems, I use Photoshop. I load all my original five shots plus my two tone mapped images into layers (you might want to read this blog post for a full demonstration).

By using this technique I can remove and fix blown out highlights, by blending either the single tone mapped or one of the originals into the areas that are ruined or just look bad.

The result is, that the buildings and reflections come from the double tone mapped image, primarily, while the sky and the water comes from the original exposures.
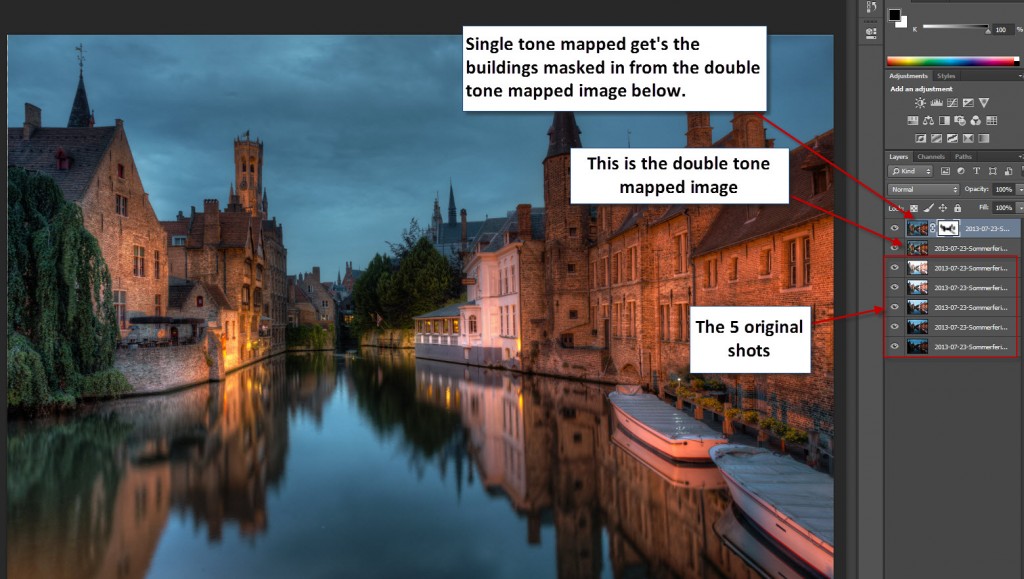
Canal in an old middle age town - photo shop

Final touches

When done in Photoshop I then save the file as a flattened TIFF file and import that into Lightroom.

In Lightroom, I use the brush tool to increase contrast and the clarity in the sky. By doing this, I enhance some details in an otherwise flat sky. The texture is there, it’s just not very easy to see, but I can be enhance it this way. A side effect of doing this, is that the colors get too saturated, I have to turn down the saturation a bit.
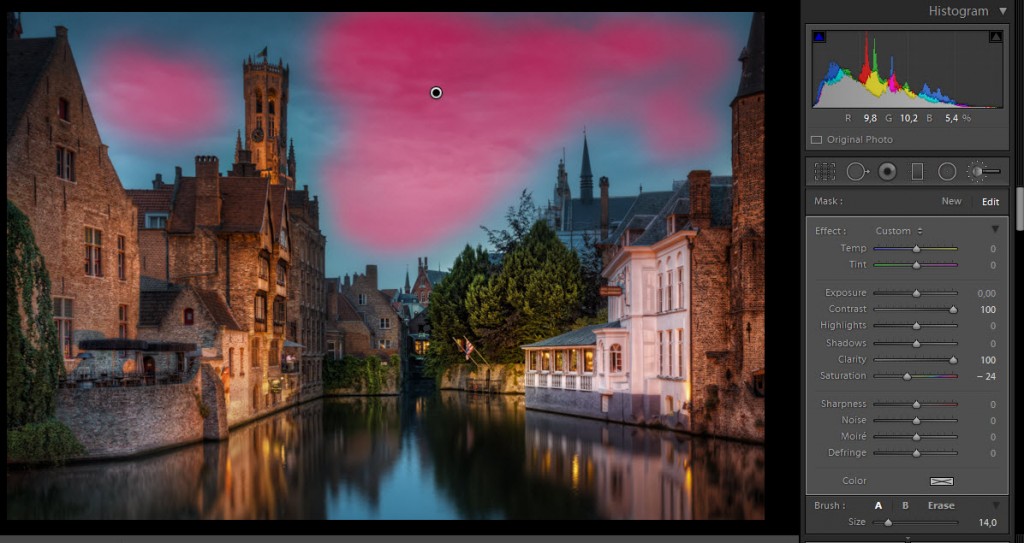
Canal in an old middle age town - Lightroom

The pink areas are the areas that I painted using the brush. On the right you can see what settings that is applied to the pink areas.

Further reading

If you find this kind of processing interesting and want to try it out for yourself, you might want to get a hand on a copy of Photomatix Pro. There is a free trial, but if you use the discount code “caughtinpixels” you will get a 15% discount.

Get Photomatix Pro.

You might also want to read my basic understanding of making HDR photos. There’s a lot of things to understand, and a lot of pitfalls. I get around all of these things here.

I also have these tutorials:

Detailed tutorial on using Photomatix Pro.

Learn how to make double tone mapped images in Photomatix Pro.

Learn how to blend layers using layer masks in Photoshop.

Learn how to blend layers using layers masks using GIMP, the free alternative to Photoshop.

Taiery Gorge Railway


Warning: Undefined array key "multiauthor" in /var/www/caughtinpixels.com/public_html/wp-content/plugins/post-layout/plugin.php on line 114

Warning: Undefined array key "mobile" in /var/www/caughtinpixels.com/public_html/wp-content/plugins/post-layout/plugin.php on line 352

The Taieri Gorge Railway from Dunedin in New Zealand. A vintage train runs through a beautiful gorge. Read more about the processing and see other photos by Jacob Surland at www.caughtinpixels.com

 Buy a print

I spend half a day in New Zealand on the Taiery Gorge Railway running through the beautiful scenic gorge, crossing the largest metal construction on the southern hemisphere – a bridge across the gorge.

This is the original photo:

2012-11-23-New Zealand-DSC_5531

Nikon D600, Nikon 28-300mm, ISO 100, 92mm, f/5.6, 1/200 Sec

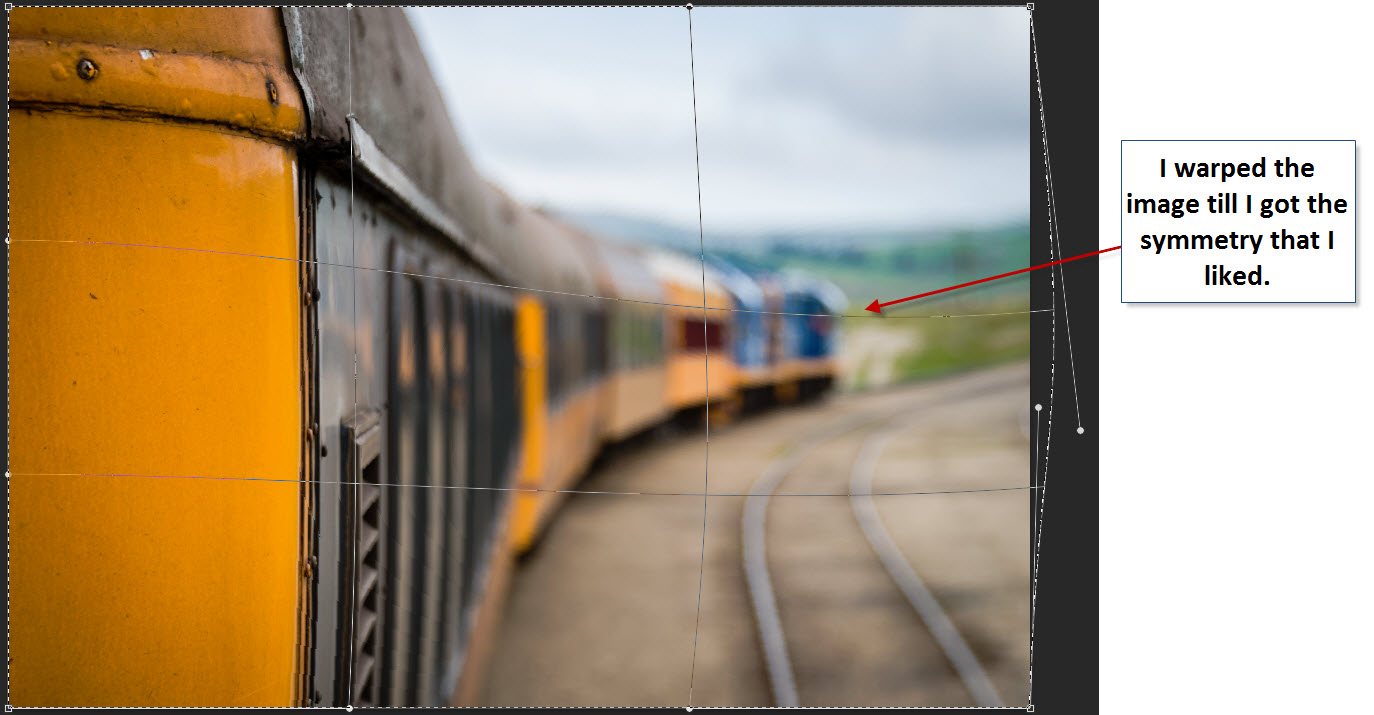
As you can see it is quite tilted. I shot it leaning out of a porch and couldn’t control the camera a lot, because the train was rumbling along and I had to take care, not to fall off. To fix it I first straighten the horizon in Lightroom. That is standard procedure. The second step I took was to get a more symetric look of the train running into the horizon.

This I accomplished by using the Edit->Transform->Warp tool in Photoshop CS. This tool is quite good for changing the exact placement of objects in the image. You can select any rectangle, in this case I want to select all of my image and activate the Warp tool (menu Edit -> Transform -> Warp):

2012-11-23-New Zealand-DSC_5531 - Select Warp

The warp tool allows you to push things around ind the image. In this case I pushed the train downwards, until I got the symmetry that I wanted.

2012-11-23-New Zealand-DSC_5531 - Use Warp

Armageddon Sunset – Yet Another Way to Make HDR


Warning: Undefined array key "multiauthor" in /var/www/caughtinpixels.com/public_html/wp-content/plugins/post-layout/plugin.php on line 114

Warning: Undefined array key "mobile" in /var/www/caughtinpixels.com/public_html/wp-content/plugins/post-layout/plugin.php on line 352

Roskilde fiord revisited for an amageddon sunset to try out my brand new Sigma 12-24mm full frame lens. My first impression is very good. Photo by Jacob Surland - see more photos and tutorials at www.caughtinpixels.com.

Buy a print

There are many ways of making HDR photos and this is yet another way. I have used Merge to 32-bit HDR, a plugin for Lightroom, made by HDR Soft who also makes the state of the art HDR software Photomatix Pro. Merge to 32-bit HDR just does the first step of what Photomatix does. It merges your photos into one 32-bit TIFF photo and reimports it back into Lightroom. It does not do any tone mapping of the photo and the result is quite neutral when it get’s into Lightroom. But the photo is loaded with  information from all of your bracketed photos and you can start playing around with the development module in Lightroom and get the most impressive things out of your photo.

One of the huge advantages doing an HDR in this way, is that you don’t get the noise that tone mapping sometimes gives. And it really is very easy in many ways, especially if you start to build or gather a collection of Lightroom presets. Over the last few months I have been creating presets in Lightroom, which really makes sense, because I save a lot of time when I post process my photos. Not only do presets work as … well presets … a lot of preset post-processing configurations, but it has another advantage, they inspire me. Presets give me ideas and inspiration as I try out some of the presets. I might not use a preset as the single click post-processing, but it does give me a good (and fast) start.

I quite fond of my presets and I’m working on making my Lightroom presets available from this website in the near future. I will make them available along with a guide to explain the concepts and ideas to what I do and how the presets work and can be used, with some examples.

I already showed, that you make HDR photos, even though you are using Lightroom post-processing. I showed how to use Lightroom and GIMP to make an HDR (you can find the tutorial here). And now I will show how to do it with Merge to 32-bit HDR and Lightroom to make an HDR photo.

Merge to 32-bit HDR from HDR Soft

You need both Lightroom and Merge 32 from HDR Soft. If you use the Discount code “caughtinpixels” on HDR soft you will get a 15% discount when you buy anything from HDR Soft. You can also buy it bundled with Photomatix Pro

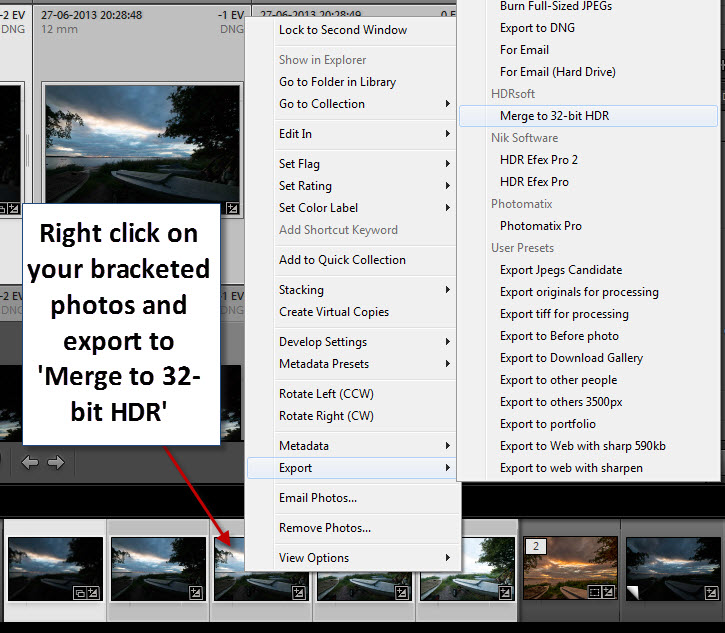
‘Merge to 32-bit HDR’ plugs it self into Lightroom. First you select your bracketed photos, like I just selected my 5 bracketed photos below. Then you start the export into Merge to 32-bit HDR this way:

Armageddon Sunset - Merge 32 export

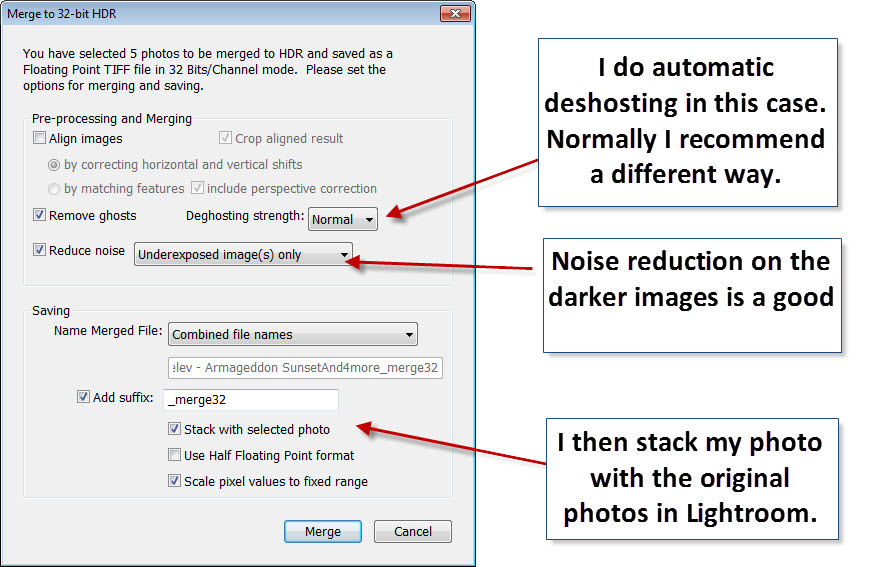
You then get some options. Normally I really do recommend a different process to remove ghosting in your photos, but on the other hand, if the automatic deghosting does a good job, you are done quickly and if it doesn’t give a good result, you can always turn to my recommend procedure. My recommended process is to mask one of the photos into the HDR photo, where the photo is ghosted. You can do that using either GIMP or Photoshop. With this particular photo, I think deghosting did a good job.

Armageddon Sunset - Merge 32 export step 2

When the photo is reimported into Lightroom it’s a neutral flat and a bit dark photo, which is completely unprocessed:

Armageddon Sunset - Original

I then applied one of my presets called Armageddon Sunset Revisited. It adds an orange hue to a sunset photo giving it this very sunset feeling. I did do one more thing. I want the boat in front to pop a little more. By using the brush feature in Lightroom, I painted on the boats and the small path, and increased the exposure and contrast a bit.

Armageddon sunset - Local adjustments

When I merge my 5 exposure bracketed photos into one 32-bit tiff file I have got a lot more information, than I just had in 1 RAW file. TIFF files comes in 8-bit, 16-bit (the normal) and 32-bit – the more bits, the more information. When you do HDR’s and tone mapped images, the 32-bit image is an intermediate product, that you normally don’t use or see, but this tool just exports it. The more information there is in one image, the more details I can extract from the shadows and the highlights, and a 32-bit file can contain A LOT more information than any RAW file can contain. But it also takes up a lot of hard drive. My Nikon D800 produces 400+ Mb 32-bit TIFF files, when made from 5 HDR shots. So the 32-bit TIFF files, are not keepers in my world- they are intermediate products I delete, when I have made my final image. I then export my final image as a 16-bit TIFF file and reimport and delete the 32-bit TIFF file to save disk space.

If you have Lightroom and want to try out this way of making HDR photos, you can buy Merge to 32-bit HDR from HDR Soft with a 15% discount by using my discount code “caughtinpixels”.

And soon you will be able to get my Lightroom presets from this website.


A devils game at Sydney Opera House – removing people


Warning: Undefined array key "multiauthor" in /var/www/caughtinpixels.com/public_html/wp-content/plugins/post-layout/plugin.php on line 114

Warning: Undefined array key "mobile" in /var/www/caughtinpixels.com/public_html/wp-content/plugins/post-layout/plugin.php on line 352

A Devils Game at Sydney Opera House A boy playing with his diablo at the top of the stair in front of Sydney Opera House. Photo by Jacob Surland, www.caughtinpixels.com.

Buy a print

There are so many great angles to shoot the Sydney Opera House from, but unfortunately also terrible many people hovering around the great landmark. I had about half an hour to shoot photos, and one particular couple stayed right in the same spot for at least 30 minutes. They are on all of my photos…

The boy is my 12 year old son playing with his Diablo. I took many photos of this scene, because I had to “capture a moment” and you rarely get that in one single shot. However in this shot, where I feel I did capture the moment, was a guy in a red t-shirt passing behind and the couple of course was there too. But by using one of the other images I could remove the guy in the red t-shirt, however, the couple I had to remove using the Clone stamp and healing brush in Photoshop.

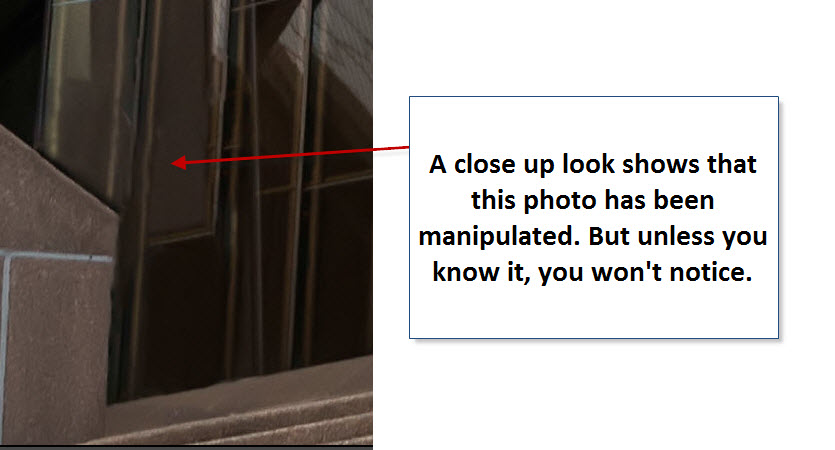
Removing large areas with the clone stamp can’t be perfect, because you have no way of knowing what is behind the area that you remove, but with a careful hand, you can reconstruct something the eye accepts. And it is about deceiving the viewer. The viewer must not notice!

This is the original unprocessed photo shot with a Nikon 28-300mm lens on my Nikon D600 camera. I do like the D600, despite the dust problems, because it takes fantastic photos and does 5.5 shots pr second, which is good when you want to capture a moment.

A devils game at the Sydney Opera House - Original

Nikon D600, Nikon 28-300mm, ISO 400, 28 mm, f/8.0, 1/400 sec

The photo below I used to remove the guy in the red t-shirt. I used the same Lightroom processing, to make the images have the same mood and colors. The final Image I have processed a little bit more to get the final result.

A devils game at the Sydney Opera House - second shot

And what is the result of the healing brush and clone stamp removed people – not like they never existed, but good enough to deceive the viewer:

A devils game at the Sydney Opera House - removed people

The Millinium Wheel in a Fiery Sky – before and after


Warning: Undefined array key "multiauthor" in /var/www/caughtinpixels.com/public_html/wp-content/plugins/post-layout/plugin.php on line 114

Warning: Undefined array key "mobile" in /var/www/caughtinpixels.com/public_html/wp-content/plugins/post-layout/plugin.php on line 352

The Millinium Wheel In Fiery Sky in London. On great warm summer night I went down to the Millinium Wheel to get some close ups.  Photo by Jacob Surland. See www.caughtinpixels.com

Buy a print of the Millinium Wheel

The Millinium Wheel in London is huge. This shot I have shot using a tripod and a wide angle lens. I have cropped the image a bit, and then I have applied one of my Lightroom presets, which includes a graduated filter to darken the sky. Because the sky is quite dark in the first place, it grows completely black in the top. When the sky is lit by city light, it turns this orangy color, which when I did the trick with the graduated filter, makes it look more or less like smoke with a fire behind. This is the original shot:

The Millinium Wheel in a fiery sky